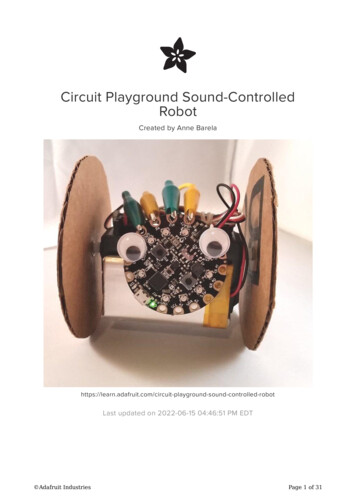
Transcription
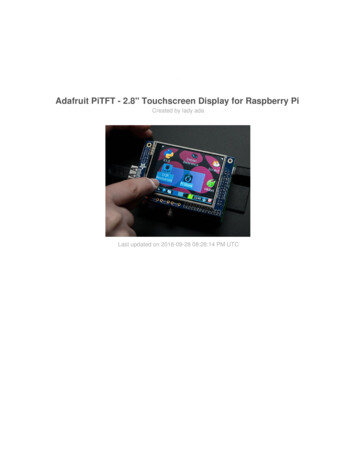
Adafruit PiTFT - 2.8" Touchscreen Display for Raspberry PiCreated by lady adaLast updated on 2016-09-28 08:28:14 PM UTC
Guide ContentsGuide ContentsOverviewOriginal PiTFTPiTFT PlusAssemblyEasy InstallReady to go imageDIY Installer scriptStep 1. Expand FilesystemStep 2. Install new KernelStep 3. Enable & Configure the PiTFTDetailed InstallationBefore you startDownload & Install KernelTouchscreen Install & CalibrateSetting up the TouchscreenRunning evtestAutoMagic Calibration ScriptManual CalibrationX CalibrationUsing the ConsoleTurn off Console BlankingHELP! (FAQ)Playing VideosHow To Play VideosConverting/Resizing VideosDisplaying ImagesUsing FBCPBacklight ControlControlling the backlight Adafruit 616262Page 2 of 81
Extras!Tactile switch as power buttonMaking it easier to click icons in XBoot to X Windows on PiTFTRight-click on a touchscreenGesture InputInstallationUsage6969PiTFT Pygame TipsInstall pip & pygameEnsure you are running SDL 1.2Downloads2.8" PiTFT Plus Schematic & LayoutPiTFT 3.2" Plus SchematicOriginal PiTFT 2.8" Schematic & Layout Adafruit -raspberry-pi73737477777979Page 3 of 81
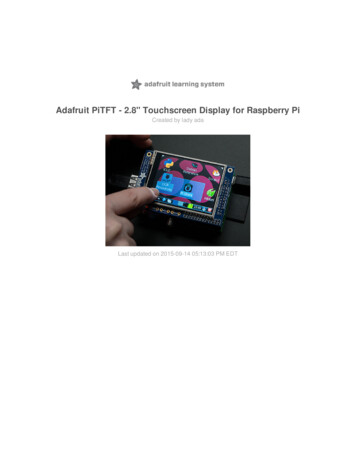
OverviewIs this not the cutest little display for the Raspberry Pi? It features a 2.8" display with 320x24016-bit color pixels and a resistive touch overlay. The plate uses the high speed SPI interfaceon the Pi and can use the mini display as a console, X window port, displaying images orvideo etc. Best of all it plugs right in on top!Original PiTFTThe original version PID 1601 is designed to fit nicely onto the Pi Model A or B but also worksperfectly fine with the Pi Zero, Pi 2, Pi 3 or Pi 1 Model A or B as long as you don't mind thePCB overhangs the USB ports by 5mm Adafruit iPage 4 of 81
PiTFT PlusThe newer PiTFTs are updated to fit perfectly onto the Pi Zero, Pi 3, Pi 2 or Model A , B !(Any Pi with a 2x20 connector) Not for use with an old Pi 1 with 2x13 connector Adafruit iPage 5 of 81
This design uses the hardware SPI pins (SCK, MOSI, MISO, CE0, CE1) as well as GPIO #25and #24. All other GPIO are unused. Since we had a tiny bit of space, there's 4 spots foroptional slim tactile switches wired to four GPIOs, that you can use if you want to make abasic user interface. For example, you can use one as a power on/off button.We bring out GPIO #23, #22, #21, and #18 to the four switch locations! Adafruit iPage 6 of 81
To make it super easy for use: we've created a custom kernel package based of off Notro'sawesome framebuffer work, so you can install it over your existing Raspbian (or derivative)images in just a few commands. Adafruit iPage 7 of 81
This tutorial series shows you how to install the software, as well as calibrate the touchscreen,splay videos, display images such as from your PiCam and more! Adafruit iPage 8 of 81
AssemblyThis tutorial page is for PiTFT that came as a kit. If your PiTFT is already assembled, skip thisstep!Before you start check that you have the parts you need: an assembled PiTFT plate with the2.8" screen, extra tall female header and the 2x13 IDC socket. Note that it is normal for thescreen to be 'loose' - this is so its easier for you to solder the connector on! Adafruit iPage 9 of 81
Check also on the back that the TFT is attached and that the flex connector is seated into theonboard FPC socket.The easiest way to attach theheader is if you have a RaspberryPi as a 'stand' - make sure itspowered off & unplugged! Adafruit iPage 10 of 81
Plug the extra tall female headerinto the GPIO port on the Pi asshown. Make sure its seated niceand flatPlace the PiTFT shield on top so allthe pins stick through the connectoron the side. Gently flip the TFT soits off to the side and wont be inyour way while you solder Adafruit iPage 11 of 81
Heat up your soldering iron, andgrab some solder. Start by tacksoldering one of the corners whilepressing on the plate to make it sitflat. Once you have one or two pinsdone you can continue to soldereach of the pins. Adafruit iPage 12 of 81
Before attaching the display, checkthat all the pins are soldered nicelyand there's no bridging, cold solder,shorts, or unsoldered pins.Now we can attach the screen.Remove the two thin tape coverstrips.Line up the screen on the whiteoutline, make sure there's somespace from the header you justsoldered in and the metal sides ofthe screen. As long as you don'treally press down on the screenyou can reposition it once or twice. Adafruit iPage 13 of 81
Once you have the screen so it isdefinitely not touching the header,you can gently press on the sidesto secure the tape.If the protective plastic cover is stillon the screen you can press itagainst a clean table from above.That way you will really securelyattach it!If you want to attach an AdafruitCobbler or similar, you can solder inthe optional 2x13 IDC on thebottom of the screen as shownhere. This will keep the top sideclean and flat. Solder in all 26 pinsThe picture shows a 2x13 maleheader. We've since updated this Adafruit iPage 14 of 81
product to include an IDC socket soit's easier to add a cobbler. Both willwork, though!You can attach a 26-pin IDC cablejust make sure the pin 1 indicator ison the right as indicated in thisphoto - there's also a #1 marking onthe PCB! Adafruit iPage 15 of 81
Easy InstallThe PiTFT requires kernel support and a couple other things to make it a nice stand-alonedisplay. We have a detailed step-by-step setup for hackers who want to tweak, customize orunderstand the PiTFT setup. If you just want to get going, check out the following for easyinstall instructions!Ready to go imageIf you want to start with a fresh image, we have two for Raspbian. There's the larger 'classicJessie' image that will boot into X by default, and requires a 8G image, it has a lot moresoftware installed. There's also the smaller 'Jessie Lite' that will boot into the command line,and can be burned onto a 2G card! Click below to download and install into a new SD card.Unzip and follow the classic SD card burning tutorials (http://adafru.it/aMW)These images are customized for the RESISTIVE touch 2.8" PiTFT, also known as PID #1601and #2298 or the Resistive 2.4" HAT, a.k.a PID #2455 - These are not for use with 3.5" PiTFTor Capacitive Touch PiTFTDownload Jessie-based PiTFT 2.4" and 2.8" Resistive Image for Pi 1, Pi 2 and Pi 3 (March25, 2015)http://adafru.it/mA9Download Jessie Lite-based PiTFT 2.4" and 2.8" Resistive Image for Pi 1, Pi 2 and Pi 3(March 25, 2015)http://adafru.it/mAaPrevious images:Raspbian Jessie 2015/09/24-based image (http://adafru.it/iDA)Raspbian Wheezy 2015/09/09-based image (http://adafru.it/idJ)Raspbian 2014/06/20-based image (http://adafru.it/dSM)Raspbian 2014/09/09-based image (http://adafru.it/e12)DIY Installer scriptIf you don't want to download an image, you can run our installation package helper frominside your existing Raspbian install. It will download the kernel add-ons, and configure yourPi for PiTFT joy Adafruit iPage 16 of 81
The helper is available for perusal here (http://adafru.it/eIn) if you are interested in how itworksThe DIY Installer isn't working right now, please try the All-In-One image above - no ETA onwhy its not working, something to do with the latest Raspbian has changed. Thanks!Step 1. Expand FilesystemStart by expanding the filesystem This is required!!!sudo raspi-config(expand filesystem)sudo rebootStep 2. Install new KernelThen, once the filesys is expanded, download and install t he new kernel by running thefollowing commands:curl -SLs https://apt.adafruit.com/add-pin sudo bashsudo apt-get install raspberrypi-bootloadersudo apt-get install adafruit-pitft-helperThe first command adds apt.adafruit.com to your repository list, so you can grab codedirectly from adafruit's servers Adafruit iPage 17 of 81
The next two do the actual download and installation, it'll take a while because there's a lot ofsoftware to replace for PiTFT support. Adafruit iPage 18 of 81
It's normal for the Pi to pause and/or take a while at this step for many minutes, theres a lot ofkernel software to replaceStep 3. Enable & Configure the PiTFTOK now the kernel and helper are installed, all you have to do is run the helper which willconfigure the kernel device tree overlays and add the few configurations to make the console Adafruit iPage 19 of 81
show up, etc.sudo adafruit-pitft-helper -t 28rThis will install the "2.8 Resistive" type of PiTFT into the current install. This is the same asthe 2.4" Resistive screen too (same resolution, pinout, etc.)At the end you will be prompted on whether you want the text console to appear on the PiTFT.Answer Y or N depending on your personal desires!You will also be prompted on whether you want one of the tactile buttons to act as an 'on off'switch. Answer Y or N depending on your personal desires! Adafruit iPage 20 of 81
Thats it!Run sudo reboot to try out your fancy new PiTFT :) Adafruit iPage 21 of 81
Detailed InstallationThe DIY Installer isn't working right now, please try the All-In-One image above - no ETA onwhy its not working, something to do with the latest Raspbian has changed. Thanks!If you've grabbed our Easy Install image, or use the script, this step is not required, it'salready done! This is just for advanced users who are curious on how to configure andcustomize the kernel installIn the next few steps we'll cover thedetailed installation procedure. Chances are, you shouldgrab the Easy Install image or script. If you have some interest in the details of how we installthe PiTFT setup, read on!In order to add support for the 2.4" or 2.8" TFT and touchscreen, we'll need to install a newLinux Kernel. Lucky for you, we created a kernel package that you can simply install over yourcurrent Raspbian (or Raspbian-derived) install instead of needing a whole new image. Thismakes it easier to keep your install up-to-date. Adafruit iPage 22 of 81
To use our kernel .deb files you must be using Raspbian or a derivative. This wont work withArch or other Linux flavors. As Raspbian is the official OS for the Pi, that's the only Linux wewill support! Others can recompile their own kernel using our patchfile (http://adafru.it/cY2),but we have no tutorial or support or plans for such.Before you startYou'll need a working install of Raspbian with network access. If you need help getting thatfar, check out our collection of Pi tutorials (http://adafru.it/aWq).We'll be doing this from a console cable connection, but you can just as easily do it from thedirect HDMI/TV console or by SSH'ing in. Whatever gets you to a shell will work!Also, run sudo apt-get update !To run these all the setup and config commands you'll need to be logged into a properTerminal - use ssh, a console cable, or the main text console (on a TV). The WebIDE consolemay not work.Download & Install KernelThe only way we're distributing the PiTFT kernel packages right now is thru apt.adafruit.comso you'll still need to run:curl -SLs https://apt.adafruit.com/add-pin sudo bashTo add apt.adafruit.com to your list of software sources Adafruit iPage 23 of 81
Then install the kernel withsudo apt-get install raspberrypi-bootloaderThis will take a up to 20 minutes so go make a sandwich or coffee. It takes longer than it usedto because there's now 2 kernels (v6 and v7 arm) and 2 kernel module directories.Don't use rpi-update! Adafruit iPage 24 of 81
OK since you're not going to run the helper, lets add the device tree overlay manually. Edit/boot/config.txt withsudo nano /boot/config.txtand add the following lines at the end:[pi1]device tree bcm2708-rpi-b-plus.dtb[pi2]device tree bcm2709-rpi-2-b.dtb[all]dtparam spi ondtparam i2c1 ondtparam i2c arm ondtoverlay pitft28r,rotate 90,speed 32000000,fps 20 Adafruit iPage 25 of 81
The rotate variable tells the driver to rotate the screen0 90 180 or 270 degrees.0 is portrait, with the bottom near theUSB jacks90 is landscape, with the bottom of the screen near the headphone jack180 is portrait, with the top near the USB jacks270 is landscape, with the top of the screen near the headphone jack.You can change this file withnano and reboot to make the change stick.The speed variable tells the driver how to fast to drive the display. 32MHz 32000000)(is agood place to start but if your screen is acting funny, try taking it down to 16MHz (16000000)especially if you're doing something like using a GPIO extender to put the screen away fromthe Pi.Save the file. Now we'll just reboot to let it all sink in.sudo shutdown -h now (if you don't have the TFT installed, shutdown, place theTFT on the Pi and re-power)orsudo reboot (if you have the TFT plate installed already)When the Pi restarts, the attached PiTFT should start out all white and then turn black. Thatmeans the kernel found the display and cleared the screen. If the screen did not turn black,that means that likely there's something up with your connection or kernel install. Solder Adafruit iPage 26 of 81
anything that needs resoldering!Now that you're rebooted, log back in on the console/TV/SSH. There's nothing displayed onthe screen yet, we'll do a test to make sure everything is perfect first!Run the following commands to startx on the/dev/fb1 framebuffer, a.k.a PiTFT screen:sudo mv /usr/share/X11/xorg.conf.d/99-fbturbo.conf export FRAMEBUFFER /dev/fb1startxYou should see the Pi desktop show up on the TFT! Congrats, you've completed the first testperfectly.Hit Control-C in the console to quit the X server so we can continue configurationNext up we'll add support for the touch screen automatically on boot. Edit the module list withsudo nano /etc/modules Adafruit iPage 27 of 81
and add stmpe-ts on a line at the endSave the file and reboot the Pi withsudo reboot and look at the console output (or rundmesg in the console window after logging in) you will see the modules install. Look inparticular for the STMPE610 detection and the ILI9340 screen frequency as highlighted hereWe can set up the touchscreen for rotate 90 configuration by doing the following (for moredelicate calibration or for other rotate XX values, see the next section)Create the directory and new calibration configuration file:sudo mkdir /etc/X11/xorg.conf.d Adafruit iPage 28 of 81
sudo nano /etc/X11/xorg.conf.d/99-calibration.confand enter in the following lines, then save.Section "InputClass"Identifier"calibration"MatchProduct "stmpe-ts"Option "Calibration" "3800 200 200 3800"Option "SwapAxes""1"EndSectionYou can now try to run X again withFRAMEBUFFER /dev/fb1 startxType Control-C to quit XIf you don't ever want to have to type FRAMEBUFFER /dev/fb1 before startx, you can makeit a default state by editing your profile file: sudo nano /.profile and addingexport FRAMEBUFFER /dev/fb1near the top and saving the file. Then reboot to reload the profile file. It will now alwaysassume you want to use /dev/fb1 Adafruit iPage 29 of 81
Adafruit iPage 30 of 81
Touchscreen Install & CalibrateIf you've grabbed our Easy Install image, or use the script, this step is not required, it'salready done! This is just for advanced users who are curious on how to configure andcustomize the touchscreenSetting up the TouchscreenNow that the screen is working nicely, we'll take care of the touchscreen. There's just a bit ofcalibration to do, but it isn't hard at all.Before we start, we'll make a udev rule for the touchscreen. That's because the eventX nameof the device will change a lot and its annoying to figure out what its called depending onwhether you have a keyboard or other mouse installed. Adafruit iPage 31 of 81
Runsudo nano /etc/udev/rules.d/95-stmpe.rulesto create a new udev file and copy & paste the following line in:SUBSYSTEM "input", ATTRS{name} "stmpe-ts", ENV{DEVNAME} "*event*", SYMLINK "input/touchscreen"Remove and re-install the touchscreen withsudo rmmod stmpe ts; sudo modprobe stmpe tsThen type ls -l /dev/input/touchscreenIt should point to eventX where X is some number, that number will be different on differentsetups since other keyboards/mice/USB devices will take up an event slotThere are some tools we can use to calibrate & debug the touchscreen. Install the "event test"and "touchscreen library" packages withsudo apt-get install evtest tslib libts-bin Adafruit iPage 32 of 81
Running evtestNow you can use some tools such as sudo evtest /dev/input/touchscreen which will let yousee touchscreen events in real time, press on the touchscreen to see the reports. Adafruit iPage 33 of 81
AutoMagic Calibration ScriptIf you rotate the display you need to recalibrate the touchscreen to work with the new screen Adafruit iPage 34 of 81
orientation. You can manually run the calibration processes in the next section, or you can runa small Python script which will automatically set a default touchscreen calibration based onthe screen orientation.This helper is automatically installed for you but if you'd like you can check it out here ongithub (http://adafru.it/eIu)Run it at the command line withsudo adafruit-pitft-touch-calit will try to figure out what display you have installed and the rotation it's set up forBy default the script will attempt to read the screen orientation by examining the PiTFTmodule configuration with modprobe. If the script can read the orientation it will print out thecurrent orientation, the current touchscreen calibration values, and the new touchscreencalibration values baesd on the current orientation. Before updating the calibration the scriptwill ask you to confirm that you'd like to make the change. Press y and enter to confirm. Adafruit iPage 35 of 81
Try using this default calibration script to easily calibrate your touchscreen display. Note thatthe calibration values might not be exactly right for your display, but they should be closeenough for most needs. If you need the most accurate touchscreen calibration, follow thesteps in the next section to manually calibrate the touchscreen.Manual CalibrationIf the "automagic" calibration technique isn't working for you, or you have some other setupwhere you need to carefully calibrate you can do it 'manually'You will want to calibrate the screen once but shouldn't have to do it more than that. We'llbegin by calibrating on the command line by runningsudo TSLIB FBDEVICE /dev/fb1 TSLIB TSDEVICE /dev/input/touchscreents calibratefollow the directions on the screen, touching each point. Using a stylus is suggested so youget a precise touch. Don't use something metal, plastic only! Adafruit iPage 36 of 81
You should see five crosshair targets. If you see less than that, the touchscreen probablygenerated multiple signals for a single touch, and you should try calibrating again.Next you can run sudo TSLIB FBDEVICE /dev/fb1TSLIB TSDEVICE /dev/input/touchscreen ts test which will let you draw-test the touchscreen. Go back and re-calibrate if you feel the screen isn't precise enough! Adafruit iPage 37 of 81
X CalibrationYou can also calibrate the X input system but you have to use a different program calledxinput calibratorYou can do this if the calibration on the screen isnt to your liking or any time you change therotate XX module settings for the screen. Since the screen and touch driver are completelyseparated, the touchscreen doesn't auto-rotateNormally you'd have to compile it but we have a ready to go package for you so run:sudo apt-get install -y xinput-calibratorBefore you start the xinput calibrator you will need to delete the old calibration data so runsudo rm /etc/X11/xorg.conf.d/99-calibration.confBefore running startx and the calibrator - otherwise it gets really confused!Now you'll have to run the xcalibrator while also running X. You can do this by startx and thenopening up the terminal program and running the xinput calibrator command (which ischallenging to do on such a small screen) OR you can do what we do which is run startx in aSSH/Terminal shell and then run the xinput calibrator from the same shell, which requires thefollowing command order:FRAMEBUFFER /dev/fb1 startx &DISPLAY :0.0 xinput calibratorFollow the directions on screen Adafruit iPage 38 of 81
Once complete you'll get something like:Run sudo nano /etc/X11/xorg.conf.d/99-calibration.conf and copy theSection "InputClass"Identifier"calibration"MatchProduct "stmpe-ts"Option "Calibration" "172 3763 3769 164"Option "SwapAxes""1"EndSectionor whatever you got, into there. You can quit X if you want by typingfg to bring that commandinto the foreground, and then Control-C to quit.Depending on the 'rotation' of the screen, when you do this calibration, you may needto comment out the SwapAxes part with a # and/or swap the numbers around so lookslike: Adafruit iPage 39 of 81
Option "Calibration" "119 3736 3850 174"toOption "Calibration" "3736 119 174 3850"Your touchscreen is now super calibrated, hurrah! Adafruit iPage 40 of 81
Using the ConsoleIf you've grabbed our Easy Install image, or use the script, this step is not required, it'salready done! This is just for advanced users who are curious on how to configure andcustomize the consoleOne fun thing you can do with the display is have it as your main console instead of theHDMI/TV output. Even though it is small, with a good font you can get 20 x 40 of text. Formore details, check out https://github.com/notro/fbtft/wiki/Boot-console (http://adafru.it/cXQ)First up, we'll update the boot configuration file to use the TFT framebuffer/dev/fb1 instead ofthe HDMI/TV framebuffer /dev/fb0sudo nano /boot/cmdline.txtyou can also edit it by putting the SD card into a computer and opening the same file. Adafruit iPage 41 of 81
At the end of the line, find the text that saysrootwait and right after that, enter in:fbcon map:10 fbcon font:VGA8x8 then save the file.On the next boot, it will bring up the console.Note that the kernel has to load up the display driver module before it can displayanything on it so you won't get the rainbow screen, a NooBs prompt, or a big chunk ofthe kernel details since the module is loaded fairly late in the boot process.I think the VGA8x8 font is a bit chunky, you probably want 12x6 which is what is shown in thephoto above. To change the font, run sudo dpkg-reconfigure console-setup and go thru toselect Terminus 6x12 Adafruit iPage 42 of 81
Adafruit iPage 43 of 81
Turn off Console BlankingYou may notice the console goes black after 30 minutes, this is a sort of 'power saving' or'screensaver' feature. You can disable this by editing /etc/kbd/config and setting the blanktime to 0 (which turns it off)BLANK TIME 30 Adafruit iPage 44 of 81
Adafruit iPage 45 of 81
HELP! (FAQ)My PiTFT used to work, now it doesn't!Did you do an apt-get upgradeor rpi-update ? This command will blow away our PiTFT kernel whichmeans that you will no longer have PiTFT support, you will have to redo the easy-installsteps to reinstall the kernel.If you had already made a working PiTFT setup, you may be able to reinstall the Adafruitkernel like so:sudo apt-get install raspberrypi-bootloader 1.20150528-1If it tells you that the latest version is already installed, try this instead:sudo apt-get install --reinstall raspberrypi-bootloader 1.20150528-1.you can check here (http://adafru.it/eUK) and substitute the most recent version you see inthe 1.20150528-1 part.I'm booting my Pi with the PiTFT and the HDMI output 'locks up' during boot!It looks like the Pi is 'halting' or 'locking' up during boot but what is really happening isthe console is switching from the HDMI output to the PiTFT output.Check your PiTFT connections, particularly make sure you seated the PiTFT on the Piproperly, nothing is in the way, and the TFT flex connector is seated properly. Adafruit iPage 46 of 81
My PiTFT works for a bit and then I get a black screen with a short line of white pixels in onecornerSounds like you tried to configure your Pi to 'boot straight to X', that is, start up the graphicsinterface on boot. This doesn't work by default because the Pi operating system is notexpecting a PiTFT so it boots to the HDMI output. See below for how to set up your Pi to bootto X on the PiTFTTo 'fix' this, you can either connect an HDMI monitor, then in a terminal window runsudoraspi-config and configure the Pi to boot to the command line not X! If you do not have anHDMI monitor, you can also try a console cableHow can I force the Pi to bring up X on the HDMI/TV monitor?There's two ways to do it. In older Pi installs, use thefb0 framebuffer when you want todisplay stuff on the HDMI/TV display, for example:FRAMEBUFFER /dev/fb0 startx Adafruit iPage 47 of 81
will use the HDMI/TV framebuffer for X windows instead of the PiTFTOn Jessie Pi installs, runsudo nano /usr/share/X11/xorg.conf.d/99-fbdev.confto edit the configuration file and make sure it contains:Section "Device"Identifier "display"Driver "fbdev"Option "fbdev" "/dev/fb0"EndSectionchange the Option "fbdev" "/dev/fb0" line to Option "fbdev" "/dev/fb1" if you want the xdisplay on thePiTFTI'm tring to run startx and I get FATAL: Module g2d 23 not found.don't forget you have to remove the turbo file!sudo mv /usr/share/X11/xorg.conf.d/99-fbturbo.conf How come OMX-Player and Minecraft and other programs don't a
Adafruit PiTFT - 2.8" Touchscreen Display for Raspberry Pi Created by lady ada Last updated on 2016-09-28 08:28:14 PM UTC