Transcription
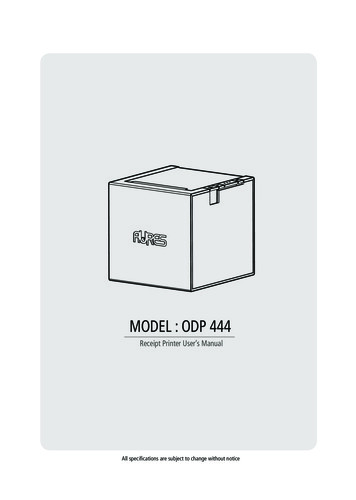
MODEL : ODP 444Receipt Printer User’s ManualAll specifications are subject to change without notice
This device complies with part 15 of the FCC Rules.Operation is subject to the following two conditions.1) This device may not cause harmful interference, and2) This device must accept any interference received,including interference that may cause undesired operation.Jeff Burroughs15042 Parkway Loop, Building D, Tustin, CA 92780 USA 714.669.3111
FRLe Groupe Aures vous remercie de votre confiance.Téléchargez nos derniers drivers et utilitairesainsi que nos conseils d’installation sur le sitedu Support Technique AURES :www.aures-support.frUKThe AURES Group thanks you for your loyalty.To download out most recent drivers and utilities andobtain advice regarding the installation of your equipment,please visit the AURES Technical Support Website :www.aures-support.fr/UKDEDie AURES Gruppe bedankt sich für lhre Bestellung.Um unsereneuesten Treiber, Utilitiesund Konfigurationsratschläge zu lhren Produktenherunterzuladen besuchen Sie bitte unseretechnische Support-Website :www.aures-support.fr/DE
Table of Contents1. Parts Identifications2. Setting up the printer2.1 Unpacking2.2 Connecting the cables2.3 Loading the roll paper2.4 Jam Error3. Control panel and other functions3.1 Control panel3.2 Error Indicating4. Self Test5. ASCII Print6. ECO Mode6.1 Font6.2 Paper Reduce6.3 Density7. Printer Setting7.1 Baudrate7.2 Cutter7.3 Error Beep7.4 Melody8. Hexadecimal Dump9. Peripherals Connection9.1 Bluetooth Connection9.2 Wi-Fi Connection9.3 NFC Connection10. Printer Cleaning11. Specifications12. Command 223252
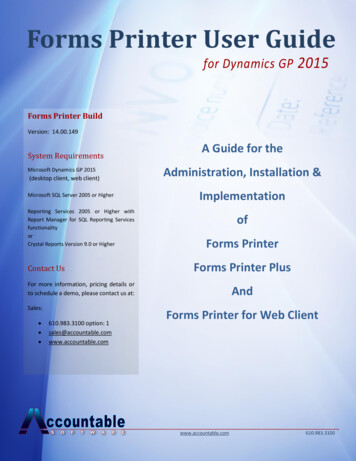
1. Parts IdentificationsPOWER SWITCHUsed to turn on/offpower to the printer.CONTROL PANELFeatures LED indicatorsto indicate printer statusand switches to operatethe printer.FEED BUTTONCOVER OPEN PUSH BUTTONPush down this button toopen the printer cover.PRINTER COVEROpen this cover to load orreplace a paper roll.3
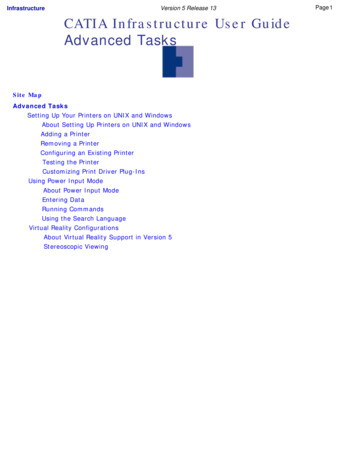
2. Setting Up the Printer2-1. UnpackingYour printer box should include these items. If any items are damaged or missing, please contact yourdealer for assistance.The PrinterCDRoll PaperAdaptorSerial Cable 1Serial Cable 2USB Cable4
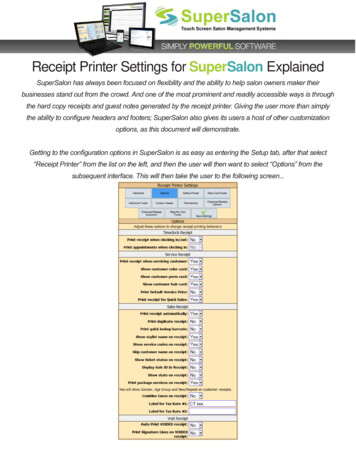
2-2. Connecting the CablesAll cables connect to the connector panel on the back of the printer which is shown below:ETHERNET SWITCHCASH DRAWER CONNECTORPOWER CONNECTORETHERNET CONNECTORUSB CONNECTORSERIAL CONNECTORBefore connecting any of the cables, make sure that both the printer and the computer are turned off.5
2-2-1. Interface Connector 9 Pin Serial USB “B” Type Ethernet 9Pin Serial InterfacePin234, tInput-Signal 5VDATADATA GNDI/O-DescriptionPrinter receive data line RS-232C levelPrinter transmit data line RS-232C levelPrinter handshake to host line RS-232C levelSystem GroundData Send ReadyUSB InterfacePin1234Description 5VPrinter transmit data linePrinter transmit data lineSystem Ground6
Ethernet InterfacePIN12345678SIGNALData Out Data Out Data IN N.CN.CData IN N.CN.CI/OOutput Data Output Data Input Data Input Data -This equipment is indoor use and all the communication wirings are limited to inside of the building.2-2-2. Cash Drawer ConnectorThe printer can operate a cash drawer with a 6 pin RJ-11 modular connector.The driver is capable of supplying a maximum current of 1.0A for 510ms or less when not printing.PIN123456SIGNALSignal GNDDrawer kick-out drive signal 1Drawer open/close signal 24VDrawer kick-out drive signal 2Signal GNDDESCRIPTIONOutputInputOutput-7
2-3. Loading the Roll PaperNotes: Be sure to use paper rolls that meet the specifications. Do not use paper rolls that have thepaper glued to the core because the printer cannot detect the paper end correctly. Turn off power switch.1. Make sure that the printer is not receiving data; Otherwise, data may be lost.2. Open the printer cover by pushing down the cover open push button.3. Remove the used paper roll core if there is one inside.4. Insert new paper roll as shown.8
5. Note the correct direction that the paper comes off the roll:OX6. Pull out a small amount of paper roll as shown. Then, close the cover.7. Tear off the paper as shown.9
2-4. Jam ErrorWhen the cutter is jammed, please follow the steps below.Section 11. With printer on, press the cover open button to open the printer cover lightly.(Printer cover is not fully opened with the cutter protruding.)2. Turn the printer off and on, and when the cutter returns to its original position,remove the jammed paper and close the printer cover.10
※ If section 1 does not solve the cutter jam, please follow section 2.Section 21. Turn off the power.2. Insert the screwdriver into the hole while pressing the cover open button as shown in the figure.OPENHole3. Align the screwdriver with the second hole located inside the hole and screw.Any direction would be ok.Second Hole CAUTION:The second hole is not visible tothe naked eye.11
4. Close the printer cover after removing the jammed paper.CLOSE5. Turn On the Power.12
3. Control panel and other functions3-1. Control panelYou can control the basic paper feeding operations of the printer with the button on the control panel.The indicator lights let you to monitor the printer’s status.POWER SWITCHCONTROL PANELPOWERERRORPAPERFEED BUTTONPress the FEED button once to advance paper one line. You can also hold down the FEED button tofeed paper continuously.3-2. Error indicatorsPAPERREDERRORREDPOWERGREENPower OffOFFOFFOFFNormal power is not supplied to theprinterPower OnOn LineCover OpenPaper EndOFFOFFOFFONOFFOFFONONONONONONNormal power is supplied to the printerNormal error-free modeClose coverInsert new paper rollSTATUSREMARKS13
4. Self TestThe self-test result indicated whether the printer is operating properly. Also with this, user can checkfollowing options or status of the printer. Control circuitPrinter mechanismPrinting qualityROM versionInterface settingThis test is independent of any other equipment or software.Running the self test1. Make sure the printer is turned off and the printer cover is closed properly before performing the self test2. Turn the printer on holding the FEED button, then the self-test will start. The self-test prints the printersetting value and then prints the following, and pauses. (Error LED On)SELECT MODE BY BUTTON1. ASCII PRINT2. ECO MODE3. PRINTER SETTING4. HEXADUMP MODE3. Press the FEED button consecutively (1 4)1. ASCII PRINT(press the FEED button once)Printing test page constructed with ACII code.2. ECO MODE(press the FEED button twice)Set the ECO mode for saving paper and power.(Default font type, Reduce paper margin, Density)3. PRINTER SETTING(press the FEED button triple time)Set the printer option.(Serial baudrate, Cutting mode, Error beep, Melody)4. HEXADUMP MODE(press the FEED button quad time)Printing the HEX value received from the interface※ Wait for 5 6 seconds if you want to exit. Printer performs a cutting when exiting this mode4. The printer is ready to receive data after finishing setting.14
5. ASCII PrintASCII PRINT is printing a test page constructed ASCII code. You can able to check the printer worksproperly with thisThe ASCII PRINT test automatically ends and cuts the paper after printing the following:*** Completed ***The printer is ready to receive data as soon as it completes the ASCII PRINT.6. ECO ModeAfter entering the ECO MODE, the list which can select the ECO option will be printed. Similar likeSelf Test, you can press the FEED button to select a ECO option.Once the input performs properly, the printer shows a result and store.ECO MODE1. FONT SETTING2. LINE SPACE SETTING3. LINE FEED SETTING4. BARCODE[1D] HEIGHT5. DENSITY SETTING6-1. FontFONT SETTING menu can be change the Font mapping(FONT A / FONT B).If you did not want other side font, you can disable that.- FONT A : 12x24- FONT B : 9x17FONT SETTING1. FONT A - A / FONT B - B2. FONT A - B / FONT B - B3. FONT A - A / FONT B - A4. FONT A - B / FONT B - A15
6-2. Paper ReduceReduce menu (Line space, Line feed, barcode[1D] height) was developed for paper saving.- Line space"Line space" means the amount of feed when you intentionally generate newlines.- Line feed"Line feed" means the amount of feed when there is an automatic line break.- Barcode Height“Barcode Height” means the height of the barcode when creating a one-dimensional barcode.LINE SPACE SETTING1.2.3.4.NORMALREDUCE 50%REDUCE 75%REDUCE 90%LINE FEED SETTING1.2.3.4.NORMALREDUCE 50%REDUCE 75%REDUCE 90%1D BARCODE HEIGHT SETTING1.2.3.4.NORMALREDUCE 50%REDUCE 75%REDUCE 90%6-3. DensityAdjust the print density to save the power consumed by the printer.SELECT DENSITY1. NORMAL2. LOW3. DARK16
7. Printer SettingChange the printer settings. The options below can also be changed via the Memory Saver.PRINTER SETTING1. SELECT BAUDRATE2. SELECT CUTTING MODE3. SELECT ERROR BEEP OPTION4. SELECT MELODY OPTION7-1. BaudrateAfter entering the BAUDRATE MODE, the list which can select the BPS will be printed.Similar like Self Test, you can press the FEED button to select a BAUDRATE.Once the input performs properly, the printer shows a result and store.The printer is ready to receive data as soon as it completes the SELECT BAUDRATEMODE.SELECT BAUDRATE1. 4800bps2. 9600bps3. 19200bps4. 38400bps5. 57600bps6. 115200bps7-2. CutterSet cutter mode.SELECT CUTTING MODE1. PARTIAL CUT2. FULL CUT7-3. Error BeepIf the cover is open or there is no paper, the error beep function is activated.This option allows you to enable / disable the error beep.SELECT ERROR BEEP OPTION1. BEEP ON2. BEEP OFF17
7-4. MelodyTo DK Port (Cash), Melody box or external buzzer can be connected.You can activate it from the Melody Setting menu, and the melody will operate after the cuttingoperation.- Melody Box : Melody is fixed and volume can be adjusted.- External Buzzer : 3 types of melody are output according to the Melody Type setting andvolume control is not includedSELECT MELODY OPTION1. MELODY SETTING2. SELECT MELODY TYPEMELODY SETTING1. MELODY ON AFTER CUTTING2. MELODY OFFSELECT MELODY TYPE1. MELODY-Ⅰ2. MELODY-Ⅱ3. MELODY-Ⅲ18
8. Hexadecimal DumpThis feature allows experienced users to see exactly what data is coming to the printer. This can beuseful in finding software problems.When you go into the hex dump function, the printer prints all commands and other data inhexadecimal format along with a guide section to help you find specific commands.To use the hex dump feature, follow these steps1. Please turn printer off.2. Please turn printer on while press down “Feed” button.3. Press the FEED button three times when the Self Test printed.4. Now printer had entered into Hexa dump mode.5. Run any software program that sends data to the printer. The printer prints ”Hexadecimal printingmode ” and then all the codes it receives in a two-column format. The first column contains thehecadecimal codes and the second column gives the ASCII characters that correspond to the codes.Hecadecimal Dump1B 21 00 1B 26 02 40 40 .!.& . @ @1B 25 01 1B 63 34 00 1B .%.c4 .41 42 43 44 45 46 47 48 ABCDEFGH A period (.) is printed for each code that has no ASCII equivalent.6. Turn off the printer.7. Turn on the printer.19
9. Peripherals ConnectionThis product can communicate with other devices via Bluetooth or Wi-Fi communication and cable. NOTEThe Standard model does not support Bluetooth, Wi-Fi, and NFC.(ODP444 Standard USB Serial Ethernet)9-1. Bluetooth Connection1. The Printer can be connected to devices equipped with Bluetooth communication capacity(PDAs, PCs, etc.)2. Use the Bluetooth connection function supported by the device to connect to the printer.9-2. Wi-Fi Connection1. The Printer can be connected to devices equipped with Wi-Fi communication capacity(PDAs, PCs, etc.)2. Use the Wi-Fi connection function supported by the device to connect to the printer. NOTEPlease refer to the configuration manual for details.20
9-3. NFC Connection1. The printer can be connected to devices equipped with NFC communication capabilities.2. Use the NFC connection function supported by the device to connect to the printer. NOTE- NFC is only compatible with Bluetooth.21
10. Printer cleaningIf the interior of the printer is dusty, printing quality can be lowered.In this case, follow the instructions below to clean the printer. Note :1. Make sure to turn the printer power off prior to cleaning2. Regarding print head cleaning, as the print head is very hot during printing, turn off the printerpower and wait approximately 10 minute before start.3. When cleaning the print head, take care not to touch the heated part of the print head.The print head subject to be damaged by static electricity.4. Take care not to allow the print head to become scratched and /or damaged in any way.1. Use an applicator swab moistened with an alcohol solution to clean the print head and removeany dusts.2. Once the cleaning is completed, insert paper roll into the printer few minutes later and closethe printer cover. Preventing OverheatingTo prevent the motor from overheating, continuous operation of the printer should be 1.5 m orless in print length. Set the pause time for 30 seconds or more than it.22
11. SpecificationsPrinting MethodDirect ThermalPrinting SpeedMax. 200 mm/secResolution180 DPIDot Pitch0.141mm x 0.141mmPrinting WidthMax. 72mmNumber of print columns.Font A - 42 columns / Font B - 56 columnsBarcode1DUPC-A, UPC-E, EAN-8, EAN-13, Code 39, Code 93,Codebar, ITF, Code128 with subsets A/B/C and UCCCase Codes2DQR, PDF417, DatamatrixEmulationESC/POS CompatibleDriverWindows Driver(10, 2012, 8, 7, 2008, VISTA, 2003, XP,32bit & 64bit), Window CE & Mobile Driver & SDK(CE 4.2 , Mobile 5.0 ), Linux Driver, Mac Driver,OPOS Driver, JavaPOS Driver, iOS SDK, Android(2.1 ) SDK,Blackberry SDK, SymbianSensorPaper end, Cover openPaper typeThermal PaperWidthMax. 80mmThickness0.06 0.09mmRoll Max DiameterMax. 83mmRoll Core12.5mm 0.5mmInterfaceStandardUSB, RS232C, Ethernet,Wi-Fi(802.11a/b/g/n), Bluetooth Ver 4.2(iOS), NFC TagReliabilityMCBF70 million linesTPH Life160 KmCutter Life1,500,000 cuts (Type : Guillotine)Paper23
AdaptorACAC100 240V, 50/60HzDC24V / 1.75ASize130 x 137 x 127 [W x D x H (mm)]Weight0.95kgTemperatureHumidityOperation0 45 Storage-20 60 Operation35 80%Storage10 90%24
12. Command 27282930313233343536373839CommandHTLFCRFFCANDLE EOTDLE ENQDLE DC4ESC FFESC SPESC !ESC ESC %ESC &ESC *ESC ESC 2ESC 3ESC ESC ?ESC @ESC DESC EESC GESC JESC LESC MESC RESC SESC TESC VESC WESC \ESC aESC c 3ESC c 4ESC c 5ESC dESC pFunctionHorizontal tabPrint and line feedPrint and carriage returnPrint and return to standard mode(in page mode)Cancel print data in page modeReal-time status transmissionReal-time request to printerGenerate pulse at real-timePrint data in page modeSet right-side character spacingSelect print mode(s)Set absolute print positionSelect/cancel user-defined character setDefine user-defined charactersSet bit-image modeTurn underline mode on/offSelect default line spacingSet line spacingSelect peripheral deviceCancel user-defined charactersInitialize printerSet horizontal tab positionsTurn emphasized mode on/offTurn double-strike mode on/offPrint and feed paper using minimum unitsSelect page modeSelect character fontSelect an international character setSelect standard modeSelect print direction in page modeTurn 90 clockwise rotation mode on/offSet printing area in page modeSet relative print positionSelect justificationSelect paper sensor(s) to output paper-end signalsSelect paper sensor(s) to stop printingEnable/disable panel buttonsPrint and feed paper n linesGeneral pulseREMARKS25
2345678910CommandESC tESC {FS pFS qGS !GS GS *GS /GS BGS HGS IGS LGS PGS VGS WGS \GS aGS fGS hGS kGS rGS v 0GS w Add ESC iESC mFS !FS &FS FS .FS 2 c1 d1 dkFS CFS S 1 2FS WFunctionSelect character code tableTurn upside-down printing mode on/offPrint NV bit imageDefine NV bit imageSelect character sizeSet absolute vertical print position in page modeDefine downloaded bit imagePrint downloaded bit imageTurn white/black reverse printing mode on/offSelect printing position of HRI charactersTransmit printer IDSet left marginSet horizontal and vertical motion unitsSelect cut mode and cut paperSet printing area widthSet relative vertical print position in page modeEnable/disable Automatic Status Back(ASB)Select font for HRI charactersSet bar code heightPrint bar codeTransmit statusPrint raster bit imageSet bar code widthREMARKSFull cutPartial cutSet print mode(s) for Kanji charactersSelect Kanji character modeTurn underline mode on/off for Kanji characterCancel Kanji character modeDefine user-defined Kanji charactersSelect Kanji character code systemSet Kanji character spacingTurn quadruple-size mode on/off for Kanji character26
ODP 444 Rev. A 03/19
Do not use paper rolls that have the paper glued to the core because the printer cannot detect the paper end correctly. Turn off power switch. 1. Make sure that the printer is not receiving data; Otherwise, data may be lost. 2. Open the printer cover by pushing down the cover open push button. 3. Remove the used paper roll core if there is .