Transcription
Captaris RightFAX9/21/2009
Captaris RightFAX2Table of ContentsAbout the Captaris RightFAX Plugin. 3System Requirements . 3Installation . 3Setting up your First RightFAX-Enabled Form . 3Attachment Setup . 15Fax Cover Page . 15Optional Test. 15RightFAX Connection Test Utility . 16
Captaris RightFAX3About the Captaris RightFAX PluginThe Captaris RightFAX plugin will allow Reform 12 Enterprise/PDC to interact with aRightFAX server in order to automatically distribute documents to your fax system.System Requirements Reform 12 Enterprise or Reform 12 PDC Windows 2003 Server, Windows 2000, or Windows XP (64-bit editions ofWindows are NOT supported) RightFAX FaxUtil application installed (for client)InstallationTo install the Captaris RightFAX plugin to your existing Reform 12 installation, downloadand run the Captaris RightFAX installation executable.Step through the prompts, and the installation will begin. Allow the installation tocomplete and then read on to the next section to learn how to implement CaptarisRightFAX to your forms.Setting up your First RightFAX-Enabled FormIn this tutorial, we are going to create a new form from an existing template, and thenconfigure it to send a document to a RightFAX server to be sent out. The RightFAX Pluginuses data located in Special Fields on your form to push your fax job up to the RightFAXserver. These Special Fields can be automatically added and configured by using theincluded setup wizard.First, the Reform Designer must be started. To open it, go toStart Programs Reform Designer.1. For the example, we will be creating a new form with an existing template. Go toFile New New. Select the Fax template and click OK.2. When it asks if you would like to open a text file for designing, select No.
Captaris RightFAX43. Next, go to File Save to save your form. Name it Fax.fom.4. You can now close the Reform Designer since we have our form which we will beusing alongside the Workflow Designer to route the document.*Now that we have our form, we can begin to fulfill the desired RightFax workflow usingthe Workflow Designer. First, the Workflow Designer must be started.5. To open it, go to Start Programs Reform Workflow-Designer WorkflowDesigner.6. Once open, we must go to File New 7. At the below screen, select “Document Automation” and click Ok.
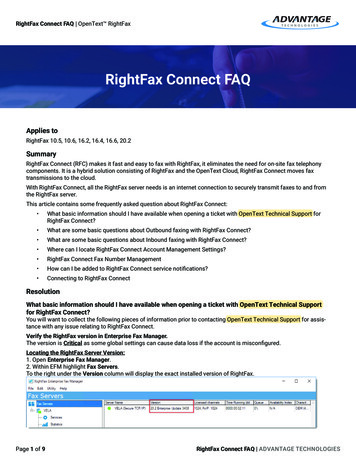
Captaris RightFAX58. You will now notice that your Inputs, Processes and Outputs have been populated bythe various plugins you have installed (RightFax being one of the Outputs)9. Once opened, we can start adding the necessary components to the workflow.First, drag and drop a Form and File object onto the workflow by clicking andholding your mouse on Form and File and then moving your mouse over to theworkflow and releasing the mouse button.*You will be prompted with the following dialog:
Captaris RightFAX10. Enter a description for the object you just added. This is done by typing in theprovided box. Type “RightFax Demo” and click Finish. This will take you back toyour workflow.11. Now we are ready to configure the “RightFax Demo” form and input file. To do so,right click on the newly added object and select “Configuration ” or simplydouble-click on it.12. You are now presented with the Input Setup window. First, we want to select theTextFile or data stream that our form will be using. To do so, you can simply begintyping in the box, or you can browse to find it. We are interested in the Fax.outfile. Click the small folder icon to bring up a window which will let us choose thatfile. Select the file and click Open.6
Captaris RightFAX13. After choosing the text file, you are taken back to the Input Setup page so that youcan now select a form. Click the small folder icon to bring up a window which willlet us choose the desired Fax.FOM form file. Select the FOM file and click Open.7
Captaris RightFAX14. Now that you have both your Input Text File and Reform Form selected, the setupof Form and File is complete. You can quickly double check that the correct filesare selected and then click Finish.15. You will also be prompted to add a page-break field to the forms. At this point, wewant to select No.16. To finish the Fax workflow, we want to add a RightFax Output. We use the samedrag and drop procedure as with the Form and File (see step 9). Take your mouseand drag the “RightFax” object from under Output onto the workflow somewherebelow your Input. Once you release your mouse, you will be prompted to describeRightFax. Type “RightFax” in the box and then click Finish.8
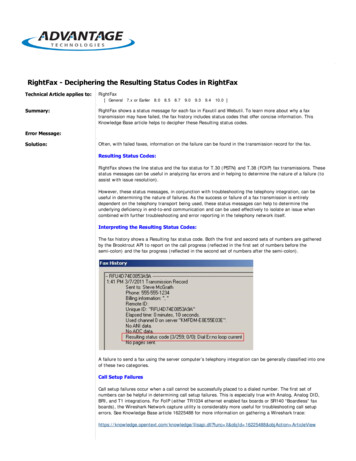
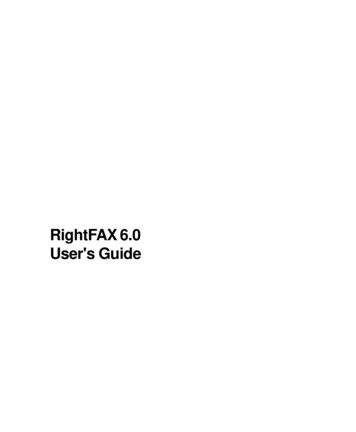
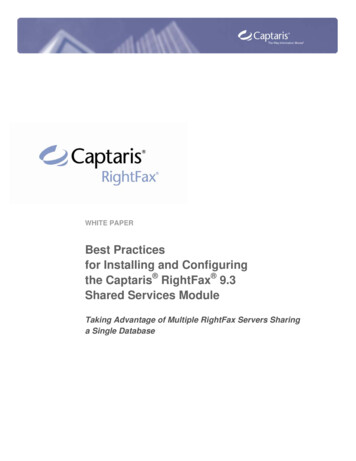
Captaris RightFAX17. Once you click Finish, you are taken back to your workflow. Your RightFax willhave a Red Caption because it is not yet configured. To configure RightFax, youmust first connect the Form and File object titled “RightFax Demo”. To do so, firstselect the “Add Connector” button from the menu bar. Next, drag your mousefrom the small “x” underneath “RightFax Demo” to the small “x” above “RightFax”as pictured below. When the connection is complete, the connecter will turn black(if red, connection has not been made correctly, try again) and the “RightFaxDemo” caption will turn green.18. You will be prompted to configure RightFax upon completing the connection. ClickYes. You can also double click on the RightFax object or rightclick and select“Configuration ” if you chose not to. This configuration will step you through allthe settings necessary for RightFax to successfully connect to your RightFax serverand send faxes. The first page will ask for the server name and the user name thatwill be used to connect to the RightFax server. Fill in both boxes, and then click theStart Wizard button.9
Captaris RightFAX1019. The next piece of information the configuration required is the FaxNumber where tosend the fax to. Enter in a valid fax number by typing it in the provided box and thenclick Next.20. Next is the “Recipient’s Name”. Here we would like to use data that is available inthe data stream instead of a static value. To do so, we first must click the “Clickhere to select variable information” button.*Note-After doing so, we see that a list will appear with the different fields that you canchoose for your variable data. We will be selecting from this list, but if you needed to
Captaris RightFAX11still type static data, you can do so by clicking the appropriate button for staticinformation and then typing it in.21. We want to use the dynamic field ClientName as the “Recipient Name”. SelectClientName from the list and click Next.22. For “Recipient’s Company Name”, we would like to again use variable data from theprint stream. To do so, first click the button “Click here to select variable data”.From the list that appears, select ShipToName (scroll down) and click Next.
Captaris RightFAX23. Type in a value for the Recipient’s Phone Number, and click Next.24. Type in “Quote Information” for the Subject and click Next.12
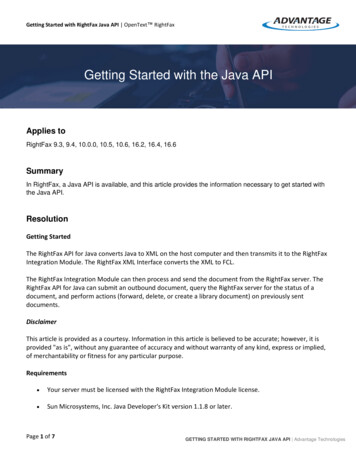
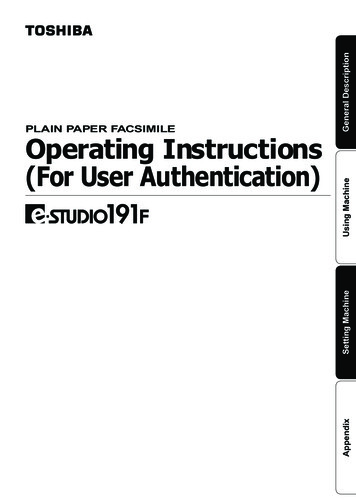
Captaris RightFAX1325. For “Notes”, we would like to again use variable data from the print stream. To doso, first click the button “Click here to select variable data”. From the list thatappears, select Description and click Finish.26. You have completing configuring your simple RightFax workflow. Your 2 objects(“RightFax Demo” and “RightFax”) should all be green meaning they have beensuccessfully configured and the workflow is ready to be created.
Captaris RightFAX1427. To make all the appropriate forms and changes, execution must be carried out.This is done by clicking the “Execute” buttonon the menu bar. Afterexecution, you will be notified about what has taken place. Click OK.28. You can now close the Workflow Designer. Your form has been saved in yourdefault forms directory. A backup of your original Fax.FOM file has been copied tothe “Workflow Designer Original Forms” folder in your forms directory. Anypermanent form changes should be made to this original form as it is usedthroughout the form configuration process as a template.29. To test out your settings and make sure that faxes can be sent, first we should openthe form with the Reform Designer. Navigate to your Forms directory and doubleclick on Fax.FOM. When asked to open the associated TextFile, click Yes. Verify thatthe special fields exist on the right hand side of your form. Then go to File Print.Reform will use the information of the objects that were just added to your form toprocess and send the fax.*Check your RightFAX server to make sure the fax was successfully sent.
Captaris RightFAX15Attachment SetupTo configure Reform to use attachments with Captaris RightFAX, click on theAttachment Setup button beside the Transport Type dropdown list in Page Setup to callup the Attachment Setup dialog box. The Attachment Setup dialog allows you to choosefrom various file types, resolutions and color formats for your attachments.The recommended attachment type for the RightFAX plugin is a TIFF image with Group 4compression.Note: You can change the Color format to Gray Scale or Color, but you willexperience a noticeable speed difference.Fax Cover PageTo use the RightFAX cover page in your faxes, select Fax Cover Page under theAutomation submenu of the Options menu as usual. Instead of browsing for a coverpage, type in the fax cover name that exists in your RightFAX System. To use RightFAX’sdefault cover page, type System Default in the Cover Page File box, as pictured below.Note: The RightFAX Client must be installed on the computer running Reform.Reform communicates with RightFAX using Port 445; this port must be white listedif any firewalls are running.Optional TestTo test the functionality of RightFAX once you have followed the directions above:Start the Reform Spooler by clicking the Spooler icon under Reform in your programslist.Copy the RightFAXPO.out file from the C:\Program Files\Reform \Backups directoryinto the C:\Program Files\Reform \Spooler directory. At this point, the Reform Spoolershould send 15 Purchase Orders in 10 separate fax jobs to RightFAX using the phonenumber 555-555-5555.
Captaris RightFAX16To view the form used for this test, open RightFAXPO.fom in Reform Designer andselect Yes when prompted to open the associated text file.To view fax results, use Windows NotePad to view PrintResults.txt in the Reformdirectory after the fax job is completed.RightFAX Connection Test UtilityThis included Connection Test Utility is used to check the integrity of various settingswhen setting up a MOST server to work together with RightFAX. It checks severalsettings to make sure that they are configured properly. If there is some kind of issuewith the MOST and RightFAX servers communicating, this utility can be used to isolate aproblem and fix it.Keep in mind that this Connection Test Utility is only intended for workflows that areusing RightFAX integration together with MOST.1. Displays some information that should be read before proceeding.2. Checks to see that you have correctly set the necessary Global Variables fromwithin the MOST Designer application.3. Verifies that you are able to write to the shared directory on the RightFAX Serverwhere fax jobs are sent.4. Checks to make sure that a connection can be established between the MOSTserver and the RightFAX server.5. Checks the integrity of the connection between the MOST server and theRightFAX database.Other company or product names mentioned herein may be trademarks or registeredtrademarks of their respective companies
18. You will be prompted to configure RightFax upon completing the connection. Click Yes. You can also double click on the RightFax object or rightclick and select "Configuration " if you chose not to. This configuration will step you through all the settings necessary for RightFax to successfully connect to your RightFax server