Transcription
OpenTextRightFax
This document, as well as the software described in it, is provided under a software license agreement with STIComputer Services, Inc. Use of this software and all related documentation is subject to and limited by the termsand conditions stated in such software license agreement. The content of this manual is furnished forinformational use only, is subject to change without notice and should not be construed as a commitment by STIComputer Services, Inc. STI Computer Services, Inc. assumes no responsibility or liability for any errors orinaccuracies that may appear in this document.No part of this document may be reproduced or transmitted in any form or by any means, electronic ormechanical, for any purpose without the express permission of STI Computer Services, Inc. 2015 STI Computer Services, Inc. All rights reserved.Copyright protection claimed includes all forms and matters of copyrightable material and information now orhereafter allowed by statutory or judicial law, including without limitation, material generated from the softwareprograms which are displayed on the screen, such as icons, screen displays, graphics, user interfaces, etc.ChartMaker Medical Suite is a registered trademark of STI Computer Services, Inc.All other trademarks and registered trademarks are the properties of their respective companies or mark holders.Page 1Updated 5/1/2015OpenText RightFax
ContentsUsing RightFax . 3Signing into the Fax Appliance . 3Sending a Fax (Using Clinical) . 4Sending a Fax (Using the Fax Printer Driver) . 7Sending a Fax (Using the Fax Server Client) . 9Managing Received Faxes . 11Fax Appliance Web Interface (User Mode) . 12Logging into the Web Interface . 12Fax Appliance Folders . 14Viewing & Managing Failed Faxes . 15Modifying User Preferences . 16Fax Appliance Web Interface - Administrative Mode . 17Overview . 17Creating a New User . 17Managing Users . 18Reports . 18Clinical Audit Trail . 19Index. 20Resources / Notes. 22Document Change Log . 23Page 2Updated 5/1/2015OpenText RightFax
Using RightFaxSIGNING INTO THE FAX APPLIANCEUsers must be logged into the fax appliance in order to successfully send a fax. During yourinitial setup, you will be logged in as the administrator. You can leave this as your default orchange it to a specific user (either will allow you to send a fax).1. Click the arrow in your taskbar to show hidden icons2. Right-click on the Print-to-Fax icon and select “Options”3. Enter your Username and PasswordNOTE: This is the same user name and password you utilize to access Practice Managerand Clinical. (The network address should have been entered at the time of installation. It iseither the IP address of the fax appliance or the name of the fax appliance on the network.)4. Click “OK”Page 3Updated 5/1/2015OpenText RightFax
SENDING A FAX (USING CLINICAL)Single page or multiple page documents can be faxed from within ChartMaker Clinical throughthe Organizer in a patient’s chart.1. Open the patient’s chart and access the Organizer ()2. Select the chart document(s) that you would like to fax.TIP: If you would like to fax multiple documents at once, press and hold the “ctrl” key onyour keyboard and then select each document.3. Go to Chart Fax 4. (Optional) Enter any applicable cover sheet notesPage 4Updated 5/1/2015OpenText RightFax
5. Select the type of recipient you are searching for by selecting the corresponding tabTabPatient referringphysiciansReferring physiciansAdditional recipientsAllows you to select Any referring providers that are linked to the patient’s accountAny referring provider setup in the Referrals table (Administration Practice Tables) in Practice ManagerA provider not in the Referrals table by allowing you to manually enter arecipient6. Search for the fax recipientNOTE: You can search by Name, Fax Number or Phone Number by selecting theapplicable option from the Search Column dropdown.Page 5Updated 5/1/2015OpenText RightFax
7. Highlight the applicable recipient(s) on the left and click the arrow (recipient(s) to the “Selected recipients” section on the right) to move the8. Click “Send”NOTE: The following message will appear when the documents were successfullyprepared and transmitted to the OpenText Fax Appliance. This only indicates that thedocuments were transmitted to the fax appliance. This does not indicate successfultransmission of the fax to the fax recipient(s).9. Click “OK”Page 6Updated 5/1/2015OpenText RightFax
SENDING A FAX (USING THE FAX PRINTER DRIVER)Single page or multiple page documents can also be faxed outside of ChartMaker Clinical,using the Print feature in a third-party program.1. From the File menu of your program (Word, Excel, Internet Explorer, etc), select “Print ”2. Select “Fax Printer” from the dropdown and click “OK”3. Type the recipient’s name and fax number and click “Add to List”.TIP: You can check “Also add to Contacts” to keep a personal address book. Thesecontacts will not be shared with others. (Note: If you are logged in as an administrator,the contacts added here will stay with that admininistrative user)Page 7Updated 5/1/2015OpenText RightFax
4. Click “Send” OR if you have more documents to add to this fax or want to modify some ofthe features, you can click “Next”If you selected “Next”, you will have the option to attach a document by clicking “Add file ” andthen browsing to select the file. If you would like to send the fax at this point, click “Send”. If youwould like to configure a cover sheet, click “Next”.If you selected “Next”, you will have the option to configure a cover sheet. The administrator has theoption to create multiple cover sheets. Choose the one you want by clicking the dropdown under“Select a cover sheet”. Type your notes for the recipient in the “Enter cover sheet notes” box. If youwould like to send the fax at this point, click “Send”. If you would like to configure your contactinformation, click “Next”.If you selected “Next”, you will have the option to configure YOUR contact information (Name,Company, Phone, etc.), which will be displayed on the cover page, as well as the delivery time of thefax. If you would like to schedule the fax to be sent at a later time, check the box for “Delay sendinguntil:” and either type in the time or click the clock for a dropdown list of times. Click “Send”.Page 8Updated 5/1/2015OpenText RightFax
SENDING A FAX (USING THE FAX SERVER CLIENT)Single page or multiple page documents can also be faxed directly from the fax server client.1. Click the arrow in your taskbar to show hidden icons2. Right-click on the Print-to-Fax icon and select “Launch fax client”3. Enter your Username and PasswordNOTE: This is the same user name and password you utilize to access Practice Managerand Clinical. (The network address should have been entered at the time of installation. Itis either the IP address of the fax appliance or the name of the fax appliance on thenetwork.)4. Click “OK”Page 9Updated 5/1/2015OpenText RightFax
5. Click “New Fax”6. From the Send Fax dialog, enter the recipient’s Name and Fax NumberNOTES: You can add additional recipients by clicking the “More Recipients” button.Contacts from the administrator profile will not be available if you are signed in as adifferent user.OPTIONAL:To select a cover sheet, select the applicable version from the “Select cover sheet”dropdown and enter any applicable notes to the recipient in the “Notes” box. and addyour notes if necessary. To modify your contact information (name, phone number, etc.)or time of delivery, click “Options ”.7. Click “Add Attachment ” to browse and select the document you would like to faxTIP: You can change the order of multiple attachments with the “Move Up” and “MoveDown” options.8. Click “Send”Page 10Updated 5/1/2015OpenText RightFax
MANAGING RECEIVED FAXESThe OpenText Fax Appliance may also be utilized to receive incoming faxes. The destinationpath/folder for incoming faxes is generally the scans folder on the server but may differ basedon individual client need and/or preference.1. In Clinical, go to Chart Scan Documents2. Select the applicable Scans directory (i.e. Local Files or Unassigned Files)3. Complete the remaining steps to select the patient, heading, date and folder for the scan/faxand click “Save”Page 11Updated 5/1/2015OpenText RightFax
Fax Appliance Web Interface (User Mode)LOGGING INTO THE WEB INTERFACEThe fax appliance web interface can be accessed in one of two ways. Either method will requirethe user to enter their fax appliance username and password.Via the Fax Client:1. Click the arrow in your taskbar to show hidden icons2. Right-click on the Print-to-Fax icon and select “Launch fax client”3. Enter your Username and PasswordNOTE: This is the same user name and password you utilize to access Practice Managerand Clinical. (The network address should have been entered at the time of installation. Itis either the IP address of the fax appliance or the name of the fax appliance on thenetwork.)4. Click “OK”Page 12Updated 5/1/2015OpenText RightFax
Via the Internet:1. Open a web browser and type http://otfa/ or http://rightfaxserver/rightfaxexpress in theaddress bar2. Select “User”3. Enter your Username and PasswordNOTE: This is the same user name and password you utilize to access Practice Managerand Clinical. (The network address should have been entered at the time of installation. Itis either the IP address of the fax appliance or the name of the fax appliance on thenetwork.)4. Click “Sign In”Page 13Updated 5/1/2015OpenText RightFax
FAX APPLIANCE FOLDERSThe fax appliance web interface provides various folder options (Inbox, Outbox, Sent, Trash) forviewing your fax transmissions. Please note, folder content is user specific and is based onwhich user is signed into the fax appliance.The typical, default, fax transmission setting will attempt to send each fax up to 4 times with 5minutes in between each attempt.FolderInboxOutboxSentTrashGlobal Inbox*Global Outbox*Allows you to View incoming faxesView faxes which are in the process of being transmitted by the fax appliance.Once the fax transmission is complete, the fax will disappear from the Outboxand can be viewed in the Sent folder. Faxes which fail will remain in theOutbox with a Condition of “Failure”.View faxes which have been sent successfullyView faxes which were manually deletedView all incoming faxesView all outgoing faxes* Only available if set by the administratorPage 14Updated 5/1/2015OpenText RightFax
VIEWING & MANAGING FAILED FAXESFailed faxes will reside in the Outbox of the fax appliance. The Condition column will display astatus of “Failure” for failed faxes. Failed faxes can be retried by highlighting the failed fax andselecting the “Retry” icon.The “Retry” icon provides two options: Retry or Retry with new fax number. Retry with new faxnumber allows you to attempt sending the fax with an alternate fax number.The “Resend” icon (available in the Sent Folder) allows you to resend a fax that was previouslysent.Page 15Updated 5/1/2015OpenText RightFax
MODIFYING USER PREFERENCES1. Click “Preferences” in the top right corner of the screen2. Select the type of information you want to modify (User Information, Fax Cover SheetDefaults, Notification Options, or Received Fax Options)3. Modify the applicable information4. Click the “X” in the upper right after making changesPage 16Updated 5/1/2015OpenText RightFax
Fax Appliance Web Interface - Administrative ModeOVERVIEWWhen logging into the fax appliance web interface in order to modify system defaults andconfigurations, make sure you select “Administrator” and log in with administrator credentials.After logging in, you will have the ability to manage the faxing software using the following tabs:Users, Devices, Cover Sheets, Dialing Rules, Reports, and System.NOTE: Do not use the Devices tab. The Dialing Rules tab is not applicable. Coversheets need to be edited in HTML. If you do not have knowledge of HTML, pleasecontact Clinical Support for assistance.CREATING A NEW USER1. From the User tab, click “New”2. Add the appropriate information into the fieldsNOTE: You can provide the user access to the “shared contacts”, have the user see allglobal faxes (by default, you will only see the faxes you send and receive) and/or allowanother user to be an administrator.3. Click “Save”Page 17Updated 5/1/2015OpenText RightFax
MANAGING USERS1. From the Users tab, highlight the user2. Click “Edit” to modify the user’s information (including password) or “Delete” to removethem from the system3. If editing, click “Save” to close the dialogREPORTSYou can see activity reports through the Reports tab by selecting the Start and End Dates andthen clicking “Generate”.Page 18Updated 5/1/2015OpenText RightFax
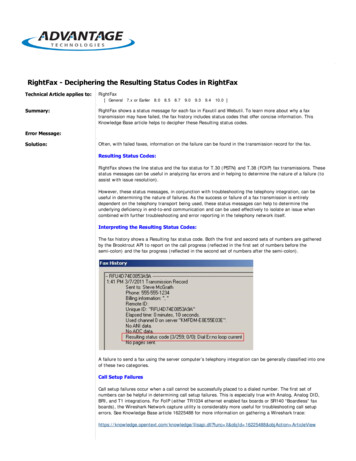
CLINICAL AUDIT TRAILThe Audit Trail in ChartMaker Clinical will display faxes that were processed and sent to theOpenText Fax Appliance. This does not verify that the fax was successfully transmitted to thefax recipient(s). To verify the transmission, reference the fax appliance web interface.Sample Audit Trail:Page 19Updated 5/1/2015OpenText RightFax
IndexAMAdd Attachment · 10Managing received faxes · 11Add File · 8Managing users · 18Additional recipients · 5Modifying user preferences · 16Also add to Contacts · 7More Recipients · 10CNChart Fax · 4New Fax · 10Chart Scan Documents · 11Clinical Audit Trail · 19OCover sheet · 4, 8, 10, 17Creating a new user · 17Options · 10Organizer · 4Outbox · 14, 15DDelay sending until · 8PDevices · 17Dialing Rules · 17Patient referring physicians · 5Preferences · 16FPrint · 7Failed faxes · 15Print-to-Fax Options · 3Print-to-Fax Launch fax client · 9, 12Fax appliance folders · 14Fax Appliance Web Interface · 12, 14, 17Fax Appliance Web Interface-Administrative Tasks · 17RFax Printer · 7Received Fax Options · 16Fax Status Notifications · 16Referrals · 5Referring physicians · 5IReports · 17, 18Inbox · 14Retry with new fax number · 15Retry · 15Incoming faxes · 11SLScans directory · 11Launch fax client · 9, 12Select a cover sheet · 8Logging into the web interface · 12Select cover sheet · 10Selected recipients · 6Sending a Fax (Using Clinical) · 4Page 20Updated 5/1/2015OpenText RightFax
Sending a Fax (Using the Fax Printer Driver) · 7USending a Fax (Using the Fax Server Client) · 9Sent · 14User Information · 16Signing into the fax appliance · 3Users · 17System · 17VTViewing & managing failed faxes · 15Taskbar · 3, 9, 12Trash · 14Page 21Updated 5/1/2015OpenText RightFax
Resources / NotesTrainer:Phone:STI ChartMaker Medical Suite Support:1-800-487-9135NOTES:Page 22Updated 5/1/2015OpenText RightFax
Document Change LogDateVersionChanges5/1/155.6Initial ReleasePage 23Updated 5/1/2015OpenText RightFax
Page 3 Updated 5/1/2015 OpenText RightFax Using RightFax SIGNING INTO THE FAX APPLIANCE Users must be logged into the fax appliance in order to successfully send a fax. During your initial setup, you will be logged in as the administrator. You can leave this as your default or change it to a specific user (either will allow you to send a fax). 1.