Transcription
Getting Started withBD FACSDivaSoftwareFor In Vitro Diagnostic Usebdbiosciences.comPart No. 642213 Rev. AJune 2007BD Biosciences2350 Qume DriveSan Jose, CA 95131-1807USATel (877) 232-8995Fax (800) 325-9637facservice@bd.comAsia PacificTel (65) 6-861-0633Fax (65) 6-860-1593BrazilTel (55) 11-5185-9995Fax (55) 11-5185-9895CanadaToll Free (888) 259-0187Tel (905) 542-8028Fax (888) 229-9918canada@bd.comEuropeTel (32) 2 400 98 95Fax (32) 2 401 70 94help.biosciences@europe.bd.comJapanNippon Becton Dickinson Company, Ltd.Toll Free 0120-8555-90Tel 81-24-593-5405Fax 81-24-593-5761MexicoToll Free 01-800-236-2543Tel (52) 55 5999 8296Fax (52) 55 5999 8288
2007, Becton, Dickinson and Company. All rights reserved. No part of this publication may be reproduced,transmitted, transcribed, stored in retrieval systems, or translated into any language or computer language, in anyform or by any means: electronic, mechanical, magnetic, optical, chemical, manual, or otherwise, without priorwritten permission from BD Biosciences.The information in this guide is subject to change without notice. BD Biosciences reserves the right to change itsproducts and services at any time to incorporate the latest technological developments. Although this guide has beenprepared with every precaution to ensure accuracy, BD Biosciences assumes no liability for any errors or omissions,nor for any damages resulting from the application or use of this information. BD Biosciences welcomes customerinput on corrections and suggestions for improvement.BD FACSDiva software Becton, Dickinson and Company. This software is the property of Becton, Dickinson andCompany. Each sale of a stored unit of this software grants the purchaser a nontransferable, nonexclusive, personallicense. This software may not be duplicated, reproduced, or copied in any form or by any means whatsoever, exceptas otherwise permitted by law.BD, BD logo, and all other trademarks are property of Becton, Dickinson and Company 2007 BDCy is a trademark of Amersham Biosciences Corp. Cy dyes are subject to proprietary rights of AmershamBiosciences Corp. and Carnegie Mellon University and are made and sold under license from Amersham BiosciencesCorp. only for research and in vitro diagnostic use. Any other use requires a commercial sublicense from AmershamBiosciences Corp., 800 Centennial Avenue, Piscataway, NJ 08855-1327, USA.Microsoft and Windows are registered trademarks of Microsoft Corporation. All other company and product namesmay be trademarks of the respective companies with which they are associated.PerCP is licensed under US Patent No. 4,876,190.BD FACSDiva software is for in vitro diagnostic (IVD) use when used with IVD reagents and cytometers. Refer to theinformation supplied by the manufacturer for application-specific limitations.HistoryRevisionDateChange Made337647 Rev A01/04Initial release for BD FACSDiva software version 4.0.338007 Rev A04/04Updated for version 4.0.1: CE IVD marking338574 Rev A09/04Updated for version 4.1; see the New Features section for details.Modified: Creating an Experiment, Working With Experiments in the Browser, Importing Data,Using Tethering and Batch Analysis, Gating Multicolor Experiments, Setting Up CompensationControls. New: Changing Browser Button Defaults, Using Biexponential Display.640744 Rev A05/06Updated for version 5.0; see the New Features section for details.Modified: Becoming Familiar with the Workspace, Using Administrative Options, UsingBiexponential Display. New: Adjusting Biexponential Scaling, Copying and Pasting Gates,Publishing and Presenting Data. Moved: Calculating Compensation Manually (to BD FACSDivaSoftware Reference Manual).642213 Rev A06/07Updated for version 6.0. See the New Features section for details.Modified: Becoming Familiar with the Workspace, Using Administrative Options, Managing Listsin Experiment Layout.
ContentsAbout This Guide5New Features . . . . . . . . . . . . . . . . . . . . . . . . . . . . . . . . . . . . . . . . . . . . . . . .5Conventions . . . . . . . . . . . . . . . . . . . . . . . . . . . . . . . . . . . . . . . . . . . . . . . . .11Technical Assistance . . . . . . . . . . . . . . . . . . . . . . . . . . . . . . . . . . . . . . . . . . .11BD FACSDiva Tutorials13Becoming Familiar with the Workspace . . . . . . . . . . . . . . . . . . . . . . . . . . . .14Using Administrative Options . . . . . . . . . . . . . . . . . . . . . . . . . . . . . . . . . . . .19Adding an Administrator Password . . . . . . . . . . . . . . . . . . . . . . . . . . . .19Creating a New User . . . . . . . . . . . . . . . . . . . . . . . . . . . . . . . . . . . . . . .21Viewing User-Specific Changes . . . . . . . . . . . . . . . . . . . . . . . . . . . . . . . .25Deleting a User . . . . . . . . . . . . . . . . . . . . . . . . . . . . . . . . . . . . . . . . . . . .28Creating and Working with Experiments . . . . . . . . . . . . . . . . . . . . . . . . . . .29Creating a Folder and an Experiment . . . . . . . . . . . . . . . . . . . . . . . . . . .29Exporting an Experiment as a Template . . . . . . . . . . . . . . . . . . . . . . . . .37Creating an Experiment from a Template . . . . . . . . . . . . . . . . . . . . . . .38Importing an Experiment . . . . . . . . . . . . . . . . . . . . . . . . . . . . . . . . . . . .39Working with Experiments in the Browser . . . . . . . . . . . . . . . . . . . . . . .41Assigning Default Templates . . . . . . . . . . . . . . . . . . . . . . . . . . . . . . . . .44Using Gating Features . . . . . . . . . . . . . . . . . . . . . . . . . . . . . . . . . . . . . . . . . .46Creating Gates . . . . . . . . . . . . . . . . . . . . . . . . . . . . . . . . . . . . . . . . . . . .46Editing Gates . . . . . . . . . . . . . . . . . . . . . . . . . . . . . . . . . . . . . . . . . . . . .48Subsetting Populations . . . . . . . . . . . . . . . . . . . . . . . . . . . . . . . . . . . . . .50iii
ivUsing Biexponential Display . . . . . . . . . . . . . . . . . . . . . . . . . . . . . . . . . .56Using Tethering and Batch Analysis . . . . . . . . . . . . . . . . . . . . . . . . . . . .58Gating Multicolor Experiments . . . . . . . . . . . . . . . . . . . . . . . . . . . . . . .64Publishing and Presenting Data . . . . . . . . . . . . . . . . . . . . . . . . . . . . . . . . . . .73Maintaining the Database . . . . . . . . . . . . . . . . . . . . . . . . . . . . . . . . . . . . . . .75Archiving Experiments . . . . . . . . . . . . . . . . . . . . . . . . . . . . . . . . . . . . . .75Deleting Experiments . . . . . . . . . . . . . . . . . . . . . . . . . . . . . . . . . . . . . . .76Previewing Cytometer Setup and Tracking Features . . . . . . . . . . . . . . . . . . .78Accessing Cytometer Configurations . . . . . . . . . . . . . . . . . . . . . . . . . . .80Characterizing Baseline Cytometer Performance . . . . . . . . . . . . . . . . . . .81Running Daily Performance Checks . . . . . . . . . . . . . . . . . . . . . . . . . . . .82Tracking Cytometer Performance . . . . . . . . . . . . . . . . . . . . . . . . . . . . . .83Getting Started with BD FACSDiva Software
About This GuideThis Getting Started guide provides tutorials to familiarize you withBD FACSDiva software. If you are a new user, use the tutorials to get startedwith the software. If you are an experienced user, try the updated tutorials tobecome familiar with new software features. Updated features are highlighted inthe New Features section.New FeaturesThis version of BD FACSDiva software includes powerful features to providereproducible and objective data for BD FACSDiva supported cytometers as wellas enhanced workflow, experiment setup, formatting, and exporting features.New Cytometer Setup and Tracking features work in conjunction with a newbead reagent to provide: A complete baseline characterization of the cytometer Automated performance checking and tracking of characterizationmeasurements A new feature to maintain application-specific settingsFor a brief overview of Cytometer Setup and Tracking, see Previewing CytometerSetup and Tracking Features on page 78. For detailed information, refer to theBD Cytometer Setup and Tracking Application Guide.5
Additional enhanced BD FACSDiva software features include the following:New Look for Workspace WindowsThe BD FACSDiva software has been updated to display in the titles of theBrowser, the Inspector, the Cytometer window, and the Worksheet window, theactive component for that window.Additional Administrative Options for More Control Administrators can now control users’ ability to modify theBD FACSDiva setups previously saved in the Setup Catalog. See Creating aNew User on page 21 in this guide. New custom fields in the Account Administration dialog allow theadministrator to create a name and value for each user profile. Forexample, a custom name field could be “Account Number” with the valuefield displaying a numeric value. See Creating a New User on page 21 inthis guide. Administrators can access the latest user tracking log file through the Filemenu. Also, new columns of information have been added includingsoftware build version, cytometer, serial number, and the custom fielddescribed above. See Tracking User Logins on page 36 in theBD FACSDiva Software Reference Manual. When importing user profiles into BD FACSDiva software, the errormessage now indicates the duplicate user names. See Importing UserProfiles on page 38 in the BD FACSDiva Software Reference Manual.For more about the new administrative options, see Creating a New User onpage 21 of this guide or refer to Administrative Options in the BD FACSDivaSoftware Reference Manual.Graphical Interfaces for Cytometer Configuration 6Graphical depiction of the optical bench for BD FACSDiva supportedcytometersGetting Started with BD FACSDiva Software
New drag and drop features to assign fluorophores, filters, and mirrors tothe cytometer configurations. All configuration management tasks such as set current, create, edit, anddelete are done through the new Cytometer Setup and Tracking feature.To understand the new configuration options, refer to the BD Cytometer Setupand Tracking Application Guide.New Statistical Calculations and Exporting Features Robust Coefficient of Variation (rCV) and Robust Standard Deviation(rSD) calculations automatically eliminate outliers. See CalculatingStatistics on page 247 in the BD FACSDiva Software Reference Manual. Export statistics in an XML format and append or overwrite an existingstatistics XML file. See Publishing and Presenting Data on page 73 in thisguide. New scaling selections are available for linear and channel values tosupport applications. See Editing Parameter Statistics on page 245 in theBD FACSDiva Software Reference Manual.Simpler Gating Features Proportional resizing of polygon and rectangular gates. See Editing Gateson page 48 in this guide. Drag and drop gates within a plot or from one plot to another within aworksheet. See Dragging and Dropping Gates into Plots on page 232 in theBD FACSDiva Software Reference Manual. Drag and drop gates in the population hierarchy. See Dragging Gates intothe Population Hierarchy on page 232 in the BD FACSDiva SoftwareReference Manual. New feature to apply gate coordinates (such as shape and size) betweenworksheets to other tubes in an open experiment. See Applying GateCoordinates on page 240 in the BD FACSDiva Software ReferenceManual.About This Guide7
Enhanced Experiment Layout for Single Point Design Create and add keywords to a global list. Easily create new labels from the pre-defined Labels List. Copy and paste rows and columns. Set stopping time and stopping and storage gates for specific tubes or wells. Assign preferred global worksheets. Rename tubes, wells, and specimens.Refer to Using Experiment Layout on page 67 in the BD FACSDiva SoftwareReference Manual for details on the features listed above.Increased Acquisition Flexibility Resize the Acquisition Dashboard and hide sub-windows. See AcquisitionDashboard on page 128 in the BD FACSDiva Software Reference Manual. Events to Record field maintains the last entered value. See AcquisitionSetup on page 131 in the BD FACSDiva Software Reference Manual. Stopping Time selection maintains the last entered value. See AcquisitionSetup on page 131 in the BD FACSDiva Software Reference Manual.New Worksheet Features8 Create headers and footers on the worksheet, including cytometer name,experiment name, user name, date and time, BD FACSDiva softwareversion, etc. See Headers and Footers on page 100 in the BD FACSDivaSoftware Reference Manual. Display a grid on the worksheet that is scalable. See Using the WorksheetGrid Tab on page 186 in the BD FACSDiva Software Reference Manual.Getting Started with BD FACSDiva Software
Snap-To Grid feature that makes elements in the worksheet snap to thegrid. See Using the Worksheet Toolbar on page 181 in the BD FACSDivaSoftware Reference Manual. Worksheet toolbar button to save the worksheet as a PDF file. PDF files canalso be created for Carousel Run Reports and Batch Analysis Reports. SeeSaving Worksheets as PDF Files on page 194 in the BD FACSDivaSoftware Reference Manual. Export selected worksheet elements as an XML file including plots, textboxes, statistics, and population hierarchies. See Publishing and PresentingData on page 73 of this guide.Improved BD FACSLoader Workflow Specify a unique export directory for each specimen within a carousel. User-defined interim mix settings per number of tubes and length of mix(BD FACSCanto II only). Carousel Report now includes the directory selected for each specimen’sdata in the carousel.BD HTS OptionsFor more details about the following, see the BD HTS User’s Guide. Create and modify compensation controls in the Plate window. Rename specimens in the Plate window. Enable plate controls in the Plate window. Copy and paste wells to blank positions in the Plate window. Choose apply and export panel templates in the Plate window.About This Guide9
Expanded Sorting FeaturesThe following features have been added to improve sorting capability. For moredetails, see the BD FACSAria User’s Guide. Pause counters to load a new tube into the BD FACSAria cell sorter. Save Sort Reports. Improved indicators in the Browser to show where sort layouts are beingcreated. Addition of experiment and specimen information to Sort Reports. New default Sort Precision Model: 4-Way Purity. Persistence of the target events count.Other Features and Changes10 Export gated events as an FCS file. See Exporting Gated Events into FCSFiles on page 264 in the BD FACSDiva Software Reference Manual. Create label-specific information for compensation tubes without having tocreate tubes. Add a description to keywords in the Inspector window. See Defining andEditing Keywords on page 89 in the BD FACSDiva Software ReferenceManual. User preference to prevent display of data in plots until the recording iscompleted. See General Preferences on page 96 in the BD FACSDivaSoftware Reference Manual. Record and save large data files of up to 10 million events. See CurrentActivity and Basic Controls on page 129 in the BD FACSDiva SoftwareReference Manual. Users who have access can edit setups.Getting Started with BD FACSDiva Software
Simplified installation upgrade process. See Installing BD FACSDivaSoftware on page 19 in the BD FACSDiva Software Reference Manual.ConventionsThe following table lists conventions used in this guide.Table 1 Text and keyboard conventionsConvention; TipUseHighlights features or hints that can save time and preventdifficultiesNOTICEDescribes important features or instructions The arrow indicates a menu choice. For example, “chooseFile Print” means to choose Print from the File menu.Ctrl-XWhen used with key names, a dash means to press two keyssimultaneously. For example, Ctrl-P means to hold down theControl key while pressing the letter p.Technical AssistanceFor technical questions or assistance in solving a problem: In BD FACSDiva software, choose Help Online Help. Locate topicsspecific to the operation you are performing.To quickly find information on any topic, enter search terms on the Searchtab. You can search individual books, or search all books at once. You canalso use the Contents or Index tab to find information. To find softwareinformation, click to expand topics in the Software Help book; to findcytometer information, expand the Cytometer Help book. Refer to the Troubleshooting section in the Software or Cytometer Helpbooks.About This Guide11
If additional assistance is required, contact your local BD Biosciences CustomerSupport representative or supplier.When contacting BD Biosciences, have the following information available: product name, part number, and serial number; software version andcomputer system specifications any error messages details of recent cytometer performanceBD Biosciences might also request the console.log and LogFile.xml files, whichcan be found in C:\Program Files\BD FACSDiva Software\log, as well as yourexported experiment file.For cytometer support from within the US, call (877) 232-8995, prompt 2, 2.For support from within Canada, call (888) 259-0187.Customers outside the US and Canada, contact your local BD representative ordistributor.12Getting Started with BD FACSDiva Software
BD FACSDiva TutorialsUse the following tutorials to learn how to use BD FACSDiva software if you area new user, or practice using new features if you are an experienced user. Becoming Familiar with the Workspace on page 14 Using Administrative Options on page 19 Creating and Working with Experiments on page 29 Using Gating Features on page 46 Publishing and Presenting Data on page 73 Maintaining the Database on page 75 Previewing Cytometer Setup and Tracking Features on page 7813
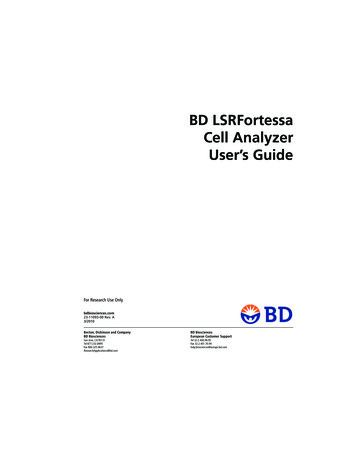
Before You Begin If you already have BD FACSDiva software on your system, upgrade itusing the instructions provided with the installation CD. After the upgrade,restart your cytometer and computer as described in the upgradeinstructions. If you are new to BD FACSDiva software, start thesoftware by double-clicking the shortcut icon on thedesktop.shortcut iconWhen the Log In dialog appears, click OK. No password is required the first timeyou log into the software. For more information about user login, see UsingAdministrative Options on page 19.Becoming Familiar with the WorkspaceAfter a successful login, the BD FACSDiva workspace appears showing the mainapplication windows (Figure 1). Hide or show windows by clicking buttons onthe workspace toolbar ( 1 in the figure).If you are new to BD FACSDiva software, take a minute to become familiar withthe workspace. Some software features are cytometer-specific, so your workspacecomponents might look different from those shown in this example. Forinformation about cytometer-specific components, refer to your cytometer manual.14Getting Started with BD FACSDiva Software
Figure 1 BD FACSDiva workspace1246531Click a button on the workspace toolbar to hide or show the correspondingwindow. Most windows can be resized by dragging a border or corner.Becoming Familiar with the Workspace15
2dabThe Browser lists folders, experiments, andexperimental elements in a hierarchical view,provides an interface for setting upexperiments, and contains a current tubepointer (c) indicating the tube for whichacquisition or analysis data will be shown.Only one experiment can be open at a time.In an open experiment, you can add, rename,or copy elements, and record or display data.c316Click a button on the Browser toolbar (a) toadd elements to the Browser. To display fewerexperiments, enter a term in the search field(b) and click the Find button (d).The Acquisition Dashboard contains controls for setting up, starting, andmonitoring data acquisition and recording. Basic controls are always shown.Acquisition setup and status information can be hidden or shown by right-clickinganywhere on the Dashboard (except for buttons and fields or in Basic Controls) todisplay the Show/Hide menu and making your selection. Your Dashboard mightcontain more controls than those shown depending on your cytometer type andoptions.Getting Started with BD FACSDiva Software
4The Cytometer window shows cytometerconnectivity status. When you are connected to acytometer, the window also shows statusmessages. If an experiment is open and thecurrent tube pointer is set, the window displayscytometer settings for the current acquisitiontube and laser controls.Additional controls might be displayed in thiswindow depending on the cytometer you arerunning; refer to your cytometer manual for adescription.5Use the Inspector to view or modifythe attributes of one or more objectsin the worksheet or Browser. Thecontents of the Inspector changedepending on what is selected. Forexample, this Inspector shows plotoptions.Becoming Familiar with the Workspace17
6The Worksheet window is where you create global or normal worksheetscontaining plots, gates, statistics, and custom text.Plots on a global worksheet show data for only one tube at a time, the tube that isselected with the current tube pointer. These worksheets are indicated by greentabs (a). Plots on a normal worksheet are tube-specific. These worksheets areindicated by tabs that are white when active and gray when inactive.Click the Worksheets view button on the Worksheet toolbar (b) to switch betweenglobal or normal worksheets. Then you can create analysis objects or free text oralign objects on a worksheet.baUnlike other workspace windows, theBiexponential Editor is hidden by default. Whenyou are using automatic scaling, there is no needto show the Biexponential Editor.Use the Biexponential Editor to manually adjustbiexponential scales, export and import scalevalues, and apply values to other elements in anexperiment.18Getting Started with BD FACSDiva Software
Using Administrative OptionsIf you have administrator privileges, BD FACSDiva software allows you to createuser names that can be password-protected. Experiments, workspace setup, anduser preferences are saved with your login name. After login, other users cannotview your experiments unless they have administrative access, or you havedesignated an experiment as shared.The following tutorials describe how to add an administrator password and create anew user, and show how workspace setup, user preferences, and the Browser viewdiffer from one user to another.Adding an Administrator PasswordWhen you first log into the software, no administrator password is required.BD Biosciences recommends that you protect your administrator account byassigning a password.1 Log into the software as Administrator, if necessary.2 Choose File Administration.3 Enter a password of 1–16 alphanumeric characters in the Password field.Using Administrative Options19
4 Confirm the password by typing it again.5 Enter your name, initials, and institution if you would like.For instructions on adding institution names to the menu, see step 8 underCreating a New User.6 Click Save.; Tip20Keep a copy of your password in a secure location in case you forget it.Getting Started with BD FACSDiva Software
Creating a New User1 Log into the software as Administrator, if necessary.Enter the password you defined in the previous section and click OK.2 Choose File Administration.3 In the Account Administration dialog, click Add.4 Select the generic name in the User Name field, and enter JoeSmith.new nameUser names can consist of 4–20 alphanumeric characters. Spaces are notallowed.5 Press the Tab key or click in the next field; enter 1234 for the password.6 Confirm the password by typing 1234 in the Confirm field.Using Administrative Options21
7 (Optional) Enter Joe Smith for Full Name, and JS for Initials.This information is not required; you can leave the fields blank.8 (Optional) To add an institution, click the “ ” button next to theInstitution menu:buttonThe Institution dialog appears. In the Institutions dialog, click Add. Select Institute1 in the Name field, enter CompanyName, and pressReturn; click OK to dismiss the Institutions dialog.Institution names can be 1–20 alphanumeric characters. Spaces are notallowed. 22Choose CompanyName from the Institution menu in the AccountAdministration dialog.Getting Started with BD FACSDiva Software
9 (Optional) To add a custom field to the user profile, enter the name inCustom Field Name, then enter the value associated with that field inCustom Field Default.A new field with a drop-down menu is displayed under the Institution fieldwith the custom name and value that you entered. For example, if youentered “Account Number” in Custom Field Name and “10-21A” inCustom Field Default, the new field is called Account Number and displays10-21A as the value in the drop-down menu.Using Administrative Options23
Custom Field NameCustom FieldDefault Value10 Leave the Access Type as Operator, and the Account Access as Enabled.Change the Access Type to Administrator only when you want to providethe selected user with administrative privileges. Administrators can createand disable users, view all users’ experiments, and edit cytometerconfigurations.Change the Account Access to Disabled only when you want to disable auser’s login name.11 Under Access Privileges, click to deselect all options except FSC AreaScaling and Edit Diva Setups.24Getting Started with BD FACSDiva Software
You can limit which setting(s) a user can edit by clicking to deselect thecorresponding checkbox. In this example, Joe Smith will be able to editFSC area scaling settings and Diva Setups.For more information about these settings, refer to the BD FACSDivaSoftware Reference Manual or your cytometer manual.12 Click Save to add the new user.JoeSmith will be available as a login name the next time you log into thesoftware, as you will see in the next section.; TipTo transfer user profiles to another computer, select the user(s) you want toexport and click Export. Save the exported file. Copy the saved file to the othercomputer and click Import in the Account Administration dialog. All definedprofiles will be imported.Viewing User-Specific ChangesAlong with experiments, workspace setup and user preferences are saved withyour login name, as you will see in this section.1 Choose File Log Out.2 Log into the software as JoeSmith.3 Choose Edit User Preferences.4 Click the Gates tab and change the default preferences to the following:Using Administrative Options25
5 Click OK to dismiss the User Preferences dialog.6 Click buttons on the workspace toolbar to hide the Worksheet window andthe Inspector.InspectorWorksheet7 Drag the Cytometer window on top of the Browser and resize theBD FACSDiva workspace so it is half the width it is now.8 Choose File Log Out.9 Log into the software as Administrator.As the cytometer connects, notice that the window changes to the size itwas previously, and that the five main workspace windows are now shown.10 Choose Edit User Preferences, click the Gates tab, and note that thepreferences are back to the default options of no color.26Getting Started with BD FACSDiva Software
11 Click OK to dismiss the User Preferences dialog.12 Log out and then back into the software as JoeSmith.Notice how your workspace setup and preferences revert to how they werepreviously set when you were logged in as JoeSmith.13 To restore the workspace to its default size and windows to their defaultpositions, choose View Reset Positions.Click the Inspector and Worksheet buttons to show their windows, if youlike.14 Log out and then back into the software as Administrator.Using Administrative Options27
Deleting a UserNext, delete JoeSmith as a user name. User names can be deleted as long as theydo not have experiments in the Browser. Once a user has experiments, you caneither disable the user name or delete their experiments and then delete the username. Refer to the BD FACSDiva Software Reference Manual for details.Only those designated as Administrators can delete or disable other users.1 Choose File Administration.2 Select JoeSmith in the list of users and click Delete.CompanyName3 Click Save to save your changes and dismiss the dialog.4 (Optional) Log out and then back into the software and verify thatJoeSmith is not available as a login name.28Getting Started with BD FACSDiva Software
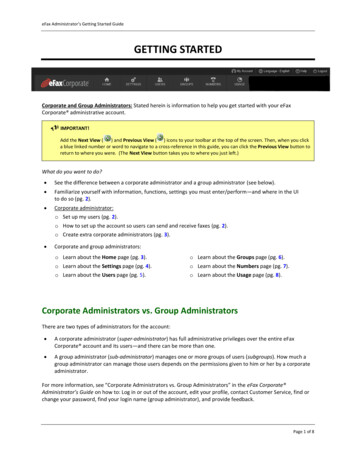
Creating and Working with ExperimentsAn experiment is a group of elements used to acquire and analyze data from theflow cytometer. You build experiments as you acquire and analyze data. TheBrowser is where you create experiments and access stored data.There are three ways to add experiments to the Browser. Use the New Experiment button ( ) on the Browser toolbar to create anew default experiment. The button can be customized to use anyexperiment template that has been defined by going to User Preferences Templates. See Assigning Default Templates on page 44. Use the Experiment New Experiment command to create a newexperiment based on a saved template with customized elements such asplots, gates, statistics views, and cytometer settings. Use the File Import Experiments command to access experimentelements and data from an archived experiment.The following tutorials describe how to use each of these commands and how towork with the resulting experiments in the Browser. You must be connected tothe cytometer to use some of the features in this section. If needed, start yourcytometer and log into the software before proceeding.Creating a Folder and an ExperimentThis section describes how to create a practice folder and an experimentcontaining basic analysis elements.1 Click the New Folder button () on the Browser toolbar.2 Rename the folder Practice.To rename any Browser object, select it in theBrowser and start typing. Press Enter to apply thenew name.new folderCreating and Working with Experiments29
Notice that the folder
Using Tethering and Batch Analysis, Gating Multicolor Experiments, Setting Up Compensation Controls. New: Changing Browser Button Defaults, Using Biexponential Display. 640744 Rev A 05/06 Updated for version 5.0; see the New Features section for details. Modified: Becoming Familiar with the Workspace, Using Administrative Options, Using