Transcription
Excel Add-inInstallation & User Guide
ContentsPre-requisites . 1Installation . 2Settings . 4Using the Excel Add-in . 5Copyright . 7
Pre-requisites If you are a local installation you must have SSL installed on the Bromcom server. If you need support settingthis up contact the HelpdeskYou must have Microsoft Excel installed on your machineYou need Administrator rights to install the Add-inYou will need to make sure you have the correct Permissions to use the Excel Add-in to check this.Open the MIS and go to Config Setup Roles and Permissions and select the Role you want to amend and click Edit.Select the Reporting option from the Module dropdown, look for the Excel Add-in option and tick this and click Save.All Users with this Role will now be able to access the Excel Add-in option. Repeat this for other Roles if required.1Excel Add-in Installation & User Guide
InstallationLogin to the MIS, click on your Image in the top right hand corner of the page. From the dropdown menu selectVersions.At top right of this page under Download Client Installers you will see click on the Excel Add-in Installer (32-bit or64-bit) link to download the Installer.This will download the Installer, access the File from your downloads (this may be different depending on whichbrowser you use) and double click on it to start the Installation.2Excel Add-in Installation & User Guide
The Installer will be verified, when done click on the Install button.The Installer will begin the Installation.When complete close the Installer.The installer will now installed the files needed for the Add-in.3Excel Add-in Installation & User Guide
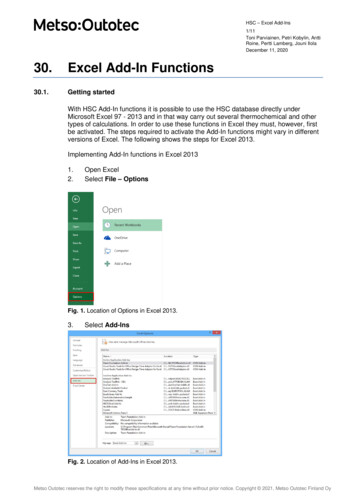
SettingsNow open up Excel and click on the Add-ins tab at the top of the page and then click on the Settings button on theleft.You now need to fill out the highlighted details for your Connection Settings and click the OK button. This will retainthe Connections Settings information you just entered.URL – This will be cloudmis.bromcom.com if you are a Cloud User or the name of your Server if you are a LocalInstallation.School ID – This is your unique Bromcom Site Number. Your Administrator will know what this is or contact theBromcom Helpdesk.Username and Password – Enter your Username and Password.You can now use the Excel Add-in.4Excel Add-in Installation & User Guide
Using the Excel Add-inDestination Sheet – This gives you the option to choose which sheet to Export the Data to and which Cell to start in.Source Domain – From this dropdown you can choose which Domain you want data from.Currently you can choose from Assessment Results, Behaviour Events, Exam Results, Single Central Recordsfor External Staff, Support Staff or Teaching Staff, Student Actions, Student Groups, Students, TermlyAttendance and several Finance options.Filters – The Filters option allows you to add Filters to narrow down the data that is Exported into the sheet, just clickthe Add button and select from the dropdown list.Once these have been selected click on the Save button.You will notice that when clicking Save the Sheets you selected from the Destination Sheet option will display in theConfigured Sheets panel on the left. These can be removed are added by clicking on the Delete button with the Sheetselected. When finished click the OK button.5Excel Add-in Installation & User Guide
After clicking OK you will be returned to a blank worksheet. Click on the Refresh Data button.The Add-in will now Import the selected data into one or more worksheets.If you have any questions or queries regarding the installation or operation of the Excel Add-In please contact theHelpdesk.6Excel Add-in Installation & User Guide
CopyrightThis document and the software described in it are copyrighted with all rights reserved. Under copyright laws, neitherthe documentation nor the software may be reproduced, copied, translated, or reduced to any electronic medium ormachine-readable form, without prior written consent from Bromcom Computers Plc. Failure to comply with thiscondition may result in prosecution.This computer program is the intellectual property of Bromcom Computers Plc. The program is protected undercopyright law and is licensed for use only by the user who has subscribed as a customer of Bromcom Computers Plc.Sale, lease, hire rental or re-assignment to, or by, a third party without the prior and written permission of BromcomComputers is prohibited.Disclaimer: Bromcom's policy is one of constant development and improvement. We reserve the right to alter, modify,correct and upgrade our software programs and publications without notice and without incurring liability.Copyright:Bromcom Computers PlcRutland House,44 Masons HillBromleyKentBR2 9JGUnited KingdomWeb: www.bromcom.com (Main Site)https://support.bromcom.com (Users Site)Tel: (Helpdesk) 44 (0) 20 8290 7177Note: ToJune 20207Excel Add-in Installation & User Guide
Excel Add-in Installation & User Guide 2 Installation Login to the MIS, click on your Image in the top right hand corner of the page. From the dropdown menu select Versions. At top right of this page under Download Client Installers you will see click on the Excel Add-in Installer (32-bit or 64-bit) link to download the Installer. This will download the Installer, access the File from your .