Transcription
CubeXTM3D printerUser guideSee inside for use and safety information.
INTRODUCTIONCopyright . . . . . . . . . . . . . . . . . . . . . . . . . . . . . . . . . . . . . . . . . . . . . . . . . . . . . . . . . . . . . . . . . . . . . . . . . . . . . . . . . . . . . . . . . . . . . . . . . . . . . . . . . . . . . . . 3FCC notice . . . . . . . . . . . . . . . . . . . . . . . . . . . . . . . . . . . . . . . . . . . . . . . . . . . . . . . . . . . . . . . . . . . . . . . . . . . . . . . . . . . . . . . . . . . . . . . . . . . . . . . . . . . . . . 3Warranty . . . . . . . . . . . . . . . . . . . . . . . . . . . . . . . . . . . . . . . . . . . . . . . . . . . . . . . . . . . . . . . . . . . . . . . . . . . . . . . . . . . . . . . . . . . . . . . . . . . . . . . . . . . . . . . 3Limitation of liability . . . . . . . . . . . . . . . . . . . . . . . . . . . . . . . . . . . . . . . . . . . . . . . . . . . . . . . . . . . . . . . . . . . . . . . . . . . . . . . . . . . . . . . . . . . . . . . . . . . . . . . 3IMPORTANT SAFETY INFORMATIONSafety symbols and definitions . . . . . . . . . . . . . . . . . . . . . . . . . . . . . . . . . . . . . . . . . . . . . . . . . . . . . . . . . . . . . . . . . . . . . . . . . . . . . . . . . . . . . . . . . . . . . . 4Safety guidelines . . . . . . . . . . . . . . . . . . . . . . . . . . . . . . . . . . . . . . . . . . . . . . . . . . . . . . . . . . . . . . . . . . . . . . . . . . . . . . . . . . . . . . . . . . . . . . . . . . . . . . . . . 4CUBEX 3D PRINTER FEATURES AND BENEFITSCubeX 3D printer properties . . . . . . . . . . . . . . . . . . . . . . . . . . . . . . . . . . . . . . . . . . . . . . . . . . . . . . . . . . . . . . . . . . . . . . . . . . . . . . . . . . . . . . . . . . . . . . . . 5Print materials . . . . . . . . . . . . . . . . . . . . . . . . . . . . . . . . . . . . . . . . . . . . . . . . . . . . . . . . . . . . . . . . . . . . . . . . . . . . . . . . . . . . . . . . . . . . . . . . . . . . . . . . . . . 5Material color choices . . . . . . . . . . . . . . . . . . . . . . . . . . . . . . . . . . . . . . . . . . . . . . . . . . . . . . . . . . . . . . . . . . . . . . . . . . . . . . . . . . . . . . . . . . . . . . . . . . . . . 5At a glance . . . . . . . . . . . . . . . . . . . . . . . . . . . . . . . . . . . . . . . . . . . . . . . . . . . . . . . . . . . . . . . . . . . . . . . . . . . . . . . . . . . . . . . . . . . . . . . . . . . . . . . . . . . . . . 6Requirements for your CubeX . . . . . . . . . . . . . . . . . . . . . . . . . . . . . . . . . . . . . . . . . . . . . . . . . . . . . . . . . . . . . . . . . . . . . . . . . . . . . . . . . . . . . . . . . . . . . . . 7UNPACKING AND SETTING UP THE CUBEXWhat’s included . . . . . . . . . . . . . . . . . . . . . . . . . . . . . . . . . . . . . . . . . . . . . . . . . . . . . . . . . . . . . . . . . . . . . . . . . . . . . . . . . . . . . . . . . . . . . . . . . . . . . . . . . . 7Unpacking your CubeX . . . . . . . . . . . . . . . . . . . . . . . . . . . . . . . . . . . . . . . . . . . . . . . . . . . . . . . . . . . . . . . . . . . . . . . . . . . . . . . . . . . . . . . . . . . . . . . . . . . 8-9Activate your CubeX and link to your Cubify account . . . . . . . . . . . . . . . . . . . . . . . . . . . . . . . . . . . . . . . . . . . . . . . . . . . . . . . . . . . . . . . . . . . . . . . . . . . . 10Removing the remaining packing materials . . . . . . . . . . . . . . . . . . . . . . . . . . . . . . . . . . . . . . . . . . . . . . . . . . . . . . . . . . . . . . . . . . . . . . . . . . . . . . . . . . . . 11CubeX main menu overview . . . . . . . . . . . . . . . . . . . . . . . . . . . . . . . . . . . . . . . . . . . . . . . . . . . . . . . . . . . . . . . . . . . . . . . . . . . . . . . . . . . . . . . . . . . . . . . 12Installing the Print Pad . . . . . . . . . . . . . . . . . . . . . . . . . . . . . . . . . . . . . . . . . . . . . . . . . . . . . . . . . . . . . . . . . . . . . . . . . . . . . . . . . . . . . . . . . . . . . . . . . . . . 13Checking the XYZ axis . . . . . . . . . . . . . . . . . . . . . . . . . . . . . . . . . . . . . . . . . . . . . . . . . . . . . . . . . . . . . . . . . . . . . . . . . . . . . . . . . . . . . . . . . . . . . . . . . . . 13Checking the Z-gap between the Print Jet tip and the Print Pad . . . . . . . . . . . . . . . . . . . . . . . . . . . . . . . . . . . . . . . . . . . . . . . . . . . . . . . . . . . . . . . . . . . . 14Installing Material Cartridge . . . . . . . . . . . . . . . . . . . . . . . . . . . . . . . . . . . . . . . . . . . . . . . . . . . . . . . . . . . . . . . . . . . . . . . . . . . . . . . . . . . . . . . . . . . . . . 14-15Replacing a Material Cartridge . . . . . . . . . . . . . . . . . . . . . . . . . . . . . . . . . . . . . . . . . . . . . . . . . . . . . . . . . . . . . . . . . . . . . . . . . . . . . . . . . . . . . . . . . . . 15-16Create a test print . . . . . . . . . . . . . . . . . . . . . . . . . . . . . . . . . . . . . . . . . . . . . . . . . . . . . . . . . . . . . . . . . . . . . . . . . . . . . . . . . . . . . . . . . . . . . . . . . . . . . . . 16INSTALL YOUR CUBIFY INVENT SOFTWARE . . . . . . . . . . . . . . . . . . . . . . . . . . . . . . . . . . . . . . . . . . . . . . . . . . . . . . . . . . . . . . . . . . . . . . . 17DOWNLOADING AND INSTALLING CUBEX SOFTWARE . . . . . . . . . . . . . . . . . . . . . . . . . . . . . . . . . . . . . . . . . . . . . . . . . . . . . . . . . . 17-18CubeX software overview . . . . . . . . . . . . . . . . . . . . . . . . . . . . . . . . . . . . . . . . . . . . . . . . . . . . . . . . . . . . . . . . . . . . . . . . . . . . . . . . . . . . . . . . . . . . . . . 18-19CubeX software user interfaceHome Tab . . . . . . . . . . . . . . . . . . . . . . . . . . . . . . . . . . . . . . . . . . . . . . . . . . . . . . . . . . . . . . . . . . . . . . . . . . . . . . . . . . . . . . . . . . . . . . . . . . . . . . . . . . . 19View Tab . . . . . . . . . . . . . . . . . . . . . . . . . . . . . . . . . . . . . . . . . . . . . . . . . . . . . . . . . . . . . . . . . . . . . . . . . . . . . . . . . . . . . . . . . . . . . . . . . . . . . . . . . . . . 20Settings Tab . . . . . . . . . . . . . . . . . . . . . . . . . . . . . . . . . . . . . . . . . . . . . . . . . . . . . . . . . . . . . . . . . . . . . . . . . . . . . . . . . . . . . . . . . . . . . . . . . . . . . . . . . 20CREATION FILE PREPARATION & PRINTING YOUR CREATIONSHow to open files in the CubeX software . . . . . . . . . . . . . . . . . . . . . . . . . . . . . . . . . . . . . . . . . . . . . . . . . . . . . . . . . . . . . . . . . . . . . . . . . . . . . . . . . . . 20-21Opening a single part file . . . . . . . . . . . . . . . . . . . . . . . . . . . . . . . . . . . . . . . . . . . . . . . . . . . . . . . . . . . . . . . . . . . . . . . . . . . . . . . . . . . . . . . . . . . . . . . . . . 21Opening multiple single part files . . . . . . . . . . . . . . . . . . . . . . . . . . . . . . . . . . . . . . . . . . . . . . . . . . . . . . . . . . . . . . . . . . . . . . . . . . . . . . . . . . . . . . . . . 21-22Positioning multiple parts . . . . . . . . . . . . . . . . . . . . . . . . . . . . . . . . . . . . . . . . . . . . . . . . . . . . . . . . . . . . . . . . . . . . . . . . . . . . . . . . . . . . . . . . . . . . . . . . . . 22Opening a multi-part assembly file . . . . . . . . . . . . . . . . . . . . . . . . . . . . . . . . . . . . . . . . . . . . . . . . . . . . . . . . . . . . . . . . . . . . . . . . . . . . . . . . . . . . . . . . 22-23Using the shell selector tool . . . . . . . . . . . . . . . . . . . . . . . . . . . . . . . . . . . . . . . . . . . . . . . . . . . . . . . . . . . . . . . . . . . . . . . . . . . . . . . . . . . . . . . . . . . . . . . . 23Rotating a part . . . . . . . . . . . . . . . . . . . . . . . . . . . . . . . . . . . . . . . . . . . . . . . . . . . . . . . . . . . . . . . . . . . . . . . . . . . . . . . . . . . . . . . . . . . . . . . . . . . . . . . . . . 24Scaling a part . . . . . . . . . . . . . . . . . . . . . . . . . . . . . . . . . . . . . . . . . . . . . . . . . . . . . . . . . . . . . . . . . . . . . . . . . . . . . . . . . . . . . . . . . . . . . . . . . . . . . . . . . . . 24Using the CubeX software to build a .cubex file . . . . . . . . . . . . . . . . . . . . . . . . . . . . . . . . . . . . . . . . . . . . . . . . . . . . . . . . . . . . . . . . . . . . . . . . . . . . . . 24-25Saving a .cubex file for printing . . . . . . . . . . . . . . . . . . . . . . . . . . . . . . . . . . . . . . . . . . . . . . . . . . . . . . . . . . . . . . . . . . . . . . . . . . . . . . . . . . . . . . . . . . . . . 25Printing your creation . . . . . . . . . . . . . . . . . . . . . . . . . . . . . . . . . . . . . . . . . . . . . . . . . . . . . . . . . . . . . . . . . . . . . . . . . . . . . . . . . . . . . . . . . . . . . . . . . . . . . 25FINISHING YOUR CREATIONRemoving your creation from the Print Pad . . . . . . . . . . . . . . . . . . . . . . . . . . . . . . . . . . . . . . . . . . . . . . . . . . . . . . . . . . . . . . . . . . . . . . . . . . . . . . . . . . . . 26Removing rafts . . . . . . . . . . . . . . . . . . . . . . . . . . . . . . . . . . . . . . . . . . . . . . . . . . . . . . . . . . . . . . . . . . . . . . . . . . . . . . . . . . . . . . . . . . . . . . . . . . . . . . . . . 26Removing supports with wire cutters . . . . . . . . . . . . . . . . . . . . . . . . . . . . . . . . . . . . . . . . . . . . . . . . . . . . . . . . . . . . . . . . . . . . . . . . . . . . . . . . . . . . . . . . . 261
Removing supports with the Ultrasonic Support Removal Tank . . . . . . . . . . . . . . . . . . . . . . . . . . . . . . . . . . . . . . . . . . . . . . . . . . . . . . . . . . . . . . . . . . . . 27Hot water method . . . . . . . . . . . . . . . . . . . . . . . . . . . . . . . . . . . . . . . . . . . . . . . . . . . . . . . . . . . . . . . . . . . . . . . . . . . . . . . . . . . . . . . . . . . . . . . . . . . . . 27Caustic soda method . . . . . . . . . . . . . . . . . . . . . . . . . . . . . . . . . . . . . . . . . . . . . . . . . . . . . . . . . . . . . . . . . . . . . . . . . . . . . . . . . . . . . . . . . . . . . . . . . . 28CUBEX MAINTENANCERestoring roughness to the Print Pad . . . . . . . . . . . . . . . . . . . . . . . . . . . . . . . . . . . . . . . . . . . . . . . . . . . . . . . . . . . . . . . . . . . . . . . . . . . . . . . . . . . . . . . . 29Leveling the Jet Wiper height . . . . . . . . . . . . . . . . . . . . . . . . . . . . . . . . . . . . . . . . . . . . . . . . . . . . . . . . . . . . . . . . . . . . . . . . . . . . . . . . . . . . . . . . . . . . . . 29Leveling the Aluminum Print Plate . . . . . . . . . . . . . . . . . . . . . . . . . . . . . . . . . . . . . . . . . . . . . . . . . . . . . . . . . . . . . . . . . . . . . . . . . . . . . . . . . . . . . . . . . 29-30Fine-tuning your Print Pad . . . . . . . . . . . . . . . . . . . . . . . . . . . . . . . . . . . . . . . . . . . . . . . . . . . . . . . . . . . . . . . . . . . . . . . . . . . . . . . . . . . . . . . . . . . . . . . . . 31Unblocking the CubeX Print Jet tip . . . . . . . . . . . . . . . . . . . . . . . . . . . . . . . . . . . . . . . . . . . . . . . . . . . . . . . . . . . . . . . . . . . . . . . . . . . . . . . . . . . . . . . . . . 31Unblocking the CubeX Print Jet . . . . . . . . . . . . . . . . . . . . . . . . . . . . . . . . . . . . . . . . . . . . . . . . . . . . . . . . . . . . . . . . . . . . . . . . . . . . . . . . . . . . . . . . . . . . . 31Setting the Print Jet gap . . . . . . . . . . . . . . . . . . . . . . . . . . . . . . . . . . . . . . . . . . . . . . . . . . . . . . . . . . . . . . . . . . . . . . . . . . . . . . . . . . . . . . . . . . . . . . . . 31-32Updating CubeX firmware . . . . . . . . . . . . . . . . . . . . . . . . . . . . . . . . . . . . . . . . . . . . . . . . . . . . . . . . . . . . . . . . . . . . . . . . . . . . . . . . . . . . . . . . . . . . . . . 32-34Restoring the settings your CubeX 3D printer firmware from v1.01 . . . . . . . . . . . . . . . . . . . . . . . . . . . . . . . . . . . . . . . . . . . . . . . . . . . . . . . . . . . . . . . . . 34How to contact Cubify support . . . . . . . . . . . . . . . . . . . . . . . . . . . . . . . . . . . . . . . . . . . . . . . . . . . . . . . . . . . . . . . . . . . . . . . . . . . . . . . . . . . . . . . . . . . . . . 34Setting up the CubeX Print Jet offsets . . . . . . . . . . . . . . . . . . . . . . . . . . . . . . . . . . . . . . . . . . . . . . . . . . . . . . . . . . . . . . . . . . . . . . . . . . . . . . . . . . . . . . 34-352
INTRODUCTIONThank you for purchasing the CubeX 3D Printer. This printer enables everybody in the family to express their creativity likenever before. With eighteen different material colors to choose from, enjoy the freedom to print in color or mix it up.CubeX 3D Printer’s ready-to-print technology, provides a new dimension to your imagination and helps you share yourcreations with others in the Cubify community at Cubify.com. At Cubify.com you can: Upload your creations for sale Purchase creations from others Get your creations 3D printed and shipped to you Buy the CubeX 3D Printer and CubeX Cartridges Engage with other creative partnersCOPYRIGHT 2013 by 3D Systems, Inc. All rights reserved. This document is subject to change without notice. This document is copyrighted and containsproprietary information that is the property of 3D Systems, Inc. Cubify, CubeX, and the 3D Systems logo are registered trademarks of 3D Systems, Inc.Use of the Cubify.com website constitutes acceptance of its Terms of Service and Privacy Policy.FCC NOTICEThis equipment has been tested and found to comply with the limits for a class “B” digital device, pursuant to Part 15 of the FCC Rules. These limitsare designed to provide reasonable protection against harmful interference. This equipment generates, uses, and can radiate radio frequency energyand, if not installed and used in accordance with the instruction manual, may cause harmful interference to radio communications. Operation ofthis equipment in a residential area is likely to cause harmful interference in which case the user will be required to correct the interference at theirexpense.WARRANTY3D Systems warrants that the CubeX 3D Printer will be free from defects in materials and workmanship, during the applicable warranty period, whenused under the normal conditions described in the documentation provided to you, including this User Guide. 3D Systems will promptly repair orreplace the CubeX 3D Printer, if required, to make it free of defects during the warranty period. This warranty excludes (i) normal consumable orexpendable parts (such as Material Cartridges), (ii) repairs required during the warranty period because of abnormal use or conditions (such as riots,floods, misuse, neglect or improper service by anyone except 3D Systems or its authorized service provider), and (iii) repairs required during thewarranty period because of the use of non-integrated, non-approved or non-licensed materials with the CubeX 3D Printer. The warranty period for theCubeX 3D printer is the shorter of (i) 90 days from the date your CubeX 3D printer is activated or (ii) 24 months after the CubeX 3D Printer is shippedfrom 3D Systems to the end customer or intermediary. For consumers who are covered by consumer protection laws or regulations in their country ofpurchase or, if different, their country of residence, the benefits conferred by our ninety (90) day warranty are in addition to, and operate concurrentlywith, all rights and remedies conveyed by such consumer protection laws and regulations, including but not limited to these additional rights.THIS WARRANTY IS THE ONLY WARRANTY PROVIDED FOR THE CUBEX 3D PRINTER. TO THE MAXIMUM EXTENT PERMITTED BY LAW, 3DSYSTEMS EXPRESSLY DISCLAIMS ALL OTHER WARRANTIES FOR THE CUBEX 3D PRINTER AND EACH OF ITS COMPONENTS, WHETHERTHOSE WARRANTIES ARE EXPRESS, IMPLIED OR STATUTORY, INCLUDING WARRANTIES OF MERCHANTABILITY AND FITNESS FORINTENDED OR PARTICULAR PURPOSES.LIMITATION OF LIABILITY3D SYSTEMS WILL NOT BE RESPONSIBLE FOR INDIRECT, SPECIAL, CONSEQUENTIAL, EXEMPLARY OR INCIDENTAL DAMAGES (SUCH ASLOSS OF PROFIT OR EMPLOYEE’S TIME) REGARDLESS OF THE REASON. IN NO EVENT SHALL THE LIABILITY AND/OR OBLIGATIONS OF3D SYSTEMS ARISING OUT OF THE PURCHASE, LEASE, LICENSE AND/OR USE OF THE EQUIPMENT BY YOU OR OTHERS EXCEED THEPURCHASE PRICE OF THE CUBEX 3D PRINTER.3
IMPORTANT SAFETY INFORMATIONSAFETY SYMBOLS AND DEFINITIONSHot Surface Hazard: A hot surface is accessible in the vicinity of this sign or at the Print Jet; avoid contact. Hotsurfaces can cause severe burns.!Caution: Indicates something may happen that could cause loss of data, damage to equipment, or could causepersonal injury.Caution: Indicates a pinch point hazard that could cause person injury.SAFETY GUIDELINES Follow all safety rules in this section and observe all cautions and warnings in this guide. Do not modify any safety features or make modifications to the CubeX. Doing so is prohibited and voids the warranty. Use of print materials other than genuine 3D Systems components may void the warranty. Adult supervision is required; observe children closely and intervene as necessary to prevent potential safety problems andensure the CubeX’s appropriate use. Ensure small 3D prints are not accessible to young children. 3D prints are potential chokinghazards for young children. When the CubeX is operating, the tip of the material dispenser (Print Jet) becomes hot; avoid touching this area until it hascooled down.4
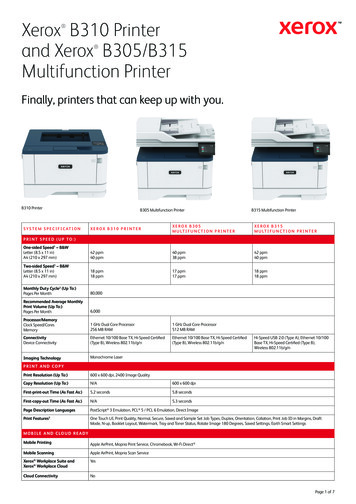
CUBEX 3D PRINTER FEATURES AND BENEFITSThe CubeX 3D Printer creates the model by pulling filament from the cartridge through the print jets via the delivery tubes.The filament is then jetted through the print jet tip in a thin string of molten plastic. The print jet movement is coordinatedby the print plate, which lowers incrementally after each layer is deposited so a new layer can be drawn on top of the last,building the part up.CUBEX 3D PRINTER PROPERTIES Plastic Jet Printing technology Houses up to three print jets for multi-color and multi-material prints Choice between ABS and PLA plastic, both recyclable Prints objects up to 275 x 265 x 240 mm (10.75”x10.5”x9.5”) EZ load print cartridge Fully automated supports: peel off supports for ABS and PLA; PLA supports can also be removed using the UltrasonicSupport Removal Tank available at Cubify.com/cubex/store parts.aspxPRINT MATERIALSThe CubeX can use two different types of print materials: PLA and ABS. Each material has unique benefits and you canguide your selection based on the properties your part requires.PLAThis is a hard plastic that has a low environmental impact. It is derived from renewable, starch-basedresources.We recommend using PLA when printing extra-large parts on CubeX as it is a more stable printmaterial.PLA is the optimal support material for industrial ABS parts. PLA has the ability to dissolve away incaustic soda solutions supported by an ultra-sonic tank. (see page 36 for more information)ABSThis is a well-known plastic known for its strength and industrial properties.As a build material, ABS is good for both small and large parts.ABS works as an excellent support material for extra-large PLA parts.MATERIAL COLOR CHOICESGlow-in-thedark NeonGreenGlow-in-thedark NeonBlueWhiteBlackSilverIndustrial GreyNatural*MagentaRedNeon OrangeTanYellowNeon GreenGreenBlueTealPurpleBrown* Natural is only available in PLA plastic, not ABS.5
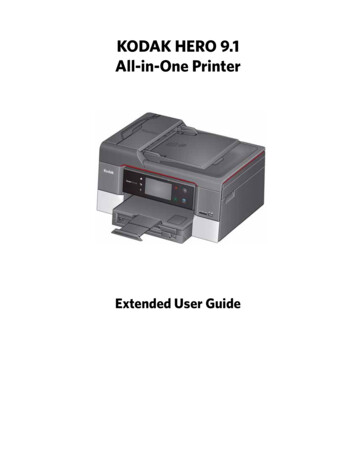
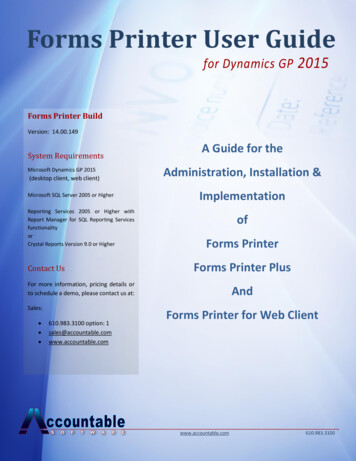
AT A GLANCEGet acquainted with your CubeX 3D Printer before you begin printing. This section identifies the important areas that will bediscussed throughout this guide.CubeX Duo is depicted for illustration purposes only. Locations of important areas are the same for the Cube X and Cube XTrio.ABHIJUnderneath top coverCDEFFrontHIJKLMTop area, inside printerGNBottomOPBottom area, inside printerATouchscreenIPrint Jet 2BFunction buttonJPrint Jet 3CJet WiperKPrint Jet Tip 1DZ-axisLPrint Jet Tip 2EPrint Pad & Print PlateMPrint Jet Tip 3FMemory stick USB port and PC connection USB portNMaterial Cartridge Bay 1 (for Print Jet 1)GPower supplyOMaterial Cartridge Bay 2 (for Print Jet 2)HPrint Jet 1PMaterial Cartridge Bay 3 (for Print Jet 3)6
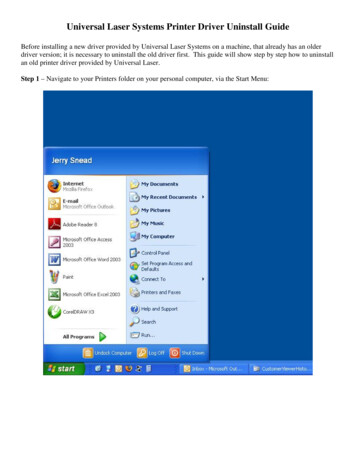
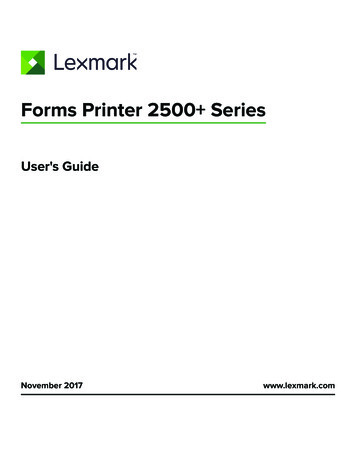
REQUIREMENTS FOR YOUR CUBEXWeight and dimensions:PC requirements: 515mm (w) x 515mm (l) x 598mm (h) (20 ¼” x 20¼” x 23 ½” inches) 36kg (79 lbs) 37kg (81.5 lbs) Duo 38kg (84 lbs) Trio Microsoft Windows 7 Microsoft Windows XP (SP3 or higher) Microsoft Windows 8Software: CubeX Client Software, available at Cubify.comMinimum hardware requirements (a PC with theseminimum requirements will be required to run thesoftware):Electrical requirements: 110-240v AC Processor: Multi-core processor - 2GHz or fasterper core System RAM: 2 GB Screen Resolution: 1024x768Material storage (although all polymers degrade with time, thefollowing conditions help ensure that the material remains ofhigh quality): Unpack material only as needed Store material at 10-30 C Use within 12 months of receiptUNPACKING AND SETTING UP THE CUBEXWHAT’S INCLUDEDCubeX printerMaterial cartridgeCubeStick (x2)ToolkitSnipsNeedleWrenchnose pliersPrint PadJet WiperPower cordUSB StickPrint Pad WrenchDrillbit
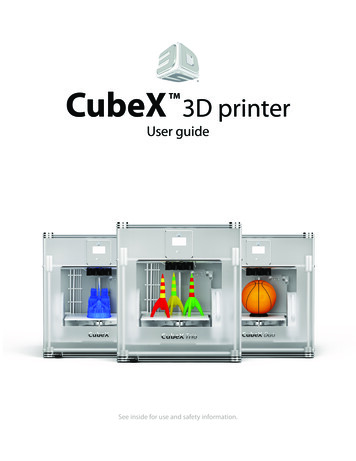
UNPACKING YOUR CUBEX1.Open the box and remove the top acrylic lid located between two layers of foam. Setaside the two foam inserts for future packing. (Fig. 1)Fig. 12.With two people, remove CubeX from the box, lift from the metal frame on both sidesof the printer. Place CubeX on a table. (Fig. 2)Fig. 23.Remove the material cartridges and tool kit from the bottom of box. (Fig. 3)Fig. 34.Using the snips located in the tool kit, cut blue straps away from cardboard. Cut awayall blue zip ties securing the printer carriage. (Fig. 4)Fig. 45.Using the snips, cut away all yellow zip ties securing the foam parts in place.Remove foam packing material. (Fig. 5)Fig. 56.Remove all foam fittings. (Fig. 6)Fig. 68
7.Lift the cardboard piece from the foam package and remove the foam package. Thispackage includes your power cord, Cube Stick glue and the jet wiper. (Fig. 7)Fig. 78.Remove print pad from CubeX. (Fig. 8)Fig. 89.Using the 4 x 100 hex screwdriver (located in tool kit), remove plexiglass Z-Axisguard by unbolting the 4 screws holding it in place and remove plexiglass and bolts.(Fig. 9)Fig. 910. To power on, plug the power cord into the power supply located underneath theprinter base. Lift the right side of the printer to gain access to the power supply. (Fig.10)Fig. 1011. The LED on the control panel should light up indicating the printer has power.Remove the “Warning” label from the touchscreen. (Fig. 11)Fig. 1112. Press the Control button, the CubeX Activation Screen will appear. You will need toregister and activate your CubeX to unlock the printer. (Fig. 12)Fig. 129
ACTIVATE YOUR CUBEX AND LINK TO YOUR CUBIFY ACCOUNTCreating an account on Cubify.com is easy and gives you access to all of the great designs and collections that will driveand inspire your creativity. To create an account, type in Cubify.com in your web browser and click onSign Up to open the registration form. If you already have an account, clickon Log In and provide your User ID and Password. (Fig. 13)Fig. 13 In My Cubify drop down menu, Click on Activate my CubeX. (Fig. 14)Fig. 14 Enter the SERIAL NUMBER; the serial number is located on the interior backwall and on the back of the CubeX frame. (Fig. 15) Enter the CubeX ID; this ID can be found on the upper right corner of theCubeX touchscreen and click ACTIVATE. (Fig. 15)Fig. 15 Congratulation, Your CubeX is now activated in Cubify.com. To unlock yourCubeX, the four digit Activation Code that appears on the screen will beneeded. (Fig. 16) Also, an email will be sent to you with your Activation Code.Click on Marketplace drop down menu and click on Free Files. Downloadthe free creation files to your USB stick or save them on your computer. Enter the Activation ID into your CubeX using the numbers on yourtouchscreen and select the check box (Fig. 17); your CubeX is now unlocked.Make a note of your activation code as this may be required in the future.Click on the check box again to return to the touchscreen menu.Fig. 16Fig. 1710
REMOVING THE REMAINING PACKAGING MATERIALS1.Using left / right arrows on the touch screen, navigate to the MOVE menu. (Fig. 18)Fig. 182.Using the up arrow on the right side of screen, move the print plate up far enough toremove the foam. (Fig. 19)Fig. 193.Remove the last foam piece underneath the build plate. (Fig. 20)Fig. 204.Move the Print Pad all the way down to install the Jet Wiper. (Fig. 21)Fig. 215.To install the Print Wiper, insert the wiper’s two key holes onto the two rods locatedat the back, right side of printer. The wiper’s white plastic piece and spring should befacing the front. (Fig. 22)Fig. 2211
CUBEX MAIN MENU OVERVIEWTOUCHSCREEN Tap on the touchscreen to navigate to the main menus using the arrows on the bottomcorners of the touchscreen. To return to the touch screen, pressing the control button.PRINTINFOPRINT View the .cubex files that are saved on your memory stick and select a .cubex file to print.INFO Provides Material Cartridge status and printing status during the printing process.PJ-MAPPJ-MAP Allows you to re-map your print jets.PJ-CONPJ-CON Allows you to manually jet your print jets, giving you control of temperature and RPM.MOVEMOVE Manually moves your print jet carriage in the X, Y and Z directions.HOMEHOME Sends the print jet carriage to its home position located in the back left corner of the printer.LEVELLEVEL Level your print pad in relation to the print tips.Z GAPZ-GAP Set the distance between the print pad and print tips during the first layer of printing.ZOFFSETOFFSET Set the relative distance between each print tip.!UPDATEDo not use the offset menu unless you have been advised to do so by Cubify support, changing thismay affect the quality of multi-material prints.UPDATE Us
Silver Green Industrial Grey Blue Natural* Teal Magenta Purple Red Brown PLA This is a hard plastic that has a low environmental impact . It is derived from renewable, starch-based resources . We recommend using PLA when printing extra-large parts on CubeX as it is a more stable print material . PLA is the optimal support material for .