Transcription
HPHP LaserJet 1100 Printer User GuideCopyright 1999Hewlett-Packard Co.Printed in USAManual Part No.C4224-90967Printed on at least50% Total Recycled Fiber withat least 10% Post-Consumer 1100UserGuide
HP LaserJet 1100 PrinterUser Guide
Copyright HewlettPackard Company 2002All Rights Reserved.Reproduction,adaptation, or translationwithout prior writtenpermission is prohibited,except as allowed underthe copyright laws.Publication number:C4224-90967Second Edition: January,2002WarrantyTrademark CreditsThe informationcontained in thisdocument is subject tochange without notice.Adobe is a trademark ofAdobe SystemsIncorporated.Hewlett-Packard makesno warranty of any kindwith respect to MS THEIMPLIED WARRANTYOF MERCHANTABILITYAND FITNESS FOR APARTICULARPURPOSE.Hewlett-Packard shall notbe liable for any direct,indirect, incidental,consequential, or otherdamage alleged inconnection with thefurnishing or use of thisinformation.Hewlett-Packard Company11311 Chinden BoulevardBoise, Idaho 83714 U.S.A.CompuServe is a U.S.trademark ofCompuServe, Inc.Windows and WindowsNT are U.S. registeredtrademarks of MicrosoftCorporation.ENERGY STAR is a U.S.registered service markof the U.S. EnvironmentalProtection Agency.
Contents1 Getting to know the printerPrinter features and benefits . . . . . . . . . . . . . . . . . . . . . . . . . . . . . .2Print with excellent quality. . . . . . . . . . . . . . . . . . . . . . . . . . . . .2Save money . . . . . . . . . . . . . . . . . . . . . . . . . . . . . . . . . . . . . . .2Create professional documents . . . . . . . . . . . . . . . . . . . . . . . .2Printer components . . . . . . . . . . . . . . . . . . . . . . . . . . . . . . . . . . . . .3Printer control panel . . . . . . . . . . . . . . . . . . . . . . . . . . . . . . . . .4Printer paper input trays . . . . . . . . . . . . . . . . . . . . . . . . . . . . . .5Printer paper guides . . . . . . . . . . . . . . . . . . . . . . . . . . . . . . . . .5Printer paper output paths . . . . . . . . . . . . . . . . . . . . . . . . . . . .6Printer door . . . . . . . . . . . . . . . . . . . . . . . . . . . . . . . . . . . . . . . .7Choosing paper and other media . . . . . . . . . . . . . . . . . . . . . . . . . .8Loading paper into the printer . . . . . . . . . . . . . . . . . . . . . . . . . . . . .9Specific types. . . . . . . . . . . . . . . . . . . . . . . . . . . . . . . . . . . . . .9Turning the power off . . . . . . . . . . . . . . . . . . . . . . . . . . . . . . . . . .10Voltage conversions . . . . . . . . . . . . . . . . . . . . . . . . . . . . . . . . . . .10Accessing printer properties (driver) and help. . . . . . . . . . . . . . . .11Printer properties (driver) . . . . . . . . . . . . . . . . . . . . . . . . . . . .11Printer online help . . . . . . . . . . . . . . . . . . . . . . . . . . . . . . . . . .12Printing a self-test page. . . . . . . . . . . . . . . . . . . . . . . . . . . . . . . . .132 Printing mediaPrinting transparencies . . . . . . . . . . . . . . . . . . . . . . . . . . . . . . . . .16Printing envelopes. . . . . . . . . . . . . . . . . . . . . . . . . . . . . . . . . . . . .17Printing labels . . . . . . . . . . . . . . . . . . . . . . . . . . . . . . . . . . . . . . . .18Printing letterhead . . . . . . . . . . . . . . . . . . . . . . . . . . . . . . . . . . . . .19Printing cards . . . . . . . . . . . . . . . . . . . . . . . . . . . . . . . . . . . . . . . .20ENContents i
3 Printing tasksPrinting with manual feed . . . . . . . . . . . . . . . . . . . . . . . . . . . . . . .22Printing on both sides of the paper (manual duplexing) . . . . . . . .23Manual duplex using the paper output bin (standard). . . . . . .24Manual duplex (special) heavy-media, card stock . . . . . . . . .25Printing watermarks. . . . . . . . . . . . . . . . . . . . . . . . . . . . . . . . . . . .26Accessing the watermark feature . . . . . . . . . . . . . . . . . . . . . .26Printing multiple pages on a single sheet of paper(N-up printing) . . . . . . . . . . . . . . . . . . . . . . . . . . . . . . . . . . . . . . . .27Accessing the multiple pages per sheet feature . . . . . . . . . . .27Printing booklets . . . . . . . . . . . . . . . . . . . . . . . . . . . . . . . . . . . . . .28Canceling a print job . . . . . . . . . . . . . . . . . . . . . . . . . . . . . . . . . . .30Changing print quality settings . . . . . . . . . . . . . . . . . . . . . . . . . . .31Print using EconoMode (save toner) . . . . . . . . . . . . . . . . . . . . . . .314 Managing the toner cartridgeHP toner cartridges . . . . . . . . . . . . . . . . . . . . . . . . . . . . . . . . . . . .34HP policy on non-HP toner cartridges. . . . . . . . . . . . . . . . . . .34Toner cartridge storage. . . . . . . . . . . . . . . . . . . . . . . . . . . . . .34Toner cartridge life expectancy. . . . . . . . . . . . . . . . . . . . . . . .34Recycling toner cartridges . . . . . . . . . . . . . . . . . . . . . . . . . . .34Saving toner . . . . . . . . . . . . . . . . . . . . . . . . . . . . . . . . . . . . . .34Redistributing toner . . . . . . . . . . . . . . . . . . . . . . . . . . . . . . . . . . . .35Changing the toner cartridge. . . . . . . . . . . . . . . . . . . . . . . . . . . . .365 Troubleshooting the printerFinding the solution . . . . . . . . . . . . . . . . . . . . . . . . . . . . . . . . . . . .38Pages did not print . . . . . . . . . . . . . . . . . . . . . . . . . . . . . . . . .38Pages printed; however . . . . . . . . . . . . . . . . . . . . . . . . . . . . .38Printer light patterns . . . . . . . . . . . . . . . . . . . . . . . . . . . . . . . .39Error messages on screen . . . . . . . . . . . . . . . . . . . . . . . . . . .41Paper handling problems . . . . . . . . . . . . . . . . . . . . . . . . . . . .43Printed page is different than what appeared on screen . . . .44Improving print quality . . . . . . . . . . . . . . . . . . . . . . . . . . . . . . . . . .46Image defect examples. . . . . . . . . . . . . . . . . . . . . . . . . . . . . .46Correcting print defects. . . . . . . . . . . . . . . . . . . . . . . . . . . . . .48Cleaning the printer . . . . . . . . . . . . . . . . . . . . . . . . . . . . . . . . . . . .51Cleaning the toner cartridge area . . . . . . . . . . . . . . . . . . . . . .52Cleaning the printer paper path . . . . . . . . . . . . . . . . . . . . . . .53Clearing printer paper jams . . . . . . . . . . . . . . . . . . . . . . . . . . . . . .54Removing a jammed page . . . . . . . . . . . . . . . . . . . . . . . . . . .55Paper jam: removing torn pieces of paper . . . . . . . . . . . . . . .57Changing the pickup roller . . . . . . . . . . . . . . . . . . . . . . . . . . .58Cleaning the pickup roller . . . . . . . . . . . . . . . . . . . . . . . . . . . .60Resetting the printer . . . . . . . . . . . . . . . . . . . . . . . . . . . . . . . . . . .61iiContentsEN
6 Service and supportAvailability . . . . . . . . . . . . . . . . . . . . . . . . . . . . . . . . . . . . . . . . . . .64Obtaining hardware service. . . . . . . . . . . . . . . . . . . . . . . . . . . . . .64Guidelines for repacking the printer . . . . . . . . . . . . . . . . . . . . . . .65Service information form . . . . . . . . . . . . . . . . . . . . . . . . . . . . . . . .66HP Support . . . . . . . . . . . . . . . . . . . . . . . . . . . . . . . . . . . . . . . . . .67Customer Support and product repair assistance(U.S. and Canada) . . . . . . . . . . . . . . . . . . . . . . . . . . . . . . . . .67European Customer Support Center . . . . . . . . . . . . . . . . . . .68Online services . . . . . . . . . . . . . . . . . . . . . . . . . . . . . . . . . . . .71Obtaining software utilities and electronic information . . . . . .72HP direct ordering for accessories or supplies . . . . . . . . . . . .73HP Support Assistant compact disc . . . . . . . . . . . . . . . . . . . .73HP service information . . . . . . . . . . . . . . . . . . . . . . . . . . . . . .73HP SupportPack . . . . . . . . . . . . . . . . . . . . . . . . . . . . . . . . . . .73HP FIRST . . . . . . . . . . . . . . . . . . . . . . . . . . . . . . . . . . . . . . . .73Worldwide sales and service offices . . . . . . . . . . . . . . . . . . . . . . .75Appendix A Printer specificationsSpecifications . . . . . . . . . . . . . . . . . . . . . . . . . . . . . . . . . . . . . . . .80FCC compliance . . . . . . . . . . . . . . . . . . . . . . . . . . . . . . . . . . . . . .82Environmental Product Stewardship Program . . . . . . . . . . . . . . .83Protecting the Environment. . . . . . . . . . . . . . . . . . . . . . . . . . .83Material safety data sheet . . . . . . . . . . . . . . . . . . . . . . . . . . . . . . .85Regulatory statements . . . . . . . . . . . . . . . . . . . . . . . . . . . . . . . . .86Declaration of Conformity . . . . . . . . . . . . . . . . . . . . . . . . . . . .86Laser safety statement . . . . . . . . . . . . . . . . . . . . . . . . . . . . . .87Canadian DOC regulations . . . . . . . . . . . . . . . . . . . . . . . . . . .87Korean EMI statement . . . . . . . . . . . . . . . . . . . . . . . . . . . . . .87Laser statement for Finland . . . . . . . . . . . . . . . . . . . . . . . . . .88Appendix B Paper specificationsPrinter paper specifications . . . . . . . . . . . . . . . . . . . . . . . . . . . . . .90Supported paper sizes (printer). . . . . . . . . . . . . . . . . . . . . . . . . . .90Guidelines for using paper . . . . . . . . . . . . . . . . . . . . . . . . . . . . . .91Labels . . . . . . . . . . . . . . . . . . . . . . . . . . . . . . . . . . . . . . . . . . .92Transparencies . . . . . . . . . . . . . . . . . . . . . . . . . . . . . . . . . . . .92Envelopes . . . . . . . . . . . . . . . . . . . . . . . . . . . . . . . . . . . . . . . .93Card stock and heavy media . . . . . . . . . . . . . . . . . . . . . . . . .95Appendix C Memory (DIMMs)Installing DIMMs (memory) . . . . . . . . . . . . . . . . . . . . . . . . . . . . . .98Test DIMM installation. . . . . . . . . . . . . . . . . . . . . . . . . . . . . . . . .100Removing DIMMs . . . . . . . . . . . . . . . . . . . . . . . . . . . . . . . . . . . .101ENiii
Appendix D Warranty and licensingHewlett-Packard software license agreement . . . . . . . . . . . . . . .104Hewlett-Packard limited warranty statement . . . . . . . . . . . . . . . .106Limited warranty for toner cartridge life . . . . . . . . . . . . . . . . . . . .108Appendix E Accessories and ordering informationIndexivContentsEN
1Getting to know theprinterThis chapter provides information on the following topics:NoteEN Printer features and benefits Printer components Choosing paper and other media Loading paper into the printer Turning the power off Voltage conversions Accessing printer properties (driver) and help Printing a self-test pageFor installation instructions, see the “HP LaserJet Quick ReferenceGuide” that came with your printer.1
Printer features and benefitsCongratulations on the purchase of your new printer. You can . . .Print with excellent quality Print at 600 dots per inch (dpi) with Resolution Enhancementtechnology (REt).Save money Use EconoMode to save toner. Print on both sides of the paper to save paper (manualduplexing). Print multiple pages on a single sheet of paper to save paper(N-up printing).Create professional documents Protect your documents by using Watermarks such as“confidential.” Print Booklets. This feature enables you to easily print the pagesrequired to create cards or books. Once printed, all you have todo is fold and staple the pages. Print the first page on different paper/media than the followingpages.2 Chapter 1 Getting to know the printerEN
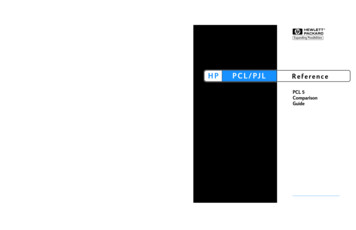
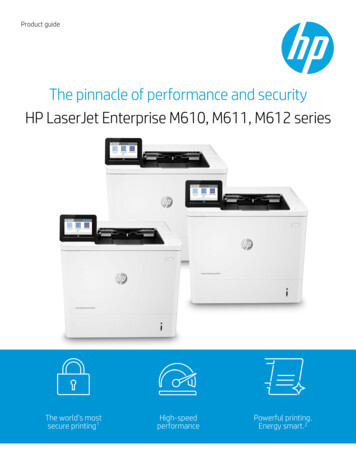
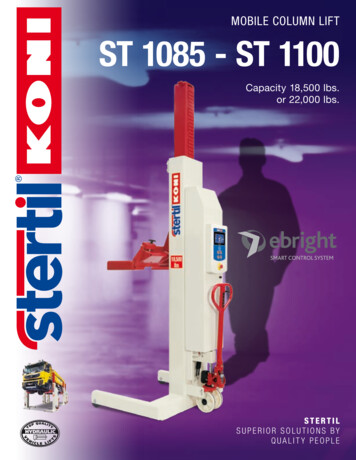
Printer components21. Printer control panel2. Paper supports3. Paper input tray4. Single-sheet paper input tray (priority feed)5. Paper guides6. Paper-output lever7. Straight-through output path8. Printer door9. Paper output bin134958761. Power switch (220-240 volt printers)2. Power receptacle3. Memory door4. Parallel port1EN234Printer components 3
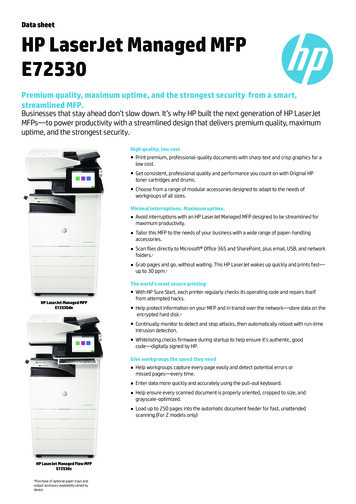
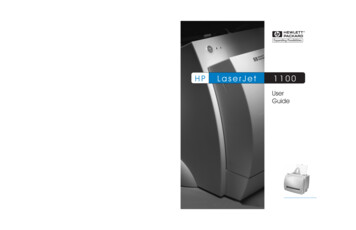
Printer control panelThe printer control panel is comprised of two lights and one lightedbutton. These lights produce patterns that identify the status of yourprinter.Go button and lightReady lightAttention lightNote Go button and light: Press and release to print a self-test pageor when in manual-feed mode, or press and hold for 5 seconds toreset the printer. Ready light: Indicates the printer is ready to print. Attention light: Indicates printer initialization, reset, and errors.See “Printer light patterns” for functional descriptions of all the lightpatterns.4 Chapter 1 Getting to know the printerEN
Printer paper input traysRear paper input trayThe paper input tray located closest to the back of the printer can holdup to 125 sheets of 20 lb. paper or it can hold multiple envelopes.Front (single-sheet) paper input trayThe single-sheet paper input tray should be used when feeding singlepages or media such as envelopes. You can print the first page ondifferent media than the rest using the single-sheet paper input tray.NoteThe printer will automatically (priority feed) print from the single-sheetpaper input tray before printing from the paper input tray.Printer paper guidesBoth input trays have paper guides. Paper guides are used to ensurethe paper is correctly fed into the printer and that the print is notskewed (crooked text on the page). When loading paper, adjust thepaper guides to match the width of the paper being printed.ENPrinter components 5
Printer paper output pathsPaper output binThe paper output bin is located on the front of the printer. Printedpaper will be collected here in the correct sequence when the paperoutput lever is in the up position. Use the output bin when printinglarge, collated documents or when copying documents so that theoriginal is separated from the copies.Straight-through paper output pathThe straight through paper output path is useful when printingenvelopes, transparencies, heavy media, or anything that tends tocurl when printed. Printed paper will stack in reverse order with thepaper-output lever down.6 Chapter 1 Getting to know the printerEN
Printer doorOpen the printer door to access the toner cartridge, clear jams, andclean the printer. The printer door is located on the front of the printer.Open and close the printer door by firmly grasping the top left andright sides of the printer door and pulling it towards you.NoteENIf the scanner is attached, it may be necessary to move the printer tothe edge of your workstation before opening the printer door in orderto get the full range of motion.Printer components 7
Choosing paper and other mediaHP LaserJet printers produce excellent print quality documents. Youcan print on a variety of print media, such as paper (including up to100% recycled fiber content paper), envelopes, labels,transparencies, and custom-sized media. Properties such as weight,grain, and moisture content are important factors, affecting printerperformance and quality. To achieve the best possible print quality,use only high-quality paper designed for laser printers. See “Printerpaper specifications” for detailed paper and media specifications.NoteAlways test a sample of paper before purchasing large quantities.Your paper supplier should understand the requirements specified inthe HP LaserJet Printer Family Paper Specification Guide (HP partnumber 5021-8909). See “Printer paper specifications.” Maximum supported paper size: 216 by 356 mm (8.5 by 14 in.) Minimum supported paper size: 76 by 127 mm (3 by 5 in.)8 Chapter 1 Getting to know the printerEN
Loading paper into the printerPaper should be loaded with the top down and the side-to-be printedfacing forward. Always adjust the paper guides to prevent jams andskewing.CAUTIONAttempting to print on paper that is wrinkled, folded, or damaged in anyway may cause a jam to occur. See “Printer paper specifications.”NoteAlways remove all paper from the paper input tray and straightenthe stack when new paper is added. This helps prevent multiplesheets of paper from feeding through the printer at one time andreduces paper jams. See the sticker which you placed on the printerwhile setting up the hardware.Specific types. . .EN Transparencies: Load transparencies with the top down and theside-to-be-printed facing toward the front of the printer. See“Printing transparencies.” Envelopes: Load with the narrow, stamp side down and the sideto-be-printed facing toward the front of the printer. See “Printingenvelopes.” Labels: Load with the top down and the side-to-be-printed facingtoward the front of the printer. See “Printing labels.” Letterhead: Load with the top down and the side-to-be-printedfacing toward the front of the printer. See “Printing letterhead.” Cards: Load with the narrow side down and the side-to-beprinted facing toward the front of the printer. See “Printing cards.”Loading paper into the printer 9
Turning the power offPrinters that require 100-127 volts of power must be unplugged toturn the power off. Printers that require 220-240 volts can be switchedoff (the switch is located on the left side of the power plug) orunplugged.NoteTo ensure safety when working inside the printer for any reason, it isbest to unplug the printer.Voltage conversionsHP LaserJet printers are manufactured to different specifications fordifferent countries. Because of these differences, HP does notrecommend transporting products sold within the United States toanother country.In addition to the concerns about the differing power system voltages,the country of final destination may have different import and exportrestrictions, power frequencies, and regulatory requirements.NoteThe HP LaserJet family printers must be serviced by an authorizedrepair depot or reseller within the country where the printer wasoriginally purchased.Because of the different specifications and warranty coveragelimitations, Hewlett-Packard does not offer a conversion, or supportthe conversion, of U.S. version HP LaserJet family printers for foreignuse. We advise those customers planning to transport equipmentoutside the United States to purchase the products in the country offinal destination.10 Chapter 1 Getting to know the printerEN
Accessing printer properties (driver) and helpThis section provides information on the following topics: Printer properties (driver) Printer online helpPrinter properties (driver)Printer properties control the printer and allow you to change defaultsettings, such as paper size, printing on both sides of the page(manual duplexing), printing multiple pages on a single sheet of paper(N-up printing), resolution, watermarks, and printer memory. You canaccess the printer properties in two ways:Note Through the software application from which you are printing.(Change settings for current software application use.) Using the Windows operating system. (Change default settingsfor all future print jobs.)Because many software applications use a different method ofaccessing the printer properties, we will describe common methodsused in Windows 9x & NT 4.0, and Windows 3.1x.Windows 9x & NT 4.0 Change settings for current software application use: Fromthe File menu within the software application, click Print, andthen click Properties. (The steps can vary between softwareapplications; this is the most common method.) Change defaults for all future print jobs: Click the Start button,click Settings, and then click Printers. Right-click the printer iconfor which you would like to change properties, and then chooseProperties. Many of the features in Windows NT are also locatedon the Document Defaults menu.Windows 3.1xEN Change settings for current software application use: Fromthe File menu within the software application, click Print,Printers, and then click Options. (The steps can vary betweensoftware applications; this is the most common method.) Change defaults for all future print jobs: From the Windowscontrol panel, double-click Printers, highlight the printer, and thenclick Setup.Accessing printer properties (driver) and help 11
Printer online helpPrinter properties online helpThe printer properties (driver) online help includes informationspecific to the functions within the printer properties. This online helpwill guide you when changing default settings for your printer.Access the printer properties help system by opening the printerproperties and then clicking on the Help button.Online helpThe HP LaserJet 1100 online help includes information for all of theprinting, copying, and scanning software applications.To access the HP LaserJet 1100 Online Help, use any of the threemethods below: Program Group: Windows 9x & NT 4.0: Click Start, Programs, HP LaserJet1100, and then LaserJet 1100 Online Help. Windows 3.1x: From the Program Manager, double-click theHP LaserJet 1100 icon, and then double-click LaserJet 1100Online Help.NoteThe Document Assistant is not available for Windows 3.1x operatingsystems. Document Assistant: Click Tools, and then click Help. LaserJet Document Desktop: Click Help from the main menu.12 Chapter 1 Getting to know the printerEN
Printing a self-test pageAmong other items, a self-test page provides all of the printerconfiguration settings, scanner attachment verification, a sample ofthe print quality, and provides information for printer page counts aswell as scan and copy page counts. A self-test page can also helpyou verify the printer is printing correctly.To print a self-test page, press and release the Go button on theprinter control panel while the printer is in the Ready state. If theprinter is in PowerSave mode, press and release the Go button onceto awaken it, and then press and release the Go button a secondtime.ENPrinting a self-test page 13
14 Chapter 1 Getting to know the printerEN
2Printing mediaThis chapter provides information on the following topics:EN Printing transparencies Printing envelopes Printing labels Printing letterhead Printing cards15
Printing transparenciesOnly use transparencies recommended for use in laser printers, suchas HP transparency film. See “Printer paper specifications.”CAUTIONInspect the transparencies to ensure they are not wrinkled or curled,and that they do not have any torn edges.1Adjust the paper-output lever to the down position.2Load with the top down and the side-to-be-printed (rough side)facing toward the front of the printer. Adjust the paper guides.3Print, and then remove the transparencies from the front of theprinter to prevent them from sticking together. Place the printedtransparencies on a flat surface.16 Chapter 2 Printing mediaEN
Printing envelopesCAUTIONENOnly use envelopes recommended for laser printers. See “Printer paperspecifications.”1Adjust the paper output-lever to the down position.2Load with the narrow, stamp-side down and the side-to-beprinted facing toward the front of the printer. Adjust thepaper guides to fit the envelope.3Select the correct envelope size in the software application. Thissetting can be accessed through the printer properties. See“Printer properties (driver).”4Print.Printing envelopes 17
Printing labelsOnly use labels recommended for laser printers, such as HP LaserJetlabels. See “Printer paper specifications.”CAUTIONDo not use labels that are separating from the backing sheet, wrinkled,or damaged in any way. Do not feed a sheet of labels through the printertwice. The adhesive backing is designed for one pass through theprinter. Also, do not use continuous feed labels or labels that requiremoisture to stick.1Adjust the paper output-lever to the down position.2Load with the top down and the side-to-be-printed facingtoward the front of the printer. Adjust the paper guides to fitthe width of the label sheet.3Print, and then remove the printed label sheets from the front ofthe printer as they are printed to prevent them from stickingtogether.18 Chapter 2 Printing mediaEN
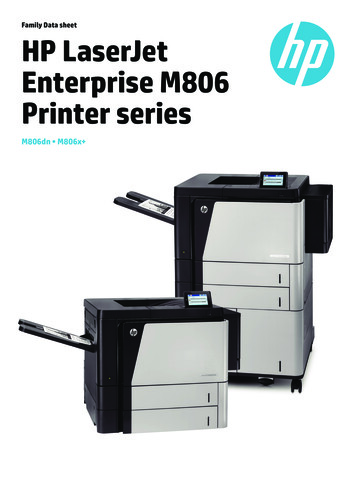
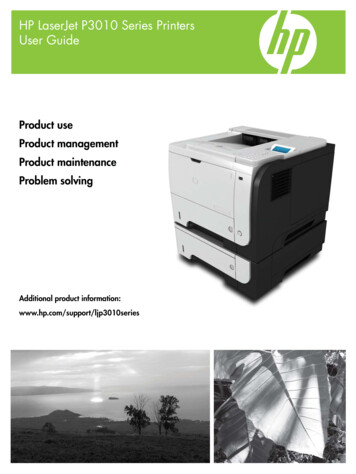
Printing letterhead1Load with the top down and the side-to-be-printed facing towardthe front of the printer. Adjust the paper guides to fit the width ofthe paper.2Print.To print a single page cover letter, using letterhead, followed by amulti-page document, load the letterhead in the single-sheet paperinput tray and load the standard paper in the multi sheet paper inputtray. By default, the printer prints from the single sheet paper inputtray first.Cover letter followed by document.Use both input trays.ENPrinting letterhead 19
Printing cardsThe HP LaserJet 1100 does not support paper smaller than 76 by127 mm (3 by 5 in.). Verify cards are not stuck together beforeloading.1Adjust the paper output-lever to the down position.2Load with the narrow side down and the side-to-be-printedfacing toward the front of the printer. Adjust the paper guidesto fit the card.3Select the correct card size in the software application beingused. (Software settings can override printer properties.)4Print.20 Chapter 2 Printing mediaEN
3Printing tasksThis chapter provides information on the following topics:EN Printing with manual feed Printing on both sides of the paper (manual duplexing) Printing watermarks Printing multiple pages on a single sheet of paper(N-up printing) Printing booklets Canceling a print job Changing print quality settings Print using EconoMode (save toner)21
Printing with manual feedUse manual feed when printing mixed media; for example, anenvelope, then a letter, then an envelope, and so forth. Load anenvelope in the single sheet paper input tray and load letterhead inthe multiple-page paper input tray. Also, use manual feed to protectyour privacy when printing to a network printer.To print using manual feed, you must access the printer properties orprinter setup in your software application and select Manual Feedfrom the Source drop down list. See “Printer properties (driver).” Afterthe setting has been enabled, you must press the Go button (blinking)each time to print.22 Chapter 3 Printing tasksEN
Printing on both sides of the paper(manual duplexing)To print on both sides of the paper (manual duplexing), you must runthe paper through the printer twice. You can print using the paperoutput bin or the straight-through output path. HP recommends usingthe paper output bin for light-weight paper. Use the straight-throughoutput path for any heavy media or media that tends to curl whenprinted, such as envelopes and card stock.NoteEN Manual duplex using the paper output bin (standard) Manual duplex (special) heavy-media, card stockManual duplexing can cause the printer to become dirty more quicklyand reduce print quality. See “Cleaning the printer” if the printerbecomes dirty.Printing on both sides of the paper (manual duplexing) 23
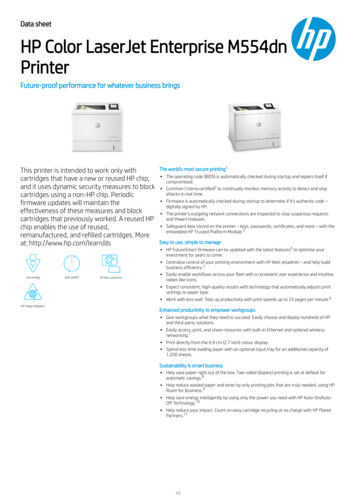
Manual duplex using thepaper output bin(standard)11Adjust the paper-output lever to theup position.2Access the printer properties. See“Printer properties (driver).” On theFinishing tab, click Manual Duplex(standard), and then click OK. Printthe document.3After side one has been printed,remove the remaining paper fromthe paper input tray and set it asideuntil after you finish your manualduplexing job.4Gather up the printed pages fromside one, rotate the stack clockwise,and then straighten the stack beforeplacing it back in the paper input tray.Once reloaded, page one should beoriented upside down and locatedclosest to the back of the printer.(The printed side should be facingtoward the back of the printer.)23Click OK (on screen), and then waitfor the pages to print.424 Chapter 3 Printing tasksEN
Manual duplex (special)heavy-media, card stockFor heavy media (card stock, etc.), usethe straight-through output path.11Adjust the paper-output lever to thedown position.2Access the printer properties. See“Printer properties (driver).” On theFinishing tab, click Manual Duplex(special), and then click OK. Printthe document.3After side one has been printed,remove the remaining paper fromthe paper input tray and set it asideuntil after you finish your manualduplexing job.4Gather up the printed pages fromside one, flip the stack, and thenstraighten the stack before placing itback in the paper input tray. Oncereloaded, page one should beoriented upside down and locatedclosest to the front of the printer.(The printed side should be facingtoward the back of the printer.)23Click OK (on screen), and then waitfor the pages to print.4ENPrinting on both sides of the paper (manual duplexing) 25
Printing watermarksThe watermark option allows you to print text “underneath” (in thebackground) of an existing document. For example, you may want tohave large gray letters reading “draft” or “confidential” printeddiagonally across the first page or all pages of a document.Accessing the watermark feature1From your software application, access the printer properties.See “Printer properties (driver).”2On the Finishing tab, you can specify the type of Watermark youwould like to have printed on your document.26 Chapter 3 Printing tasksEN
Printing multiple pages on a single sheet of paper(N-up printing)You can select the number of pages you want to print on a singlesheet of paper. If you choose to print more than one page per sheet,the pages will appear decreased in size and will be arranged on thesheet in the order that they would otherwise be printed. Specify up to9 pages per sheet of paper.Accessing the multiple pages per sheetfeatureEN1From your software application, access the printer properties.See “Printer properties (driver).”2On the Finishing tab and Document Options, you can specifythe number of Pages per sheet that you would like to haveprinted.Printing multiple pages on a single sheet of paper (N-up printing) 27
Printing bookletsYou can print booklets on letter, legal,executive, or A4 size paper.121Load the paper, and then adjust thepaper-output lever to the up position.2From your software application,access the printer properties. See“Pr
EN 1 1Getting to know the printer This chapter provides information on the following topics: Printer features and benefits Printer components Choosing paper and other media Loading paper into the printer Turning the power off Voltage conversions Accessing printer properties (driver) and help Printing a self-test page Note For installation instructions, see the "HP LaserJet Quick Reference