Transcription
Sage 300 2022Installation and Administration GuideAugust 2021
This is a publication of Sage Software, Inc. 2021 The Sage Group plc or its licensors. All rights reserved. Sage, Sage logos, and Sageproduct and service names mentioned herein are the trademarks of Sage Global Services Limitedor its licensors. All other trademarks are the property of their respective owners.Last updated: August 19, 2021
ContentsChapter 1: IntroductionSystem Requirements . 1–1Network Configuration . 1–2Typical Network Configurations . 1–3Where To Now? . 1–5Chapter 2: Installing Sage 300 ProgramsBefore You Begin. 2–1Installation Considerations . 2–1Using Sage 300 Sample Data . 2–3Installing Sage 300 . 2–4Installing the Programs . 2–4Entering License Information . 2–6Setting Up Workstations. 2–8Workstation Setup Utility. 2–8Setting Up a Workstation . 2–9Running Sage 300 Intelligence Reporting for the First Time . 2–9Where To Now? . 2–10Chapter 3: Database SetupOverview of Database Setup . 3–1Creating System, Company, and Portal Databases . 3–1Creating Microsoft SQL Server Databases . 3–2Setting Up Company and System Databases . 3–9Setting Up a System Database . 3–9Assigning Company Colors . 3–12Setting Up a Company Database . 3–13Setting Global Security Options . 3–15Where To Now? . 3–17Installation and Administration Guideiii
Chapter 4: Activating Sage 300Before You Begin. 4–1Signing On to a New Company . 4–2Creating the Company Profile . 4–4Entering Company Information . 4–5Activating Your Data . 4–8Change the Administrator’s Password . 4–10Change the ADMIN Password . 4–11Where To Now? . 4–12Chapter 5: Configuring Sage 300 Web ScreensOverview. 5–1Configuring Security for Web Screens . 5–2Configuring the Portal Database . 5–3Configuring a Microsoft SQL Server Express Database. 5–4Configuring English Windows to Display Chinese . 5–5Setting Up a User Account for IIS and Windows Services. 5–5Starting the Sage 300 Web Screens . 5–6Chapter 6: Performing Administrative TasksAdd Users . 6–1Using Windows as the Authentication Method . 6–3Set Up Security Groups and Assign User Authorizations . 6–5Create Security Groups . 6–5Authorizing Users . 6–6Create and Assign UI Profiles for Customized User Interface Forms . 6–7Set Up Customization Directories . 6–11Remove Sage 300 Programs . 6–11Chapter 7: Licensing Sage 300Licensing Products and Users . 7–1LanPak Licenses . 7–2Creating a Temporary LanPak License . 7–2Requesting Activation Codes . 7–4Updating Your Sage 300 Licenses . 7–5Viewing License Information . 7–7Monitoring LanPak Activity . 7–7ivSage 300
Chapter 1IntroductionRead all chapters in this guide before you install or set up a newinstallation of Sage 300.This guide provides the information you need to: Install Sage 300. Set up databases for use with Sage 300. Set Sage 300 security. Set up Workstations to run Sage 300. Activate your data for new accounting programs. Configure the Sage 300 web screens. Set up users and groups, and perform other administrative tasks. Understand Sage 300 licensing.The order of topics in this self-teaching guide matches the sequence oftasks you would typically perform to install and set up Sage 300.Integration withSage CRMTo find out how to integrate Sage 300 with Sage CRM, see the Sage CRMIntegration Guide.Important!This guide contains troubleshooting tips and technical information onconfiguring supported operating systems and database engines for usewith Sage 300. However, this guide is not a replacement for a qualifiednetwork or database administrator.Depending on your purchase agreement, some features describedin this guide may not be available in your product.System RequirementsBefore you can install Sage 300, your hardware and your operatingsystem must be correctly configured and fully operational.For a complete list of hardware and operating system requirements forworkstations and servers, see the Compatibility document.do?externalId 26777Installation and Administration Guide1–1
Network ConfigurationNetwork ConfigurationYou can configure Sage 300 in a number of ways. The best configurationfor your company depends on the number of users who need to use Sage300 programs and data concurrently, and your network setup.Each network configuration contains the following components: Server — The computer that hosts the Sage 300 data, and optionally,Sage 300 programs.In a small workgroup, a workstation may act as a server, providingother workstations with access to Sage 300 data and programs. Workstation — A computer that connects to a server to access Sage300 programs and/or data. A workstation may: Run the Sage 300 desktop. Connect to Sage 300 via an Internet browser. Connect to another workstation or server using Remote DesktopProtocol (RDP).Database Engine — The software used to create, retrieve, update,and delete data from a database.Sage 300 works with the Microsoft SQL Server database engine only.Refer to the System Requirements section for supported versions. 1–2Sage 300Sage 300 Program Files — These include: The Sage 300 System Manager. Accounting applications, such as Accounts Receivable and AccountsPayable.Sage 300 Shared Data — This includes: Site folder. User folder. Data. Company folder. License Files (*.lic).Sage 300 Databases — In Sage 300, there are two types ofdatabases: The System database stores information on users, passwords,security groups, security settings, and currency for all thecompanies that are linked to it. The Company database contains information that is shared by allthe company’s accounting applications. This includes the company
Network Configurationprofile, fiscal calendar, optional field data, tax information for bothsales and purchases, bank information, and all the accounting datafor the company. Each company database must be linked to asystem database.Typical Network ConfigurationsThis section describes the most common network configurations,including: Single computer. Windows peer-to-peer network. Client-server network.Single “Standalone” ComputerInstalling on a single computer is the simplest configuration. Allcomponents are installed on one computer.Windows Peer-to-Peer NetworkA Windows peer-to-peer network allows the server and workstations toshare resources. This type of network is good for small workgroups,consisting of two to five workstations networked together using MicrosoftWindows Network. One of the workstations acts as a server, allowingother computers to access data stored on its hard drive.If more than two users require concurrent access to Sage 300 data orprograms, the workstation acting as the server should be dedicated. Youmay encounter performance issues if you run Sage 300 on the server atthe same time as other users are accessing Sage 300 from theirworkstations.Installation and Administration Guide1–3
Network ConfigurationClient-Server NetworkIn a client-server configuration, Sage 300 programs and databases are onone or more dedicated servers.The optional Terminal Server may also reside on the same physical server.Workstations may access programs as well as data from the server(s), ormay have Sage 300 programs installed locally for better performance.On each workstation that will run Sage 300 programs locally,you must install System Manager and the accounting applications.Note:If you use Sage 300 Intelligence Reporting, note that:1–4Sage 300 Databases must reside on a single server. If you use a Citrix server, there are some special considerations. Formore information, see the Sage 300 Intelligence Reporting CitrixInstallation Guide.
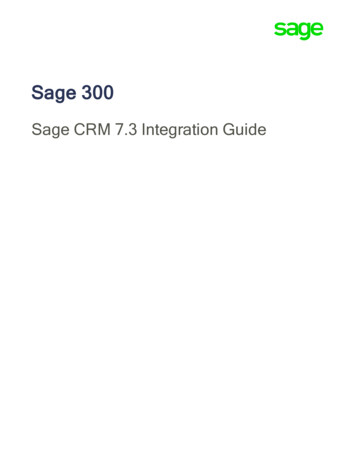
Where To Now?Sage 300 Integrated with Sage CRMSimilar to Sage 300, Sage CRM can be installed locally, or on a server, orbe deployed on the Web.In the illustration below, we’ve shown the Sage 300 Web server and theSage CRM Web server on separate computers.The Sage 300 and Sage CRM Web server can reside on thesame computer. Typically, one database server stores both theSage CRM and Sage 300 data.Note:RecommendationFor better security and performance, do not store shared data on the Webserver.For more information about integrating Sage 300 with Sage CRM, see theSage CRM Integration Guide.Where To Now?You are now ready to install Sage 300.Installation and Administration Guide1–5
Chapter 2Installing Sage 300 ProgramsThis Chapter explains how to install System Manager, Sage 300accounting programs, and Sage 300 Intelligence Reporting.Before You BeginUnderstand theimplications foryour chosenconfigurationBefore proceeding, be sure you understand the different systemconfigurations and their implications for installing Sage 300: On a single workstation and on a network. Over different operating systems.Use the information in Chapter 1, “Introduction,” to help you determinethe configuration that best meets your company’s needs.Make sure yoursystem meetsminimumrequirementsAlso, make sure that the computer on which you are installing Sage 300meets at least the minimum system requirements for the configurationyou choose. For up-to-date information on system requirements, see theCompatibility document.do?externalId 26777If you areupgrading If you are upgrading an existing system to the currentversion of Sage 300, use the instructions in the Sage 300 UpgradeGuide to prepare for and upgrade to the current version.WARNING:Installation ConsiderationsRead the following sections before you install Sage 300.Considerations for Installing on a Windows Peer-to-Peer NetworkBefore installing or upgrading Sage 300 on a Windows Peer-to-Peernetwork, be aware of the following special considerations: Each workstation must be running Windows 7 or Windows 8. A maximum of five users is supported when running in a peer-to-peerenvironment.Installation and Administration Guide2–1
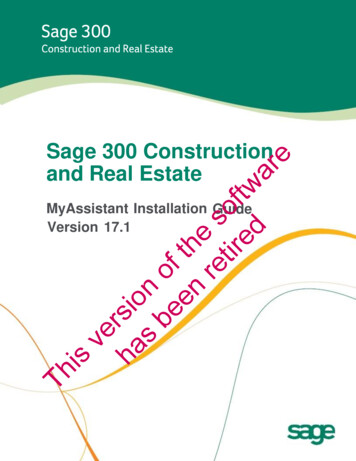
Before You Begin If more than two users require concurrent access to Sage 300 data orprograms, the workstation acting as the server should be dedicated.You may encounter performance issues if you run Sage 300 on theserver at the same time as other users are accessing Sage 300 fromtheir workstations. On the workstation that will be acting as the server, share the Sage300 Program and Shared Data folders, as follows: Share the Program and Shared Data folders. On each workstation, use Universal Naming Convention (UNC)paths to connect to the shared folder. For example, \\server\share.If you choose to map a drive letter to the shared folder on theserver, then in the Map Network Drive window, select theReconnect at Logon check box to create a persistent connection.Considerations for 64-bit Windows Operating SystemsSage 300 is a 32-bit program. When you create a data source for Sage300, you must use the 32-bit version of the ODBC Administrator.In 64-bit versions of supported Windows operating systems, you can findthe 32-bit ODBC Administrator in the following ations for Installing the Sage 300 Web ScreensSage 300 web screens bring the power of Sage 300 to your web browser,providing a browser-based interface for Sage 300, with graphicalpresentations of key financial data.If you intend to install the Sage 300 web screens, you must first: Ensure that Microsoft’s Internet Information Services (IIS) is installedon the server that will host the Sage 300 web screens.If IIS is not installed, install it before you attempt to install the Sage300 web screens.2–2Sage 300
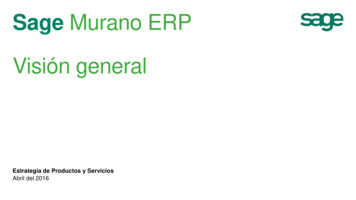
Using Sage 300 Sample Data When selecting Windows features, under World Wide Web Services’Application Development Features, select the ASP, CGI, ISAPIExtensions, and ISAPI Filters options, as shown here:Using Sage 300 Sample DataSage 300 comes with two sample company databases that let usersexperiment and become familiar with Sage 300 features before they workwith your company data. The two databases are: SAMINC. A single-currency database for a US company namedSample Company Inc. It uses the US Payroll program. SAMLTD. A multicurrency database for a Canadian Company namedSample Company Ltd. It uses the Canadian Payroll program.Both databases contain data for the following accounting modules: General LedgerAccounts ReceivableAccounts PayableInventory ControlOrder EntryPurchase OrdersPayroll (US or Canadian)Project and Job CostingYou can choose to install sample data when you install Sage 300.If you use Sage 300 Intelligence Reporting, sample data isrequired for demonstration reports.Note:Installation and Administration Guide2–3
Installing Sage 300Installing Sage 300You install Sage 300 System Manager, System Manager Components, andall Sage 300 accounting applications in one continuous process, consistingof two phases:1. Installing the programs.2. Entering license information (unless you have already installed licensesfor this version).Installing the Programs1. Download Sage 300, and then double-click the ISO file.If the installation screen does not appear automatically, go to the rootdirectory (for example, d:\), and run AUTORUN.EXE.A screen may appear prompting you to install one or more programsand tools that are required by Sage 300.2. On the installation screen, click View Pre-Installation Checklist. Print acopy of the checklist and follow all steps before you continue.3. On the installation screen, click Sage 300.4. On the Sage 300 installation screen, click Sage 300.5. On the Welcome screen, click Next.6. Click the option to accept the license agreement, and then click Next.7. Select the geographical region where you are installing the software,and then click Next.8. For the client information, enter your 7-digit or 10-digit client ID andthe company name to use for registration, and then click Next.9. For the optional information, enter a contact person, your dealer, andcertified consultant, and then click Next.10. Select the edition of Sage 300 you require, and then click Next.11. Specify the names and locations of your program and data folders, andthen click Next.To use web screens, you must specify the full path for theshared data folder (do not specify a mapped drive) and a local pathfor the programs folder (do not specify a mapped drive or a UNCpath).Note:2–4Sage 300
Installing Sage 30012. On the Select Features screen, select features and applications toinstall, and then click Next.ProgramdependenciesMost of the applications require you to install others, and all of themrequire core System Manager files. The following list shows anyadditional requirements in parentheses for each application: Bank Services (requires Tax Services, G/L Subledger Services). Accounts Payable (requires Bank Services, Tax Services, G/LSubledger Services). Accounts Receivable (requires Bank Services, Tax Services,G/L Subledger Services). Inventory Control (requires G/L Subledger Services). Order Entry (requires Accounts Receivable, Inventory Control, TaxServices). Purchase Orders (requires Accounts Payable, Inventory Control,Tax Services). Project and Job Costing (requires G/L Subledger Services, AccountsPayable, Accounts Receivable, Tax Services). G/L Consolidations (requires General Ledger). Intercompany Transactions (requires General Ledger). Sage Intelligence Reporting (requires the Financials Suite). Payment Processing (requires Accounts Receivable, Order Entry,and Sage Exchange).13. On the next screen, in the Program Folder field, type the location onthe Start menu where you want Sage 300 to appear, then click Next.14. Click Install.Enter activationcodesOnce installation has finished, the Sage 300 License Manager appears ifyou have not already installed licenses for this version. Follow theinstructions in the next section to enter license information.Installation and Administration Guide2–5
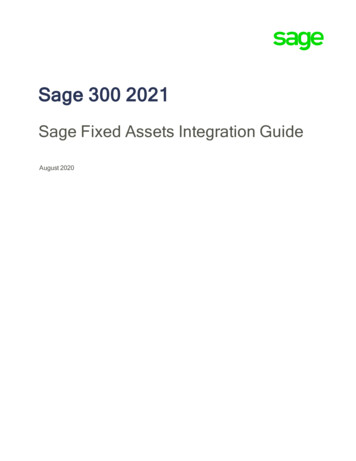
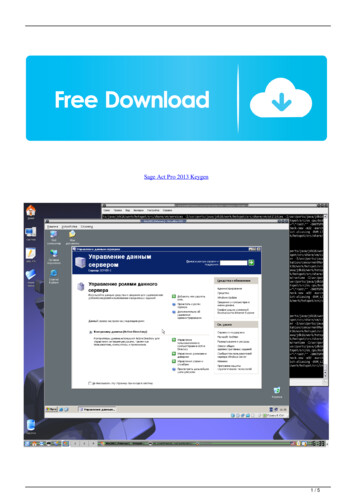
Installing Sage 300Entering License InformationIn the Sage 300 License Manager, the License Information tab showsinformation entered during installation:Do not change the company name unless you need tochange the business entity to which the programs are registered.Note:If you change the company name, the licenses will appearUnauthorized, until you apply for and enter new activation codes.The process for entering Sage 300 license information differs dependingon whether you have a subscription license or a perpetual license.To enter Sage 300 subscription license information:1. On the License Information tab, enter your serial number.2. Click Refresh.Required license information such as activation codes and expiry datesis automatically entered or updated.3. Click Close.4. Click Finish to close the Installation wizard.To enter Sage 300 perpetual license information:1. If you have activation codes for your Sage 300 programs, click theLicenses tab, then, for each Sage 300 program:a. Double-click in the Serial Number column, and then enter the serialnumber.b. Double-click in the Activation Code column, and then enter theactivation code.If you don’t yet have activation codes, you can use the 30-daytemporary licenses created during installation, and enter thepermanent code later, as described in Chapter 7, “Licensing Sage300.”2. If you installed Analysis Connector modules for Sage 300 IntelligenceReporting, enter their activation codes on the Licenses tab.The Report Manager, Report Viewer, Analysis, and Connectorprograms are not available with a 30-day license. You must have apermanent license to use them. (Sage 300 comes with one freeReport Manager license.)Note:2–6Sage 300
Installing Sage 3003. Click the Users tab.The system allows you to register only one LanPak license. Ifa temporary LanPak license exists for this version, skip to step c,and then follow the remaining instructions to enter your permanentregistration on the existing line.Note:a. Right-click the grid, and then select Insert from the menu thatappears. The new entry shows your current Sage 300 version andedition.b. In the new line, double-click the License Type column, and thenselect LanPak from the list.Do not select a database-specific entry!c. Double-click in the Count column, and then type the total numberof users who require Sage 300 access for this installation. (Thecount is the sum of existing users plus the new users for whomyou’re adding LanPak licenses.)If you have a permanent license for this version, and you are askedif you want to overwrite the existing license, click Yes.The system immediately deletes any existing LanPak licenses.d. Double-click in the Serial Number column, and then type theLanPak serial number that Sage provided.e. Double-click in the Activation Code column, and then type theactivation code that Sage provided.If you don’t yet have an activation code, you can create atemporary license by leaving the activation code blank.f.Press Tab, or click elsewhere on the grid, to leave the field.The system changes the Count to the purchased amount (ifnecessary) and enters Activated in the Activation Code field.LanPakIMPORTANT:Sage 300.You must record at least one LanPak license to useFor Sage 300 Intelligence Reporting, one Report Manager license forone user is free with Sage 300. If you have additional licenses forReport Manager and Report Viewer, enter their activation codes in theActivation Code column.4. Click Close.5. Click Finish to close the Installation wizard.Installation and Administration Guide2–7
Setting Up WorkstationsSetting Up WorkstationsWorkstation Setup UtilityThe Workstation Setup utility is a component of the System Managerinstallation. It installs the components that a workstation requires to runSystem Manager and accounting modules on a server.You must run Workstation Setup on each workstation that will run Sage300 programs from a server.You do not need to run Workstation Setup on a workstationto use the Sage 300 web screens.Note:Do not run Workstation Setup if: The workstation will run Sage 300 programs locally.In this case, install Sage 300 System Manager and the accountingapplications on the workstation, as described earlier in this chapter. The workstation is using Remote Desktop Protocols (RDP) to remotelycontrol another workstation or server.In this case, install Remote Desktop Client on your remote computer.Then, connect through a Terminal Server or directly to a workstationor server that is configured for remote access.This guide does not include instructions for setting upterminal services or RDP. Talk to your network administrator aboutthis option.Note:Setting Up a Workstation1. Share your Sage 300 program folder, with at least the followingpermissions for users: Read Read and Execute2. Share your Sage 300 data folder, with Full Control permission forusers.3. Create your system and company databases. For more information,see Chapter 3, “Database Setup.”2–8Sage 300
Running Sage 300 Intelligence Reporting for the First Time4. On the workstation, run the Workstation Setup utility:a. Locate the setup.exe file for the utility. By default, it is in the Sage300 program folder on the server where you installed Sage 300:\\ server \ program folder \WSSetup\setup.exeb. Right-click setup.exe, and then click Run As Administrator.5. Enter the paths for your shared program folder and data folder.Running Sage 300 Intelligence Reporting for theFirst TimeThe first time you run Sage 300 Intelligence Reporting, you must log in asthe Windows administrator.A user with Windows administrator privileges must register the ActiveXcomponent, BICore.exe, that Intelligence Reporting requires. To registerthis component, open any Sage 300 Intelligence Reporting form. Once thecomponent is registered, other types of users can open these forms.If you use workstation setup, you must also run Sage 300 IntelligenceReporting workstation setup (located in BX66A\WSSetup) on everyworkstation where you will view and use Intelligence Reporting screens.Where To Now?New installationIf you are installing Sage 300 for the first time, you must create and setup system and company databases.If you plan to use the Sage 300 web screens, you must also create aportal database.For information on setting up databases for Sage 300, see Chapter 3,“Database Setup.”Activating dataOnce you have set up company and system databases, you can activateyour data for the current version, as described in Chapter 4, “ActivatingSage 300.”Configuring theweb screensIf you installed the Sage 300 web screens, you need to configure them toconnect them to the portal database.For information about configuring the Sage 300 web screens, seeChapter 5, “Configuring Sage 300 Web Screens.”Installation and Administration Guide2–9
Where To Now?Grace period fortemporary licensesYou can use temporary licenses for 30 days while you wait for youractivation codes. However, you must enter activation codes before thegrace period ends, or you will no longer have access to Sage 300.For instructions on updating your licenses, see Chapter 7, “Licensing Sage300.”Upgrading anexisting system2–10Sage 300If you are upgrading an existing system, refer to the Sage 300 UpgradeGuide for steps on activating your data and for important informationabout the conversion of your data, including additional steps you mayneed to take before and after activation.
Chapter 3Database SetupIn this chapter, you’ll learn how to create your Sage 300 system,company, and portal databases, and how to set global security options.This chapter does not provide detailed instructions on how to install orconfigure database software. See your database or network administratorfor detailed instructions and support.To get the most recent list of supported database versions, see theCompatibility document.do?externalId 26777Overview of Database SetupBefore you can create a company in Sage 300, you must create systemand company databases using Microsoft SQL Server.Portal databaseIf you plan to use the Sage 300 web screens, you must also create aportal database in Microsoft SQL format. Normally, you create the portaldatabase on the same server as your company database.After creating the databases using your database software, you use theDatabase Setup utility to set up the databases for Sage 300.Creating System, Company, and Portal DatabasesIn Sage 300, there are three types of databases: System Database. Stores information on users, passwords, securitygroups, security settings, and currency for all the companies that arelinked to it. You must create a system database before creating acompany database. Company Database. Contains information that is shared by all thecompany’s accounting applications. This includes the company profile,fiscal calendar, optional field data, tax information for both sales andpurchases, bank information, and all the accounting data for thecompany. Each company database must be linked to a systemdatabase. Multiple company databases can be linked to the samesystem database.Installation and Administration Guide3–1
Creating System, Company, and Portal Databases Portal Database. The portal database stores files used by theSage 300 web screens.The portal database is shared by all companies in a Sage 300installation, so you set up only one portal database.Database IDSage 300 uses a Database ID to identify databases. Each ID is a uniquecode of uppercase characters, consisting of letters from A to Z, ornumbers from 0 to 9, or any combination of letters and numbers.The ID for system and company databases cannot be morethan six characters long. This restriction does not apply to portaldatabase IDs.Note:For simplicity, we recommend that the Database ID, the database, thefolder for the database, and the Data Source Name (DSN) be identical.The sections that follow provide instructions for creating system,company, and portal databases.Creating Microsoft SQL Ser
Install Sage 300. Set up databases for use with Sage 300. Set Sage 300 security. Set up Workstations to run Sage 300. Activate your data for new accounting programs . Configure the Sage 300 web screens. Set up users and groups, and perform other administrative tasks. Understand Sage 300 licensing.