Transcription
Welding GuideLEARNING TO STICK WELDRefer tohttp://www.lincolnelectric.com/safetyfor additional safety information.Welding SafetyInteractive Web Guidefor mobile devicesLTW2 Issue Date 07/13 Lincoln Global, Inc. All Rights Reserved.
Safety DepenDS on youThe serviceability of a product or structure utilizing this type ofinformation is and must be the sole responsibility of the builder/user.Many variables beyond the control of The Lincoln Electric Companyaffect the results obtained in applying this type of information. Thesevariables include, but are not limited to, welding procedure, platechemistry and temperature, weldment design, fabrication methods,and service requirements.WARNINGThis statement appears where the information must be followedexactly to avoid serious personal injury or loss of life.CAUTIONThis statement appears where the information must be followed toavoid minor personal injury or damage to this equipment.Keep youR heaD out of the fumeSDON’T get too close to the arc. Usecorrective lenses if necessary tostay a reasonable distance awayfrom the arc.READ and obey the Material SafetyData Sheet (MSDS) and the warninglabel that appears on all containersof welding materials.USE ENOUGH VENTILATION orexhaust at the arc, or both, to keepthe fumes and gases from your breathing zone and the general area.IN A LARGE ROOM OR OUTDOORS, natural ventilation may beadequate if you keep your head out of the fumes (see below).USE NATURAL DRAFTS or fans to keep the fumes away from yourface.If you develop unusual symptoms, see your supervisor. Perhaps thewelding atmosphere and ventilation system should be checked.weaR coRRect eye, eaR & boDy pRotectionPROTECT your eyes and face with welding helmetproperly fitted and with proper grade of filter plate(See ANSI Z49.1).PROTECT your body from welding spatter and arcflash with protective clothing including woolenclothing, flame-proof apron and gloves, leatherleggings, and high boots.PROTECT others from splatter, flash, and glare withprotective screens or barriers.IN SOME AREAS, protection from noise may beappropriate.BE SURE protective equipment is in good condition.ALSO, WEAR SAFETY GLASSES IN WORKAREA AT ALL TIMES.SpeciaL SituationSDO NOT WELD OR CUT containers or materials which havepreviously been in contact with hazardous substances unless they areproperly cleaned. This is extremely dangerous.DO NOT WELD OR CUT painted or plated parts unless specialprecautions with ventilation have been taken. They can release highlytoxic fumes or gases.Additional precautionary measuresPROTECT compressed gas cylinders from excessive heat, mechanicalshocks, and arcs; fasten cylinders so they cannot fall.BE SURE cylinders are never grounded or part of an electrical circuit.REMOVE all potential fire hazards from welding area.ALWAYS HAVE FIRE FIGHTING EQUIPMENT READY FORIMMEDIATE USE AND KNOW HOW TO USE IT.
LEARNING TO STICK WELDTABLE OF CONTENTSPageLearn to Stick Weld .1Arc Welding Circuit.1What Happens in the Arc .1Correct Welding Position.2Correct Way to Strike an Arc .2Correct Arc Length .2Practice .3Common Metals.3Joint Types and Positions.4Butt Joint.4Penetration .4Fillet Joint.4Multi Pass Welds .5Welding in the Vertical Position .5Vertical-Up Welding .5Vertical-Down Welding .5Overhead Welding .6Welding Sheet Metal.6Hardfacing .6How to hardface the Sharp Edge.6Hardfacing of Idler and Roller .7Welding Cast Iron .7Cast Iron Plate Preparation .83
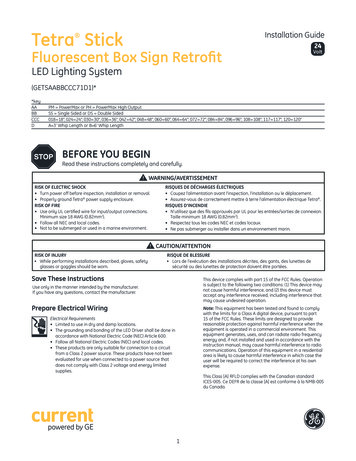
LEARNING TO STICK WELDLEARNING TO STICK WELDNo one can learn to weld simply by reading about it. Skillcomes only with practice. The following pages will help theinexperienced welder to understand welding and develophis skill. For more detailed information, order a copy of“New Lessons in Arc Welding”, available from the James F.Lincoln Foundation.the aRc-weLDing ciRcuitThe operator’s knowledge of arc welding must go beyond the arcitself. If you want to get the most out of your welding practice, yourknowledge of welding must go beyond the arc. You also need tounderstand how to control the arc, and this requires knowledge of thewelding circuit and the equipment that provides the electric currentused in the arc. Figure 1 is a diagram of the welding circuit. Thecircuit begins where the electrode cable is attached to the weldingmachine and ends where the work cable is attached to the weldingmachine. Current flows through the electrode cable to the electrodeholder, through the holder to the electrode and across the arc. On thework side of the arc, the current flows through base metal to the workcable and back to the welding machine. The circuit must be completefor the current to flow. To weld, the work clamp must be tightlyconnected to clean base metal. Remove paint, rust, etc. as necessaryto get a good connection. Connect the work clamp as close aspossible to the area you wish to weld. Avoid allowing the weldingcircuit to pass through hinges, bearings, electronic components orsimilar devices that can be damaged.This arc-welding circuit has a voltage output of up to 79 volts, whichis enough to shock.The electric arc is made between the work and the tip end of a smallmetal wire - the electrode - which is clamped in a holder. The holderis held by the welder.What Happens in the Arc?Figure 2 illustrates the action that takes place in the electric arc. Itclosely resembles what is actually seen during welding.FIGURE 2—The welding arcThe “arc stream’’ is seen in the middle of the picture. This is theelectric arc created by the electric current flowing through the spacebetween the end of the electrode and the work. The temperature ofthis arc is about 6000 F. (3315 C.), which is more than enough tomelt metal. The arc is both very bright and very hot. If you look at thearc with your naked eye, you risk several hours’ or days’ worth ofpain and poor, blurry vision. A welding helmet with a very dark lens,specifically designed for arc welding, must be used whenever viewingthe arc.Have you ever watched water flow from a garden hose onto soft soilor earth? Eventually, the water will build up enough to displace anddig into the soil beneath it. It may even form a small crater that thenfills with water. The arc works the same way, melting the base metaland actually digging into it as it moves across the surface of the basemetal. The molten metal forms a molten pool or crater and tends toflow away from the arc. As it moves away from the arc, it cools andsolidifies. A slag forms on top of the weld to protect it during cooling.WARNINGELECTRIC SHOCK CAN KILL.CAREFULLY REVIEW THE ARC WELDINGSAFETY PRECAUTIONS AT THE BEGINNINGOF YOUR OPERATOR’S MANUAL.ARC RAYS CAN BURNEYES AND SKIN.when uSing an open aRc pRoceSS, it iSneceSSaRy to uSe coRRect eye, heaD anDA gap is made in the welding circuit (see figure 1) by holding the tip of boDy pRotection.the electrode 1/16-1/8” away from the work or base metal beingPROTECT YOURSELF AND OTHERS, READwelded. The electric arc is established in this gap and is held and“ARC RAYS CAN BURN” AT THE FRONT OF THEmoved along the joint to be welded, melting the metal as it is movedOPERATOR’S MANUAL SUPPLIED WITH THEArc welding is a manual skill requiring a steady hand, good physicalWELDER.condition, and good eyesight. The operator controls the welding arcand, therefore, the quality of the weld made .To electrical(earth) ground.FIGURE 1—The welding circuit for Shielded MetalArc Welding(SMAW)1
LEARNING TO STICK WELDThe function of the covered electrode is much more than simply tocarry current to the arc. The electrode is composed of a core of metalwire around which has been extruded and baked a chemicalcovering. The core wire melts in the arc, and tiny droplets of moltenmetal shoot across the arc into the molten pool. The electrodeprovides additional filler metal for the joint to fill the groove or gapbetween the two pieces of the base metal. The covering also melts orburns in the arc. It has several functions. It makes the arc steadier,provides a shield of smoke-like gas around the arc to keep oxygenand nitrogen in the air away from the molten metal, and provides aflux for the molten pool. The flux picks up impurities and forms theprotective slag. The principal differences between various types ofelectrodes are in their coatings. By varying the coating, it is possibleto greatly alter the operating characteristics of electrodes. By understanding the differences in the various coatings, you will gain a betterunderstanding of selecting the best electrode for the job you have athand. In selecting an electrode, you should consider the followingaspects:2. The Correct Way to Strike an ArcBe sure the work clamp makes good electrical contact tothe work.Lower your autodarkening or fixed shade welding helmet.Scratch the electrode slowly over the metal and you will seesparks flying. While scratching, lift the electrode 1/8"(3.2mm) to establish the arc.NOTE: If you stop moving the electrode while scratching,the electrode will stick.NOTE: Most beginners try to strike the arc by making a fast jabbing motiondown onto the plate. Result: They either stick or their motion is so fastthat they break the arc immediately.3. The Correct Arc LengthThe arc length is the distance from the tip of the electrodecore wire to the base metal.1. The type of deposit you want, e.g. mild steel,stainless, low alloy, hardfacingOnce the arc has been established, maintaining the correctarc length becomes extremely important. The arc should beshort, approximately 1/16 to 1/8" (1.6 to 3.2mm) long. As theelectrode burns off, it must be fed to the work to maintaincorrect arc length.2. The thickness of the plate you want to weld3. The position it must be welded in (downhand, out ofposition)4. The surface condition of the metal to be weldedThe easiest way to tell whether the arc has the correctlength is by listening to its sound. A nice, short arc has adistinctive, “crackling” sound, very much like eggs frying ina pan. The incorrect, long arc has a hollow, blowing orhissing sound.5. Your ability to handle and obtain the desiredelectrodeThe following four simple manipulations are of prime importance.Without complete mastery of these four, further welding is more orless futile. With complete mastery of the four, welding will be easy.4. The Correct Welding SpeedThe important thing to watch while welding is the puddle ofmolten metal right behind the arc. Do NOT watch the arcitself. It is the appearance of the puddle and the ridge wherethe molten puddle solidifies that indicate correct weldingspeed. The ridge should be approximately 3/8" (9.5mm)behind the electrode.1. The Correct Welding PositionAt first, you may find it easier to use the two-handedtechnique shown below. This requires the use of a weldinghelmet.a. Hold the electrode holder in your right hand.The tendancy is to weld too fast, resulting in a thin, uneven,“wormy” looking bead. Watching the molten metal.b. Touch your left hand to the underside of your right.c. Put the left elbow against your left side.(For welding left-handed it is the opposite.)If you are using a hand shield, hold the electrode holder inyour right hand and the hand shield in your left. (For weldingleft-handed it is the opposite.)Whenever possible, weld from left to right (if right-handed).This enables you to see clearly what you are doing.IMPORTANT: For general welding it is not necessary to weave the arc; neitherforwards and backwards nor sideways. Weld along at a steady pace. Youwill find it easier.Hold the electrode at a slight angle as shown.NOTE: When welding on thin plate, you will find that you will have to increasethe welding speed, whereas when welding on heavy plate, it is necessaryto go more slowly in order to get good penetration.2
LEARNING TO STICK WELDPRACTICECommon MetalsMost metals found around the farm or small shop are lowcarbon steel, sometimes referred to as mild stee
welding circuit and the equipment that provides the electric current used in the arc. Figure 1 is a diagram of the welding circuit. The circuit begins where the