Transcription
Luma Surveillance Mobile AppOwner’s GuideVersion 180503-1035
Mobile App User’s GuideGetting StartedThe Luma Surveillance app allows you to view live and recorded video from your system. With internet access,you can review footage on your compatible Android or iOS device from anywhere in the world. The app is availableon both the Google Play store and the Apple App store.When you launch your app, it opens into the live view. From here you can monitor all of your surveillance camerasvia the internet, no matter where they are. If your installer did not set up your Luma app for you, see “AddingDevices” on page 9.Providing Video to Law EnforcementUS courts require a digital watermark to ensure that a surveillance video has not been tampered with. Only videoswith this watermark are admissible as evidence in a court of law.Surveillance videos recorded by and exported directly from your Luma recorder (using the Export or Clip tools) arethe only files that have the digital watermark.Videos recorded through the Luma mobile app do not have this watermark. Yes, you can show them to lawenforcement, but they are not admissible in court as evidence.ContentsUsing the Live View. 3Managing Recorders and Cameras . 9Grid Settings. 3Adding Devices. 9Control Icons . 3Editing a Device. 10Landscape Mode. 4Hiding a Device. 10Customizing Your View. 4Removing a Device. 10Fisheye Controls. 5Setting Up the Live View. 10PTZ Controls. 5Configuration. 11Playing Recorded Video. 6Password Protection. 11Finding the Recording You Want. 6Traffic Statistics. 11Landscape mode. 6Hard-Decoding Preferred. 11Control Icons. 7About. 11Working with Pictures and Videos. 8Viewing and Editing a Single File. 8Managing Groups of Files. 82
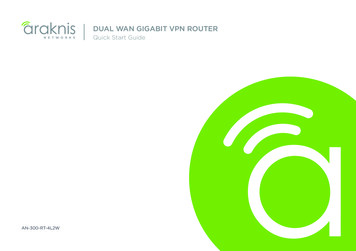
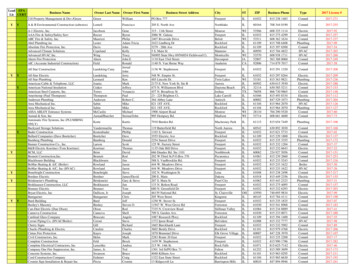
Mobile App User’s GuideUsing the Live ViewAlthough you’ll spend most of your time here, you can tapto get to the main menu orto view the device list.One camera always has a blue border. This is the active camera, and is the onethat tools affect (e.g., snapshot).Grid SettingsYour app can show multiple cameras at once by using a grid view. Below thecamera screens, theandicons set the grid view to show 1, 4, 9, or16 cameras. The box a camera is in is called a channel.) show the different pagesThe dots in between the grid view icons (you can view, based on your current grid settings. The blue dot indicates yourcurrent page; gray dots are other available pages.Swipe the camera grid (not the dots) left or right to move to another page.Double tap on a given channel to zoom in on a single-channel view of thatcamera. Double-tapping a second time returns you to the previous grid view.Control IconsAt the bottom of the screen is a toolbar with nine control icons. Only five are visible at a time in portrait mode,but you can swipe the toolbar left or right to reveal the rest of the icons. In order, the tools are:Zoom: Tapfor digital zoom. When this is active (it turns blue and switches you to singlechannel mode), you can pinch and splay your fingers (or double-tap) on the screen to zoom inand out. Tap again to close digital zoom and return to your previous view mode.Playback: Tap to switch to playback mode. See “Playing Recorded Video” on page 6.Resolution: When you are in single-channel mode, tapto toggle the app’s resolution betweenmedium and high (the blue text indicates which resolution is active). Tap the icon again to closeresolution mode. High resolution is disabled when viewing multiple cameras simultaneously.Snapshot: Tappingtakes a photo of the active camera on your screen (the one with the blueborder). This is not a screen shot. The image is saved, but the toolbars, etc., are not included. Thesnapshot is saved in the app’s Picture & Video section, and can be viewed there.Record: The icon starts a recording of the active camera (the one with the blue border). Whilerecording, a appears in the top left corner of the channel. The recording is of just the camera;toolbars are not included. The video is saved in the app’s Picture & Video section, and can beviewed from there. Recorded videos have a minimum length of 5 seconds.PTZ: Theallows pan/tilt/zoom control of a PTZ-enabled camera. See “PTZ Controls” on page5 for complete details.Microphone: Tap the / icon to enable you to speak through your mobile device to the activecamera’s speaker (if it has one). Combined with the speaker feature (next icon), this allows twoway audio communication.Speaker: Theicon activates audio from the active camera, if it is audio enabled. Presstomute the camera’s audio feed again. If multiple cameras have this active, the app only playsaudio from the active channel.Fisheye: Tapto open the fish-eye controls for the active camera. See “Fisheye Controls” onpage 5 for more details.3
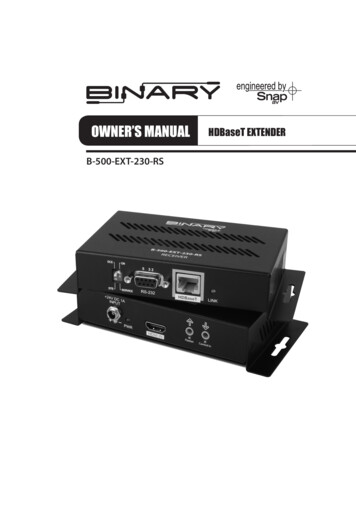
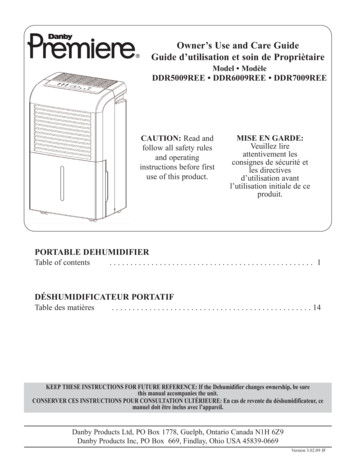
Mobile App User’s GuideLandscape ModeRotate your smartphone or tablet to view the cameras in landscapemode. The controls operate the same as in portrait mode.Note that inactivity, as well as rearranging the camera channels,makes the controls disappear. Tap the screen to make them reappear.The page dots are shown across the top, while the grid view settingsare shown to the right. Swipe the camera screen left or right to moveto another page.All nine control icons are visible across the bottom.Note that the homeand device listbuttons are not available in landscape mode; you must switch to portrait.Customizing Your ViewYou can rearrange your cameras in your grid by dragging a camera first eitherup or down (the top of the screen turns green), then moving it over anotherchannel, whether that channel has a camera assigned to it or not. The twocameras switch channels.Removing a CameraYou can completely remove a camera from the view by dragging it up to the topof the screen. The top of the screen turns red (as shown at right) and the trashcan icon opens to indicate that the camera’s view will be removed from thegrid. That channel remains empty. This does not affect the camera itself, nordoes it remove the camera from your list of devices; it just detaches it from thatparticular channel in your app.Adding a CameraClick theicon in an empty channel to choose a camera to fill that channel on your screen. Choosing a givencamera removes that camera from any other channel to which it has been assigned.Tapping in the live view takes you to the camera list. From the camera list, you select which cameras to view inyour app. Your app can view up to 16 cameras at once, drawn from any device in your list. You can mix and matchanalog and digital cameras from different locations.icon to the right of a recorder to select all of its cameras. Tapagain (or ) to deselect allYou can tap thecameras. Tap the icon by one of your devices to open up its list of cameras so you can select them individually.Each camera that is selected shows a blue by it; you can also tap that icon to select or deselect the camera.You can refresh the list by pulling the list down, and then releasing it.Tap Start Live View at the bottom to start the live view with these settings, ormaking the changes you just specified.to return to the live view withoutMarking FavoritesWhen one or more cameras are selected, you can tapto mark those cameras as favorites. Whenever you markcameras as favorites, the app creates a group for that batch. This group behaves like a recorder with its own set ofcameras. A single camera can be part of more than one favorites grouping.To make them easy to find, your favorites always show at the top of your camera list. You can delete a device fromthe favorites list by dragging the group (not the camera) to the left or right, then tapping Delete. This does notremove the camera from its recorder, just from the favorites group.4
Mobile App User’s GuideFisheye ControlsWhen you activate the fisheye button, you can use the following tools:180 Field (use with ceiling or table mounts): This splits the view of the camera into two sections,each covering half of the camera’s view. Within each field, the view angle cuts off at about 20 above the center of the camera to create two natural-looking panoramas that project the camera’sentire field of view.360 Field (ceiling, table): This operates like the 180 field above, but displays the entire view ofthe camera in one image. It is very distorted, and best viewed in landscape mode.Panorama (wall mount): This creates a panoramic view for wall-mounted cameras.Natural View: This button limits the camera view to roughly 60 wide, which gives the view amuch more natural appearance. Swipe the expanded view to pan the view left or right as wellas up and down. Pinch or splay your fingers on the screen to zoom in and out. These actions donot actually move the camera, but focuses on different parts of the lens.PTZ ControlsYour Luma app includes five PTZ (pan/tilt/zoom) controls. You can access these by tapping the PTZ ( ) icon. Doingso turns the PTZ icon blue to show it’s active, and switches you to single-channel mode. You cannot leave thissingle-channel mode until you deactivate the PTZ controls by tappingagain.While in PTZ control mode, you can drag your finger across the camera channel to pan the camera in that direction.You can also pinch or splay your fingers to zoom in and out.The PTZ controls are:Auto-scan: Tappingstarts and stops auto-scan, if this command is supported by the camera.Zoom: Tappingopens the zoom panel. You can zoom in to see distant objects ( ) or zoom outfor the whole picture ( – ). Tapagain to close the panel.Focus:opens the focus control panel. You can focus on near objects ( ) or distant ones ( – ).Tap again to close the panel.Iris: The opens the iris control panel. Opening the iris ( ) makes the picture brighter, whileclosing it ( – ) makes it darker. Tap again to close the panel.Presets: Tap to open the preset control panel, where you edit camera positions. Tapthe panel. Within the preset control panel:to close}} To create a preset, move the camera to the desired position, scroll the digits to the presetnumber (from 1–256), and then tap Set. The preset is saved on the camera.}} To call a preset, scroll the digits to the preset number (from 1–256), and then tap Call.}} To delete a preset, scroll the digits to the preset number (from 1–256), and then tap Delete.5
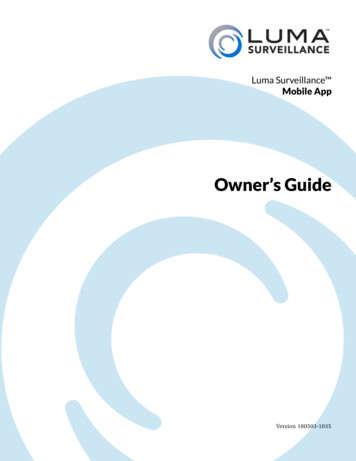
Mobile App User’s GuidePlaying Recorded VideoTo review recorded files, tap the icon from the live view screen. Alternatively, tap themode to get to the home screen, then select Remote Playback from the menu.icon when in portraitFinding the Recording You WantTap the icon in the upper right (or thedevice list.icon in a camera channel) to go to theThis screen lets you locate recordings taken by your surveillance system. You cansearch and filter the recordings based on camera and time.First, at the top, tap on the From: and To: boxes to set the start and end times foryour search. Rolling selection boxes let you choose the exact date and time youwish to use. By default, the system selects the previous 24 hours.Once you’ve set your times, choose the cameras you wish to use. The appautomatically loads those cameras with events from the times specified, and beginsplayback with the first event recorded on any of the cameras.You can view playback from several cameras at once, however the playback speedbutton only works if all cameras being played back have video recordings. Also,depending on your camera settings, high-speed playback may not work in gridmode due to the amount of data being transferred.The TimelineBelow the camera view, the timeline shows the active camera’s activity. Blue barsshow when the active camera was recording by schedule, and red bars show whenit was recording due to a trigger (e.g., motion detection).The orange marker shows where in the timeline the playback is. It’s always in the center of the display, andincludes the time stamp of the current video frame.You can swipe the timeline to the left and right to scan the events. If you swipe to a moment before that camera’sfirst recording, the system corrects the timeline’s position to the start of that camera’s earliest recording (within thesearch parameters). If you swipe to a blank area where there are no recordings, the system starts playback at thebeginning of the next available video.Moving the timeline only shifts the playback of the active camera. In this way, you can get asynchronous playback.Landscape modeYou can rotate your device to view the playback in landscape mode.The controls operate the same as in portrait mode; they’re just arrangeddifferently.The timeline is shown across the top. You can swipe the timeline asusual to search for recordings.All seven control icons are visible across the bottom.6
Mobile App User’s GuideControl IconsAt the bottom of the screen is a toolbar with seven control icons. Only five are visible at a time in portrait mode,but you can swipe the toolbar left or right to reveal the rest of the icons. All seven are visible in landscape mode.In order, the tools are:Zoom: Tapfor digital zoom. When this is active (it turns blue and switches you to singlechannel mode), you can pinch and splay your fingers (or double-tap) on the screen to zoom inand out. Tap again to close digital zoom.Live View: Tap to leave playback and return to the live view mode.Pause/Play: Tapto suspend playback, andto resume playback.Speed: Tapto open the playback options. Tapto set the playback time fromor1/4 time to 4x. The icon changes to reflect the chosen speed. Your best high-speed playbackperformance occurs in single-channel mode.Snapshot: Tappingtakes a photo of the active camera on your screen (the one with the blueborder). This is not a screen shot. The image is saved, but the toolbars, etc., are not included. Thesnapshot is saved in the app’s Picture & Video section, and can be viewed there.Record: The icon starts a recording of the active camera (the one with the blue border). Whilerecording, a appears in the top left corner of the channel. The recording is of just the camera;toolbars are not included. The video is saved in the app’s Picture & Video section, and can beviewed from there. Recorded videos have a minimum length of 5 seconds.Speaker: Theactivates audio from the active camera, if it is audio enabled. Pressto mutethe camera’s audio feed again. If multiple cameras have this active, the app only plays audiofrom the active channel.7
Mobile App User’s GuideWorking with Pictures and VideosYou can review and edit snapshots and recordings made by your Luma app on the Picture & Video page.At the top, theicon takes you to the home page, while thebutton lets you edit files in large batches.Viewing and Editing a Single FileTap on the file’s thumbnail. Tap theicon to return to the primary Picture & Video page.From here, you can view individual photos and play videos. While viewing a video, theappear at the bottom and can be used./,, and/iconsSwipe the file left or right to review other files.At the bottom, tap to send the current file to someone via email ( ), or to copy the file (if it’s a photo) to yoursmartphone’s or tablet’s photo album; or else tap the icon to delete it permanently.Managing Groups of FilesAt the top of the Picture & Video page, tap the icon. You can then tap as many files as you like to select them.Each selected file is marked with a . You can then tap to send the selected files to someone via email ( ), or(if it’s a photo) you can tap to copy the selected files to your smartphone’s or tablet’s photo album. You can alsotap the icon to delete them permanently.Tapto leave batch edit mode and return to the primary Picture & Video page.Important Notes Regarding VideosNote that you cannot move videos to the photo album, but you can email them.Videos are recorded in MP4 format, which is not natively playable on iOS platforms. You’ll need to download VLCor another thrid-party video player to review these files.8
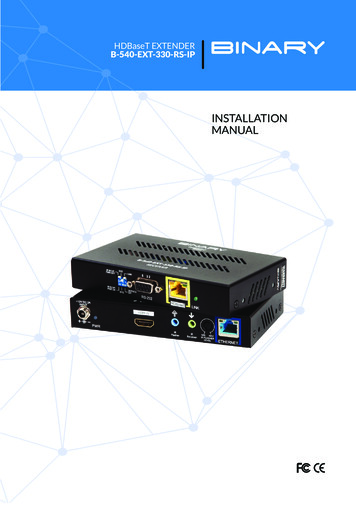
Mobile App User’s GuideManaging Recorders and CamerasThe devices page is where you manage the cameras and recorders that the app can access.At the top, theicon takes you to the home page, while thebutton adds a new device to your app.Adding DevicesThere are 2 ways to add your surveillance recorders to the app, enumerated below.Connect your smartphone or tablet to the internet before adding devices.Method 1: LumaLinkBe sure you have the latest version of the mobile app:}} Android: Version 4.3.2 20180329 or later}} iOS: Version 4.5.1 Build 20180329 or laterClaim your recorder on OvrC, then log into LumaLink using your OvrC password.All your P2P enabled devices are automatically added to your device list.The default name for a P2P device is a 28-character concatenation of the customername, location, and device model. you can change the name as desired.Method 2: RouterIn order to add your surveillance recorders (each with all of its attached cameras) to your app, you must providethe following information for each one:}} The device’s IP address or DDNS address}} Device server port number}} Device user name and passwordYou will also want an alias for the recorder: a name to help you remember exactly what it is (e.g., “lake house”).1. Tap theicon to get to thehome screen. Select Devicesfrom the menu.2. On the screen shown below,tap the icon at the top to adda Luma device.3. Enter the information and tapthebutton. For address, useeither the recorder’s IP addressor its DDNS URL.9
Mobile App User’s GuideThe app queries the device to ensure that everything is accurate, then adds it to the list of devices on your app.When you add a recorder, the app adds all cameras controlled by that recorder. If the app cannot find your device, itgives you an error code and takes you to the editing dialog, explained below, with the new device already selected.Repeat steps 2 and 3 for each Luma device that you wish to add. When you are finished, tap Start Live View at thebottom of the Devices screen (you may need to scroll down if you have a lot of devices).Editing a DeviceWithin the devices page, tap on one of the devices. This opens a special dialog in which you can edit the devicesthat your app can access. Tap the icon to begin editing.You can tap to cancel all your edits or to add the device with its new parameters. You cannot save edits withouttrying to add the device, not even a change to its alias.Hiding a DeviceYou can also use the slider button on the P2P-enabled devicepage to hide the recorder from the device list (see near right).On the device page the slider shows all devices, including theP2P devices you had previously hidden (see far right).Removing a DeviceIf you want to remove a device from your app, swipe thatdevice to the left and tap Delete. Note that you cannot removeindividual cameras from a recorder.Setting Up the Live ViewAt the top,takes you to the home screen. Select Live View from the menu.Selecting Which Cameras to ViewTapping in the live view takes you to the camera list. From the camera list, you select which cameras to view inyour app. Your app can view up to 16 cameras at once, drawn from any device in your list. You can mix and matchanalog and digital cameras from widely dif
The Luma Surveillance app allows you to view live and recorded video from your system. With internet access, you can review footage on your compatible Android or iOS device from anywhere in the world. The app is available on both the Google Play store and the Apple App store. When you launch your app, it opens into the live view. From here .