Transcription
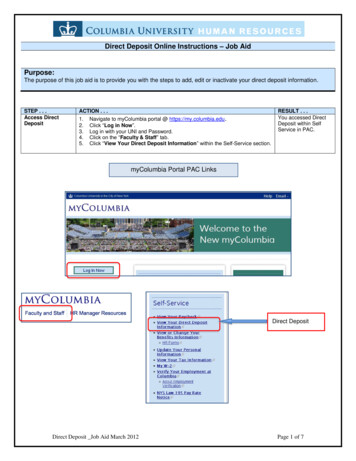
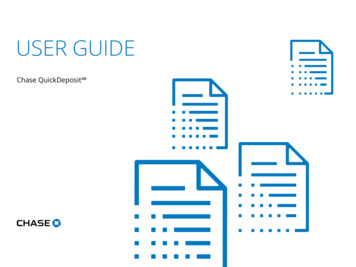
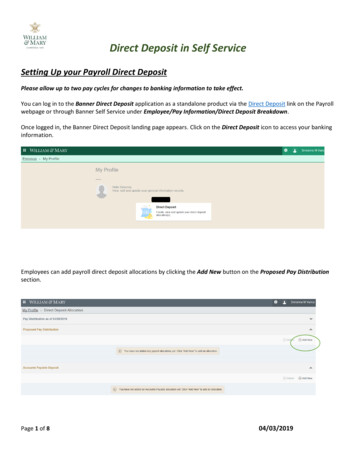
Direct Deposit in Self ServiceSetting Up your Payroll Direct DepositPlease allow up to two pay cycles for changes to banking information to take effect.You can log in to the Banner Direct Deposit application as a standalone product via the Direct Deposit link on the Payrollwebpage or through Banner Self Service under Employee/Pay Information/Direct Deposit Breakdown.Once logged in, the Banner Direct Deposit landing page appears. Click on the Direct Deposit icon to access your bankinginformation.Employees can add payroll direct deposit allocations by clicking the Add New button on the Proposed Pay Distributionsection.Page 1 of 804/03/2019
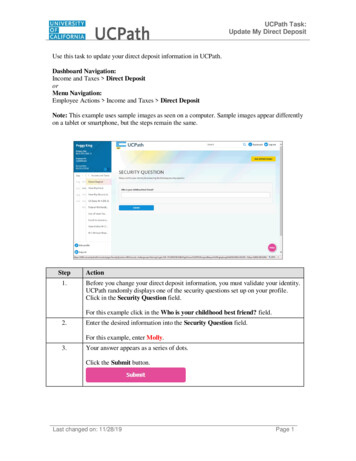
Direct Deposit in Self ServiceThe Add Payroll Allocation window will open. Here is where you will enter your banking information.Below please find brief descriptions of each required field.Bank Routing NumberEnter a valid Bank Routing number for your institution. Valid bank routing numbers for the United States can contain upto 9 characters.Sample Check icon ‘i’Select this icon to view an image of a sample check that displays the locations of the bank routing number and accountnumber on a checkAccount NumberEnter a valid bank Account Number. Valid bank account numbers for the United States can contain up to 17 characters.Page 2 of 804/03/2019
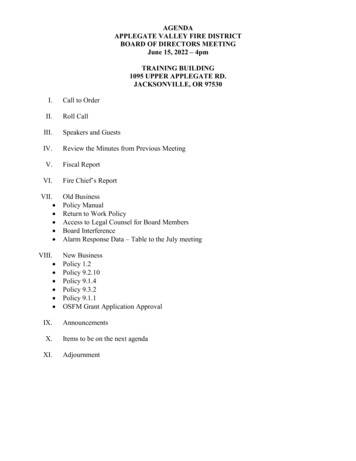
Direct Deposit in Self ServiceAccount Type Drop-down ListUse this drop-down list to select either checking or savings for the Payroll direct deposit allocation.Amount Radio Button GroupThe payroll Amount is designated as Remaining, Specific, or Percentage. Use Remaining Amount – Select this option button to deposit the amount of money remaining after the priorallocations are deposited into the designated accounts.Note: If the Use Remaining Amount option button is selected, the Priority field will be disabled and not available forselection. Remaining Amount can also be selected to deposit the entire allocation into one designated account. Use Specific Amount – Select this option button to deposit a specific amount of money into the designated account.Enter this amount in the ‘Enter Amount’ input field. Valid values are 0.01 to 99999999.99.Page 3 of 804/03/2019
Direct Deposit in Self Service Use Percentage – Select this option button to deposit a percentage amount of money into the designated account.Enter this amount in the Enter Percentage % input field.Priority List fieldUse this drop-down list to select a priority for the direct deposit allocation. Select the down arrow from this list todisplay the priority numbers available for selection.Disclaimer Check BoxUse this check box to acknowledge the customized disclaimer message that the institution has created to receiveauthorization to initiate direct credits or debits on behalf of the user.Save New DepositUse this button to save any pending changes that may exist on the landing page.Note: This button is not enabled until the Disclaimer check box is checked.Once all required fields have been updated and the deposit saved, this information will be shown under Proposed PayDistribution as a pre-note.Page 4 of 804/03/2019
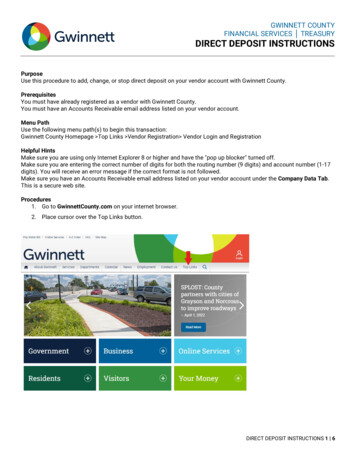
Direct Deposit in Self ServiceSetting Up your Accounts Payable DepositEmployees are also required to have active banking information for transactions processed through Accounts Payable.Please be sure to complete the Accounts Payable Deposit section. Begin by clicking Add New.You will have the option of electing to route your Accounts Payable deposits to an existing Payroll Direct Deposit, or youcan create a record for a new account.Create from existing account informationSelect the account to be used from the drop-down list if multiple payroll accounts exist or proceed to the next step (ifthere is only one payroll account it will default to it).Page 5 of 804/03/2019
Direct Deposit in Self ServiceCreate NewThe steps to create a new banking record for Accounts Payable are the same as those outlined earlier for setting up yourPayroll direct deposit information. In the Bank Routing Number field, enter the bank routing number.In the Account Number field, enter the account number.From the Account Type list, select the account type (either Checking or Savings).Page 6 of 804/03/2019
Direct Deposit in Self Service Check the Disclaimer text box to acknowledge you read the disclaimer.Click Save New Deposit.Once all required fields have been updated and the deposit saved, this information will be shown under AccountsPayable Deposit as a pre-note.Updating your Direct Deposit AccountsDeleting an AccountEmployees can delete their existing direct deposit account by selecting the check box in front of the account to bedeleted and clicking the Delete button.Select the check box next to the account to be deleted.Click the Delete button.The “Are you sure you want to delete the selected Payroll deposits?” message is displayed.Click the Delete button in the notification window to remove the account.Page 7 of 804/03/2019
Direct Deposit in Self ServiceEditing or Updating an AccountEmployees can update Account Type, Amount or Priority under Proposed Pay Distribution by entering changes directlyinto the field to be edited.Click the disclaimer check box to acknowledge your consent and click Save Changes.The Saved Successfully message will appear in the upper right corner of your screen.Page 8 of 804/03/2019
Click on the Direct Deposit icon to access your banking information. Employees can add payroll direct deposit allocations by clicking the Add New button on the Proposed Pay Distribution section. Direct Deposit in Self Service Page 2 of 8 04/03/2019 The Add Payroll Allocation window will open. Here is where you will enter your banking information.