
Transcription
PIX/ASA as a Remote VPN Server with ExtendedAuthentication using CLI and ASDM ConfigurationExampleDocument ID: ts UsedRelated ProductsConventionsBackground InformationConfigurationsConfigure the ASA/PIX as a Remote VPN Server using ASDMConfigure the ASA/PIX as a Remote VPN Server using CLICisco VPN Client Password Storage ConfigurationDisable the Extended AuthenticationVerifyTroubleshootIncorrect Crypto ACLNetPro Discussion Forums Featured ConversationsRelated InformationIntroductionThis document describes how to configure the Cisco 5500 Series Adaptive Security Appliance (ASA) to act asa remote VPN server using the Adaptive Security Device Manager (ASDM) or CLI. The ASDM deliversworld class security management and monitoring through an intuitive, easy to use Web based managementinterface. Once the Cisco ASA configuration is complete, it can be verified using the Cisco VPN Client.Refer to PIX/ASA 7.x and Cisco VPN Client 4.x with Windows 2003 IAS RADIUS (Against ActiveDirectory) Authentication Configuration Example in order to set up the remote access VPN connectionbetween a Cisco VPN Client (4.x for Windows) and the PIX 500 Series Security Appliance 7.x. The remoteVPN Client user authenticates against the Active Directory using a Microsoft Windows 2003 InternetAuthentication Service (IAS) RADIUS server.Refer to PIX/ASA 7.x and Cisco VPN Client 4.x for Cisco Secure ACS Authentication ConfigurationExample in order to set up a remote access VPN connection between a Cisco VPN Client (4.x for Windows)and the PIX 500 Series Security Appliance 7.x using a Cisco Secure Access Control Server (ACS version 3.2)for extended authentication (Xauth).PrerequisitesRequirementsThis document assumes that the ASA is fully operational and configured to allow the Cisco ASDM or CLI tomake configuration changes.
Refer to Allowing HTTPS Access for ASDM or PIX/ASA 7.x: SSH on the Inside and Outside InterfaceConfiguration Example to allow the device to be remotely configured by the ASDM or Secure Shell (SSH).Components UsedThe information in this document is based on these software and hardware versions: Cisco Adaptive Security Appliance Software Version 7.x and later Adaptive Security Device Manager Version 5.x and later Cisco VPN Client Version 4.x and laterThe information in this document was created from the devices in a specific lab environment. All of thedevices used in this document started with a cleared (default) configuration. If your network is live, make surethat you understand the potential impact of any command.Related ProductsThis configuration can also be used with Cisco PIX Security Appliance Version 7.x and later.ConventionsRefer to Cisco Technical Tips Conventions for more information on document conventions.Background InformationRemote access configurations provide secure remote access for Cisco VPN clients, such as mobile users. Aremote access VPN lets remote users securely access centralized network resources. The Cisco VPN Clientcomplies with the IPSec protocol and is specifically designed to work with the security appliance. However,the security appliance can establish IPSec connections with many protocol compliant clients. Refer to theASA Configuration Guides for more information on IPSec.Groups and users are core concepts in the management of the security of VPNs and in the configuration of thesecurity appliance. They specify attributes that determine users access to and use of the VPN. A group is acollection of users treated as a single entity. Users get their attributes from group policies. Tunnel groupsidentify the group policy for a specific connections. If you do not assign a particular group policy to a users,the default group policy for the connection applies.A tunnel group consists of a set of records that determines tunnel connection policies. These records identifythe servers to which the servers to which the tunnel users are authenticated, as well as the accounting servers,if any, to which connections information is sent. They also identifiy a default group policy for theconnections, and they contain protocol specific connection parameters. Tunnel groups include a smallnumber of attributes that pertains to the creation of the tunnel itself. Tunnel groups include a pointer to agroup policy that defines user oriented attributes.In the sample configuration in this document, local user accounts are used for authentication. If you wouldlike to use another service, such as LDAP and RADIUS, refer to Configuring an External RADIUS Server forAuthorization and Authentication.The Internet Security Association and Key Management Protocol (ISAKMP), also called IKE, is thenegotiation protocol that hosts agree on how to build an IPSec Security Association. Each ISAKMPnegotiation is divided into two sections, Phase1 and Phase2. Phase1 creates the first tunnel to protect laterISAKMP negotiation messages. Phase2 creates the tunnel that protects data that travels across the secureconnection. Refer to ISAKMP Policy Keywords for CLI Commands for more information on ISAKMP.
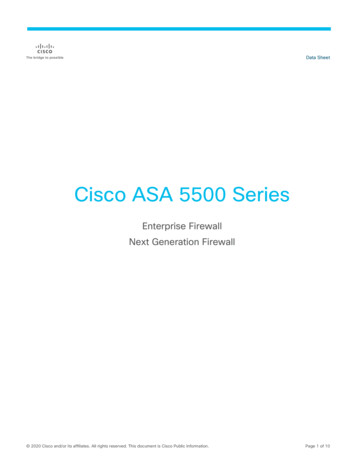
ConfigurationsConfigure the ASA/PIX as a Remote VPN Server using ASDMComplete these steps in order to configure the Cisco ASA as a remote VPN server using ASDM:1. Select Wizards VPN Wizard from the Home window.2. Select the Remote Access VPN tunnel type and ensure that the VPN Tunnel Interface is set asdesired.
3. The only VPN Client Type available is already selected. Click Next.4. Enter a name for the Tunnel Group Name. Supply the authentication information to use.Pre shared Key is selected in this example.
There is not a way to hide/encrypt the pre shared key on the ASDM. The reason is that the ASDMshould only be used by people who configure the ASA or by people who are assisting the customerwith this configuration.5. Choose whether you want remote users to be authenticated to the local user database or to an externalAAA server group.You add users to the local user database in step 6.Refer to PIX/ASA 7.x Authentication and Authorization Server Groups for VPN Users via ASDMConfiguration Example for information on how to configure an external AAA server group viaASDM.
6. Add users to the local database if necessary.Do not remove existing users from this window. Select Configuration Device Administration Administration User Accounts in the main ASDM window to edit existing entries in the databaseor to remove them from the database.
7. Define a pool of local addresses to be dynamically assigned to remote VPN Clients when theyconnect.8. Optional: Specify the DNS and WINS server information and a Default Domain Name to be pushedto remote VPN Clients.
9. Specify the parameters for IKE, also known as IKE Phase 1.Configurations on both sides of the tunnel must match exactly. However, the Cisco VPN Clientautomatically selects the proper configuration for itself. Therefore, no IKE configuration is necessaryon the client PC.10. Specify the parameters for IPSec, also known as IKE Phase 2.Configurations on both sides of the tunnel must match exactly. However, the Cisco VPN Clientautomatically selects the proper configuration for itself. Therefore, no IKE configuration is necessaryon the client PC.
11. Specify which, if any, internal hosts or networks should be exposed to remote VPN users.If you leave this list empty, it allows remote VPN users to access the entire inside network of theASA.You can also enable split tunneling on this window. Split tunneling encrypts traffic to the resourcesdefined earlier in this procedure and provides unencrypted access to the Internet at large by nottunneling that traffic. If split tunneling is not enabled, all traffic from remote VPN users is tunneled tothe ASA. This can become very bandwidth and processor intensive, based on your configuration.
12. This window shows a summary of the actions that you have taken. Click Finish if you are satisfiedwith your configuration.
Configure the ASA/PIX as a Remote VPN Server using CLIComplete these steps in order to configure a remote VPN Access Server from the command line. Refer toConfiguring Remote Access VPNs or Cisco ASA 5500 Series Adaptive Security Appliances CommandReferences for more information on each command that is used.1. Enter the ip local pool command in global config mode in order to configure IP address pools to usefor VPN remote access tunnels. In order to delete address pools, enter the no form of this command.The security appliance uses address pools based on the tunnel group for the connection. If youconfigure more than one address pool for a tunnel group, the security appliance uses them in the orderin which they are configured. Issue this command in order to create a pool of local addresses that canbe used to assign dynamic addresses to remote access VPN Clients:ASA AIP CLI(config)#ip local pool vpnpool 172.16.1.100 172.16.1.199 mask255.255.255.02. Issue this command:ASA AIP CLI(config)#username marty password 123456783. Issue this set of commands in order to configure the specific tunnel: ASA AIP CLI(config)#isakmp policy 1 authentication pre share ASA AIP CLI(config)#isakmp policy 1 encryption 3des ASA AIP CLI(config)#isakmp policy 1 hash sha ASA AIP CLI(config)#isakmp policy 1 group 2 ASA AIP CLI(config)#isakmp policy 1 lifetime 43200 ASA AIP CLI(config)#isakmp enable outside ASA AIP CLI(config)#crypto ipsec transform set ESP 3DES SHA esp 3desesp sha hmac ASA AIP CLI(config)#crypto dynamic map outside dyn map 10 set transform setESP 3DES SHA ASA AIP CLI(config)#crypto dynamic map Outside dyn map 10 set reverse route ASA AIP CLI(config)#crypto dynamic map outside dyn map 10 setsecurity association lifetime seconds 288000 ASA AIP CLI(config)#crypto map Outside map 10 ipsec isakmp dynamicOutside dyn map ASA AIP CLI(config)#crypto map outside map interface outside ASA AIP CLI(config)#crypto isakmp nat traversal4. Optional: If you would like the connection to bypass the access list that is applied to the interface,issue this command:ASA AIP CLI(config)#sysopt connection permit ipsecThis command works on 7.x images before 7.2(2). If you use image 7.2(2), issue theASA AIP CLI(config)#sysopt connection permit vpn command.5. Issue this command:ASA AIP CLI(config)#group policy hillvalleyvpn internal6. Issue these commands in order to configure client connection settings: ASA AIP CLI(config)#group policy hillvalleyvpn attributes ASA AIP CLI(config)#(config group policy)#dns server value 172.16.1.11 ASA AIP CLI(config)#(config group policy)#vpn tunnel protocol IPSec ASA AIP CLI(config)#(config group policy)#default domain value test.com
7. Issue this command:ASA AIP CLI(config)#tunnel group hillvalleyvpn ipsec ra8. Issue this command:ASA AIP CLI(config)#tunnel group hillvalleyvpn ipsec attributes9. Issue this command:ASA AIP CLI(config tunnel ipsec)#pre shared key cisco12310. Issue this command:ASA AIP CLI(config)#tunnel group hillvalleyvpn general attributes11. Issue this command in order to refer the local user database for authentication.ASA AIP CLI(config tunnel general)#authentication server group LOCAL12. Associate the group policy with the tunnel groupASA AIP CLI(config tunnel ipsec)# default group policy hillvalleyvpn13. Issue this command while in the general attributes mode of the hillvalleyvpn tunnel group in orderto assign the vpnpool created in step 1 to the hillvalleyvpn group.ASA AIP CLI(config tunnel general)#address pool vpnpoolRunning Config on the ASA DeviceASA AIP CLI(config)#show running configASA Version 7.2(2)!hostname ASAwAIP CLIdomain name corp.comenable password WwXYvtKrnjXqGbu1 encryptednames!interface Ethernet0/0nameif Outsidesecurity level 0ip address 10.10.10.2 255.255.255.0!interface Ethernet0/1nameif insidesecurity level 100ip address 172.16.1.2 255.255.255.0!interface Ethernet0/2shutdownno nameifno security levelno ip address!interface Ethernet0/3shutdownno nameifno security levelno ip address!interface Management0/0shutdownno nameifno security levelno ip address!passwd 2KFQnbNIdI.2KYOU encrypted
ftp mode passivedns server group DefaultDNSdomain name corp.compager lines 24mtu Outside 1500mtu inside 1500ip local pool vpnpool 172.16.1.100 172.16.1.199 mask 255.255.255.0no failovericmp unreachable rate limit 1 burst size 1no asdm history enablearp timeout 14400timeout xlate 3:00:00timeout conn 1:00:00 half closed 0:10:00 udp 0:02:00 icmp 0:00:02timeout sunrpc 0:10:00 h323 0:05:00 h225 1:00:00 mgcp 0:05:00 mgcp pat 0:05:00timeout sip 0:30:00 sip media 0:02:00 sip invite 0:03:00 sip disconnect 0:02:00timeout uauth 0:05:00 absolutegroup policy hillvalleyvpn1 internalgroup policy hillvalleyvpn1 attributesdns server value 172.16.1.11vpn tunnel protocol IPSecdefault domain value test.comusername marty password 6XmYwQOO9tiYnUDN encryptedno snmp server locationno snmp server contactsnmp server enable traps snmp authentication linkup linkdown coldstartcrypto ipsec transform set ESP 3DES SHA esp 3des esp sha hmaccrypto dynamic map Outside dyn map 10 set transform set ESP 3DES SHAcrypto dynamic map outside dyn map 10 set security association lifetime seconds 288000crypto map Outside map 10 ipsec isakmp dynamic Outside dyn mapcrypto map Outside map interface Outsidecrypto isakmp enable Outsidecrypto isakmp policy 10authentication pre shareencryption 3deshash shagroup 2lifetime 86400crypto isakmp nat traversal 20tunnel group hillvalleyvpn type ipsec ratunnel group hillvalleyvpn general attributesaddress pool vpnpooldefault group policy hillvalleyvpntunnel group hillvalleyvpn ipsec attributespre shared key *telnet timeout 5ssh timeout 5console timeout 0!class map inspection defaultmatch default inspection traffic!!policy map type inspect dns preset dns mapparametersmessage length maximum 512policy map global policyclass inspection defaultinspect dns preset dns mapinspect ftpinspect h323 h225inspect h323 rasinspect netbiosinspect rshinspect rtspinspect skinnyinspect esmtp
psipxdmcp!service policy global policy globalprompt hostname 1192: endASA AIP CLI(config)#Cisco VPN Client Password Storage ConfigurationIf you have numerous Cisco VPN Clients, it is very hard to remember all the VPN Client usernames andpasswords. In order to store the passwords in the VPN Client machine, configure the ASA/PIX and the VPNClient as this section describes.ASA/PIXUse the group policy attributes command in global configuration mode:group policy VPNusers attributespassword storage enableCisco VPN ClientEdit the .pcf file and modify these parameters:SaveUserPassword 1UserPassword type your password Disable the Extended AuthenticationIn tunnel group mode, enter this command in order to disable the extended authentication, which is enabled bydefault, on the PIX/ASA 7.x:asa(config)#tunnel group client ipsec attributesasa(config tunnel ipsec)#isakmp ikev1 user authentication noneAfter you disable the extended authentication, the VPN Clients do not pop up a username/password for anauthentication (Xauth). Therefore, the ASA/PIX does not require the username and password configuration toauthenticate the VPN Clients.VerifyAttempt to connect to the Cisco ASA using the Cisco VPN Client in order to verify that the ASA issuccessfully configured.1. Select Connection Entries New.
2. Fill in the details of your new connection.The Host field should contain the IP address or hostname of the previously configured Cisco ASA.The Group Authentication information should correspond to that used in step 4. Click Save when youare finished.3. Select the newly created connection, and click Connect.
4. Enter a username and password for extended authentication. This information should match thatspecified in steps 5 and 6.5. Once the connection is successfully established select Statistics from the Status menu to verify thedetails of the tunnel.This window shows traffic and crypto information:This window shows split tunneling information:
TroubleshootUse this section to troubleshoot your configuration.Incorrect Crypto ACLASDM 5.0(2) is known to create and apply a crypto access control list (ACL) that can cause problems forVPN Clients that use split tunneling, as well as for hardware clients in network extension mode. Use ASDMversion 5.0(4.3) or later to avoid this problem. Refer to Cisco bug ID CSCsc10806 ( registered customers only) formore details.NetPro Discussion Forums Featured ConversationsNetworking Professionals Connection is a forum for networking professionals to share questions, suggestions,and information about networking solutions, products, and technologies. The featured links are some of themost recent conversations available in this technology.NetPro Discussion Forums Featured Conversations for SecuritySecurity: Intrusion Detection [Systems]Security: AAASecurity: GeneralSecurity: FirewallingRelated Information Cisco ASA 5500 Series Adaptive Security Appliances Most Common L2L and Remote Access IPsec VPN Troubleshooting Solutions Cisco ASA 5500 Series Adaptive Security Appliances Troubleshoot and Alerts Technical Support & Documentation Cisco Systems
Contacts & Feedback Help Site Map 2007 2008 Cisco Systems, Inc. All rights reserved. Terms & Conditions Privacy Statement Cookie Policy Trademarks ofCisco Systems, Inc.Updated: Feb 25, 2008Document ID: 68795
The remote VPN Client user authenticates against the Active Directory using a Microsoft Windows 2003 Internet Authentication Service (IAS) RADIUS server. Refer to PIX/ASA 7.x and Cisco VPN Client 4.x for Cisco Secure ACS Authentication Configuration Example in order to set up a remote access VPN connection between a Cisco VPN Client (4.x for .


![PIX-55 Operation Manual [AJR-224503]](/img/55/amano-pix55.jpg)

