Transcription
Cisco Firepower Threat Defense for theASA 5512-X, ASA 5515-X, ASA 5525-X,ASA 5545-X, and ASA 5555-X UsingFirepower Device Manager Quick StartGuideFirst Published: August 10, 2016Last Updated: November 2, 2020Version: 6.2 and laterEnd of Support NoticesNote: You cannot install Firepower Threat Defense 6.7 or subsequent releases on the ASA 5515-X, 5525-X,5545-X, and 5555-X. The final supported Firepower Threat Defense release for these platforms is 6.6.0Note: You cannot install Firepower Threat Defense 6.3 or subsequent releases on the ASA 5512-X. The finalsupported Firepower Threat Defense release for this platforms is 6.2.3.1. Is This Guide for You?This guide explains how to complete the initial configuration of your Firepower Threat Defense device using theFirepower Device Manager web-based device setup wizard included on Firepower Threat Defense devices.Firepower Device Manager lets you configure the basic features of the software that are most commonly used forsmall networks. It is especially designed for networks that include a single device or just a few, where you do notwant to use a high-powered multiple-device manager to control a large network containing many Firepower ThreatDefense devices.If you are managing large numbers of devices, or if you want to use the more complex features and configurationsthat Firepower Threat Defense allows, use the Firepower Management Center to configure your devices insteadof the integrated Firepower Device Manager.Use the CLI setup wizard to configure your Firepower Threat Defense device for network connectivity and toregister the device to a Firepower Management Center as described in http://www.cisco.com/go/ftd-asa-quick.2. Package ContentsThis section lists the package contents of each chassis. Note that contents are subject to change, and your exactcontents might contain additional or fewer items.Cisco Systems, Inc.3www.cisco.com
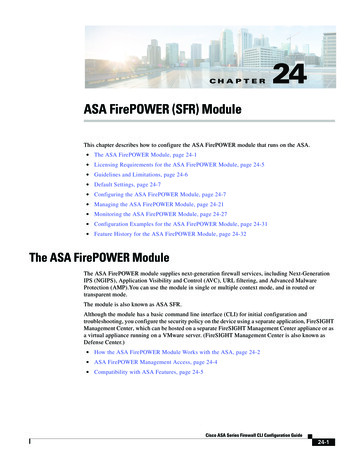
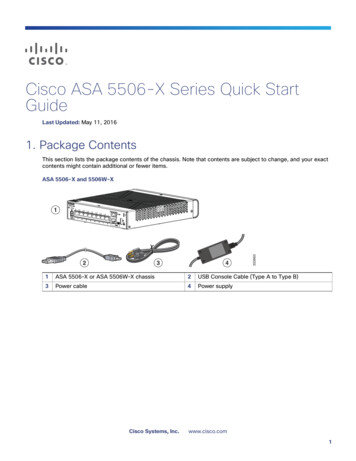
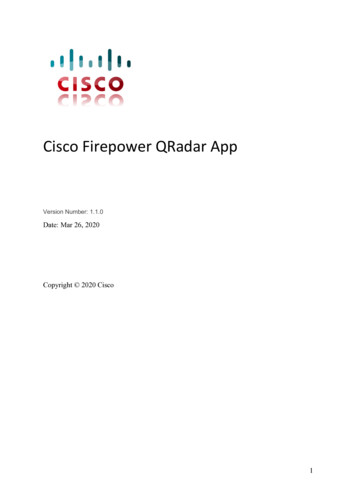
Cisco Firepower Threat Defense for the ASA 5512-X, ASA 5515-X, ASA 5525-X, ASA 5545-X, and ASA 5555-X Using2. Package ContentsASA 5512-X, ASA 5515-X, or ASA 5525-X12456330545371ASA 5512-X, ASA 5515-X, or ASA 5525-XChassis2Blue Console Cable and Serial PC TerminalAdapter (DB-9 to RJ-45)3Power Cord4Power Cord Retainer54 10-32 Phillips Screws for rack mounting64 12-24 Phillips Screws for rack mounting74 M6 Phillips Screws for rack mountingASA 5545-X and ASA 5555-X123330544451ASA 5545-X or ASA 5555-X Chassis(one power supply shown)2Blue Console Cable and Serial PC TerminalAdapter (DB-9 to RJ-45)3Power Cord4Power Cord Retainer5Slide Rail Kit3. License RequirementsFirepower Threat Defense devices require Cisco Smart Licensing. Smart Licensing lets you purchase and managea pool of licenses centrally. Unlike product authorization key (PAK) licenses, Smart Licenses are not tied to aspecific serial number or license key. Smart Licensing lets you assess your license usage and needs at a glance.4
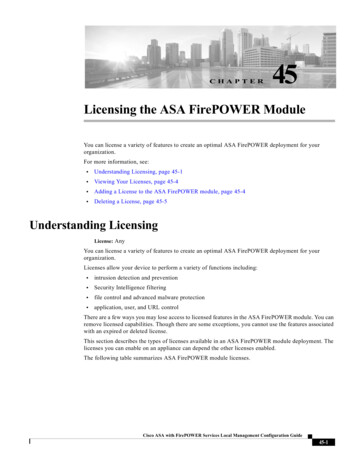
Cisco Firepower Threat Defense for the ASA 5512-X, ASA 5515-X, ASA 5525-X, ASA 5545-X, and ASA 5555-X Using2. Package ContentsIn addition, Smart Licensing does not prevent you from using product features that you have not yet purchased.You can start using a license immediately, as long as you are registered with the Cisco Smart Software Manager,and purchase the license later. This allows you to deploy and use a feature, and avoid delays due to purchase orderapproval.When you purchase one or more Smart Licenses for Firepower features, you manage them in the Cisco SmartSoftware Manager: anager/index.html. The SmartSoftware Manager lets you create a master account for your organization. For more information about the CiscoSmart Software Manager, see the Cisco Smart Software Manager User Guide.Your purchase of a Firepower Threat Defense device or Firepower Threat Defense Virtual automatically includes aBase license. All additional licenses (Threat, Malware, or URL Filtering) are optional. For more information aboutFirepower Threat Defense licensing, see the Licensing the System chapter of the Cisco Firepower Threat DefenseConfiguration Guide for Firepower Device Manager.4. Deploy the Firepower Threat Defense in Your NetworkThe following figure shows the recommended network deployment for Firepower Threat Defense on the ASA5512-X, ASA 5515-X, ASA 5525-X, ASA 5545-X, and ASA 5555-X.FirepowerThreat DefenseoutsideGigabitEthernet 0/0DHCP from outside nwinsideGigabitEthernet 0/1192.168.1.1Management ComputerDHCP from inside ifc:192.168.1.xOutsideManagementAlternative: Management 0/0IP Address:192.168.45.45The example configuration enables the above network deployment with the following behavior. inside -- outside traffic flow outside IP address from DHCP DHCP for clients on inside. There is a DHCP server on the inside interface. You can plug your managementcomputer directly into one of the inside interfaces and get an address on the 192.168.1.0/24 network.HTTPS access is enabled on the inside interface, so you can open Firepower Device Manager through theinside interface at the default address, 192.168.1.1. Alternatively, you can connect to Management 0/0 to set up and manage the device using the FirepowerDevice Manager. There is a DHCP server on the management interface. You can plug your managementcomputer directly into this interface and get an address on the 192.168.45.0/24 network.HTTPS access is enabled on the management interface, so you can open Firepower Device Manager throughthe management interface at the default address, 192.168.45.45.Note: The physical management interface is shared between the Management logical interface and theDiagnostic logical interface; see the Interfaces chapter of the Firepower Threat Defense Configuration Guidefor Firepower Device Manager.5
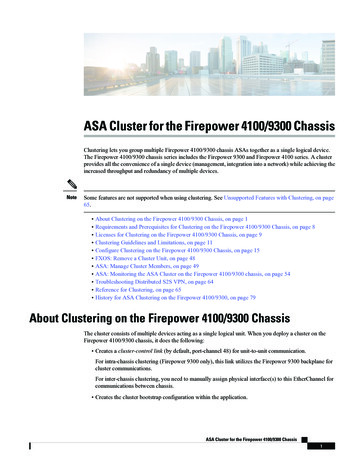
Cisco Firepower Threat Defense for the ASA 5512-X, ASA 5515-X, ASA 5525-X, ASA 5545-X, and ASA 5555-X Using2. Package Contents The Firepower Threat Defense system requires Internet access for licensing and updates. The default gatewayfor the management IP address is to use the data interfaces to route to the Internet. Thus, you do not need towire the Management physical interface to a network.Connect the InterfacesThe default configuration assumes that certain interfaces are used for the inside and outside networks. Initialconfiguration will be easier to complete if you connect network cables to the interfaces based on theseexpectations. To cable the above scenario on the ASA 5512-X, 5515-X, 5525-X, 5545-X, and 5555-X, see thefollowing illustration.Note: The following illustration shows a simple topology using a management computer connected to the insidenetwork. Other topologies can be used and your deployment will vary depending on your basic logical networkconnectivity, ports, addressing, and configuration requirements.Figure 1ASA 5512-X, 5515-X, 5525-X, 5545-X, and 5555-XGigabitEthernet 0/0outside, DHCP from outside nwOutsideOther Data NetworksManagement ComputerDHCP from inside ifc: 192.168.1.x6
Cisco Firepower Threat Defense for the ASA 5512-X, ASA 5515-X, ASA 5525-X, ASA 5545-X, and ASA 5555-X Using2. Package ContentsManagement ComputerDHCP from inside: 192.168.1.xGigGigabitEthernet0/1-0/5 “soft switch”insinside, 192.168.1.1GigabitEthernet 0/0outside, DHCP from ModemWAN ModemInternetProcedure1. Connect the GigabitEthernet 0/0 (outside) interface to your ISP/WAN modem or other outside device. Bydefault, the IP address is obtained using DHCP, but you can set a static address during initial configuration.2. Connect a local management workstation, the one you will use to configure the device, to the inside interfaceGigabitEthernet 0/1.3. Configure the workstation to obtain an IP address using DHCP. The workstation gets an address on the192.168.1.0/24 network.Note: You have a couple of other options for connecting the management workstation. You can also directlyconnect it to the Management port. The workstation gets an address through DHCP on the 192.168.45.0/24network. Another option is to leave your workstation attached to a switch, and attach that switch toGigabitEthernet 0/1. However, you must ensure that no other device on the switch's network is running a DHCPserver, because it will conflict with the one running on the inside interface, 192.168.1.1.5. Power on the Firepower Threat Defense Device1. Attach the power cable to the Firepower Threat Defense device and connect it to an electrical outlet.The power turns on automatically when you plug in the power cable; do not press the power button on thefront panel. (For older models, the power does not turn on automatically; check the hardware installation guidefor more information).2. Check the Power LED on the front of the Firepower Threat Defense device; if it is solid green, the device ispowered on.3. Check the Status LED on the front of the Firepower Threat Defense device; after it is solid green, the systemhas passed power-on diagnostics.7
Cisco Firepower Threat Defense for the ASA 5512-X, ASA 5515-X, ASA 5525-X, ASA 5545-X, and ASA 5555-X Using2. Package Contents6. Launch Firepower Device ManagerWhen you initially log into Firepower Device Manager, you are taken through the device setup wizard to completethe initial system configuration.Before You BeginEnsure that you connect a data interface to your gateway device, for example, a cable modem or router. For edgedeployments, this would be your Internet-facing gateway. For data center deployments, this would be a back-bonerouter. Use the default “outside” interface identified in 4. Deploy the Firepower Threat Defense in Your Network,page 5.Procedure1. Open a browser and log into Firepower Device Manager. Assuming you did not go through initial configurationin the CLI, open Firepower Device Manager at https://ip-address, where the address is one of the following:— If you are connected to the inside interface: https://192.168.1.1.— If you are connected to the Management physical interface: https://192.168.45.45.2. Log in with the username admin, password Admin123.3. If this is the first time logging into the system, and you did not use the CLI setup wizard, you are prompted toread and accept the End User License Agreement and change the admin password. You must complete thesesteps to continue.4. Configure the following options for the outside and management interfaces and click Next.Note: Your settings are deployed to the device when you click Next. The interface will be named “outside” andit will be added to the “outside zone” security zone. Ensure that your settings are correct.a. Outside Interface—This is the data port that you connected to your gateway mode or router. You cannotselect an alternative outside interface during initial device setup. The first data interface is the defaultoutside interface.Configure IPv4—The IPv4 address for the outside interface. You can use DHCP or manually enter a staticIP address, subnet mask, and gateway. You can also select Off to not configure an IPv4 address.Configure IPv6—The IPv6 address for the outside interface. You can use DHCP or manually enter a staticIP address, prefix, and gateway. You can also select Off to not configure an IPv6 address.b. Management InterfaceDNS Servers—The DNS server for the system's management address. Enter one or more addresses of DNSservers for name resolution. The default is the OpenDNS public DNS servers. If you edit the fields and wantto return to the default, click Use OpenDNS to reload the appropriate IP addresses into the fields.Firewall Hostname—The hostname for the system's management address.Note: When you configure the Firepower Threat Defense device using the device setup wizard, the systemprovides two default access rules for outbound and inbound traffic. You can go back and edit these accessrules after initial setup.5. Configure the system time settings and click Next.a. Time Zone—Select the time zone for the system.b. NTP Time Server—Select whether to use the default NTP servers or to manually enter the addresses of yourNTP servers. You can add multiple servers to provide backups.6. Configure the smart licenses for the system.8
Cisco Firepower Threat Defense for the ASA 5512-X, ASA 5515-X, ASA 5525-X, ASA 5545-X, and ASA 5555-X Using2. Package ContentsYou must have a smart license account to obtain and apply the licenses that the system requires. Initially, youcan use the 90-day evaluation license and set up smart licensing later.To register the device now, click the link to log into your Smart Software Manager account, generate a newtoken, and copy the token into the edit box.To use the evaluation license, select Start 90 day evaluation period without registration. To later register thedevice and obtain smart licenses, click the name of the device in the menu to get to the Device Dashboard,then click the link in the Smart Licenses group.7. Click Finish.What to Do NextOnce you complete the device setup wizard, a pop-up presents you with your next options to configure the device. If you connected other interfaces to networks, select Configure Interfaces to configure each of the connectedinterfaces. If you want to modify the default access rules, select Configure Policy to configure and manage trafficpolicies.You can select either option, or dismiss the pop-up to return to the Device Dashboard.7. How to Configure the Device in Firepower DeviceManagerAfter you complete the setup wizard, you should have a functioning device with a few basic policies in place: (Except for ASA 5506-X.) An outside and an inside interface. No other data interfaces are configured. (ASA 5506-X only.) An outside interface, and an inside bridge group that includes all other data interfaces. Security zones for the inside and outside interfaces. An access rule trusting all inside to outside traffic. A interface NAT rule that translates all inside to outside traffic to unique ports on the IP address of the outsideinterface. A DHCP server running on the inside interface or bridge group.The following steps provide an overview of additional features you might want to configure. Please click the helpbutton (?) on a page to get detailed information about each step.Procedure1. Choose Device, then click View Configuration in the Smart License group.Click Enable if you want to use the optional Threat license.Note: The ISA 3000 supports the Threat license only. It does not support the Malware or URL Filtering licenses.Thus, you cannot configure features that require the Malware or URL Filtering licenses on the ISA 3000.If you have not registered, you can do so from this page. Click Request Register and follow the instructions.Please register before the evaluation license expires.For example, an enabled Threat license should look like the following:9
Cisco Firepower Threat Defense for the ASA 5512-X, ASA 5515-X, ASA 5525-X, ASA 5545-X, and ASA 5555-X Using2. Package Contents2. If you wired other interfaces, choose Device, then click View Configuration in the Interfaces group andconfigure each wired interface.The ASA 5506-X comes pre-configured with a bridge group containing all non-outside data interfaces, thereis no need to configure these interfaces. However, if you want to break apart the bridge group, you can edit itto remove the interfaces you want to treat separately. Then you can configure those interfaces as hostingseparate networks.For other models, you can create a bridge group for the other interfaces, or configure separate networks, orsome combination of both. Click the edit icon for each interface to define the IP address and other settings.The following example configures an interface to be used as a “demilitarized zone” (DMZ), where you placepublicly-accessible assets such as your web server. Click Save when you are finished.3. If you configured new interfaces, choose Objects, then select Security Zones from the table of contents.Edit or create new zones as appropriate. Each interface must belong to a zone, because you configure policiesbased on security zones, not interfaces. You cannot put the interfaces in zones when configuring them, so youmust always edit the zone objects after creating new interfaces or changing the purpose of existing interfaces.The following example shows how to create a new dmz-zone for the dmz interface.10
Cisco Firepower Threat Defense for the ASA 5512-X, ASA 5515-X, ASA 5525-X, ASA 5545-X, and ASA 5555-X Using2. Package Contents4. If you want internal clients to use DHCP to obtain an IP address from the device, choose Device SystemSettings DHCP Server, then select the DHCP Servers tab.There is already a DHCP server configured for the inside interface, but you can edit the address pool or evendelete it. If you configured other inside interfaces, it is very typical to set up a DHCP server on those interfaces.Click to configure the server and address pool for each inside interface.You can also fine-tune the WINS and DNS list supplied to clients on the Configuration tab. The followingexample shows how to set up a DHCP server on the inside2 interface with the address pool192.168.4.50-192.168.4.240.5. Choose Device, then click View Configuration (or Create First Static Route) in the Routing group andconfigure a default route.The default route normally points to the upstream or ISP router that resides off the outside interface. A defaultIPv4 route is for any-ipv4 (0.0.0.0/0), whereas a default IPv6 route is for any-ipv6 (::0/0). Create routes foreach IP version you use. If you use DHCP to obtain an address for the outside interface, you might already havethe default routes that you need.Note: The routes you define on this page are for the data interfaces only. They do not impact the managementinterface. Set the management gateway on Device System Settings Management Interface.11
Cisco Firepower Threat Defense for the ASA 5512-X, ASA 5515-X, ASA 5525-X, ASA 5545-X, and ASA 5555-X Using2. Package ContentsThe following example shows a default route for IPv4. In this example, isp-gateway is a network object thatidentifies the IP address of the ISP gateway (you must obtain the address from your ISP). You can create thisobject by clicking Create New Network at the bottom of the Gateway drop-down list.6. Choose Policies and configure the security policies for the network.The device setup wizard enables traffic flow between the inside-zone and outside-zone, and interface NATfor all interfaces when going to the outside interface. Even if you configure new interfaces, if you add them tothe inside-zone object, the access control rule automatically applies to them.However, if you have multiple inside interfaces, you need an access control rule to allow traffic flow frominside-zone to inside-zone. If you add other security zones, you need rules to allow traffic to and from thosezones. These would be your minimum changes.In addition, you can configure other policies to provide additional services, and fine-tune NAT and access rulesto get the results that your organization requires. You can configure the following policies:— SSL Decryption—If you want to inspect encrypted connections (such as HTTPS) for intrusions, malware, orto enforce compliance with your URL and application usage polices, you must decrypt the connections.Use the SSL decryption policy to determine which connections need to be decrypted. The systemre-encrypts the connection after inspecting it.— Identity—If you want to correlate network activity to individual users, or control network access based onuser or user group membership, use the identity policy to determine the user associated with a givensource IP address.— Security Intelligence—Use the Security Intelligence policy to quickly drop connections from or toblacklisted IP addresses or URLs. By blacklisting known bad sites, you do not need to account for them inyour access control policy. Cisco provides regularly updated feeds of known bad addresses and URLs sothat the Security Intelligence blacklist updates dynamically. Using feeds, you do not need to edit the policyto add or remove items in the blacklist.— NAT (Network Address Translation)—Use the NAT policy to convert internal IP addresses to externallyrouteable addresses.12
Cisco Firepower Threat Defense for the ASA 5512-X, ASA 5515-X, ASA 5525-X, ASA 5545-X, and ASA 5555-X Using2. Package Contents— Access Control—Use the access control policy to determine which connections are allowed on thenetwork. You can filter by security zone, IP address, protocol, port, application, URL, user or user group.You also apply intrusion and file (malware) policies using access control rules. Use this policy to implementURL filtering.— Intrusion—Use the intrusion policies to inspect for known threats. Although you apply intrusion policiesusing access control rules, you can edit the intrusion policies to selectively enable or disable specificintrusion rules.The following example shows how to allow traffic between the inside-zone and dmz-zone in the accesscontrol policy. In this example, no options are set on any of the other tabs except for Logging, where At Endof Connection is selected.7. Choose Device, then click View Configuration in the Updates group and configure the update schedules forthe system databases.If you are using intrusion policies, set up regular updates for the Rules and VDB databases. If you use SecurityIntelligence feeds, set an update schedule for them. If you use geolocation in any security policies as matchingcriteria, set an update schedule for that database.8. Click the Deploy button in the menu, then click the Deploy Now button(device.), to deploy your changes to theChanges are not active on the device until you deploy them.8. Where to Go Next For more information about managing the Firepower Threat Defense with the Firepower Device Manager, seethe Firepower Threat Defense configuration guide, or the Firepower Device Manager online help.Cisco and the Cisco logo are trademarks or registered trademarks of Cisco and/or its affiliates in the U.S. and other countries. Toview a list of Cisco trademarks, go to this URL: www.cisco.com/go/trademarks. Third-party trademarks mentioned are the propertyof their respective owners. The use of the word partner does not imply a partnership relationship between Cisco and any othercompany. (1721R) 2018 Cisco Systems, Inc. All rights reserved.13
Cisco Firepower Threat Defense for the ASA 5512-X, ASA 5515-X, ASA 5525-X, ASA 5545-X, and ASA 5555-X Using2. Package Contents14
Cisco Firepower Threat Defense for the ASA 5512-X, ASA 5515-X, ASA 5525-X, ASA 5545-X, and ASA 5555-X Using 2. Package Contents In addition, Smart Licensing does not prevent you from using product features that you have not yet purchased. You can start using a license immediately, as long as you are registered with the Cisco Smart Software Manager,