Transcription
SharePoint 2010: Workflowswith Nintex 2013SharePoint 2010: Workflows with Nintex 1.0.072 Pages
About IT TrainingThe University Information Technology Services (UITS) IT Training program at Indiana Universityoffers instructor-led computing workshops and self-study training resources to the Indiana Universitycommunity and beyond. We deliver training to more than 30,000 participants annually acrossall Indiana University campuses. Our staff is comprised of enthusiastic professionals who enjoydeveloping and teaching computing workshops. We appreciate your feedback and use it to improveour workshops and expand our offerings. We have received several international awards for ourmaterials and they are being used at universities across the country. Please keep your questions,comments and suggestions coming!In Bloomington, contact us at ittraining@indiana.edu or call us at (812) 855-7383.In Indianapolis, contact us at ittraining@iupui.edu or call us at (317) 274-7383.For the most up-to-date information about workshops and schedules, visit us at:http://ittraining.iu.edu/Copyright 2013 - The Trustees of Indiana UniversityThese materials are for personal use only and may not be copied or distributed. If you would like touse our materials for self-study or to teach others, please contact us at: IT Training, 2709 East 10thStreet, Bloomington, IN 47408-2671, phone: (812) 855-7383. All rights reserved.The names of software products referred to in these materials are claimed as trademarks of theirrespective companies or trademark holders.
ContentsWelcome and Introduction . . . . . . . . . . . . . . . . . . . . . . . . . . . . 5Calculating a Date . . . . . . . . . . . . . . . . . . . . . . . . . . . . . . 38What You Should Already Know . . . . . . . . . . . . . . . . . . . . 5Configuring the Calculate Date Action with a ListLookup . . . . . . . . . . . . . . . . . . . . . . . . . . . . . . . . . . . . 39What You Will Learn . . . . . . . . . . . . . . . . . . . . . . . . . . . . . 5What You Will Need to Use These Materials . . . . . . . . . . . 5Getting Started . . . . . . . . . . . . . . . . . . . . . . . . . . . . . . . . . . . . . 6Getting the Exercise Files . . . . . . . . . . . . . . . . . . . . . . . . . 6Finding Help . . . . . . . . . . . . . . . . . . . . . . . . . . . . . . . . . . . . 6Want to Learn More? . . . . . . . . . . . . . . . . . . . . . . . . . . . . . 6Today’s Project . . . . . . . . . . . . . . . . . . . . . . . . . . . . . . . . . . . . . 7Understanding Workflows . . . . . . . . . . . . . . . . . . . . . . . . . . . . 7Creating Workflows . . . . . . . . . . . . . . . . . . . . . . . . . . . . . . 8Creating a Site from a Template . . . . . . . . . . . . . . . . . . . . . 8Activating Nintex at the Site Level . . . . . . . . . . . . . . . . . 10Exploring the Nintex Interface . . . . . . . . . . . . . . . . . . . . . . . . 11Configuring A Workflow . . . . . . . . . . . . . . . . . . . . . . . . . . . . 13Exploring Workflow Settings Options . . . . . . . . . . . . . . . 15Automatically Starting a Workflow Via Modification 16Creating A Simple Workflow . . . . . . . . . . . . . . . . . . . . . . . . . 20Configuring a Flexi Task . . . . . . . . . . . . . . . . . . . . . . . . . 21Configuring the Task Notification . . . . . . . . . . . . . . . 23Understanding Flexi Task Options . . . . . . . . . . . . . . . 24Adding a Notification . . . . . . . . . . . . . . . . . . . . . . . . . . . . 25Configuring the Send Notification Workflow Action . . . . 25Reusing Workflow Actions . . . . . . . . . . . . . . . . . . . . . 30Publishing a Workflow . . . . . . . . . . . . . . . . . . . . . . . . . . . 31Creating a Complex Workflow . . . . . . . . . . . . . . . . . . . . . . . . 32Building a Workflow Efficiently . . . . . . . . . . . . . . . . . . . . . . 35Understanding Variables . . . . . . . . . . . . . . . . . . . . . . . . . . 36Adding and Configuring the Create Item Action . . . . . . . 41Using A List Lookup . . . . . . . . . . . . . . . . . . . . . . . . . . . . 42Staying Organized With An Action Set . . . . . . . . . . . . . . 44Working With Comments . . . . . . . . . . . . . . . . . . . . . . 45Using Copy/Paste in Nintex . . . . . . . . . . . . . . . . . . . . . . . 46Challenge: Edit Actions to Build a Workflow . . . . . . . . . 48Testing a Workflow . . . . . . . . . . . . . . . . . . . . . . . . . . . . . . 49Debugging a Workflow . . . . . . . . . . . . . . . . . . . . . . . . . . . 49Using Site Workflows . . . . . . . . . . . . . . . . . . . . . . . . . . . . . . .50Creating Variables . . . . . . . . . . . . . . . . . . . . . . . . . . . . . . 51Calculating a Date . . . . . . . . . . . . . . . . . . . . . . . . . . . . . . 53Understanding Collections . . . . . . . . . . . . . . . . . . . . . . . . 55Using Collection Variables . . . . . . . . . . . . . . . . . . . . . . . . 57Populating Collection Variables With Query List . . . 58Using a For Each Loop . . . . . . . . . . . . . . . . . . . . . . . . . . .61Using Collection Operations . . . . . . . . . . . . . . . . . . . . . . 63Configuring a Collection Operation . . . . . . . . . . . . . . 65Building a String . . . . . . . . . . . . . . . . . . . . . . . . . . . . . . . 66Creating the Final Output . . . . . . . . . . . . . . . . . . . . . . . . . 68Challenge: Create the Final Output . . . . . . . . . . . . . . 68Challenge: Send Final Notification . . . . . . . . . . . . . . 69Scheduling A Site Workflow . . . . . . . . . . . . . . . . . . . . . . 69Wrapping Up . . . . . . . . . . . . . . . . . . . . . . . . . . . . . . . . . . . . . 71Contributions to These Materials . . . . . . . . . . . . . . . . . . . . . . 71
Welcome and IntroductionWelcome to SharePoint 2010: Workflows with Nintex.What You Should Already KnowYou should have already attended SharePoint 2010 Site Administration Basicsor have the equivalent skills. Specifically, you should be able to: create a SharePoint site create lists and libraries in SharePointWhat You Will LearnIn this session, participants will see how to create workflows in Nintex toautomate SharePoint functionality. These workflows are very powerful andcan make business processing much easier by automating file creation, taskcompletion, and notifying stakeholders in a site. We will see how to createworkflows, where to create them, and create a few simple workflows and seeexamples of more complex workflows.Participants will: explore the Nintex interface create workflows in Nintex see how to use workflows to automate SharePoint processesWhat You Will Need to Use These MaterialsTo complete this workshop successfully, you will be provided with: The use of SharePoint 2010 with Nintex Workflows installedSharePoint 2010: Workflows with Nintex 1.0.05
Getting StartedThese materials presume you will begin work from the desktop, and have anyrequired exercise files located in an epclass folder there.Getting the Exercise FilesMost of our workshops use exercise files, listed at the bottom of page 1 of thematerials. In our computer-equipped classrooms, these files are located in theepclass folder, which should already be on the computer desktop. If you areusing our materials in a different location, you may obtain the exercise filesand detailed installation instructions from our Web site at:http://ittraining.iu.edu/downloads/Once you are logged on and have the needed files in an epclass folder on yourdesktop, you are ready to proceed with the rest of the workshop.Finding HelpIf you have computer-related questions not answered in these materials, youmay look for the answers in the UITS Knowledge Base, located at:http://kb.iu.edu/Want to Learn More?IT Training offers many training options for extending your skills beyond thisworkshop: Self-study training: You may access computer-based training from leadingcommercial vendors, obtain the materials for other STEPS workshops, oraccess IT Training’s own tutorials on a range of topics at:http://ittraining.iu.edu/online/ IT Training Tips weblog: Our award-winning blog has short tutorials andtraining posts on a broad range of topics and technologies. It’s written bytraining and support providers from across the entire IU system; you mayread and comment on these at:http://ittrainingtips.iu.edu/6SharePoint 2010: Workflows with Nintex 1.0.0
Today’s ProjectIn today’s workshop, we will be exploring the SharePoint workflows withNintex. Nintex is a plug-in for SharePoint that allows us to build complexworkflows with a visual interface.Today we will work with many of the individual modules available inNintex, and see how they can interact with SharePoint lists. We willcreate a simple workflow to approve a document, and then create a morecomplex workflow that allows interaction between two lists.We will also cover how to use variables, calculate dates, and loops.Let’s begin by discussing what workflows can do for us.Understanding WorkflowsWorkflows are used to automate process in SharePoint sites. Sometimes thiscan be as simple as sending a notification to an individual or group when anitem is changed. In other cases, they can be used to process data in SharePointlists, shuffling the data to other locations, or updating data within the list.Workflows can also be used to mimic database and web application operationswithin a SharePoint site.Let’s look at an example. You have a list that creates a record of a project. Thiscan contain information like the project owner, the name of the project, andthe final project due date, and any additional staffing that is needed.However, this project will need a schedule of milestones leading up to thefinal date. We could design a workflow that takes the information in thatproject record and creates a schedule based on a standard model. Thisworkflow would then add milestones to a Tasks List that includes the nameof the milestone, the deadline for that milestone, and who is responsible forthat milestone as well as some kind of key column that would associate thesemilestones with a specific project, much like a database would. This workflowcould then send a notification to each of the project team members, givingthem a list of the project schedule.This data would then be stored in the SharePoint site, where it could beaccessed by all of the project team members.This workflow could either be designed to activate when a new project recordwas added, or could be run manually by the project leader or another staffmember when they were ready to proceed.Now that we understand what we would use them for, let’s see how they arecreated.SharePoint 2010: Workflows with Nintex 1.0.07
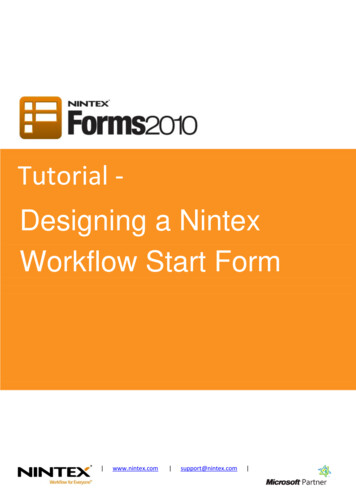
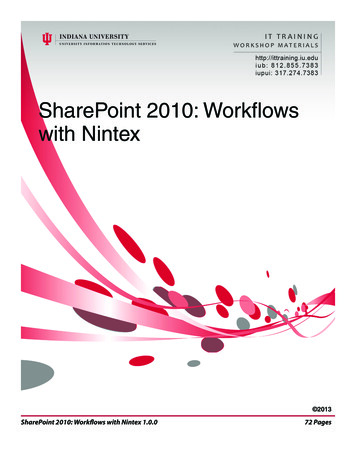
Creating WorkflowsNintex Workflows are created with a visual interface that allows you to pressand drag individual modules representing actions into a visual workflow.RibbonDrag WorkflowActions HereWorkflow ActionsThese actions will be executed in order. We can also use basic programmingconcepts like if statements to make decisions within the structure of theworkflow.Workflows can be created in one of two places: on a list, or at the site level.List workflows can act automatically when an item is added or modified,and are frequently used to process data within the list. Site workflows aremanually activated and can be used when a workflow doesn’t need a specificlist item created to work.NOTE: Of course workflows can also be created in libraries, but since theywork identically to lists in most respects, we will only use the termlists.Let’s begin by creating a list.Creating a Site from a TemplateWe’ll begin by creating a site that we can each work on throughout theworkshop. This site will be based on a template. We will open our SharePointsite to begin.8SharePoint 2010: Workflows with Nintex 1.0.0
1. Open Internet Explorer.NOTE: Nintex Workflows can only be created in Internet Explorer version8 and later. Any other browser will not be able to access the Nintexfeatures.2. To open our SharePoint site, in the address bar, type:http://www.sharepoint.iu.edu/sites/umwadv/ The site opens.NOTE: In today’s workshop, we are logged into demo accounts that will loginto SharePoint automatically. At your own workstation, you mightneed to provide a user name and pasword at this point.Let’s create a site.3. To begin creating any object, in the SharePoint Ribbon, , Create New SiteThe Create new object window appears.We have a template created that has our columns created. Let’s select itnow.4. To select our site template, in the dialog box, Nintex Basics May-13We will use the demo username located in the upper right corner of thescreen.5. To name the site, in the Name field on the right side, type:username’s site6. To add the URL, in the URL field, type:SharePoint 2010: Workflows with Nintex 1.0.0username9
The username you will use today is located in the upper right corner ofthe screen.7. To create the site, The site is created and appears.Before we continue, we have to make sure that Nintex is turned on for thissite.Activating Nintex at the Site LevelFor each site we create under our parent site, we must activate Nintex at eachlevel. Nintex has been activate at the top level, so we can use it here as well.Let’s do this now.1. To move to Site Settings, in the menu bar, The Site Settings options appear:, Site SettingsWe will use the Manage Site features option.2. To manage site features, in the Site Actions sections, Manage Site Features10SharePoint 2010: Workflows with Nintex 1.0.0
The Site Features appear. All we need to do is activate all of the items thatare associated with Nintex. There are two today.3. To activate a feature, in the list, next to Nintex Workflow 20104. Wait until you see “Activated” appear next to the button.5. To activate the reporting features, next to Nintex Workflow 2010Enterprise ReportingNow that Nintex is turned on for our site, we can begin working. Let’slook at our Quick Launch.We have a few lists already created here. We’ll use the Shared Documentslibrary to create our first workflow.6. To move to the Shared Documents library, in the Quick Launch, Shared DocumentsNow that our site exists, we can create our first workflow.Exploring the Nintex InterfaceWe will begin with a list workflow. This list will add a task and send anotification depending on who adds the list item.We can create workflows from the List tab.1. To view the Library tab, in the ribbon,The List tab appears.SharePoint 2010: Workflows with Nintex 1.0.0 11
2. To begin creating a workflow, in the list tab, , then Create A Workflow in NintexWorkflowNOTE: If your monitor is large enough, you will see the words “WorkflowSettings” next to this button. You will still click it in the same place.The Nintex workflow interface appears. We see a list of possible workflowtemplates to choose from. We’ll use the blank template today.3. To begin the workflow, The Nintex interface appears.We can see here that there is the standard SharePoint toolbar that willalways be visible.Just below that we can see the ribbon. The Nintex ribbon allows us to dobasic operations like Save and close, import and export, and change thesettings. We’ll look at the Workflow Settings shortly.Along the left side of the screen, we see the workflow actions. These arethe individual pieces we will use to create our workflow.They are broken up into categories that we can see in the bottom leftcorner.4. To view more Workflow Actions, in the Workflow Actions panel, at thebottom, OperationsIn this category, we can see different math and programming operationsthat help us to process data coming through our SharePoint site.5. To select another category, in the Workflow Actions panel, Libraries and Lists12SharePoint 2010: Workflows with Nintex 1.0.0
This category offers us ways to work with SharePoint libraries and lists.We can create lists and libraries, copy items, and other SharePoint actions.6. To move back to Commonly Used, in the Workflow Actions panel, Commonly UsedThere are many other categories, and we will discuss several of them laterin the workshop.The interface is dominated by the Workflow View window. This is wherewe will build our workflow. We can see a green bubble to indicate thebeginning of the workflow, and a red bubble to indicate the end of theworkflow.In between these two bubbles, we see a small clear button. This is wherewe can add Workflow Modules to build our workflow.Each Workflow Action we add will become a step in our workflow, andthey will execute in order, starting at the green bubble and ending at thered bubble.Before we add any actions, we must configure our workflow. Let’s do thisnow.Configuring A WorkflowThe first step to creating a workflow is opening the Workflow Settings dialogbox and setting up some basic options about the way our workflow will run.No matter the workflow, we should always visit the Workflow Settings dialogbox first. Knowing how the workflow starts is an essential part of building asuccessful workflow.Let’s open the Workflow Settings dialog box now.SharePoint 2010: Workflows with Nintex 1.0.013
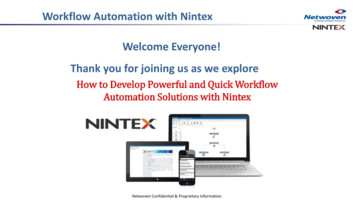
1. To open Workflow Settings, in the ribbon, The Workflow Settings dialog box appears:In this dialog box we can control how and when the workflow runs, alongwith basic information like the name and description.We can also see a ribbon in this dialog box that allows for some advancedoptions that we will discuss later in the workshop.Let’s start with a title for our workflow. This workflow will send anotification for items added to our list, so let’s name it after that function.2. To add a title, in the Title field, type:Review Document Task14SharePoint 2010: Workflows with Nintex 1.0.0
Best practice is to always add a description to your lists, libraries andworkflows. Without a description, it can become very complicated tofigure out which workflow does what in the future. So we will want to adda description to all of our workflows.3. To add a description, in the Description field type:This workflow will add a task to review the document and send anotification when uploaded.Now let’s look at some of the more advanced configuration options.Exploring Workflow Settings OptionsWhen designing a workflow, we must understand when it will be activated.The first step of any workflow is the user activating it. Since this is a list-basedworkflow, it will be run on a particular list item.We can decide at this point whether the workflow will run automatically whena list item is created, or whether we expect the user to run it manually whenneeded. We could also have it run automatically, and give the user the optionto start the workflow manually.Let’s look at these options individually. Start manually - If this box is checked, users will be able to start theworkflow manually for an individual list item. However, for a list-basedworkflow, a list item must exist before the workflow will run. Require manage list rights - This checkbox will force the user to to havesecurity privileges to the list before they can run the workflow. This can beuseful if you have a workflow that only a manager or administrator shouldhave access to. Start when items are created - If this dropdown is set to Yes, the workflowwill run every time that an item is created in the list. This is a fairlycommon type of workflow, but we must carefully design around thisconcept. We can also set to Conditional which will allow us to automaticallystart the workflow, only when specific conditions are met. Start when items are modified - This will also automatically start theworkflow, but only when items are modified. We also have the Conditionalopion here as well. Publish without validation - This will allow the workflow to be publishedand usable without the validation step that can take an extended period oftime. Using this option is not recommended, as missed validation issues cancause major problems when the workflow is running. Enable workflow to start from the item menu - This will give users theoption of starting the workflow from the list item’s context menu. The otheroptions in this section are available when it is checked. This option is verySharePoint 2010: Workflows with Nintex 1.0.015
convenient when the workflow is expected to be started manually. Enable custom history messages - This allows us to create custom historymessages that can be generated by individual workflow actions. Create workflow status column - This will create a column in the list thatwill link us to information about the workflow. This is very useful if theworkflow creates an error, as we can easily click and see what has causedthe problem. Expected workflow duration - With this feature, we can set a specific lengthof time we expect this workflow to last for tracking purposes. Task list - With this feature we can select which Tasks list we would like touse for any tasks we create with this workflow. By default they will go intothe Workflow Tasks list that is automatically created, but you can createyour own if necessary. History list - Each step of your workflow is recorded as it is completed.This can help with error checking later. Form type - This will allow us to use the default start form, or create ourown via InfoPath. This option is only used when we are asking the user forinput before the workflow is run.For this workflow, we want it to start automatically both when an item iscreated, and when that item is modified.4. To deselect the Start manually option, in the dialog box, the Start manually checkbox5. To allow the workflow to start automatically, the Start when items are created dropdown, then YesWhen we start with this option selected, we have easy access to theinformation within the item created. When we have this option selected,we should build the entire workflow around this concept.Now let’s see how to set up the workflow to begin when an item ismodified.Automatically Starting a Workflow Via ModificationWhile we want to the workflow to start again when an item is modified,we want to control how it starts.16SharePoint 2010: Workflows with Nintex 1.0.0
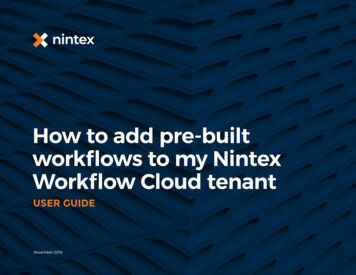
Let’s assume this workflow sends a notification to a manager toinform them that tasks are being completed. The manager will get aninitial notification that the item was created, and they want additionalnotifications when progress is made on the task and it is modified. Wewant to be careful so that if the manager updates the task the workflowdoesn’t restart and send unneeded notifications.Let’s see how to set this up now.1. To set the workflow to begin when an item is modified, in the dialog box, the Start when items are modified drop down, then Conditional2. To set the conditions, in the dialog box, The Conditional Startup Options dialog box appears:SharePoint 2010: Workflows with Nintex 1.0.017
This dialog box allows us to select a field and compare it to either adifferent field, or a value that we provide. We want to compare theModified By value to see if it was the manager. If it is, we will not restartthe workflow.In this dialog box, the first drop down is always a field from the itemthat we want to compare to. The second drop down is the comparisonoperator. This allows us to change how the two fields are compared. Thethird field will either be a text box we can add a value to, or it will beanother drop down.If we were to click the Compare to field? checkbox, then the third fieldwould become a drop down that will allow us to refer to another datacolumn. We will not do this today.Notice the line above the fields reads “Start when items are modifiedand:”. This gives us a clue about how to proceed.3. To set the field to check in the first drop down, the top drop down, then Modified By18SharePoint 2010: Workflows with Nintex 1.0.0
You will notice that several fields allow us to check the Previous Value.This is useful if we need to check what the value was before the item wasmodified. One example of this is if you don’t want the workflow to restartif the same person who previously modified the item modifies it a secondtime.For today, we want to compare this to the username of our manager.However, the comparison operator box reads Equals currently. We wantthe workflow to run only when the Modified By field does not equal ourmanagers name.Let’s change the comparison operator.4. To change the comparison operator, in the Comparison Operator field, , Not equalsNow we need to add our managers name. Let’s add the jump061 accountname we used earlier.5. To add the value to compare, in the blank text box, type:demo30, NOTE: For today’s workshop, we will consider demo30 to be the ‘manager’.The name is recognized and we can continue.6. To save the conditional, in the dialog box, We see the Workflow Settings dialog box again.7. To save the workflow settings, in the dialog box, We have completed all of our configuration settings for this workflow.Let’s begin creating the workflow actions list now.SharePoint 2010: Workflows with Nintex 1.0.019
Creating A Simple WorkflowNow that we understand the interface, let’s create our first workflow. We willcreate a simple workflow that adds a task, and then sends a notification.Let’s start by assigning a task to someone to approve the document. We addworkflow actions by pressing and dragging them from the Workflow Actionspanel.Once we have added the workflow action, we must configure it. Then we cancontinue adding more workflow actions, configuring them along the way.We will use the Flexi Task action to accomplish this. This action is used toassign a task to an individual and wait for a response (usually Approve orReject). Once it recieves a response from the reviewer, it will take appropriateactions related to that document.1. Ensure that you are looking at the Commonly Used Workflow Actionsgroup.2. To add a Flexi Task action, in the Workflow Actions panel, The Flexi Task appears on the workflow:toNotice that it has an alert icon next to the name. This indicates that theworkflow action will not function properly because it needs additionalconfiguration.For example, as we see in this intance, we have added a step in theworkflow to assign a task, but we need to configure the action to assignthe task to a particular person, decide which actions are possible for thetask, and send a notification to the people involved.We can do this by double-clicking the workflow action.20SharePoint 2010: Workflows with Nintex 1.0.0
3. To begin configuring the workflow, The Workflow Configuration appears:Here we will configure the Flexitask to assign the task to the correctapprover and what outcomes are possible.Configuring a Flexi TaskLet’s examine this dialog box now. Like many SharePoint tools, Nintexworkflows are configured with a series of web forms. We do not have to fillout all of the information in this dialog box, but it will be worthwhile tounderstand all of the options in this dialog box.We begin with the Assignees box. This will allow us to assign the task toeither a single person, or a group of people. We can either list email addressesindividually, or add an ADS group.Note below the Assignees text box, we can decide whether to add a single taskfor all assignees, or individual tasks. Which you choose depends on whetheryou need everyone to review a document, or you need anyone to approve thedocument. Today we will only have a single assignee, so we will only assignone task.SharePoint 2010: Workflows with Nintex 1.0.021
Let’s add our assignee now.1. To add the assignee, in the Assignee text box, type:demo30@exchange.iu.eduWe also see the Allow delegation checkbox. If this box is checked, theassignee will be able to delegate the task to someone else. For today wewill leave this unchecked.We can also add a task description that will help the assignee understandwhat they are meant to do.2. To add a description, in the Task Description field, type:Please review this document for approval.In the Outcomes field, we currently have two options: Approve andReject. However, we can add more if needed. For instance, if the reviewerrequires more information, we could add a “Request For Clarification”outcome that would take different actions in response. For today, we willkeep the two simple options.We have five options in the Behaviour field. These options change theway an item is approved or disapproved. Let’s examine these now: First response applies - This option will accept the first response itrecieves as the ultimate response. Majority must choose a specific outcome - This option will expect amajority of the reviewers to agree on a pre-selected outcome. If they donot reach a majority, the action will complete and any pending tasks willbe set to ‘Not required’. All must agree on a specific outcome - This option will expect all ofthe reviewers to agree on a pre-selected outcome. If they do not allagree, the action will complete and any pending tasks will be set to ‘Notrequired’. Majority decides - This option will select the most popular outcomefrom the choices available. All must agree - This option requires all reviewers to select a singleoutcome. If anyone disagrees, then no outcome will be reached.Today, we will stick with First response applies.We have several other options here, including what the name of the taskwill be, and whether to store the response in a variable to use in otherlocations, but we will move on today.22SharePoint 2010: Workflows with Nintex 1.0.0
Let’s configure the notification for this task.Configuring the Task NotificationWhen a task is assigned, an email will automatically be sent to the assignee(s)with a link to the task and document so that they can be approved or rejected.We can customize this message. Let’s see how to do that now.1. To move to the Task Notification panel, in the dialog box, NOTE: You might have to move to the General tab for this option to appear.A dialog box appears.Here we can customize the message being sent to the as
examples of more complex workflows. Participants will: explore the Nintex interface create workflows in Nintex see how to use workflows to automate SharePoint processes What You Will Need to Use These Materials To complete this workshop successfully, you will be provided with: The use of SharePoint 2010 with Nintex Workflows .