Transcription
QUICKBOOKS ONLINEQuickBooks Online Tips & Tricks
QuickBooks Online Tips & TricksTABLE OF CONTENTSQuickBooks Online tips and tricks . 3QuickBooks shortcuts. 3Browser Tips. 4Transaction tips . 5Account & Settings . 10Customer retainers & deposits . 12Recording Merchant Fees. 15Write off bad debt . 16Recording loan payments . 18Recording owner expenses . 20Sending reports to excel . 22Automated reports . 232
QuickBooks Online Tips & TricksQUICKBOOKS ONLINE TIPS AND TRICKSQUICKBOOKS SHORTCUTSThere is a helpful list of shortcuts in QuickBooks Online. It can be accessed by pressing thefollowing keys at the same time:CTRL ALT ? When you press this shortcut, QuickBooks Online displays the list ofshortcuts.In addition to these shortcuts, you can access date shortcuts on transactions. To use the dateshortcuts, place your cursor in any date field in QuickBooks online and use the followingshortcut keys: T – enters today’s dateW – enter the first day in the weekK – enters the last day in the weekY – enters the first day in the yearR – enters the last day in the yearM – enters the first day in the monthH – enters the last day in the month3
QuickBooks Online Tips & TricksBROWSER TIPSIt is recommended that you use the following browsers:1. Google Chrome – available across all platforms including Chromebooks, Windows andMac.2. Firefox – available across all platforms.3. Safari – available on MAC. Not fully supported.4. Microsoft Edge/Internet Explorer – not fully supportedMultiple Tabs1. Right click on any link in QuickBooks and click Open Link in New Tab2. Drag and drop the new tab where needed.Bookmark Bar ShortcutAdd a shortcut to the bookmarks bar to create a one-click link to any page in QuickBooks.1. Navigate to any page in QuickBooks.2. Click the star icon in the browser address bar.3. Name the shortcut as needed.4
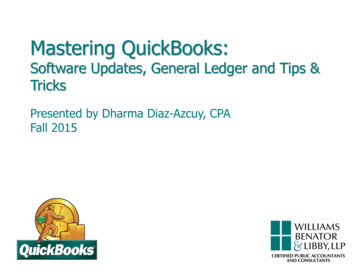
QuickBooks Online Tips & TricksTRANSACTION TIPSThere are several important ways to use tools available on transactions in QuickBooks.More MenuThe more menu in QuickBooks is available on any ‘Saved’ transaction. The More menu lets youhave access to additional information and tools to work with the transaction.Click ‘More’ to see the following options:Copy – copy any transaction in QuickBooks saving time when creating duplicate entriesVoid – void any transactionDelete – delete the transactions5
QuickBooks Online Tips & TricksTransaction Journal – click this option to view the journal entry behind any saved transaction.6
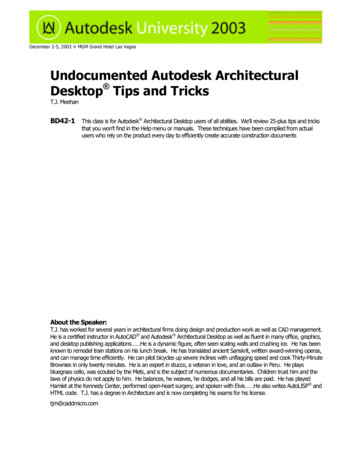
QuickBooks Online Tips & TricksPrevious Transaction ButtonClick the clock icon in the top-left corner of the transaction.AttachmentsQuickBooks Online lets you upload and save attachments on any transaction. This makesreferencing source documents easier and more efficient. To add an attachment:1.2.3.4.Open an invoiceClick attachments iconBrowse for the attachmentClick SaveNOTE: Now QuickBooks Online lets you view the source document when viewing thetransaction. This is helpful for receipts, bank statements, copies of transactions, etc.7
QuickBooks Online Tips & TricksClear All Lines – click this button to delete all lines on the transactionAdd Lines – click this button to add additional lines to the transactionAdd Subtotal – click to add a subtotalTrash Can Icon – click this button to delete a transaction lineReorder Lines – click the icon to the left of any line to reorder the lines on the transaction8
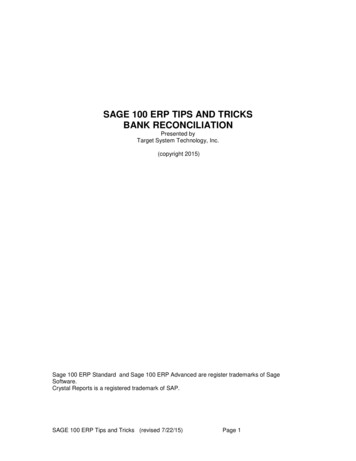
QuickBooks Online Tips & TricksRecurring EntriesCreating an invoice in QBO will create an accounts receivable transaction. You can automate theinvoice by clicking Make Recurring at the bottom of the invoice window.1. To create an invoice for specific customer, click Create Invoice next to their name. Theinvoice window displays.2. Complete the Invoice form. There are several key elements to completing the form. Theyare the following:a. Choose the customerb. Choose the Invoice date and Due date if applicable.c. Choose the Product/Service à Enter a Quantity à Rated. Choose the Sales Tax rate.3. Click Make recurring.4. Click Save Template. This will not only create the invoice but also send it automaticallyon the assigned date.9
QuickBooks Online Tips & TricksACCOUNT & SETTINGSThere are additional settings available to customize your QuickBooks. Note the following:1. Custom Transaction Numbers – select this to enable editing of Invoice numbers2. Discount – add a discount field to transactions3. Progress Invoicing – enable progress invoicing10
QuickBooks Online Tips & TricksAdvanced SettingsClick Advanced to enable advanced options in QuickBooks.Chart of Accounts – enable account numbers in QuickBooksAutomation – enable or disable automation features in QuickBooks11
QuickBooks Online Tips & TricksCUSTOMER RETAINERS& DEPOSITSYou may need to track retainers and deposits from customers. To create a retainer or depositthere are 2 steps to get setup.1. Create an account to track the Retainer or Customer Deposit.a. Go to Chart of Accountsb. Create a liability account called Customer Deposits (or name of your choice).12
QuickBooks Online Tips & Tricks2. Setup a service called Deposits. Link the service item to the Customer Deposits account.3. Record the deposit on a sales transaction.a. Record the deposit on sales transactions like a sales receipt or invoice.b. Use the Customer Deposit service item to record the payment.13
QuickBooks Online Tips & Tricks4. View the Customer Deposits on an account report.a. Run a Balance Sheetb. Click on the Customer Deposits account.c. Filter the report by the customer to view the report by customer.5. Apply the deposit or retainer.a. After the work or services are complete, you will create a sales transaction as perusual.b. After adding the services or items have been added, you’ll add the CustomerDeposit/Retainer Item.c. Enter the amount of the deposit to be applied as a negative. This will apply theamount to the transactions and affect the balance in the customer depositsaccount accurately.14
QuickBooks Online Tips & TricksRECORDING MERCHANT FEESAt times your client’s may have to record merchant fees deducted from customer deposits. Thisis common with suppliers like PayPal and others. This is best accomplished on the Bank Depositwindow. To record merchant fees, do the following:1. Click New à Bank Deposit2. Select the credit card payments to be deposited3. From the New Deposits section of the window, enter the Account Merchant Fees (oraccount of your choice)4. In the Amount field enter a negative amount to represent the amount deducted.15
QuickBooks Online Tips & TricksWRITE OFF BAD DEBTSometimes you’ll need to write off bad debt from customers.Step 1: Turn off the Automatically apply credits features in QBO1. Click Settings.2. Click Advanced.3. Click Automation.4. Clear the checkmark from Automatically apply credits.Step 2:1. Create an account to track bad debt.2. Go to Chart of Accounts.3. Create an expense account called Bad Debt expense.16
QuickBooks Online Tips & TricksStep 3:1. Create an item (service) linked to the Bad Debt Expense.2. Click the Gear icon Products and Services.3. Create a service item linked to Bad Debt Expense.Step 4:1. Create a Credit memo for the outstanding amounts for the bad debts.2. Use the Bad debt service item created in step 3.Step 5:Apply the credit against the outstanding invoices on the Receive Payments window.17
QuickBooks Online Tips & TricksRECORDING LOAN PAYMENTSRecording loan payments is a common transaction but can be more complex than everydaytransactions. To record a loan payment, it will depend on the type of loan you have. Thistransaction may vary based on the type of loan.In this example, we’ll assume that it is a declining balance loan and that the principal andinterest will change each month per a schedule provided by the bank.Step 1 – Create an Expense Transaction1.2.3.4.5.6.7.Open the expense transaction.Enter the Account and the Date of the transaction.Enter the total amount of the payment.In the Account Details section, choose the Loan account.In the Amount, enter the principal amount of the payment.Add a line to the expense and choose the Interest expense account.Enter the amount of the interest. The total of the principal and interest amounts shouldadd up to the total amount of the payment.18
QuickBooks Online Tips & TricksStep 2 – Make Loan Payment RecurringInstead of having to enter this transaction every month, you can make it recurring to remindyou.1.2.3.4.Click Save.Click Make Recurring.Enter the Template name.Choose Reminder. This lets you change the amount for the principal and interestamount instead of the transaction automatically entering every month with the sameamounts.5. Choose the Interval for the date of the entry.6. Enter the Start date and End date.7. Save the entry.Note: To make changes to Recurring transactions, click the Gear icon, and then clickRecurring Transactions. Click edit to make changes to the template.19
QuickBooks Online Tips & TricksRECORDING OWNER EXPENSESCreate a credit card or bank account to track purchases. To create the account, do thefollowing:1.2.3.4.Go to the Chart of Accounts.Click Add New.Choose the Category Type of Bank or Credit Card.Click Save & Close.20
QuickBooks Online Tips & Tricks5. Click New à Click Expense.6. Enter the Transaction as usual. For the payment account choose Owner PurchaseAccount.21
QuickBooks Online Tips & TricksSENDING REPORTS TO EXCELQuickBooks is a powerful reporting tool. To further analyze you may want to use MS Excel.QuickBooks helps you get started by exporting reports to excel with one click exports.QuickBooks maintains the formulas and formatting after sending the report to Excel. To exporta report to Excel:1. Go to Reports and run a report.2. On the report click the Export report icon.3. QuickBooks saves the report and downloads it to your computer. Click the report toopen.22
QuickBooks Online Tips & TricksAUTOMATED REPORTSUsing QuickBooks Online, you can have reports automatically sent by email to yourself andothers at regular times (e.g. 1st of the month).Any customized reports can be saved as part of a Report Group.1. In My Custom Reports, click Edit to edit the Report Group Settings.2. Click Set email schedule.3. Edit the email schedule for your specific needs.23
QuickBooks Online lets you upload and save attachments on any transaction. This makes referencing source documents easier and more efficient. To add an attachment: 1. Open an invoice 2. Click attachments icon 3. Browse for the attachment 4. Click Save NOTE: Now QuickBooks Online lets you view the source document when viewing the transaction. This is helpful for receipts, bank statements,

![[IV‐ADV‐9‐A] Tips and Tricks for Payroll and Human Resources](/img/9/tips-and-tricks-payroll-and-hr.jpg)