Transcription
OWNER’S MANUALCLEARLIGHT SANCTUARYFULL SPECTRUM SAUNASSuperior Quality and ServiceCongratulations on your purchase of a Clearlight Infrared Sauna .We are confident that you will enjoy the many benefits of your sauna for years to come.Please read this manual before using your Sauna for the first time.Please keep this manual for future reference.1077 Eastshore Hwy Berkeley, CA 94710 Phone: 800.798.1779 1.510.601.1775 www.infraredsauna.com
Table of ContentsWelcome - - - - - - - - - - - - - - - - - - - - - - - - - - - - - - - - - - - - - - - - - - - 03Installation- - - - - - - - - - - - - - - - - - - - - - - - - - - - - - - - - - - - - - - - - - 0401 SANCTUARY 1 - - - - - - - - - - - - - - - - - - - - - - - - - - - - - - - - - - 0502 SANCTUARY 2 - - - - - - - - - - - - - - - - - - - - - - - - - - - - - - - - - - 1903 SANCTUARY 3 - - - - - - - - - - - - - - - - - - - - - - - - - - - - - - - - - - 3304 SANCTUARY Y AND SANCTUARY RETREAT - - - - - - - - - - - - 4705 SANCTUARY C - - - - - - - - - - - - - - - - - - - - - - - - - - - - - - - - - - 65Enjoying Your Sauna- - - - - - - - - - - - - - - - - - - - - - - - - - - - - - - - - - - 80Using Your Sauna Control Panel- - - - - - - - - - - - - - - - - - - - - - - - - - 81Tips for Use - - - - - - - - - - - - - - - - - - - - - - - - - - - - - - - - - - - - - - - - - 85Safety Instructions - - - - - - - - - - - - - - - - - - - - - - - - - - - - - - - - - - - - 87Important Safeguards- - - - - - - - - - - - - - - - - - - - - - - - - - - - - - - - - - 89Warranty - - - - - - - - - - - - - - - - - - - - - - - - - - - - - - - - - - - - - - - - - - - 91Why Detoxify - - - - - - - - - - - - - - - - - - - - - - - - - - - - - - - - - - - - - - - - 97* The information contained in this manual is subject to change without notice.
Dear Customer,Thank you for choosing Jacuzzi saunas. We realize that you have manychoices.The Jacuzzi brand is known the world over for three important factors:1) Exceptional Customer Service2) Quality workmanship3) Superior product performanceWe use only the finest materials with expert craftsmanship, state of the arttechnology, and the highest safety standards in the industry. We also offerour residential customers a lifetime warranty on all Jacuzzi infrared saunas.You may be surprised at the noticeable effects on pain, weight, skin tone,and stress after using your Jacuzzi sauna. We invite you to experience thedifference: superior quality, service and performance.We thank you for your purchase and look forward to serving you further. Afterusing your sauna, please tell your friends about the positive changes that yousee. We find that this simple communication from one person to another isthe best way to share the story of health found by using our unique infraredsaunas.Please contact me directly with any questions, comments or suggestions.I look forward to hearing from you.Sincerely,Dr. Raleigh Duncan CEOSauna Works Inc.drduncan@infraredsauna.com800.798.1779 x 804 International: 1.510.601.1775
InstallationChoosing a locationPlace your sauna on a dry and level surface for best results. Garage, basement, attic, playroom, bedroom, or gardenhouse are just a few of the possible locations for your sauna.Your sauna’s natural cedar or basswood exterior will beautifully compliment any location.Outside, place the sauna on a deck or concrete pavers, available at your local building supply store, to protect it frommoisture in the ground which can wick up through the wooden feet. Outside installation also requires our optionalcanvas cover.Installation requirements for your sauna are as follows:1. Your Jacuzzi sauna is a self-contained and freestanding unit. It should not be built into any structure withoutprior authorization.2. Please maintain a minimum of 4-inch clearance on all sides of the unit to allow air to circulate while givingaccess for the power cord.Cleaning and maintenance1. Before using your sauna for the first time, clean the inside of the sauna with a damp cloth.Use your favorite furniture polish on the exterior.2. Place a towel on the floor and bench to absorb any perspiration. Wash these often to maintain a clean andpleasant environment inside your sauna.3. Perspiration may darken the wood over time. This can be removed by a light sanding with fine grit sandpaper.Please be careful when carrying and installing the glass pieces to avoid breakage. Make certain the glass is securely fastenedduring installation before letting go of any individual piece that could break.4www.infraredsauna.comCALL NOW 800.798.1779
SANCTUARY 101SANCTUARY 1Packaging - - - - - - - - - - - - - - - - - - - - - - - - 06Assembly Instructions - - - - - - - - - - - - - - - - - 07CALL NOW 800.798.1779www.infraredsauna.com5
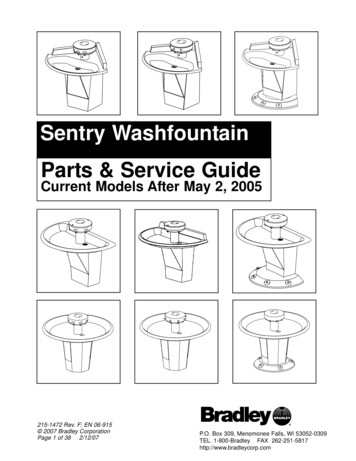
SANCTUARY 1PackagingCONTENTS OF BOXES.Box 1 of 4Box 2 of 4Box 3 of 4Box 4 of 41. Floor Panel1. Left Side Wall1. Front Wall Glass1. Front Heaters2. Ceiling Panel2. Right Side Wall2. Back Wall3. Accessories3. Bench & Bench Support4. Installation ManualACCESSORY BOX CONTENTSFront HeaterMouting Screws(4 sets)Door HandleWood piece(2 pieces)Wall Security Brackets(located installed in wall)6www.infraredsauna.comGlass SecurityBrackets (2 sets)CALL NOW 800.798.1779
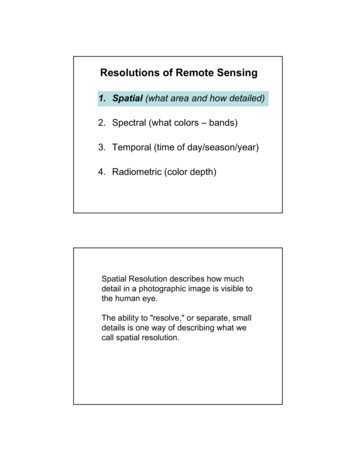
SANCTUARY 1Assembly InstructionsAssembly of the sauna requires two adults to complete. Please read the instructions thoroughly before and duringassembly to ensure proper installation of the unit. If you encounter any problems or have questions during assembly,please feel free to call our Customer Service department at 1-800-798-1779 or 1-510-601-1775.1 - LOCATION OF SAUNA & INSTALLATION ORDERWhen determining a location for your sauna, please keep in mind the following:1. The main power cord on the sauna must be easily accessible.2. The location must be dry and level.3. Panels should be installed in the following order:1) Floor4) Right Side Wall7) Wood Roof2) Back Wall5) Under Bench Support8) Glass Roof3) Left Side Wall6) Bench9) Front Wall Glass2 - PLACING FLOOR PANEL1. Place the bottom floor panel on the groundnear the location you will using the sauna.Make sure the front of the floor is in thedesired location of the door. The two floorreceptacles and the door magnet indicatethe front of the sauna.CALL NOW 800.798.17793 - CONNECTING THE BACK PANELTO THE FLOOR PANEL1. Place the back panel on the floor panel by placing it inthe groove of the floor panel.www.infraredsauna.com7
SANCTUARY 1Assembly Instructions Cont’d4 - CONNECTING SIDE WALLSThe side wall panels connect to the back wall with the installed locking brackets. There are mating brackets onthe side of each panel.1. Place the left side wall in the slot in the floor.Lift the side wall up about 4” (10cm) higherthan the backwall panel (See Picture 1).2. Place the side wall panel against the backwall (See Picture 2), then slide down sidewall panel until the two panels are equalheight. (See Picture 3).3. If the panels are not equal height or there isan obvious gap between the two panels, thismeans they are not propery attached andyou should try again.4. Repeat the steps above for the right sidewall panel.Picture 1Picture 2Picture 3If the panels still seem too tight to comedown all the way, try backing off thebracket screws by one half turn with aPhillips head screwdriver on the femalebracket.Left Side Wall Installed8www.infraredsauna.comRight Side Wall InstalledCALL NOW 800.798.1779
SANCTUARY 1Assembly Instructions Cont’d5 - INSTALLING UNDER BENCH SUPPORTSlide down the bench heater panel by lining up its sides with the vertical guides on the left and right side wallpanel.1. Be careful not to scratch the side panels when positioning the heater panel.2. Push the bench heater panel all the way down until it is touching the floor panel and securely in place.Heater must befacing outwardVertical bench heaterpanel guides are foundon the side panels.CALL NOW 800.798.1779www.infraredsauna.com9
SANCTUARY 1Assembly Instructions Cont’d6 - CONNECT HEATER CONNECTION UNDER BENCHPlug in the connectors under the bench as follows:Left Side Wall:1. Locate the short cable coming out of the floor with a single black and white cable and a single green cable.This cable is comes threaded through the hole of the white cable cover.2. Locate the cable coming out of the under bench support. Feed this cable through the open hole in the bottomof the white cable cover.3. Connect these cable to the cables coming out of the white box on the left side wall. You can connect the blackand white cables from the floor and underbench support to any black and white cable coming out of the boxas long as you match cable colors. You can connect the green cables to any of the green cables coming outof the box as long as you match cable colors.4. Screw on the cover to cover the wires on the side wall.Back Wall:1. Locate the longer cable coming out of the floor that feedsthrough a hole in the white cover.Connect the longer cable coming out of the floor to the likeconnector in the cables coming out of the white box on theback wall. Connect the cable with two wires to the cable withtwo wires in the back all. Connect the cable with four wires tothe cable with four wires coming out of the back wall.2. The extra connectors in the white box on the back wall are forthe optional Vibration Resonance Therapy (VRT). If you did notorder the VRT, continue to number3. If you ordered the VRT, follow the installation instructionsincluded with the VRT.4. Screw on the cover to cover the wires on the back wall.You can plug any male connector to any female one as long asthe colors match.10www.infraredsauna.comCALL NOW 800.798.1779
SANCTUARY 1Assembly Instructions Cont’d7 - INSTALLING THE BENCHInstall the bench panel by sliding it over the horizontal bench guides on the side panels. Be careful not to scratchthe adjacent panels when sliding in the bench.Push the bench all the way in until it touches the back panel and is securely in place.The bench is reversible. One side is ergonomic and one side is flat. You can reverse the bench after the saunainstallation is finished. Be sure that the bench is pushed all the way back until it slides under the heater guardto secure the bench in TO8 - INSTALLING WOOD PORTION OF ROOF1. Set the wood portion of theroof on the back roof guide.Besure to slide the roof backagainst the back wall.Optional: After the bench is installed, you canslide in the included wood pieces to preventthe bench from sliding left to right. One piececan be placed on each side next to the bench.If you decide to flip the reversible bench over,please remove the wood pieces first.CALL NOW 800.798.1779www.infraredsauna.com11
SANCTUARY 1Assembly Instructions Cont’dTHIS STEP IS VERY IMPORTANT.PLEASE DO NOT OMIT THIS STEP.9 - INSTALLING WALL LOCKS1. The side walls must be secured to the back wall and wood roof piece using the attached eye hooks.2. Screw in one of the eye hooks between the left side wall and backwall and one between the right side wall andbackwall.3. Secure one of the eye hooks between the left side wall and top front of the wood roof piece and one betweenthe right side wall and the top front of the wood roof piece.Attach eye hook sothat it is screwedinto both the sidewalls and back walls.Attach the eye hookso that it is screwedinto side walls andthe wood roof piece.4. Latch the three buckles that connect thewood roof piece to the back and side walls.12www.infraredsauna.comCALL NOW 800.798.1779
SANCTUARY 1Assembly Instructions Cont’d10 - INSTALLING GLASS PORTION OF ROOF AND RIGHT FRONT WALL1. Locate the glass roof piece as in the photo below.2. Locate the roof locking brackets, protective washersand screws.x2x4x6x6x4x23. Attach the brackets to the roof piece as shownbelow using the enclosed Allen Wrench.4. Place the long edge of the glass roof pieceinto the groove in the wood roof piece.Center this piece in the wood roof piece.HOLD THIS PIECE IN PLACE UNTILTHE RIGHT SIDE FRONT WALL ANDDOOR ARE INSTALLEDCALL NOW 800.798.1779www.infraredsauna.com13
SANCTUARY 1Assembly Instructions Cont’d10 - INSTALLING GLASS PORTION OF ROOF AND RIGHT FRONT WALL1. Locate the right front wall withright door.3. Secure the left front glass window to theroof glass using the included brackets.You will see pre-drilled holes in both thefront glass and roof glass.2. Place the right front wall intothe groove in the floor and alignit under the glass roof piece.Until this piece is securedusing the enclosed brackets,someone should hold the walland roof in place.4. Secure the outer-most Side Wall-Mounted L Shape Bracketsinto the wall using the screws provided.5. Repeat this process for the left frontwall and door.Sauna RoofBracketGlass CeilingOuter WallGlass Panel14www.infraredsauna.comCALL NOW 800.798.1779
SANCTUARY 1Assembly Instructions Cont’d11 - CONNECT HEATERS IN ROOF1. Locate the “trap” doors that open in the wood roof.2. Connect the black and white cables that thatcome out of the side wall to the connectorlocated in the wood roof.3. Connect the green ground wire that come out ofthe side wall to the green ground wire that is inthe wood roof.Push the wiring inside the roof area and close theroof door compartments.4. In the left side wall compartment, there will betwo connectors: 1) Heater connector. 2) Keypadconnector. The heater connector is a two wireconnector. The keypad connector is a seven wireconnector.BE SURE TO MATCH THE COLORS IN THE CONNECTORS.THE BLACK WIRE SHOULD MATCH UP WITH THE BLACK WIRE, ETC.12 - INSTALLING DOOR HANDLE1. Locate the two door handles.2. Attach the right side door handle using the enclosed screws.3. Attach the left side door handle using the enclosed screws.Note: If you are using a tablet or smartphone to control your sauna, the door handle will act as boththe door handle and tablet/smartphone holder when the door is closed.CALL NOW 800.798.1779www.infraredsauna.com15
SANCTUARY 1Assembly Instructions Cont’d13 - INSTALLING FRONT HEATERS1. Locate the two front heaters.2. Align the left front heater and plug the connector that comes out of the bottom of the heater into the plugcoming out of the in the floor.3. Align the the hole in the back of the heater with the hole in the front wall glass Using the enlcosed screws andwashers, secure the heater to the glass through the pre-drilled hole. One washer will be placed on the insideand one on the outside glass. The heater will be secured with these screws in two locations.4. Repeat this step for the right front CALL NOW 800.798.1779
SANCTUARY 1Assembly Instructions Cont’d13 - INSTALLING FRONT HEATERSWarning NoticeThe infrared heaters in your sauna are a potential BURN HAZARD. Do NOT touch theinfrared heaters when they are in operation and allow to cool before servicing.14 - LOCATING AND PLUGGING IN POWER CORDThe power cord comes out of the roof of the sauna. If you are standing facing the sauna, it comes out of the rearleft corner of the roof. Open the trap door to access the power cord and run the cord down the back of the sauna.The power cord will plug into the appropriate electrical receptacle.Note: We do not recommend using an extension cord for your sauna.Please plug the sauna directly into the wall receptacle.CALL NOW 800.798.1779www.infraredsauna.com17
SANCTUARY 1Assembly Instructions Cont’d15 - INSTALLATION IS COMPLETEInstallation of your sauna is now complete. Using a damp cloth, wipe out the sauna to remove any excesssaw dust that may have settled on the wall & floor panels and the heater panels during manufacturing andshipment.Please refer to usage instructions located later on in this manual.18www.infraredsauna.comCALL NOW 800.798.1779
SANCTUARY 102SANCTUARY 2Packaging - - - - - - - - - - - - - - - - - - - - - - - - 20Assembly Instructions - - - - - - - - - - - - - - - - - 21CALL NOW 800.798.1779www.infraredsauna.com19
SANCTUARY 2PackagingCONTENTS OF BOXES.Box 1 of 4Box 2 of 4Box 3 of 4Box 4 of 41. Floor Panel1. Left Side Wall1. Front Wall Glass1. Front Heaters2. Ceiling Panel2. Right Side Wall2. Back Wall3. Accessories3. Bench & Bench Support4. Installation ManualACCESSORY BOX CONTENTSFront HeaterMouting Screws(4 sets)Door HandleWood piece(2 pieces)Wall Security Brackets(located installed in wall)20www.infraredsauna.comGlass SecurityBrackets (2 sets)CALL NOW 800.798.1779
SANCTUARY 2Assembly InstructionsAssembly of the sauna requires two adults to complete. Please read the instructions thoroughly before and duringassembly to ensure proper installation of the unit. If you encounter any problems or have questions during assembly,please feel free to call our Customer Service department at 1-800-798-1779 or 1-510-601-1775.1 - LOCATION OF SAUNA & INSTALLATION ORDERWhen determining a location for your sauna, please keep in mind the following:1. The main power cord on the sauna must be easily accessible.2. The location must be dry and level.3. Panels should be installed in the following order:1) Floor4) Right Side Wall7) Wood Roof2) Back Wall5) Under Bench Support8) Glass Roof3) Left Side Wall6) Bench9) Front Wall Glass2 - PLACING FLOOR PANEL1. Place the bottom floor panel on the groundnear the location you will using the sauna.Make sure the front of the floor is in thedesired location of the door. The two plugsand the door magnet indicate the front of thesauna.CALL NOW 800.798.17793 - CONNECTING THE BACK PANELTO THE FLOOR PANEL1. Connect the back panel to the floor panel by lining upthe back panel on the groove of the floor panel.www.infraredsauna.com21
SANCTUARY 2Assembly Instructions Cont’d4 - CONNECTING SIDE WALLSThe side wall panels will be connected to the back wall by connecting together the installed brackets. There are“ ” brackets and “-” brackets on the side of each panel. The side walls will be installed as follows:1. Place the left side wall in the slot in the floor.Lift the side wall up about 4” (10cm) higherthan the backwall panel (See Picture 1).2. Place the side wall panel against the back wall(See Picture 2), then slide down side wall paneluntil the two panels are equal height. (SeePicture 3).3. If the panels are not equal height or there isan obvious gap between the two panels, thismeans they are not propery attached and youshould try again.4. Repeat the steps above for the right side wallpanel.Picture 1Picture 2Picture 3If the panels still seem too tight to comedown all the way, try backing off thebracket screws by one half turn with aPhillips head screwdriver on the femalebracket.Left Side Wall Installed22www.infraredsauna.comRight Side Wall InstalledCALL NOW 800.798.1779
SANCTUARY 2Assembly Instructions Cont’d5 - INSTALLING UNDER BENCH SUPPORTSlide down the bench heater panel by lining up its sides with the vertical guides on the left and right side wallpanel.1. Be careful not to scratch the side panels when positioning the heater panel.2. Push the bench heater panel all the way down until it is touching the floor panel and securely in place.Heater must befacing outwardVertical bench heaterpanel guides are foundon the side panels.CALL NOW 800.798.1779www.infraredsauna.com23
SANCTUARY 2Assembly Instructions Cont’d6 - CONNECT HEATER CONNECTION UNDER BENCHPlug in the connectors under the bench as follows:Left Side Wall:1. Locate the short cable coming out of the floor with a single black and white cable and a single green cable.This cable is comes threaded through the hole of the white cable cover.2. Locate the cable coming out of the under bench support. Feed this cable through the open hole in the bottomof the white cable cover.3. Connect these cable to the cables coming out of the white box on the left side wall. You can connect the blackand white cables from the floor and underbench support to any black and white cable coming out of the boxas long as you match cable colors. You can connect the green cables to any of the green cables coming outof the box as long as you match cable colors.4. Screw on the cover to cover the wires on the side wall.Back Wall:1. Locate the longer cable coming out of the floor that feedsthrough a hole in the white cover.Connect the longer cable coming out of the floor to the likeconnector in the cables coming out of the white box on theback wall. Connect the cable with two wires to the cable withtwo wires in the back all. Connect the cable with four wires tothe cable with four wires coming out of the back wall.2. The extra connectors in the white box on the back wall are forthe optional Vibration Resonance Therapy (VRT). If you did notorder the VRT, continue to number3. If you ordered the VRT, follow the installation instructionsincluded with the VRT.4. Screw on the cover to cover the wires on the back wall.You can plug any male connector to any female one as long asthe colors match.24www.infraredsauna.comCALL NOW 800.798.1779
SANCTUARY 2Assembly Instructions Cont’d7 - INSTALLING THE BENCHInstall the bench panel by sliding it over the horizontal bench guides on the side panels. Be careful not to scratchthe adjacent panels when sliding in the bench.Push the bench all the way in until it touches the back panel and is securely in place.The bench is reversible. One side is ergonomic and one side is flat. You can reverse the bench after the saunainstallation is finished. Be sure that the bench is pushed all the way back until it slides under the heater guardto secure the bench in TOOptional: After the bench is installed, you canslide in the included wood pieces to preventthe bench from sliding left to right. One piececan be placed on each side next to the bench.If you decide to flip the reversible bench over,please remove the wood pieces first.CALL NOW 800.798.1779www.infraredsauna.com25
SANCTUARY 2Assembly Instructions Cont’d8 - INSTALLING WOOD PORTION OF ROOF1. Set the wood portion of the roof on the back roof guide.Besure to slide the roof back against the back wall.9 - INSTALLING GLASS PORTION OF ROOF1. Place the glass roof portion on the front roof guides. Be sure that it is pushed firmly back against thewood roof portion.26www.infraredsauna.comCALL NOW 800.798.1779
SANCTUARY 2Assembly Instructions Cont’dTHIS STEP IS VERY IMPORTANT.PLEASE DO NOT OMIT THIS STEP.10 - INSTALLING WALL LOCKS1. The side walls must be secured to the back wall and wood roof piece using the attached eye hooks.2. Screw in one of the eye hooks between the left side wall and backwall and one between the right side wall andbackwall.3. Secure one of the eye hooks between the left side wall and top front of the wood roof piece and one betweenthe right side wall and the top front of the wood roof piece.4. Latch the three buckles that connect the wood roof piece to the back and side walls.Attach eye hook so that it is screwedinto both the side walls and back walls.Attach the eye hook so that it is screwedinto side walls and the wood roof piece.11 - INSTALLING GLASS DOOR AND RIGHT SIDE GLASS WINDOW1. We recommend using two people to move theglass door and right window piece. Place the glassdoor with right window in the groove in the floorand slide it securely into place against the righ wall.It may help to put the corner of the glass in placefirst then put the rest of the glass in the slot. Untilthis piece is secured as in step 2 below using theenclosed brackets, please hold this piece in place.2. Secure the front glass door and right side glasswindow to the roof glass using the includedbrackets. You will see pre-drilled holes in both thefront glass and roof glass. One person shouldhold the outside piece while the other personscrews in the bolt.CALL NOW 800.798.1779x2x4x6x4x6x2Front Wall Installedwww.infraredsauna.com27
SANCTUARY 2Assembly Instructions Cont’d11 - INSTALLING GLASS DOOR AND RIGHT SIDE GLASS WINDOW3. Secure the outer-most Side Wall-Mounted L ShapeBrackets into the wall using the screws provided.WallGlass CeilingBracketGlass Panel12 - INSTALLING LEFT SIDE GLASS1. Open the door of the sauna to allow room to place the left side glass window.2. Place the left side glass window and push it against the left side wall so it is securly in place. Until this piece issecured using the included brackets, someone should hold the piece in place.3. Secure the left front glass window to the roof glass using the included brackets. You will see pre-drilled holes inboth the front glass and roof glass.4. Secure the outer-most Side Wall-Mounted L Shape Brackets into the wall using the screws provided.WallGlass CeilingBracketGlass Panel28www.infraredsauna.comCALL NOW 800.798.1779
SANCTUARY 2Assembly Instructions Cont’d12 - INSTALLING LEFT SIDE GLASSSauna RoofSauna RoofBracketBracketGlass CeilingGlass CeilingOuter WallOuter WallGlass PanelGlass PanelFront Wall Installed13 - CONNECT HEATERS IN ROOF1. Locate the “trap” doors that open in the wood roof.2. Connect the black and white cables that comeout of the side wall to the connector located inthe wood roof.3. Connect the green ground wire that come outof the side wall to the green ground wire that isin the wood roof. Push the wiring inside the roofarea and close the roof door compartments.4. In the left side wall compartment, there will betwo connectors: 1) Heater connector. 2) Keypadconnector. The heater connector is a two wireconnector. The keypad connector is a seven wireconnector.BE SURE TO MATCH THE COLORS IN THE CONNECTORS.THE BLACK WIRE SHOULD MATCH UP WITH THE BLACK WIRE, ETC.CALL NOW 800.798.1779www.infraredsauna.com29
SANCTUARY 2Assembly Instructions Cont’d14 - INSTALLING DOOR HANDLE1. Locate the door handle.2. Attach the door handle using the enclosed screws.Note: If you are using a tablet or smartphone to control your sauna, the door handle will act as boththe door handle and tablet/smartphone holder when the door is closed.15 - INSTALLING FRONT HEATERS1. Locate the two front heaters.2. Align the left front heater and plug the connector that comes out of the bottom of the heater into the plugcoming out of the in the floor.3. Align the the hole in the back of the heater with the hole in the front wall glass. Using the included screwsand washers, secure the heater to the glass through the pre-drilled hole. One washer will be placed on theinside and one on the outside glass. The heater will be secured with these screws in two locations.30www.infraredsauna.comCALL NOW 800.798.1779
SANCTUARY 2Assembly Instructions Cont’d15 - INSTALLING FRONT HEATERS4. Repeat this step for the right front heater.Front Heater InstalledWarning NoticeThe infrared heaters in your sauna are a potential BURN HAZARD. Do NOT touch theinfrared heaters when they are in operation and allow to cool before servicing.CALL NOW 800.798.1779www.infraredsauna.com31
SANCTUARY 2Assembly Instructions Cont’d16 - LOCATING AND PLUGGING IN POWER CORDThe power cord comes out of the roof of the sauna. If youare standing facing the sauna, it comes out of the rear leftcorner of the roof. Open the trap door to access the powercord and run the cord down the back of the sauna. The powercord will plug into the appropriate electrical receptacle.Note: We do not recommend usingan extension cord for your sauna.Please plug the sauna directly intothe wall receptacle.17 - INSTALLATION IS COMPLETEInstallation of your sauna is now complete. Using a dampcloth, wipe out the sauna to remove any excess saw dustthat may have settled on the wall & floor panels and theheater panels during manufacturing and shipment.Please refer to usage instructions located later on in thismanual.32www.infraredsauna.comCALL NOW 800.798.1779
SANCTUARY 203SANCTUARY 3Packaging - - - - - - - - - - - - - - - - - - - - - - - - 34Assembly Instructions - - - - - - - - - - - - - - - - - 35CALL NOW 800.798.1779www.infraredsauna.com33
SANCTUARY 3PackagingCONTENTS OF BOXES.Box 1 of 4Box 2 of 4Box 3 of 4Box 4 of 41. Floor Panel1. Left Side Wall1. Front Wall Glass1. Front Heaters2. Ceiling Panel2. Right Side Wall2. Back Wall3. Accessories3. Bench & Bench Support4. Installation ManualACCESSORY BOX CONTENTSFront HeaterMouting Screws(4 sets)Door HandleWood piece(2 pieces)Wall Security Brackets(located installed in wall)34www.infraredsauna.comGlass SecurityBrackets (2 sets)CALL NOW 800.798.1779
SANCTUARY 3Assembly InstructionsAssembly of the sauna requires two adults to complete. Please read the instructions thoroughly before and duringassembly to ensure proper installation of the unit. If you encounter any problems or have questions during assembly,please feel free to call our Customer Service department at 1-800-798-1779 or 1-510-601-1775.1 - LOCATION OF SAUNA & INSTALLATION ORDERWhen determining a location for your sauna, please keep in mind the following:1. The main power cord on the sauna must be easily accessible.2. The location must be dry and level.3. Panels should be installed in the following order:1) Floor4) Right Side Wall7) Wood Roof2) Back Wall5) Under Bench Support8) Glass Roof3) Left Side Wall6) Bench9) Front Wall Glass2 - PLACING FLOOR PANEL1. Place the bottom floor panel on the groundnear the location you will using the sauna.Make sure the front of the floor is in thedesired location of the door. The two plugsand the door magnet indicate the front of thesauna.CALL NOW
Please read this manual before using your Sauna for the first time. Please keep this manual for future reference. 1077 Eastshore Hwy Berkeley, CA 94710 Phone: 800.798.1779 1.510.601.1775 www.infraredsauna.com