Transcription
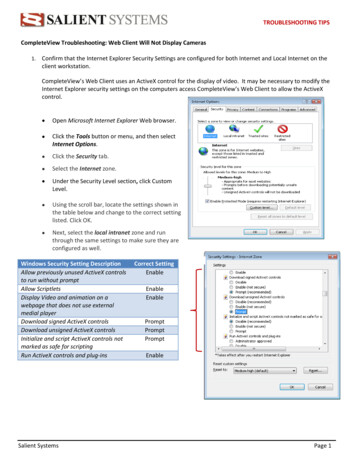
Troubleshooting guideHP ENVY 6200, 7100, 7800 Printers - InkCartridge ErrorsThis document is for HP ENVY Photo 6220, 6230, 6232, 6234, 6252, 6255, 7120, 7130, 7134, 7155,7158, 7164, 7820, 7830, 7855, 7858, and 7864 All-in-One printers.The printer does not print, and one of the following error messages displays on the printer controlpanel: Cartridge ProblemIncompatible CartridgesCartridges MissingStep 1: Update printer firmwareSome releases of ink cartridges are not compatible with older versions of printer firmware. Update thefirmware to resolve this problem.Update directly from the printerMany HP printers released in 2010 and later support Web Services, cloud-based printing services thatinclude ePrint, printer apps, firmware updates, and content that you can print directly from the controlpanel. These printers can use a direct Internet connection to find and install updates.note:Supported printers must connect to a wireless or wired network with an active Internet connection toinstall updates. If the printer connects to the computer with a USB cable, this update method is notavailable. Continue to the method to download firmware from the HP website.1. Navigate to the printer update feature. Menu names and icons vary by printer.o Printers with an ePrint button or icon: Touch or press the HP ePrint icon or button (or), touch or press Settings or Setup if necessary, then touch or press ProductUpdate or Check Product Updates.o Printers with text-based menus: Select the Setup, Service, or Settings menu, selectPreferences, Printer Maintenance, or Tools if necessary, then select Web Services,Printer Update, or LaserJet Update.2. If you are prompted to sign up or accept terms of service, follow any on-screen instructions toenable Web Services and setup automatic updates. This procedure sets up the printer's Internetconnection so it can receive updates.
3. If the printer does not automatically start the update process, select Check for Updates or asimilar menu to start the update.Download firmware updates from the HP websiteInstall the latest version of your printer firmware from the HP Customer Support downloads page.WindowsUpdate the printer firmware for printers connected to a computer with Windows.1. Make sure the printer is on and connected to the computer through your local network or USBcable.2. Go to HP Customer Support - Software and Driver Downloads.3. If a Let's identify your product to get started page displays, click Printer.4. Type your printer model number, and then click Submit.The software results page for your printer displays with the default operating system selected.5. If you need to change the version of Windows, click Change, select your version, and then clickChange.6. Click Firmware, and then click Download.If a Firmware section is not listed, an update is not currently available for your printer.7. Save the file to your computer.8. Locate and then open the file to start the installation process.9. When the HP Printer Update window opens, see if the printer serial number displays.o If the serial number displays, select the checkbox next to it, and then click Update.o If the serial number displays but the status is 'not applicable' (grayed out), you do notneed the firmware update. Click Cancel.o If the serial number does not display and your printer uses a network connection,connect a USB cable to the printer and computer. Wait 20 seconds, and then clickRefresh. When the serial number displays, select the checkbox next to it, and then clickUpdate.
10. When the update completes, click OK.11. If you connected a USB cable to update your network printer, remove the USB driver installed byWindows.1. Search Windows for control panel, and then click Control Panel in the results.2. Click View Devices and printers.3. Right-click the USB printer device that matches your printer model, and then selectRemove Device.4. Disconnect the USB cable from the printer and the computer, and then restart thecomputer.MacUpdate the printer firmware for printers connected to a Mac.1. Make sure the printer is on and connected to the computer through your local network or USBcable.2. Go to HP Customer Support - Software and Driver Downloads.3. If a Let's identify your product to get started page displays, click Printer.4. Type your printer model number, and then click Submit.The software results page for your printer displays with the default operating system selected.5. If you need to change the version of macOS or OS X, click Change, select your version, and thenclick Change.6. Click Firmware, and then click Download.If a Firmware section is not listed, an update is not currently available for your printer.
7. When the download is complete, open the [Printer name].dmg file.8. Double-click HP Firmware Updater.9. Click the name of your printer, and then click Continue.10. The updater checks the firmware version installed on the printer, and then displays the resultsin the Update Information window.o If Device is ready to be reflashed displays, click Continue to update the firmware.When the update completes, click Done.oIf This Firmware Updater does not contain upgrades for your device displays, theprinter firmware is already updated to the most recent version. Click Cancel to exit theupdater.If the error persists, continue to the next step.Step 2: Make sure the ink cartridges are correctly installedThe printer displays an error if the ink cartridges are not correctly installed. Remove the ink cartridges,check them for any plastic tape, reinstall the ink cartridges, and then try to print again.1. Turn on the printer.2. Open the ink cartridge access door.
3. Wait until the carriage is idle and silent before you continue.4. Lightly press down on the ink cartridge to release it, and then pull the ink cartridge out of itsslot.caution:Do not touch the copper-colored contacts or the ink nozzles. Touching these parts can result inclogs, ink failure, and bad electrical connections.5. Remove any protective tape that still might be on the contacts.caution:Do not try to remove the copper electrical strip.6. Hold the ink cartridge by its sides with the contacts toward the printer, insert the ink cartridgeinto its slot, and then gently push the ink cartridge until it snaps into place.
note:Install the color ink cartridge on the left and the black ink cartridge on the right.7. Repeat these steps to install the other ink cartridge.8. Close the ink cartridge access door.Try to print. If the error persists, continue to the next step.Step 3: Clean the electrical contactsThe printer might display an ink cartridge error if the ink cartridge contacts are dirty. Unplug any cordsor cables, remove the ink cartridges, and then clean the electrical contacts on the ink cartridges andprint carriage.1. Gather the following materials:o Dry foam-rubber swabs or lint-free cloth (eyeglass wipes or coffee filters work well)o Distilled, filtered, or bottled water (tap water might contain contaminants that candamage the ink cartridges)caution:Do not use platen cleaners or alcohol to clean the ink cartridge contacts. These candamage the ink cartridge or the printer.2. Open the ink cartridge access door.3. Wait until the printer is idle and silent before you continue.
4. Disconnect the power cord and any Ethernet or USB cables.5. Lightly press down on the ink cartridge to release it, and then pull the ink cartridge out of itsslot.caution:Do not remove both ink cartridges at the same time. Remove and then clean each ink cartridgeone at a time. Do not leave an ink cartridge outside the printer for more than 30 minutes.6. Hold the ink cartridge by its sides.7. Dip a clean foam-rubber swab or lint-free cloth into distilled water, and then squeeze any excesswater from it.8. Clean only the copper-colored contacts, and then allow the ink cartridge to dry forapproximately 10 minutes.9. Lightly moisten another foam-rubber swab or lint-free cloth with distilled water, and thensqueeze any excess water from the swab or cloth.10. Use the swab or cloth to clean the electrical contacts in the carriage, located inside the printer.
11. Either let the ink cartridge sit for 10 minutes to allow the cleaned area to dry, or use a new swabor cloth to dry it.note:Make sure the ink cartridge is not left out of the printer for more than 30 minutes.12. Hold the ink cartridge by its sides with the contacts toward the printer, insert the ink cartridgeinto its slot, and then gently push the ink cartridge until it snaps into place.13. Repeat these steps to clean and reinsert the other ink cartridge.14. Close the ink cartridge access door.15. Reconnect the power cord and any Ethernet or USB cables, unless your printer is connected to awireless network.16. Turn on the printer, if it does not turn on automatically.Try to print. If the error persists, continue to the next step.Step 4: Reset the printerResetting the printer can sometimes resolve an ink cartridge error.1.2.3.4.5.6.Turn the printer on, if it is not already on.Wait until the printer is idle and silent before you continue.With the printer turned on, disconnect the power cord from the rear of the printer.Unplug the power cord from the wall outlet.Wait at least 60 seconds.Plug the power cord back into the wall outlet.note:
HP recommends connecting the printer power cord directly to the wall outlet.7. Reconnect the power cord to the rear of the printer.8. Turn on the printer, if it does not automatically turn on.9. Wait until the printer is idle and silent before you proceed.Try to print. If the error persists, continue to the next step.Step 5: Clean the ink cartridge contacts againCleaning the ink cartridge contacts again can help resolve the issue. Repeat the steps you performedpreviously in this document to clean the ink cartridge contacts.Try to print. If the error persists, continue to the next step.Step 6: Replace the ink cartridgeAn error message might specify the ink cartridge that caused the error. Replace the problem inkcartridge indicated in the error message.To find your cartridge number and to purchase ink or toner supplies, go to HP Store or a local retailer.Make sure you are using the correct genuine HP ink or toner supplies for your printer. HP cannotguarantee the quality or reliability of non-HP cartridges or refilled HP cartridges. To check theauthenticity of your cartridges, go to the HP anti-counterfeit webpage (in English).If you have a defective cartridge or printhead, it might be under warranty. To check the warranty onyour ink or toner supplies, go to Printer and Page Yield Overview, and then review the limited warrantyinformation for your supplies.This printer is enabled with dynamic security. It is intended to be used only with ink cartridges with anoriginal HP chip. Ink cartridges using a non-HP chip might not work, and those that work today might notwork in the future. For more information, see Dynamic Security Enabled Printers.1. Turn on the printer.2. Load plain white paper in the input tray.3. Open the ink cartridge access door.4. Wait until the carriage is idle and silent before you continue.5. Lightly press down on the ink cartridge to release it, and then pull the ink cartridge out of itsslot.
6. Remove the new ink cartridge from its package. Be careful to only touch the black plastic on theink cartridge.7. Remove the plastic tape.caution:Do not touch the copper-colored contacts or the ink nozzles. Do not replace the protective tapeon the contacts. Handling these parts can result in clogs, ink failure, and bad electricalconnections.8. Hold the ink cartridge by its sides with the contacts toward the printer, insert the ink cartridgeinto its slot, and then gently push the ink cartridge until it snaps into place.note:Install the color ink cartridge on the left and the black ink cartridge on the right.
9. Repeat these steps to install the other ink cartridge, if necessary.10. Close the ink cartridge access door.The printer starts an initialization process. It is normal for the printer to make noises during thisprocess. After the process completes, the printer prints an alignment page.Try to print. If the error persists, continue to the next step.HP Printers - No Connection after Router orWi-Fi Settings ChangeThis document is for HP wireless inkjet printers connecting to a wireless network.This document explains how to reconnect a previously installed wireless printer to the network if youchanged your Internet Service Provider (ISP) or purchased a new router. When you change networksettings such as the network name and password, you must also reconfigure the printer for those newsettings.Connect a printer with a touchscreen control panelAccess the Wireless Setup Wizard through the printer control panel to establish a wireless connectionbetween your printer and network.1. From the home screen of your printer control panel, touch the Wireless icon.2. Touch the Setup icon.3. Touch Restore Network Defaults or Restore Network Settings, and then touch Yes to confirmyour selection.4. After the default network settings are restored, touch the back arrow, touch Wireless Settings,and then touch Wireless Setup Wizard.The printer searches for available networks.5. Touch the name of your wireless network.6. If your wireless network does not display in the list of wireless networks, touch Enter NewNetwork Name, and then type the name of your wireless network.
note:Type the exact network name, including any uppercase and lowercase letters.7. Type the WEP or WPA key (network password), and then touch Done.If you do not know your network password, go to Find Your Wireless WEP, WPA, WPA2Password.Once the printer connects to the wireless network, the blue Wireless light on the control panelturns on solid.If the printer fails to connect to the wireless network, print a Wireless Network Test Report for furtherassistance.Connect a printer that does not have a touchscreen control panelUse Wi-F
This document is for HP ENVY Photo 6220, 6230, 6232, 6234, 6252, 6255, 7120, 7130, 7134, 7155, 7158, 7164, 7820, 7830, 7855, 7858, and 7864 All-in-One printers. The printer does not print, and one of the following error messages displays on the printer control panel: Cartridge Problem.