Transcription
ArcGIS 9 Geocoding in ArcGIS
Copyright 2004 ESRIAll rights reserved.Printed in the United States of America.The information contained in this document is the exclusive property of ESRI. This work is protected under United States copyright law and otherinternational copyright treaties and conventions. No part of this work may be reproduced or transmitted in any form or by any means, electronic ormechanical, including photocopying and recording, or by any information storage or retrieval system, except as expressly permitted in writing by ESRI.All requests should be sent to Attention: Contracts Manager, ESRI, 380 New York Street, Redlands, CA 92373-8100, USA.The information contained in this document is subject to change without notice.DATA CREDITSBurglary Map: GDT and Vexcel Corp.Yellowstone Fire Data: National Park ServiceQuick-Start Tutorial Data: Atlanta, GeorgiaWRITERScott CrosierU.S. GOVERNMENT RESTRICTED/LIMITED RIGHTSAny software, documentation, and/or data delivered hereunder is subject to the terms of the License Agreement. In no event shall the U.S. Governmentacquire greater than RESTRICTED/LIMITED RIGHTS. At a minimum, use, duplication, or disclosure by the U.S. Government is subject to restrictionsas set forth in FAR §52.227-14 Alternates I, II, and III (JUN 1987); FAR §52.227-19 (JUN 1987) and/or FAR §12.211/12.212 (Commercial TechnicalData/Computer Software); and DFARS §252.227-7015 (NOV 1995) (Technical Data) and/or DFARS §227.7202 (Computer Software), as applicable.Contractor/Manufacturer is ESRI, 380 New York Street, Redlands, CA 92373-8100, USA.ESRI, ArcView, ArcEditor, ArcInfo, ArcMap, ArcCatalog, ArcSDE, SDE, Spatial Database Engine, ArcGIS, ArcLogistics, ArcToolbox, ArcIMS, StreetMap,and www.esri.com are trademarks, registered trademarks, or service marks of ESRI in the United States, the European Community, or certain otherjurisdictions.Other companies and products mentioned herein are trademarks or registered trademarks of their respective trademark owners.
Contents1 Introduction1Applications of geocoding 2Geocoding and ArcGIS 6Tips on learning the geocoding process2 Quick-start tutorial911Exercise 1: Locating and rematching addresses 12Exercise 2: Using alternate street names and place name aliasesExercise 3: Creating a dynamic geocoded feature class 233 Concepts of geocoding27What is an address? 28The geocoding work flow 32The ArcGIS geocoding framework 36The process of geocoding 38Customizing your address locator 40Quick reference guide to common geocoding tasks4 Preparing for geocoding194143Understanding address locator styles 44Commonly used address locator styles 46Preparing reference and address data 58Standardizing your reference data 595 Building an address locator61Creating an address locator 62Modifying an address locator’s settings 74Managing address locators in ArcMap 79iii
6 Locating addresses83Understanding the geocoding process 84Finding an individual address 87Geocoding a table of addresses 90Rematching a geocoded feature class 967 Additional geocoding techniques101Alternative searches 102The Alternate Name table tab 104The Alias Table dialog box 105Building an address locator for alternative searchesSearching for an intersection 1118 Keeping an address locator currentUpdating your reference data 114Versioned data and the geocoding indexRebuilding geocoding indexes 117121071131159 Distributing your address locator119Sharing elements of the geocoding framework 120Deciding to share an address locator 122Collecting address locator-related material 124Making your address locator public 128Accessing shared address locators 133ivGEOCODING IN ARCGIS
10 Modifying your address locator135Exploring the address locator file 136Why change your address locator file? 138Changing default settings 140Table schema and the locator file 144Accommodating an alternative reference data schemaModifying the query 155Accommodating changes in the rule base files 158Special cases 165GlossaryIndexCONTENTS149167179v
IntroductionIN THIS CHAPTER Applications of geocoding Geocoding and ArcGIS Tips on learning the geocodingprocess1Geocoding is the process of assigning a location, usually in the form ofcoordinate values, to an address by comparing the descriptive locationelements in the address to those present in the reference material. Addressescome in many forms, ranging from the common address format of housenumber followed by the street name and succeeding information to otherlocation descriptions such as postal zone or census tract. In essence, anaddress includes any type of information that distinguishes a place.This chapter begins by illustrating many of the applications of geocoding.Next, a brief overview of the tools and software available with ESRI ArcGIS is given. Finally, tips on applying these tools to the geocoding processwill be presented.1
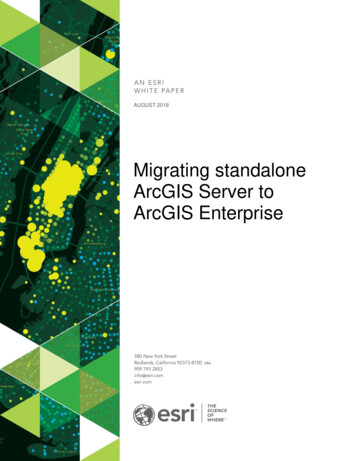
Applications of geocodingConverting an address to a specific point location on a map—commonly referred to as geocoding—can serve as a valuable tool to suityour specific needs. From simple data analysis to business and customer management to distribution techniques, there is a wide rangeof applications where geocoding can be used.Address data analysisWith geocoded addresses, you can spatially display the address locations and begin to recognize patterns within the information. Thiscan be done by simply looking at the information or by using some of the analysis tools available with ArcGIS. You can also displayyour address information based on certain parameters,allowing you to further analyze the information.BurglariesYear - All2GEOCODING IN ARCGIS
ayThursdayBurglariesBurglariesDay HoursWinterNight HoursSpringSummerFallAs illustrated on the facing page, the annual record of burglaries was initiallycreated by geocoding a database table of burglaries that consisted of an address for each. The illustrations above show how the geocoded addresses werepresented according to time, season, and day of the week to assist in crime prevention planning. Additional analysis tools available in ArcGIS could be usedto further analyze the information to identify patterns.Base data provided by GDT and Vexcel Corp.INTRODUCTION3
Customer data managementGeocoding acts as a crucial part of customer data management. Nearly every organization maintains address information for eachcustomer or client. This is usually in a tabular format, containing the customer name, address, buying habits, and any other informationyou have collected. Geocoding allows you to take your customer information and create a map of their locations. Using a variety ofrelated applications, you can use this information in many ways,from establishing marketing strategies to targeting specific clustersof customers to producing route maps and directions. Thegeocoded locations of your customers can be invaluable data.ArcLogisticsTM Route is an ESRI application that uses geocodedaddresses to optimally plan customer deliveries.4GEOCODING IN ARCGIS
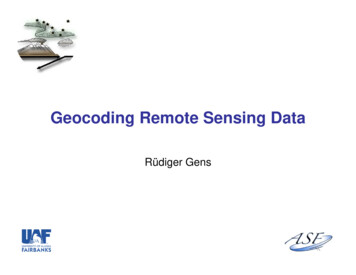
Distributed geocoding applicationsThere is a wide range of methods that you can use to share your geocoding functionality. These include everything from collecting theneeded material and sharing via a compressed file or compact disc to developing an online application, allowing users to do geocodingover the Internet.23765 Basicamente PlaceBaseline DriveBaselineSkyline StreetBowman StreetAvenida de los OsosBirmingham Drive18Somerset LaneKennedyHeightsHigh SchoolLewis & Clark StreetMany real estate firmshave found advantagesin distributing informationabout available realestate via the Internet. Bycombining the databaseof available homes andArcGIS Web services,the spatial and nonspatialinformation about ahome can be distributedto a wide audience.DriveSomersetElementarySchoolMountain charm in your own neighborhood23765 Basicamente PlaceThis single family home built in 1928 has everything youneed and more. Large, stone fireplace, spacious kitchen,detached two-car garage, large lot with views in alldirections, hardwood floors, and log beams throughout.A must see!2,800 sq ft 5 Bed, 3 Bath 240,000INTRODUCTION5
Geocoding and ArcGISThe ArcGIS system consists of several integrated tools andapplications. These are ArcCatalogTM, ArcMapTM, toolboxes,ArcSDE , and ArcGIS Server. As you progress through thegeocoding process, you may take advantage of each one of theseapplications or tools.process. There are many advantages to using ArcCatalog for GISdata storage. Following is a brief description of some of thegeocoding-specific features of ArcCatalog. For a more completedescription of ArcCatalog, see Using ArcCatalog.Organizing reference and address dataArcCatalogThe first of these applications that you will take advantage of isArcCatalog. ArcCatalog helps you organize all of yourgeographic information system (GIS) data, including thegeocoding applications that you will create in the geocodingAs feature classes and tables, your reference and addressmaterial is easily organized and managed through ArcCatalog.Specific icons related to the GIS-related data types, a catalog tree,and a variety of methods of visualizing your data provide anintegrated method of simplifying the organization process.Creating address locatorsCreating data-specific tools for geocoding—referred to asaddress locators—is done within ArcCatalog. Through a series ofeasy-to-follow dialog boxes, you can create the address locator tobest suit your specific geocoding tasks.Geocoding tables of addressesYou may wish to geocode tables of addresses directly inArcCatalog. This creates a feature class that can then be addeddirectly into ArcMap.Publishing address locators to share with other usersArcCatalog also provides you with the tools to collect anddistribute information and applications related to geocoding.Distribution of files through ArcSDE and ArcGIS Server is donethrough ArcCatalog.While ArcCatalog appears similar to many other file explorationapplications, it allows you to perform many other data maintenance andmanipulation processes.6GEOCODING IN ARCGIS
ArcMapPresentation of geocoded addressesThe second application that will be used heavily in the geocodingprocess is ArcMap. ArcMap is the central application in ArcGISDesktop. It is used to perform most of the map-based tasksincluding cartography, map analysis, and editing. ArcMapprovides a wide range of components that facilitate GISprocesses. For a more detailed description of ArcMap software’stools and functionality, see Using ArcMap.ArcMap is where you will visually interpret and present yourgeocoding results. A variety of tools allow you to manipulatesymbology, scale dependence, and classification based onspecific characteristics of each point location.Geocoding a single address interactively with ArcMapYou can also perform your geocoding process within ArcMap.Geocoding both tables and individual addresses in ArcMapprovides a method of instantly presenting the address location onyour map.Interactive review of geocoded addressesWhen reviewing your geocoded addresses, ArcMap providesyou with the tools to assess the accuracy of the points created.Creating maps showing analysis of geocoded dataArcMap provides a suite of cartographic tools to create maps.You can add your geocoded addresses, analysis results, andother related geographic data to a printable map layout. You canthen add other map features such as a title, North arrow, neatline,legend, scalebar, and so on.ToolboxesArcMap is the application in ArcGIS Desktop used to perform most of themap-based tasks including cartography, data analysis, and editing.INTRODUCTIONToolboxes store many GIS tools used in geoprocessing. Thesetools and wizards facilitate basic and advanced geoprocessingtasks such as creating buffers, importing and exporting datatypes, and manipulating data formats and projections. Within thecollection of tools, one toolbox is dedicated entirely to thegeocoding process to facilitate many common tasks.7
Toolboxes can be opened within ArcMap or ArcCatalog. For moreinformation on the geoprocessing functionality available inArcGIS, see Geoprocessing in ArcGIS.Using geoprocessing tasks within a modelThe geoprocessing functionality provides a user interface inwhich a series of tools can be combined into a model-likestructure. Geocoding tools can play an integral part within thesemodels.Analyzing geocoded addressesA large suite of tools are also available that can assist you in theanalysis of your geocoded addresses. These include everythingfrom creating a buffer around the address locations tointerpreting clusters.ArcSDEArcSDE is the key component in a multiuser ArcGIS system. Itallows you to manage geographic information and distribute it toArcGIS Desktop, ArcIMS , and other applications. As part of thedata management functionality, you can create address locatorsand share them across these multiple applications.ArcGIS ServerThe tools available in ArcGISprovide a wide range offunctionality. Several tools arededicated specifically tocommon geocoding tasks.Cleaning reference materialWhile ArcSDE was designed to share geographic informationthrough a local network, ArcGIS Server provides a mechanism inwhich such data can be shared across a wide range of mediums.These include Web applications, shared networks, Javaapplications, and so forth.For a more complete description of each of these applications andfurther discussion on their interactions, see What is GIS?As a valuable tool in the geocoding process, geoprocessing toolsinclude a tool specifically designed to modify your referencematerial to work harmoniously with the address locator.8GEOCODING IN ARCGIS
Tips on learning the geocoding processIf you’re new to GIS, take some time to familiarize yourself withArcMap and ArcCatalog. The books Using ArcMap and UsingArcCatalog contain tutorials to show you how to make maps andmanage GIS data.Begin learning the process of geocoding in Chapter 2, ‘Quickstart tutorial’. In Chapter 2 you’ll learn some of the basic andmore complex processes of geocoding. The data required for thetutorial is provided with the ArcGIS Desktop software, so you canfollow along step by step at your computer. You can also read thetutorial without using your computer.Finding answers to questionsLike most people, your goal is to complete your task whileinvesting a minimum amount of time and effort in learning how touse the software. You want intuitive, easy-to-use software thatgives you immediate results without having to read pages andpages of documentation. However, when you do have a question,you want the answer quickly so that you can complete your task.That’s what this book is all about—getting you the answers youneed, when you need them.Getting help on your computerIn addition to this book, use the ArcGIS Desktop Help system tolearn the process of preparing for and performing geocoding. Tolearn how to use Help, see Using ArcMap.Contacting ESRIIf you need to contact ESRI for technical support, refer to‘Contacting Technical Support’ in the ‘Getting more help’ sectionof the ArcGIS Desktop Help system. You can also visit ESRI onthe Web at www.esri.com and support.esri.com for moreinformation on geocoding and ArcGIS.ESRI education solutionsESRI provides educational opportunities related to geographicinformation science, GIS applications, and technology. You canchoose among instructor-led courses, Web-based courses, andself-study workbooks to find educational solutions that fit yourlearning style. For more information go towww.esri.com/education.This book describes many of the concepts of geocoding, how tobuild and use address locators, and methods of sharing thegeocoding functionality. Although you can read this book fromstart to finish, you’ll likely use it more as a reference. When youwant to know how to do a particular task, such as creating anaddress locator, just look it up in the table of contents or theindex. You’ll find a concise, step-by-step description of how tocomplete the task. Some chapters also include detailedinformation that you can read if you want to learn more about theconcepts behind the tasks. You can also refer to the glossary inthis book if you come across any unfamiliar terms.INTRODUCTION9
Quick-start tutorialIN THIS CHAPTER Exercise 1: Locating andrematching addresses Exercise 2: Using alternatestreet names and place namealiases Exercise 3: Creating a dynamicgeocoded feature class2This tutorial introduces you to geocoding with ArcGIS Desktop. You will learnthe basic techniques for creating address locators and geocoding with ArcGIS.Exercises 2 and 3 demonstrate some advanced features—using alternatenames and place name aliases and creating a dynamic feature class that isrelated to the address table.Some procedures in this tutorial require that you be familiar with usingArcCatalog and ArcMap. For example, you should know how to copy data toa new location and add data to a map. You should also have a basicunderstanding of what a geodatabase is and the objects it can contain. Ifyou’re new to GIS or feel you need to refresh your knowledge, please takesome time to read Getting Started with ArcGIS. You might also find thatworking through the quick-start tutorials in Using ArcCatalog and UsingArcMap will help you understand many of these basic concepts.11
Exercise 1: Locating and rematching addressesIn the first part of this tutorial you’ll learn how to create anew address locator, how to locate an address on a map,and how to create point features representing streetaddresses stored in a table such as customer locations.Before you begin, it is recommended that you make a copyof the data used in this tutorial so the original tutorial datawill remain unmodified. Copy the Atlanta folder to a newlocation on your computer such as the C:\ disk; you’ll find itin the ArcTutor\Geocoding folder on the local disk wherethe tutorial data was installed. You’ll need 5 MB of freedisk space to store a copy of the Atlanta folder.locator based on your copy of the Atlanta personalgeodatabase.1. Start ArcCatalog.2. In the Address Locators folder near the top of theCatalog tree, double-click Create New Address Locator.The Create New Address Locator dialog box appears.The Atlanta folder contains a personal geodatabase namedAtlanta.Creating a new address locatorAn address locator lets you convert textual descriptions oflocations into geographic features. The Address Locatorsfolder near the top of the Catalog tree lets you manageexisting locators and create new address locators on yourcomputer. The first thing you’ll do is create an address12GEOCODING IN ARCGIS
3. Click the US Streets with Zone (GDB) geocodingstyle, then click OK.The New US Streets with Zone (GDB) AddressLocator dialog box appears.4. In the Name text box, type “Atlanta”, replacing thedefault name.56. In the Choose Reference Data dialog box, navigate tothe folder containing your copy of the Atlanta personalgeodatabase. Double-click the personal geodatabase,click the streets feature class, then click Add. This willadd the streets feature class as reference data to thePrimary table tab and populate the fields.7. Leave all other address locator settings as they are andclick OK in the New US Streets with Zone (GDB)Address Locator dialog box. The new address locatorappears in the Address Locators folder.You’ll notice that the name of the address locator isprefaced by your login name. If your login name is“ssmith”, the address locator would appear in theCatalog tree as “ssmith.Atlanta”.5. On the Primary table tab, click the Browse buttonnext to the Reference data text box. This will openthe Choose Reference Data dialog box.New address locators are private; other users who login to the same computer won’t have access to youraddress locators.QUICK-START TUTORIAL13
When the new address locator is created, ageocoding index is built for the streets feature classwithin the Atlanta geodatabase. The index is stored ina new table named GC SZS1 in the Atlantageodatabase. With this index, the street features canbe quickly matched to the addresses you want togeocode.You will now modify the properties of the addresslocator you just created.8. Right-click the yourLogin.Atlanta address locator andclick Properties. The Address Locator Propertiesdialog box appears.On the right under Matching Options, you can seethat the default Minimum candidate score is 10. Thissetting determines the matching score needed toreturn a potential candidate.10. Click OK, closing the Address Locator Properties dialogbox.Your changes are saved in the address locator. Now youcan use this address locator to find out where addresses arelocated on a map.Finding an address interactivelyYou can use address locators to locate addresses while youare working in ArcMap. This process is commonly calledgeocoding.1. Start ArcMap and click OK to create a new, emptymap.2. Add the streets feature class in the Atlanta geodatabaseto the ArcMap document.9. Click and drag the slide bar to change the Minimumcandidate score to a value of 30.Find3. Click the Find button on the Tools toolbar.4. In the Find dialog box, click the Addresses tab.Before you can locate an address on your map, youmust identify the address locator you want to use.9145. Click the Browse button to choose an address locator.Navigate to the Address locators folder, click theyourLogin.Atlanta address locator, and click Add.This populates the Choose an address locator text boxand adds two additional text boxes that will be used toenter the address elements.GEOCODING IN ARCGIS
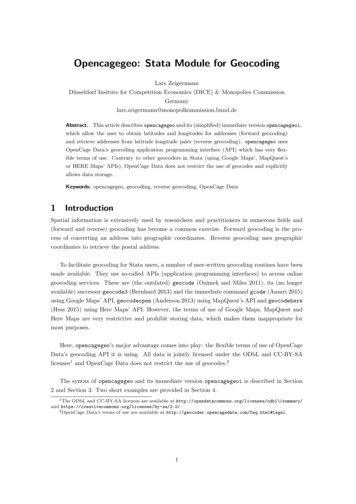
6. Type “150 Linden Ave NE” in the Street or Intersectiontext box. Type “30308” in the Zone text box.A graphic point representing the address’s location appearson the map.7. Click Find.One candidate address appears in the list at the bottomof the Find dialog box.8. Right-click the candidate and click Add as Graphic(s) toMap.9. In the Find dialog box, check Show all candidates.10. Click the Close button in the upper right corner of theFind dialog box.QUICK-START TUTORIAL15
Geocoding addresses in a tableIf you have a table that contains address information, youcan geocode all of the addresses at once. In this exerciseyou will begin with a table containing the addresses ofcustomers and geocode the entire table, showing where thecustomers are located.7. Under the Output section, click the Browse button todefine the Output shapefile or feature class. This willopen the Saving Data dialog box.1. Open a new map document in ArcMap. You do not needto save the map you created in the previous task.2. Add the streets feature class and the customers tablefrom your copy of the Atlanta geodatabase to your map.3. Right-click the customers table on the Source tab of thetable of contents and click Geocode Addresses.4. On the Choose an address locator dialog box, click Add.7The Add Address Locator dialog box will open.5. Navigate to the Address Locators folder, click theyourLogin.Atlanta address locator, then click Add.6. Click yourLogin.Atlanta in the Choose an addresslocator to use dialog box, then click OK.8. Click the Save as type dropdown arrow, then clickPersonal Geodatabase feature classes.This will open the Geocode Addresses:yourLogin.Atlanta dialog box.16GEOCODING IN ARCGIS
9. Navigate to your copy of the Atlanta personalgeodatabase, then double-click the personalgeodatabase. In the Name text box, type“atlanta results”.10. Click Save.A new point feature class named atlanta results will becreated in the Atlanta geodatabase. The point featuresgenerated by the geocoding process will be saved in thatfeature class.11. Click OK to start geocoding.When the geocoding process is finished, the Review/Rematch Addresses dialog box appears. It shows thestatistics of the addresses that were matched or notmatched. You’ll rematch the unmatched addresses laterin the tutorial.12. Leave the rematch criteria as is and click Done to closethe Review/Rematch Addresses dialog box.A Geocoding Result layer is added to the map. It shows thepoints that were added to the atlanta results feature class.You can also geocode a table of addresses in ArcCatalog.To do so, right-click the customers table in the Atlantageodatabase and click Geocode Addresses. This will inducea series of dialog boxes identical to those identified in thisexercise. You can then add the created feature class to anArcMap document.Rematching addresses1. In ArcMap, click the Tools menu, point to Geocoding,point to Review/Rematch Addresses, then clickGeocoding Result: atlanta results.2. The message “This operation requires that you be editingthis workspace. Would you like to start editing?”appears. Click Yes.The Review/Rematch Addresses dialog box opens.3. In the Rematch Criteria section, click the optionAddresses with candidates tied.QUICK-START TUTORIAL17
4. Click Match Interactively.The Interactive Review dialog box appears. The addressrecords that you have chosen to rematch are listed atthe top of the dialog box. In this exercise there is onerecord in the feature class that has two candidates thatare tied for the highest match score. The tied candidatesare listed at the bottom of the dialog box.5. Arrange the ArcMap window and the InteractiveReview dialog box so you can see the map.Near the center of the map, you will notice two pointshighlighted, one in yellow and the other in blue. Theseare the locations of the two candidates listed in thebottom window of the Interactive Review dialog box.The selected candidate is highlighted in yellow on themap.6. Click the second candidate in the candidate list. Thelocation of the yellow highlighted candidate changes onthe map.7. In the bottom right corner of the Interactive Reviewdialog box, click Match. The selected address in the listat the top of the dialog box is now associated with thesecond candidate in the list at the bottom.You can also rematch addresses with ArcCatalog. To do so,refresh the contents of the Atlanta geodatabase if you don’tsee the atlanta results feature class listed in the Contentstab. Right-click the atlanta results feature class, then clickReview/Rematch Addresses. This will induce a series ofdialog boxes similar to those described in this exercise.8. Click the Close button to close the Interactive Reviewdialog box.9. Click Done to close the Review/Rematch Addressesdialog box.10. On the Editor toolbar, click the Editor menu and clickStop Editing. Click Yes to save your changes.11. Close ArcMap. You do not need to save the changes toyour map document.18GEOCODING IN ARCGIS
Exercise 2: Using alternate street names and place name aliasesWhen you create an address locator, you have the option touse alternate street names and place name aliases. Placename aliases let you associate names of well-known placeswith street addresses—for example, the names ofmuseums, hospitals, or landmarks. When geocoding anaddress, the place name alias table is consulted first. If aplace name is found, the street address from the placename alias table is geocoded. Similarly, alternate streetnames can be defined for features in the reference data.When geocoding an address, the alternate street name tableis also searched to find potential candidates where streetshave more than one name.Creating an address locator that uses alternatenames and place name aliasesThe New US Streets with AltName (GDB) AddressLocator dialog box appears.In this task you’ll create a new address locator that usesalternate street names and place name aliases, then use it inArcMap to find addresses.1. In ArcCatalog, click the Address Locators folder at thetop in the Catalog tree, then double-click Create NewAddress Locator.2. Click the US Streets with AltName (GDB) geocodingstyle, then click OK.3. In the Name text box, type “Atlanta AltName”,replacing the default name.4. On the Primary table tab, click the Browse button nextto the Reference data text box.QUICK-START TUTORIAL19
5. From the Choose Reference Data dialog box,navigate to the Atlanta personal geodatabase.Double-click the personal geodatabase, click thestreets feature class, then click Add.10. On the right under Matching Options, click Place NameAlias Table.6. Click the Alternate Name table tab.7. Click the Browse button next to the Reference datatext box.8. In the Choose Reference Data dialog box, navigate toyour copy of the Atlanta personal geodatabase.Double-click the personal geodatabase, click thealtname table, then click Add.9. On the Alternate Name table tab, click the Join IDdropdown list, then click ALTNAME ID.The ALTNAME ID column in the altname table andthe OBJECTID column in the streets feature classare used to relate the records in the altname table tothe records in the streets feature class.QThe Alias Table dialog box appears.11. Click the Browse button, then navigate to the Atlantageodatabase. Double-click the personal geodatabase,click the place aliases table in the Atlanta geodatabase,then click Add.12. Click the Alias field dropdown arrow, then click NAME.20GEOCODING IN ARCGIS
13. Click OK.14. Click OK in the New US Streets with AltName (GDB)Address Locator dialog box. The newyourLogin.Atlanta AltName address locator appears inthe Address Locators folder.yourLogin.Atlanta AltName address locator, and clickAdd.A street may have more than one name. For example,“Atlanta Blvd” is defined as an alternate name for “Old10th St NE” in the Atlanta database. With theyourLogin.Atlanta AltName address locator, “30 Old10th St NE” and “30 Atlanta Blvd” will both find thesame location.6. Type “30 Old 10th St NE” in the Street or Intersectiontext box, then click Find.An additional geocoding index table has been added toyour copy of the Atlanta personal geodatabase. This newtable facilitates searching in the alternate name table.15. Close ArcCatalog.You can now use this address locator to find out where anaddress is located on a map.Findi
Geocoding a single address interactively with ArcMap You can also perform your geocoding process within ArcMap. Geocoding both tables and individual addresses in ArcMap provides a method of instantly presenting the address location on your map. Interactive review of geocoded addresses When reviewing your geocoded addresses, ArcMap provides