Transcription
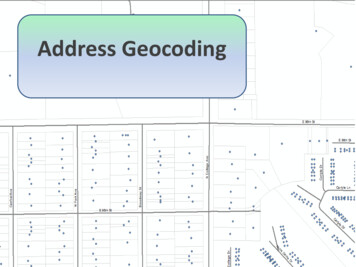
Public Safety Geocoding UsingArcGIS Online and HERE DataI.Knowledge, Skills, and Abilities (KSAs) SupportedThis training module aids in the development of several KSAs that are fundamental to using GIS insupport of public safety planning and operations. The ability to geocode using ArcGIS Online and HEREdata is a foundation-level ability that is relevant to all applications of GIS.Knowledge Gained: Geocoding process – Geocoding is a GIS operation for converting street addresses into spatialdata that can be displayed as features on a map, usually by referencing address informationfrom a street segment data layer. It is used in nearly every application of GIS for public safetyand represents a core competency for applying GIS is support of public safety and emergencymanagement nationwide. Esri has selected HERE Map Content as the foundation street data for its cloud-based mappingplatform as well as for StreetMap Premium and numerous other Esri products Esri uses HERE map content and HERE point addressing to build the geocoding locators used inboth ArcGIS Online (AGOL) and StreetMap Premium (SMP)Skills and Abilities Developed: How to convert street addresses into spatial data in a public safety scenario How to display your converted street addresses as features on a map How to use HERE map content and point addressing to build the geocoding locators used in bothAGOL and SMPII.Public Safety Geocoding Scenario in ArcGIS OnlineThe Broward County Sheriff Department would like to locate on a map all of the Broward Sheriff's OfficeDistrict Offices and all of its Fire Stations locations. The location of the District Offices and Fire Stationsis a critical piece of information use in public safety. This information is applied to maps that are used toanalyze response time to 911 calls, assess station closures based on call volume and other factors, andintegrate the data with automated vehicles location (AVL) related applications. Nearly all maps that youwill produce for use by public safety analysis and decision making will include the location of geocodedstreet addresses such as District Offices and Fire Stations.1 Page
III. Steps 1 through 4Step 1: Sign In to AGOLGo to http://napsg.maps.arcgis.com/home/ and click on Sign InEnter your organization’s credentials (or the credential provided to you by NAPSG).Username: XXXXXXPassword: XXXXXXThen click on Sign In.2 Page
It should look like this after you sign-in:Take a moment to become familiar with the mission and resources provided through NAPSG.3 Page
Step 2: Activate an AGOL Map CanvasClick on the MAP tab to activate the AGOL map canvas.The map will look like this after completing Steps 1 through 2:4 Page
Step 3: Activate the Streets BasemapThis map is mostly HERE Map Content with a few exceptions.Click on the Basemap Tab to choose the Streets pallet of basemaps.Next select Streets.5 Page
The map canvas should look like this after completing Steps 1 through 3:6 Page
Step 4: Single Address GeocodingTo geocode the Broward Sheriff's Office address enter the following address in the search box:2601 W. Broward Blvd, Ft. Lauderdale, FL 33312Notice how AGOL will give you options as you type. Be sure to select the first option.AGOL geocodes this address and zooms to it.Note - you may want to zoom out a little bit to get more geographical context as shown below.Notice how on the bottom left of the map canvas, at this scale, credits are given to HERE as a provider ofthe map content.7 Page
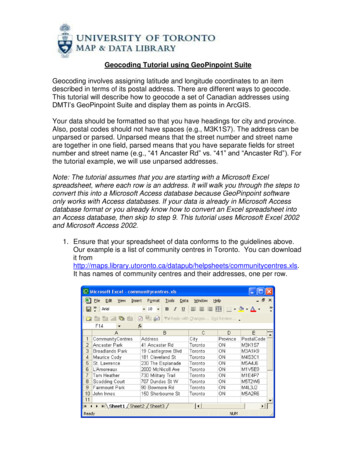
In Steps 1-4 You Learned How the geocoding process works in a public safety scenario. How Esri used its geocoding locators (software) built on top of the HERE Map Content and PointAddresses to geocode this address. Esri AGOL uses the attributes embedded on the HERE Basemap and the HERE Point Addresses togeocode the address above.Step 5: Geocoding Several Addresses Using a .csv FileNext you will geocode the Broward Sheriff's Office District OfficesThere are sixteen (16) Broward Sheriff's Office District Offices and AGOL allows you to geocode multipleaddresses at one time. Using AGOL application programming interface (API) you can also geocode alarge batch of street addresses. By using this feature, you will be able to complete geocoding tasksquickly and more efficiently. In this step we will use the default AGOL functionality to geocode severaladdresses for restaurants in San Diego.On your AGOL Geocoding Training folder you find a .cvs file called“Broward County Sheriff Office District Offices.csv”If you open the file, it will look like this:Notice that for geocoding in the United States (US), the AGOL’s geocoding locators (a piece of softwarethat understand how to address-match and geocode addresses on a GIS map) requires several fieldscontaining addresses formatted as shown in the graphic. They include: address, city, state and zip code,8 Page
state. The main point to understand here is the Esri has built its geocoding locators using HERE MapContent and that HERE data fully support Esri’s geocoding locators capabilities.Step 6: Drag & Drop a .csv File into AGOLNext you will drag & drop the Broward County Sheriff Office District Offices.csv file into the AGOLcanvas in order to geocode the 16 addresses at one time.Close the .csv file and drag it into the AGOL canvas. After your “drag & drop” the file, AGOL is smartenough to recognize the addresses’ format to be the one for the US and automatically assigns each fieldin the .csv file to the corresponding field required by the geocoding locator. This is an important conceptif you are designing and building address files.Note: If for some reason this step does not work, go to the bottom of this document for alternativesteps.Pick the United States from drop down list of countries.9 Page
Accept the remaining defaults and click on ADD LAYER. All the addresses are in Broward County, FL.The map canvas should look like this after completing step 6:The locations are shown as small orange dots. The Broward County Sheriff Office District Offices layer isadded to the AGOL Table of Contents (TOC).In Steps 5-6 You Learned: AGOL supports batch geocoding (the capability to geocode hundreds or thousands of addressesin a single –or batch – process) which will save you time when geocoding multiple addresses. It is important to properly format the address table so that AGOL can easily recognize the fieldsit has to match.10 P a g e
Step 7: Geocoding the Fire DepartmentsThe fire department operates five (5) battalions in eighteen (18) different fire stations locationsthroughout the county. The fire department operates 17 engine trucks, 7 aerial apparatus, 1 industrialfire truck, 3 aircraft fire-rescue crash trucks, 1 rotary wing aircraft / helicopter, 23 Advanced Life Support(ALS) transport units, 1 brush truck, 1 chemical fire suppression truck, and 1 foam tanker.On your AGOL Geocoding Training folder find a .cvs file calledBroward County BSO Fire Rescue Stations.csvIf you open the file, it will look like this:Notice that there is a filed called “Photo Name.” Later we will learn how to add photos to your ArcGISOnline (AGOL) map.11 P a g e
Step 8: Drag & Drop a .csv File into AGOL AgainDrag & drop the Broward County BSO Fire Rescue Stations.csv file into AGOL canvas to geocodethese 18 addresses at once.Close the .csv file and drag it into the AGOL canvas. After your “drag & drop” the file, AGOL is smartenough to recognize the addresses’ format to be the one for the United States and automatically assignseach field in the .csv file to the corresponding field required by the geocoding locator. This is animportant concept if you are designing and building address files.Accept the defaults and click Add Layer.All the addresses are in Broward County, FL.12 P a g e
The map canvas should look like this after step 8:The locations are shown as small orange dots. The Broward County Fire Rescue Stations layer is addedto the AGOL Table of Contents (TOC).13 P a g e
Step 9: Change the Symbols UsedPart A: Changing the symbols for the Fire Rescue StationsNow we have both layers in the Map TOC and they both (by default) use the same symbol, small orangedots. This does not allow the map user to differentiate between which points are Sherriff District Officesand which points are Fire Stations. Also, the small orange dots are too small for most map users (anddecision makers), so it is important that you change the symbols for each layer.From the TOC for the Fire Rescue Stations’ layer, click on the drop-down arrow and select ChangeSymbols.14 P a g e
The TOC changes and now from the Change Symbol/Options drop-down arrow select Change Symbol.In this case just change the symbol size to 30 as shown below and also change the basic symbol set toSafety Health as shown below:15 P a g e
In the Change Symbol pop-up window select the fire truck symbol (or a symbol of your liking) as shownbelow:Click DONE.The map canvas should look like this after completing step 9a:16 P a g e
Part B: Change the symbols for the Sherriff District OfficesUse the back arrow on the current layer to go back to the main TOC as shown below.The Map TOC should look like this:17 P a g e
Repeat the process outline in Step 9 but this time select a symbol for the Sheriff Office District Offices.The final map should look like this after step 9 is complete:Go back to the main TOC by clicking on the back arrow for the current layer.18 P a g e
Step 10: Save Your MapFrom the Save tab, select Save As.In the Save Map Pop-up window, make these selections and updates:-Title: Broward County Sheriff Fire Rescue Station and District OfficesTags: Fire, police, sheriffSummary: Location of public safety facilities in Broward County, FLSave in folder: use your default folder nameClick SAVE MAP.The map shows its new name:19 P a g e
To see what layers you have in your map, go to HOME tab and select My Content as shown below:It now looks like this:20 P a g e
Step 11: Sharing Your MapAt this point you can choose to share your map. To do so add checkmarks to the [web] map and noticehow the “Share” tab becomes active. Click on Share.The Share pop-up windows appears and you can decide if you want to share with everyone (publicallyavailable to anyone in AGOL) or with your organization only. For the purpose of this exercise, just shareit with the NAPSG Foundation.Click OK when done.Your changes are reflected as follows:21 P a g e
Step 12: Sharing Your Map Outside Your OrganizationYou can also share your map via a URL link to other public safety official or other organizations orindividuals by providing them a URL the can open in any internet browser.Click on the Broward County map from My Content page to open the details about the map.The map details open and should look like the image below.Notice the tags you entered previously and the two layers that make up this map.22 P a g e
Click and hold on the OPEN tab and select Open in Map Viewer.The map should look like this. Then click on the Share tab as shown.23 P a g e
In the Share pop-up box, you need to uncheck NAPSG Foundation (this is box is checked because in thelast step you shared this map within the NAPSG Organization) and check Everyone (public) as shownbelow.Notice how ArcGIS Online gives you a URL you can share via email, for example:To test it, copy this URL address and past into a new tab any internet browser. It will look like the mapyou are working on right now but it does not give the map reader access to your account. The map isfully interactive, you can zoom-in and out and you and click on the police or fire trucks symbols to accessinformation about these station/district offices. Try it!Click CLOSE when done.24 P a g e
In the Share Pop-up window you can also share the map on your organizations Facebook page ortweeter account.Tip: If for any reason you have gotten lost and cannot locate the map, do the following:Go to HOME and select My Content.25 P a g e
From My Content, click on the name of the map.You will see a description of the map. From OPEN, select Open in map viewer.26 P a g e
This will bring you back to your map:27 P a g e
Step 13: Using BookmarksBookmarks are a great way to store “favorite” locations or locations you have to frequent on a dailybasis. Using bookmarks saves you time by quickly zooming into an area of interest or focus for publicsafety.Let’s take a closer look at the fire & rescue station in Cooper City.In the search box enter this address: 10550 Stirling Rd, Cooper City, Florida.Notice that as you type ArcGIS Online gives you choices. Select the first choice or simply hit enter.The map zooms into this location and we realize that there is a sheriff’s district office and a fire & rescuestation at these locations which was not clear from the larger view.28 P a g e
Let’s create a bookmark called Cooper City.From the Bookmarks tab select Add Bookmark.In the input box type Cooper City and then close the dialog box by clicking on the X located in the upperright of the box.Now you have a bookmark you can use any time.For fun, go ahead and zoom out and then go to the Bookmarks tab and select the Cooper City bookmarkto zoom into this location.29 P a g e
Step 14: Adding Imagery as a Layer to Discover Local InformationMake sure you use the Copper City bookmark to zoom into this location.From the Add tab, select Browse Esri Map Layers.Use the drop down arrow to select Imagery from the All Categories choices.30 P a g e
Now select the World Imagery.From its drop down arrow, select As Layer to add it to your map as a layer.CLOSE the Browse Esri Map Layers dialog box.The World Imagery is added as a layer in the table of content.Your map should look like this after completing steps 1-14:31 P a g e
In Steps 13-15 You Learned: From a public safety perspective, any geographical dataset that can provide more details beyondwhat vector maps can should be used to enhance situational awareness for public safetydecision makers.Step 15: Save Your MapIf you save now using the current map extent for the Cooper City Bookmark, the next time you open themap it will open at such map extent. To avoid that, zoom to the full extent of your data by clicking onthe drop down arrow for the Broward County BSO Fire Rescue Stations and select Zoom.Turn off the World Imagery layer by removing its checkmark.The map should look like this now:From the Save tab, select Save32 P a g e
Step 16: CHALLENGE STEP: Linking Photos and Webpages toLayer FeaturesNote: Adding a picture and text to the each fire station pop-up is a long and complex step. Do only iftime permits.It may be useful to link images to features in your map layers, especially for public safety. Doing soturns points into actual photos of buildings, hazardous locations, bridges, etc. In this step we will linka photo and its corresponding webpage to each fire rescue station in Broward County.We will use the Cooper City bookmark to zoom into the Cooper City Fire Rescue Station.From Bookmarks tab select Cooper City Bookmark to zoom into this location.Now select the Cooper City Fire Rescue Station by clicking on its fire truck symbol.The point feature is selected (notice blue box around it) and the information about this station isdisplayed. This information came from the corresponding record in theBroward County BSO Fire Rescue Stations.csv file when we completed the batch geocoding in step 6.The map canvas should look like this:33 P a g e
Before we can link images and webpages to this feature (Cooper City Fire Rescue 28 Station) we need todo some set-up logistics.Identify the name of the photo for the Cooper City Fire Rescue Station.From the map graphic above we can see that the photo name is d16-station-28:-34 P a g e
Upload the photo of Cooper City Fire Rescue 28 Station - and share it within the organization.Go to HOME and then select My Content.Then click on the Add Item tab and from the Add Item dialog box navigate to your local folder wherethe fire rescue station photos are located and select photo titled d16-station-28. This is the photo of thefire station.Then add a tag all Fire and click ADD ITEM to upload the photo.35 P a g e
When the file is uploaded, the screen will look like this:36 P a g e
Now we need to capture the internal ArcGIS Online URL for this photo.To find it, click on the OPEN drop-down arrow and select Download.The screen looks like this now.37 P a g e
Click on the URL, select all of it and copy it into a Microsoft Word document as we will need it later. Inthis case the URL is: sKeyId AKIAJS2Y2E72HYCOE7BA&Expires 1414447587&Signature 641s%2FY5bPB4rpW51gaR32%2F66Ido%3DNOTE: The above URL may change from time to time so make sure you capture the URL and write downinto a Microsoft Word document as it may differ from the one above.Click on the back arrowuntil you get back to the My Content page.In the My Content page you will now see the d16-station-28 file.Add a checkmark to it and share with the NAPSG organization.In the Share Pop up box, add a check mark to the NAPSG Foundation and click OK to share within theorganization.38 P a g e
The d16-station-28 photo file is now shared with the NAPSG organization.-Find the URL for the Cooper City Fire Rescue 28 Station and select some text from the CooperCity Fire Rescue 28 Station webpage to include as a caption in the pop-up identify window:The URL for the Cooper City Fire Rescue Station is:http://www.sheriff.org/about bso/dfres/stations/d16/index.cfm Go to this site, copy andselect the text below the photo. We will use this text as a caption for the photo. Copy this textinto the Microsoft Word document as we will need it later.39 P a g e
Click the back arrowuntil you get back to the map.Now we will add a title, photo, caption and website link to the Cooper City Fire Rescue Station.Make sure the Cooper City Fire Rescue Station is selected by clicking on its corresponding fire trucksymbol.40 P a g e
While this feature is selected, click on the drop-down arrow for the Broward County BSO Fire Rescuelayer and select Configure Pop-up.41 P a g e
In the Pop-up Properties dialog box make these changes:- Under Pop-up Tile, click on the sign and select {BSO Fire Rescue Station}. This will display thename of the station.- Click ADD and select Image.42 P a g e
Under the Configure Image, make these actions:- Title: Cooper City Fire Rescue Station 28.- Caption: Station 28 was opened in August 1990 by the City of Cooper City and continues to servethe area following the merger of Cooper City Fire Rescue with BSO in 2004. The station isequipped with response apparatus including a 1750 GPM (gallons per minute) pumper, a 105foot ladder truck and transport-capable rescue vehicle. All apparatus are staffed with crosstrained personnel and can provide advanced life support care.43 P a g e
-URL: sKeyId AKIAJS2Y2E72HYCOE7BA&Expires 1414447587&Signature 641s%2FY5bPB4rpW51gaR32%2F66Ido%3D-Link (optional): http://www.sheriff.org/about bso/dfres/stations/d16/index.cfmClick OKClick SAVE POP-UP in the Pop-up Properties dialog boxTo test it close the identify pop-up for the selected fire station and then click again to see the changes.Notice the tithe of the pop-up is now Cooper City. Scroll down and notice the photo of the station with acaption for it. If you click on the photo it will take you to Cooper City Fire Rescue Station 28 webpage.44 P a g e
Step 17: Save Your WorkClick on the Save tab to save your work.Challenge Step:Now repeat the steps in the tutorial for an additional 5 or more fire rescue stations to ensure youmaster the geocoding process.45 P a g e
How the geocoding process works in a public safety scenario. How Esri used its geocoding locators (software) built on top of the HERE Map Content and Point Addresses to geocode this address. Esri AGOL uses the attributes embedded on the HERE Basemap and the HERE Point Addresses to geocode the address above. Step 5: