Transcription
ArcGIS 9 Geocoding in ArcGIS
Copyright 2004-2005 ESRIAll rights reserved.Printed in the United States of America.The information contained in this document is the exclusive property of ESRI. This work is protected under United States copyright law and otherinternational copyright treaties and conventions. No part of this work may be reproduced or transmitted in any form or by any means, electronic ormechanical, including photocopying and recording, or by any information storage or retrieval system, except as expressly permitted in writing by ESRI.All requests should be sent to Attention: Contracts Manager, ESRI, 380 New York Street, Redlands, CA 92373-8100, USA.The information contained in this document is subject to change without notice.DATA CREDITSBurglary Map: GDT and Vexcel Corp.Yellowstone Fire Data: National Park ServiceQuick-Start Tutorial Data: Atlanta, GeorgiaWRITERScott CrosierU.S. GOVERNMENT RESTRICTED/LIMITED RIGHTSAny software, documentation, and/or data delivered hereunder is subject to the terms of the License Agreement. In no event shall the U.S. Governmentacquire greater than RESTRICTED/LIMITED RIGHTS. At a minimum, use, duplication, or disclosure by the U.S. Government is subject to restrictionsas set forth in FAR §52.227-14 Alternates I, II, and III (JUN 1987); FAR §52.227-19 (JUN 1987) and/or FAR §12.211/12.212 (Commercial TechnicalData/Computer Software); and DFARS §252.227-7015 (NOV 1995) (Technical Data) and/or DFARS §227.7202 (Computer Software), as applicable.Contractor/Manufacturer is ESRI, 380 New York Street, Redlands, CA 92373-8100, USA.ESRI, ArcView, ArcEditor, ArcInfo, ArcMap, ArcCatalog, ArcSDE, SDE, Spatial Database Engine, ArcGIS, ArcLogistics, ArcToolbox, ArcIMS, StreetMap,and www.esri.com are trademarks, registered trademarks, or service marks of ESRI in the United States, the European Community, or certain otherjurisdictions.Other companies and products mentioned herein are trademarks or registered trademarks of their respective trademark owners.
Quick-start tutorialIN THIS CHAPTER Exercise 1: Locating andrematching addresses Exercise 2: Using alternatestreet names and place namealiases Exercise 3: Creating a dynamicgeocoded feature class2This tutorial introduces you to geocoding with ArcGIS Desktop. You will learnthe basic techniques for creating address locators and geocoding with ArcGIS.Exercises 2 and 3 demonstrate some advanced features—using alternatenames and place name aliases and creating a dynamic feature class that isrelated to the address table.Some procedures in this tutorial require that you be familiar with usingArcCatalog and ArcMap. For example, you should know how to copy data toa new location and add data to a map. You should also have a basicunderstanding of what a geodatabase is and the objects it can contain. Ifyou’re new to GIS or feel you need to refresh your knowledge, please takesome time to read Getting Started with ArcGIS. You might also find thatworking through the quick-start tutorials in Using ArcCatalog and UsingArcMap will help you understand many of these basic concepts.11
Exercise 1: Locating and rematching addressesIn the first part of this tutorial you’ll learn how to create anew address locator, how to locate an address on a map,and how to create point features representing streetaddresses stored in a table such as customer locations.Before you begin, it is recommended that you make a copyof the data used in this tutorial so the original tutorial datawill remain unmodified. Copy the Atlanta folder to a newlocation on your computer such as the C:\ disk; you’ll find itin the ArcTutor\Geocoding folder on the local disk wherethe tutorial data was installed. You’ll need 5 MB of freedisk space to store a copy of the Atlanta folder.locator based on your copy of the Atlanta personalgeodatabase.1. Start ArcCatalog.2. In the Address Locators folder near the top of theCatalog tree, double-click Create New Address Locator.The Create New Address Locator dialog box appears.The Atlanta folder contains a personal geodatabase namedAtlanta.Creating a new address locatorAn address locator lets you convert textual descriptions oflocations into geographic features. The Address Locatorsfolder near the top of the Catalog tree lets you manageexisting locators and create new address locators on yourcomputer. The first thing you’ll do is create an address12GEOCODING IN ARCGIS
3. Click the US Streets with Zone (GDB) geocodingstyle, then click OK.The New US Streets with Zone (GDB) AddressLocator dialog box appears.4. In the Name text box, type “Atlanta”, replacing thedefault name.56. In the Choose Reference Data dialog box, navigate tothe folder containing your copy of the Atlanta personalgeodatabase. Double-click the personal geodatabase,click the streets feature class, then click Add. This willadd the streets feature class as reference data to thePrimary table tab and populate the fields.7. Leave all other address locator settings as they are andclick OK in the New US Streets with Zone (GDB)Address Locator dialog box. The new address locatorappears in the Address Locators folder.You’ll notice that the name of the address locator isprefaced by your login name. If your login name is“ssmith”, the address locator would appear in theCatalog tree as “ssmith.Atlanta”.5. On the Primary table tab, click the Browse buttonnext to the Reference data text box. This will openthe Choose Reference Data dialog box.New address locators are private; other users who login to the same computer won’t have access to youraddress locators.QUICK-START TUTORIAL13
When the new address locator is created, ageocoding index is built for the streets feature classwithin the Atlanta geodatabase. The index is stored ina new table named GC SZS1 in the Atlantageodatabase. With this index, the street features canbe quickly matched to the addresses you want togeocode.You will now modify the properties of the addresslocator you just created.8. Right-click the yourLogin.Atlanta address locator andclick Properties. The Address Locator Propertiesdialog box appears.On the right under Matching Options, you can seethat the default Minimum candidate score is 10. Thissetting determines the matching score needed toreturn a potential candidate.10. Click OK, closing the Address Locator Properties dialogbox.Your changes are saved in the address locator. Now youcan use this address locator to find out where addresses arelocated on a map.Finding an address interactivelyYou can use address locators to locate addresses while youare working in ArcMap. This process is commonly calledgeocoding.1. Start ArcMap and click OK to create a new, emptymap.2. Add the streets feature class in the Atlanta geodatabaseto the ArcMap document.9. Click and drag the slide bar to change the Minimumcandidate score to a value of 30.Find3. Click the Find button on the Tools toolbar.4. In the Find dialog box, click the Addresses tab.Before you can locate an address on your map, youmust identify the address locator you want to use.9145. Click the Browse button to choose an address locator.Navigate to the Address locators folder, click theyourLogin.Atlanta address locator, and click Add.This populates the Choose an address locator text boxand adds two additional text boxes that will be used toenter the address elements.GEOCODING IN ARCGIS
6. Type “150 Linden Ave NE” in the Street or Intersectiontext box. Type “30308” in the Zone text box.A graphic point representing the address’s location appearson the map.7. Click Find.One candidate address appears in the list at the bottomof the Find dialog box.8. Right-click the candidate and click Add as Graphic(s) toMap.9. In the Find dialog box, check Show all candidates.10. Click the Close button in the upper right corner of theFind dialog box.QUICK-START TUTORIAL15
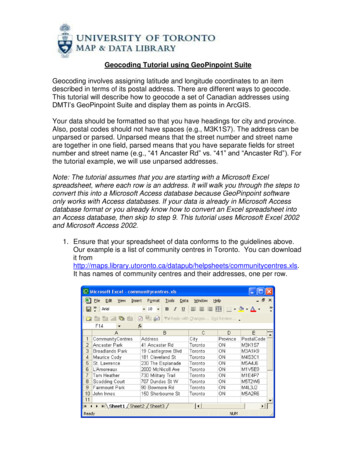
Geocoding addresses in a tableIf you have a table that contains address information, youcan geocode all of the addresses at once. In this exerciseyou will begin with a table containing the addresses ofcustomers and geocode the entire table, showing where thecustomers are located.7. Under the Output section, click the Browse button todefine the Output shapefile or feature class. This willopen the Saving Data dialog box.1. Open a new map document in ArcMap. You do not needto save the map you created in the previous task.2. Add the streets feature class and the customers tablefrom your copy of the Atlanta geodatabase to your map.3. Right-click the customers table on the Source tab of thetable of contents and click Geocode Addresses.4. On the Choose an address locator dialog box, click Add.7The Add Address Locator dialog box will open.5. Navigate to the Address Locators folder, click theyourLogin.Atlanta address locator, then click Add.6. Click yourLogin.Atlanta in the Choose an addresslocator to use dialog box, then click OK.8. Click the Save as type dropdown arrow, then clickPersonal Geodatabase feature classes.This will open the Geocode Addresses:yourLogin.Atlanta dialog box.16GEOCODING IN ARCGIS
9. Navigate to your copy of the Atlanta personalgeodatabase, then double-click the personalgeodatabase. In the Name text box, type“atlanta results”.10. Click Save.A new point feature class named atlanta results will becreated in the Atlanta geodatabase. The point featuresgenerated by the geocoding process will be saved in thatfeature class.11. Click OK to start geocoding.When the geocoding process is finished, the Review/Rematch Addresses dialog box appears. It shows thestatistics of the addresses that were matched or notmatched. You’ll rematch the unmatched addresses laterin the tutorial.12. Leave the rematch criteria as is and click Done to closethe Review/Rematch Addresses dialog box.A Geocoding Result layer is added to the map. It shows thepoints that were added to the atlanta results feature class.You can also geocode a table of addresses in ArcCatalog.To do so, right-click the customers table in the Atlantageodatabase and click Geocode Addresses. This will inducea series of dialog boxes identical to those identified in thisexercise. You can then add the created feature class to anArcMap document.Rematching addresses1. In ArcMap, click the Tools menu, point to Geocoding,point to Review/Rematch Addresses, then clickGeocoding Result: atlanta results.2. The message “This operation requires that you be editingthis workspace. Would you like to start editing?”appears. Click Yes.The Review/Rematch Addresses dialog box opens.3. In the Rematch Criteria section, click the optionAddresses with candidates tied.QUICK-START TUTORIAL17
4. Click Match Interactively.The Interactive Review dialog box appears. The addressrecords that you have chosen to rematch are listed atthe top of the dialog box. In this exercise there is onerecord in the feature class that has two candidates thatare tied for the highest match score. The tied candidatesare listed at the bottom of the dialog box.5. Arrange the ArcMap window and the InteractiveReview dialog box so you can see the map.Near the center of the map, you will notice two pointshighlighted, one in yellow and the other in blue. Theseare the locations of the two candidates listed in thebottom window of the Interactive Review dialog box.The selected candidate is highlighted in yellow on themap.6. Click the second candidate in the candidate list. Thelocation of the yellow highlighted candidate changes onthe map.7. In the bottom right corner of the Interactive Reviewdialog box, click Match. The selected address in the listat the top of the dialog box is now associated with thesecond candidate in the list at the bottom.You can also rematch addresses with ArcCatalog. To do so,refresh the contents of the Atlanta geodatabase if you don’tsee the atlanta results feature class listed in the Contentstab. Right-click the atlanta results feature class, then clickReview/Rematch Addresses. This will induce a series ofdialog boxes similar to those described in this exercise.8. Click the Close button to close the Interactive Reviewdialog box.9. Click Done to close the Review/Rematch Addressesdialog box.10. On the Editor toolbar, click the Editor menu and clickStop Editing. Click Yes to save your changes.11. Close ArcMap. You do not need to save the changes toyour map document.18GEOCODING IN ARCGIS
Exercise 2: Using alternate street names and place name aliasesWhen you create an address locator, you have the option touse alternate street names and place name aliases. Placename aliases let you associate names of well-known placeswith street addresses—for example, the names ofmuseums, hospitals, or landmarks. When geocoding anaddress, the place name alias table is consulted first. If aplace name is found, the street address from the placename alias table is geocoded. Similarly, alternate streetnames can be defined for features in the reference data.When geocoding an address, the alternate street name tableis also searched to find potential candidates where streetshave more than one name.Creating an address locator that uses alternatenames and place name aliasesThe New US Streets with AltName (GDB) AddressLocator dialog box appears.In this task you’ll create a new address locator that usesalternate street names and place name aliases, then use it inArcMap to find addresses.1. In ArcCatalog, click the Address Locators folder at thetop in the Catalog tree, then double-click Create NewAddress Locator.2. Click the US Streets with AltName (GDB) geocodingstyle, then click OK.3. In the Name text box, type “Atlanta AltName”,replacing the default name.4. On the Primary table tab, click the Browse button nextto the Reference data text box.QUICK-START TUTORIAL19
5. From the Choose Reference Data dialog box,navigate to the Atlanta personal geodatabase.Double-click the personal geodatabase, click thestreets feature class, then click Add.10. On the right under Matching Options, click Place NameAlias Table.6. Click the Alternate Name table tab.7. Click the Browse button next to the Reference datatext box.8. In the Choose Reference Data dialog box, navigate toyour copy of the Atlanta personal geodatabase.Double-click the personal geodatabase, click thealtname table, then click Add.9. On the Alternate Name table tab, click the Join IDdropdown list, then click ALTNAME ID.The ALTNAME ID column in the altname table andthe OBJECTID column in the streets feature classare used to relate the records in the altname table tothe records in the streets feature class.QThe Alias Table dialog box appears.11. Click the Browse button, then navigate to the Atlantageodatabase. Double-click the personal geodatabase,click the place aliases table in the Atlanta geodatabase,then click Add.12. Click the Alias field dropdown arrow, then click NAME.20GEOCODING IN ARCGIS
13. Click OK.14. Click OK in the New US Streets with AltName (GDB)Address Locator dialog box. The newyourLogin.Atlanta AltName address locator appears inthe Address Locators folder.yourLogin.Atlanta AltName address locator, and clickAdd.A street may have more than one name. For example,“Atlanta Blvd” is defined as an alternate name for “Old10th St NE” in the Atlanta database. With theyourLogin.Atlanta AltName address locator, “30 Old10th St NE” and “30 Atlanta Blvd” will both find thesame location.6. Type “30 Old 10th St NE” in the Street or Intersectiontext box, then click Find.An additional geocoding index table has been added toyour copy of the Atlanta personal geodatabase. This newtable facilitates searching in the alternate name table.15. Close ArcCatalog.You can now use this address locator to find out where anaddress is located on a map.Finding locations using alternate street namesand place name aliases1. Open a new map document in ArcMap.2. Add the streets feature class from the Atlantageodatabase to your map.3. Click the Find button on the Tools toolbar.7. Right-click the candidate and click Add as Graphic(s) toMap.A graphic point representing the address’s locationappears on the map.8. Type “30 Atlanta Blvd” in the Street or Intersection textbox, then click Find.4. In the Find dialog box, click the Addresses tab.5. Click the Browse button to choose an address locator.Navigate to the Address Locators folder, click theQUICK-START TUTORIAL21
9. Right-click the candidate and click Flash CandidateLocation(s). You can see that both addresses arematched to the same location on the map.In addition to geocoding addresses, you can also geocodeplace names that have been defined in the place aliasestable.10. Type “Children’s Hospital” in the Street or Intersectiontext box, then click Find.11. Right-click the first candidate in the candidates list,which has a score of 100, and click Add as Graphic(s)to Map.12. Click Cancel to close the Find dialog box.Creating address locators that use alternate names andplace name aliases is beneficial for people who know alandmark’s name but not its address. It will also help insituations where a street has more than one name.The location of the hospital appears on the map as ifyou had typed its complete address.22GEOCODING IN ARCGIS
ArcInfo and ArcEditorExercise 3: Creating a dynamic geocoded feature classWith an ArcInfo or ArcEditor seat, your geocodingresults can be dynamically linked to the original addresses ifthe address table and the result feature class are stored inthe same geodatabase. With dynamic results, modificationsto the primary address table will cause the geocodedfeature class to be updated automatically. ArcView userswill not be able to complete this exercise.1. Open a new map document in ArcMap. You do not needto save your previous map document.2. Add the customers table and the streets feature class inthe Atlanta geodatabase to your map.7. In the Geocode Addresses: yourLogin.Atlanta dialog box,click the Browse button to define the Output featureclass.8. In the Saving Data dialog box, click the Save as typedropdown arrow and click Personal Geodatabasefeature classes.9. Navigate to the Atlanta personal geodatabase, thendouble-click the personal geodatabase.10. In the Name text box, type “dynamic results”. ClickSave.3. Right-click the customers table in the Source tab of themap’s table of contents and click Geocode Addresses.4. Click Add in the Choose an address locator to use dialogbox.5. In the Add Address Locator dialog box, navigate to theAddress Locators folder, click the yourLogin.Atlantaaddress locator, then click Add.6. Click yourLogin.Atlanta in the Choose an addresslocator to use dialog box, then click OK.QUICK-START TUTORIAL23
ArcInfo and ArcEditor11. Click Create dynamic feature class related to table.A Geocoding Result layer is added to the map. It showsthe points that were added to the dynamic resultsfeature class.14. Right-click the Geocoding Result layer in the map’stable of contents and click Open Attribute Table.WThe first record in the table has the address1171 PIEDMONT AVE NE in the Street or Intersectioncolumn. The Status (M: matched, U: unmatched, or T:tied), Score (match score), and Side (R: right side of theroad or L: left side of the road) columns contain thevalues M, 100, and R respectively. To see where thiscustomer is located on the map, click this record in thetable. The feature will be highlighted on the map.15. Minimize the Geocoding Result layer’s attribute table.A new point feature class named dynamic results will becreated in the Atlanta geodatabase. The point featuresgenerated by the geocoding process will be saved in thatfeature class. A relationship class between the table andfeature class will be created.12. Click OK to start geocoding.When the geocoding process is finished, the Review/Rematch Addresses dialog box appears.16. Right-click the customers table in the map’s table ofcontents and click Open.The address that appears for the first customer in thetable, Ace Market, is 1171 Piedmont Ave. NE. Thatcustomer has moved to a new address, 30 12th St. TheZIP Code remains the same. The customers table mustbe updated with this information.13. Click Done to close the Review/Rematch Address dialogbox.24GEOCODING IN ARCGIS
ArcInfo and ArcEditor17. If the Editor toolbar is not showing, click the EditorToolbar button to show the Editor toolbar.in the Status field stands for tied; two or more candidateshad the highest score. To see on the map where AceMarket is now located, click this record in the layer’sattribute table.Editor toolbar18. On the Editor toolbar, click the Editor menu and clickStart Editing.Now you need to add a new customer to the customerstable.22. Minimize the Geocoding Result layer’s attribute tableand maximize the customers table.19. Type “30 12TH ST” in the Address column next to AceMarket.23. Scroll down to the bottom of the customers table.24. In the blank record after the last record in the table,click in the NAME column. Type “Vine Cafe”.20. Click another record in the table.21. Minimize the customers table and maximize theGeocoding Result layer’s attribute table.The new address was geocoded automatically, and thecorresponding values have been updated in the layer’sattribute table. The Status, Score, and Side columns nowcontain the values T, 81, and L, respectively. The value “T”A new blank record is added to the bottom of the table.25. In the same record, type “379 VINE ST NW” in theADDRESS column.26. Type “30314” in the ZIP column.27. Type “Cafe” in the TYPE column.28. In the SALES column type “10000”.QUICK-START TUTORIAL25
ArcInfo and ArcEditor29. Close the customers table. Maximize the GeocodingResult layer’s attribute table, then scroll to the bottom.A new feature was automatically added to the resultfeature class representing the new address.30. On the Editor toolbar, click the Editor menu and clickStop Editing. Click Yes to save your changes.31. Close ArcMap. Click No to stop ArcMap without savingthis map.26GEOCODING IN ARCGIS
This tutorial introduces you to geocoding with ArcGIS Desktop. You will learn the basic techniques for creating address locators and geocoding with ArcGIS. Exercises 2 and 3 demonstrate some advanced features—using alternate names and place name aliases and creating a dynamic feature class that is related to the address table.