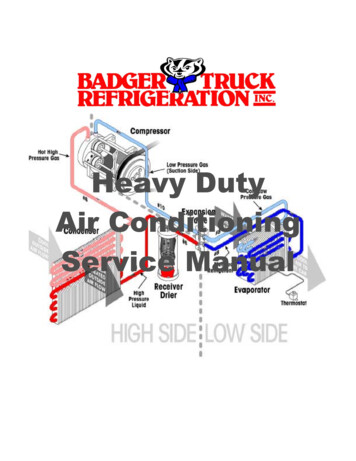
Transcription
INSTALLATION INSTRUCTIONSAIR CONDITIONING & HEAT PUMP INDOOR COILSINTRODUCTIONVexar coils are designed specifically for use with various models of manufactured housing gas furnaces or electric furnaces in bothdown-flow and up-flow applications, as long as the coil was manufactured after 03/01/08 as shown in the serial number. A metal panwill be required on up flow oil furnaces.These instructions are prim arily intended to assist qualified individuals trained and experienced in the proper installationof this type of equipm ent. Som e state codes require insta llation and service personnel to be licensed. R efer toauthorities having jurisdiction for additional guidance. R em em ber that the C lean A ir A ct of 1990 requires techniciancertification for handling refrigerant.NOTE: EFFICIENCY AND CAPACITY RATINGS ARE LISTED IN CURRENT AHRI UNITARY DIRECTORY FORVEXAR COIL MODEL NUMBERS MATCHED WITH OUTDOOR CONDENSING OR HEAT PUMP UNITS. AIRCONDITIONING COIL MATCHES ARE LISTED IN INDOOR UNIT MANUFACTURER AIR CONDITIONINGSECTION. HEAT PUMP COIL MATCHES ARE LISTED IN INDOOR COIL MANUFACTURER HEAT PUMPSECTION. MISMATCHED SYSTEMS MAY NOT WORK PROPERLY AND MAY CAUSE LOSS OF WARRANTY.VexarModel #ReplacesVexarModel #RefrigerantConnectionPiston orTXV DeviceInstalled AN/AN/AQCSWTQCSWTQCSWTSWTSWTSWTSWTSWTQCSWTSWTSWTT XV (R -22)T XV (R -22)T XV (R -22)T XV (R -22)T XV (R -22)T XV (R -22)61 (2-T on)73 (3-T on)84 (4-T on)T XV (R -410A )T XV (R -410A )T XV (R -22)T XV (R -22)T XV (R -410A )T XV (R -410A )Operational Range of theExtra Pistons metering device (s) (seein box for use specific application sheeton other sizes for outdoor unit match)*N /AN /AN /AN /AN /AN /AN 5.0.068, .080.090N /AN /AN /AN /AN /AN 8"18 1/2"18 1/2"14"18"18 1/2"14"18"18"18"18"18 1/2"FaceArea3.1 sq ft3.1 sq ft4.0 sq ft4.0 sq ft4.0 sq ft4.0 sq ft3.1 sq ft4.0 sq ft4.0 sq ft3.1 sq ft4.0 sq ft4.0 sq ft4.0 sq ft4.0 sq ft4.0 sq ftATTENTION!SOME VEXAR COILS COME WITH A TXV AS THE METERING DEVICE.HOWEVER, THE SENSOR BULB IS NOT MOUNTED DUE TO POTENTIALHEAT DAMAGE AND/OR PROPER BULB LOCATION. THEREFORE,AFTER THE SUCTION AND LIQUID LINE HAVE BEEN PROPERLYCONNECTED TO THE COIL THE BULB CAN NOW BE MOUNTED ON THESUCTION LINE. MANY TIMES, DUE TO SPACE LIMITATIONS INMANUFACTURED HOUSING APPLICATIONS IT WILL REQUIRE THESENSOR BULB TO BE MOUNTED VERTICALLY. IF THAT IS THECASE THE BULB SHOULD BE LOCATED AT LEAST 6” AWAY FROMANY BEND (ELBOW) AND FASTENED ON THE TUBING SIDEOPPOSITE THE PLANE OF THE BEND. THE BULB SHOULD BEINSULATED USING THERMAL INSULATION TO PROTECT IT FROM THEEFFECTS OF THE SURROUNDING AMBIENT TEMPERATURE.(SEE PAGE 5)NOTE!CAUTION!ALL SWEAT CONNECT COILS ARE SHIPPED FROM THE FACTORYPRESSURIZED WITH NITROGEN. THEY DO NOT CONTAIN ANYHCFC22. ALL QUICK CONNECT COILS ARE SHIPPED WITH A HCFC22HOLDING CHARGE.VEXAR COILS AND OTHER ACCESSORIES INSTALLED WHEN AIRCONDITIONING IS ADDED TO MANUFACTURED HOUSING FURNACESWILL COMPLY TO HUD REGULATIONS REQUIRING THIRD PARTYAPPROVALS. EFFICIENCY AND CAPACITY RATINGS AS REQUIRED BYHUD ARE LISTED IN CURRENT AHRI DIRECTORY FOR VEXAR MATCHEDWITH OUTDOOR UNITS. THESE COIL RATINGS ARE BASED ON AIRQUANITIES CONSISTENT WITH THOSE THAT ARE ENCOUNTERED INTYPICAL MANUFACTURED HOUSING AIR CONDITIONINGAPPLICATIONS.1Installation Instructions61BA0010/013008
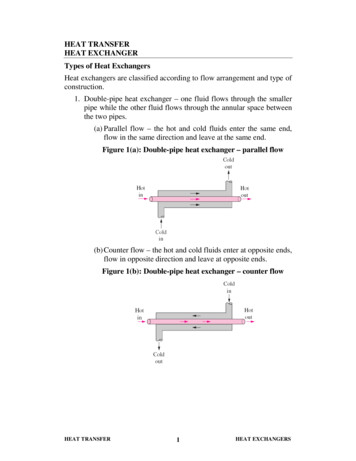
THROUGH INSTALLATIONS ON ELECTRICFURNACES. FAILURE TO PROVIDE CANRESULT IN IMPROPER DRAINAGE ORPOTENTIAL SHOCK HAZARD.GENERAL COIL INSTALLATION NOTES1.A ll coils are shipped pressurized w ith eithernitrogen or H C F C 22. C oils w ith sw eatconnections are shipped w ith a nitrogen holdingcharge w hile coils equipped w ith quick connectsare shipped w ith a H C F C 22 holding charge.ALL COILS SHOULD BE CHECKED FORPRESSURE BEFORE INSTALLATION! IFTHERE IS NO PRESSURE PRESENT, THECOIL MAY HAVE DEVELOPED A LEAKDURING SHIPMENT AND SHOULD BERETURNED TO THE POINT OF PURCHASEFOR EXCHANGE.O n a quick connect coil, test for pressure by pushingagainst the diaphragm located inside the quick connectfitting on the suction m anifold. If you are not able todepress the diaphragm , the coil contains a H C F C 22holding charge.To test for pressure on a coil equipped w ith sw eatfittings, depress the shrader valve located on thesuction m anifold.2.3.4.5.6.7.The blo w er and duct system m ust be properlysized in order to provide a dequate cooling andheating perform ance. S elect the correct m otorspeed tap on the furnace blow er to give therequired C F M needed for rated cooling capacityor upgrade the blow er assem bly to attain theproper C F M . R eturn air filters of generous sizem ust be provided, in order to avoid contam inatingthe coil, blow er and ductw ork, or restrictingnecessary airflow . F ailure to deliver the proper airflow across the indoor coil w ill cause systemand/or com ponent, i.e. TXV , perform anceproblem s.It is essential that the indoor coil and outdoorunit be properly matched and charged withthe proper amount of refrigerant. Incorrectcharge levels w ill result in inefficient operation.S ee m ore details in installation instructions for theoutdoor unit.F or optim um perform ance and efficiency of airconditioning or heat pum p coils, adjust systemchargeand/orsuperheat/subcoolingasrecom m ended by outdoor unit m anufacturers.P rocedures w ill differ betw een m anufacturers.It is recom m ended that the co il be sprayed w ithliquid detergent thoroughly and rinsed thoroughlybefore installation to assure proper drainage ofcondensate from the coil fins to elim inate w aterblow offandtoassurem axim umcoilperform ance. If not sprayed, approxim ately 50hours of break in tim e is required to achieve thesam e results.A lw ays be sure coil is installed level or slopedslightly tow ard prim ary andsecondary(thehigher of the tw o) drain fittings. If m andated bycode, connect both drain lines to open drain, butnever to a closed sew er. P itch drain lines aw ayfrom drain pan. Always, te st drain lines w ithw ater before operating. This step is m andatory inall m anufactured housing installations. R eductionin size of the drain lines is not recom m ended andm any tim es not allow ed.A WATER TRAP is recom m ended on all coilapplications, but IS REQUIRED ON PULLATTENTION!IT IS MANDATORY TO USE AN EMERGENCYAUXILIARY DRAIN PAN WITH ANY COIL OR AIRHANDLER INSTALLED IN AN ATTIC OR ABOVE AFINISHED CEILING. IT MUST HAVE ITS OWN DRAINLINE (A WATER TRAP IS NOT NECESSARY) WITH ITSOUTPUT INTO AN OPEN DRAIN (NOT A CLOSEDSEWER). IT SHOULD ALLOW EASY VISUALINSPECTION SO THAT IF CONDENSATE FLOW ISSEEN THE HOMEOWNER KNOWS THAT THE COILDRAIN PAN LINES ARE PLUGGED AND NEEDMAINTENANCE8.9.10.R efrigerant piping is critical on any coil installationw hen the outdoor unit is to be located below thelevel of the coil. F or proper piping designconsiderations, refer to the g uidelines furnishedby the m anufacturer of the outdoor unit.C heck all field installed refrigerant connectionsw ith electronic leak detector, halide torch, or soapbubbles.R efer to installation instructions provided w ith theoutdoor unit, gas or electric furnace, and line setsfor com pletion of system installation.INSTALLATION WITH ELECTRIC FURNACE:Typical electric furnace installation consists of acoil without cabinet installed on top of a downflowfurnace or the coil inside a cavity on either adownflow or upflow furnace,T h e fo llo w in g V e xa r in stallatio n kits a re u niq ue tom a n ufa ctu re d h o using a ir co nd ition ing a n d th ese kitsa re re qu ired to com p le te th e insta lla tio n .1.F ilte r 1 1 22 5 1 5 is re q uire d w h e n u sin g a ll V e xa rco il m o de ls o n N o rd yn e d o w n flo w e le ctricfu rn ace s.2.A C o il S u p p o rt B ra cke t a nd In su la tion K it isre q u ire d o n a ll C olem a n m o d e l E B xxA o r Be le ctric fu rna ces (35 0 0 .8 9 41 ).3.A coil sup p o rt b racke t, le ss in sula tio n , isre q u ire d o n a ll C o lem a n m o d e l E B xxC e le ctricfu rn ace s (35 0 0 .8 9 4 1 B ).4.C oil ca vity fo r N o rd yne e lectric fu rn ace s a rea va ila ble as an o p tio n (9 5 36 .74 1 1 ).Installation procedure:1.T u rn o ff e lectrica l po w e r to th e fu rna ce b ytu rn ing o ff b rea ke r in h o use pa n e l. CAUTION:Furnace may be connected to more than onesupply circuit.Do not use furnacedisconnect only. Check power at furnace toinsure power is off.2.R e m o ve filte r a t top o f fu rn ace ca bin e t (Nordyneonly).3.R e m o ve refrige ra n t lin e kno cko u t a t to p offu rn ace (Nordyne only).4.In sta ll insu la tion if n e ed ed .5.A ttach d ra in pa n g a sket p ro vide d w ith co il tou n d e rside o f co il p a n a n d ce nte r e va p o ra to r co ilo n fu rna ce . S ee fig u re A o n pa g e 4 .Installation Instructions61BA0010/0130082
6.7.Attach filters to sides of coil if Nordyne electric.R o u te lo w vo ltag e w iring , re frig e ra n t lin e s a ndd ra in tu b in g th ro u gh flo o r pe n etra tion .WARNING: If drain hose is below 40 Deg Fduring installation warm before expandingand/or forming.8.F o rm 3 ” d e ep trap using (fie ld su p plied ) tap ea n d (p ro vide d ) fle xib le d rain h o se a n d co n n ectto co il pa n d ra in se cu ring w ith cla m p p ro vid ed .S e e fig u re B on pa g e 4 . T h e m o st e fficie n t useo f d ra in m a te ria l is to fo rm a “P ” tra p u n d e r th eh o u se . All pull through furnaces must have acondensate trap in the drain line.9.C o n n ect re frig e ran t lin e s pe r in stru ctio ns w ithlin e se t. M a ke su re to lu b rica te q u ick co n n ectth re a ds w ith re frig e ra tio n o il fo r p ro pe r m ating .R e fe r to o u tdo o r u nit in sta lla tio n in stru ctio ns fora d d itio na l info rm a tion o n lin e se t h oo k -u p s andp ro p e r to rq ue va lue s.1 0 . W ith th e coil in p la ce se a l o ff a n y o p e n ing s a t topo r b o tto m o f fu rn ace to p re ve nt a ir le aka ge o r a irb yp a ss (use silve r b a cke d ta p e p ro vide d , ifn e e d ed ).1 1 . T u rn p o w e r o n to fu rna ce .1 2 . R ep lace fro n t d o o r.INSTALLATION WITH GAS FURNACE:8.9.10.11.12.13.SPECIAL CONSIDERATIONS FORSELECTING HEAT PUMP COILSThe selection of indoor heat pum p coils is m uch m orecritical than selection of indoor coils for air conditioningunits. The differences are as follow s:1.ATTENTION!D o not ins tall any c oil in a gas furnac e w hic h is to beoperated during the heating s eas on w ithout attac hingthe refrigerant lines to the c oil. P os sible c oil dam age w illres ult from exc es s ive refrigerant pres s ure b uild upduring heating operation.Typical downflow gas furnace installation consistsof a coil without cabinet installed in the cavity of adownflow furnace. Coil with plastic pan is notsuitable for upflow oil furnaces.Installation procedure:1.T u rn o ff e le ctrical p o w e r to fu rn a ce.2.R e m o ve th e lo w e r fro n t pa ne l o f th e fu rn a ce ,a n d re -ro ute a n y g a s pip in g in fro n t o f coilco m p a rtm e n t a s re q uire d to insta ll co il.WARNING!C o n tra cto r must co m p ly w ith a ll lo ca l, sta te , a ndfe d e ral co d es a nd re gu latio ns w h e n w o rkin g w ithg a s p ip in g . P e rson a l in ju ry o r d e a th m a y resu ltfro m im p ro p e r in sta lla tio n s!3.4.5.6.7.R e m o ve the co il co ve r pa n el(s).R e m o ve kn o ckou ts in fro n t le ft b o tto m o ffu rn ace fo r ro u tin g o f refrig e ra n t line s, lo wvo lta g e w irin g, a nd co n d en sate d ra in .A tta ch d ra in p an g aske t p rovid e d , se e fig u re“A ”, p a g e 4 , to u n de rsid e o f co il pa n an d ce n te rco il in coil ca vity.C o n n e ct d rain ho se to co n den sa te p a n fittin g ,se cu rin g w ith cla m p. S e e figu re “B ”, p ag e 4.R e m o ve kno cko u ts from co il co ve r p a n e l(s), cu tfib e rgla ss insu la tio n co ve ring o p e n in gs a n dre in sta ll co ve r.In stall silve r b acked ta p e pro vid e d to co ve ro p e n in gs in inte rio r p a n el d o o r a n d o ve rre frig e ra n t line s to se a l a ro un d lin esC o n n e ct re frig e ra nt line s and m a ke su re a llco n ne ctio ns a re tigh t an d w itho u t le a ks.R e co n ne ct th e g as pip in g if it w a s d isco n ne cte da n d sea l o ff a n y o p e nin gs a t b o ttom o f fu rn ace .N a tio n al, sta te a nd lo ca l co d es m ust b efo llo w e d .In stall filte r if n o t lo ca te d in fu rn a ce d o o r.T u rn o n ga s/e lectrica l su p p ly a n d m ake fina lsyste m che ck .R e p lace fron t do o r.2.3.4.5.O nly indoor coils w ith e xpansion/check valve flowcontrol devices m ay be used w ith outdoor heatpum p units. These devices perm it reversingrefrigerant flow in the coils w h en changing fromcooling to heating. A ll expansion valves have abuilt-in check m aking them heat pum p capablew hen m atched w ith the proper A R I rated outdoorcoil. CAP TUBE OR FIXED RESTRICTORCOILS MUST NOT BE USED WITH HEATPUMPS.Matching of indoor coils for heat pumpsdemands that the heat rejection capacity,internal volume, and equivalent meteringdevice of the matched coil be at least equal tothat of the smallest internal volume matchedcoilrecommendedbyoutdoorunitmanufacturer for that outdoor unit.It is important that selection be based onMortex recommendation for a specific coil witha specific metering device to be used with anoutdoor heat pump unit of a specific make,series, and model number.F ailure to conform to proper selectionrequirem ents w ill affect efficiency, charging, andreliability and m ay resu lt in da m age to the systemor system com ponents.The m atching of specific indoor heat pum p coilsw ith specific outdoor heat pum p units as certifiedin the heat pum p section of the current A R ID irectory w ill assure proper and efficientoperation of heat pum p system s. S eew w w .ari.org.SPECIAL INSTRUCTIONS FOR CHARGINGHEAT PUMP COILSS pecific detailed instructions for refrigerant charging ofa heat pum p system as recom m ended by the outdoorunit m anufacturer should be follow ed.Theseinstructions w ill differ betw een m anufacture rs, but ingeneral are as follow s:WITH EXPANSION/CHECK VALVE INDOOR COIL,USE LIQUID LINE SUBCOOLING METHOD INCOOLING MODE. M easure fo llow ing values fromsystem : liquid line pressure at gauge and liquid lineInstallation Instructions61BA0010/0130083
tem perature. C om pare m easurem ents to refrigerantT& P chart. Adjust charge to achieve outdoor f the installer encounters a problem using the outdoorm anufacturers suggested charging m ethod he shouldcontact the factory for assistance.TW O FIT TIN G S C A N B E U S E D W IT H T H E M O B ILE H O M E P LA S T IC P A NT H E 90 D E G E LL, P R O V ID E D , C A N B E S C R EW E D IN T H E LE F T D R A IN FIT TIN G (M A IN ) A N D E XIT F U R N A C EHAND TIGHTEN ONLY – OVERTIGHTENING CAN RESULT IN CRACKS IN DRAIN PANE N C LO S E D D R A IN H O S E W ILL S LIP O V E R T H E F IT T IN G O R A S T A N D A R D P V C FIT TIN G C A N B E U S E D IF C O D E R E Q U IR E SR IG H T D R A IN C O N N E C TIO N H A S A P LU G IN IT T O P R E V E N T F LO W U N LE S S A S E C O N D A R Y D R A IN IS R E Q U IR E DA S T R A IG H T F ITT IN G (F IE LD S U P P LIE D ) IS T O B E U S E D F O R TH E A U XIL IA R Y D R A IN W H E R E R E Q U IR E D .R E M O V E P LU G A N D IN S E R T FIT T IN G . T U R N D O W N W IT H A S TA N D A R D ¾ IN C H P V C E LL.C A U T IO N ----------B E F O R E IN S TA LLIN G C O IL O N F U R N A C E , S E E F IG U R E 2.S LIP 1” I.D . S E C TIO N O F H O S E O N T O 90 D E G . D R A IN FIT TIN G .H O S E IN S O M E C A S E S IS V E R Y T IG H T B U T W ILL S T R E T C H A S IT IS W O R K E D O N .IF H O S E C A N B E LE F T O N D U R IN G IN S T A LLA T IO N , IN S TA LL P R O V ID E D H O S E C LA M P A T T H IS T IM EIF H O S E M U S T B E R E M O V E D TO C O M P LE TE IN S TA LLA T IO N M A K E S U R E IT IS S T R E T C H E D TO A LLO WF O R E A S IE R R E A T TA C H M E N T .N O TE : G ood pre ventive m aintenance on heat pum psis critical to ensure proper airflow across the coils. Lowairflow on indoor coils during w inter m onths causeshigh head pressures and prem ature com pressordam age due to oil breakdow n. This problem is norm allythe result of a dirty air filter. The installer should instructthe hom eow ner of the im portance of keeping it clean.CONTACT US FOR HELP ORCOMMENTS ON OUR PRODUCTS.FORANYA s w e strive to better serve ou r custom ers like you, w eare alw ays ready to help you. W e also w elcom e anycom m ents from our custom ers concerning quality andim provem ents that could be m ade to our products.Thank you for the purchase of our product.4Installation Instructions61BA0010/013008
THERMAL EXPANSION VALVEINSTALLATION INSTRUCTIONSA. INTRODUCTIONThermal expansion valve (TXV) can be used on both heatpump and air conditioning applications. All TXVs have abuilt-in check valve making them heat pump capable. Allare externally equalized with non-adjustable superheatand are available with non-bleed construction. Hard startcapability for outdoor units is required when non-bleedvalve is used. The external equalizer line attached to theTXV has a female flare nut with built in Schrader valvedepressor that attaches to the Schrader valve portprovided on most coils.5.6.B. INSTALLATION NOTESWith reference to Figure 1, the TXV assembly is to beinstalled between the flowrator distributor and theexisting liquid line attached to the flowrator distributor.WARNING: COIL IS PRESSURIZED.RELIEVE PRESSURE BEFORE INSTALLING TXVBY DEPRESSING SCHRADER VALVE ON COILMANIFOLD IF NITROGEN, OR RECLAIMREFRIGERANT IF COIL HAS HOLDING CHARGE.Remove the cap on Schrader valve port on coilmanifold. Attach equalizer tubing with 1/4” femaleflare nut that includes depressor to this male Schraderport. Torque flare nut to 10-30 ft. lb. If using adifferent brand TXV, you must remove theschrader valve core prior to attaching theequalizer tube.Install the TXV bulb to the suction manifold of coil orthe suction line using the two bulb clamps, or singlelarge clamp, furnished with kit.a. Bulb should be installed on a horizontal run ofthe manifold if possible. On line 7/8” OD andsmaller the bulb should be installed at 2 or 10o’clock. With line larger than 7/8” OD, the bulbshould be installed in a position of about 4 or 8o’clock.10 O'CLOCK2 O'CLOCKSENSING BULBSTRAPSUCTION TUBEC. INSTALLATION STEPS ARE AS FOLLOWS:1. After coil pressure has been relieved, turn the femaleswivel nut counter-clockwise to remove.2. Remove the piston from the flowrator distributorfitting using a small diameter wire or paper clip(ALWAYS REMOVE THE PISTON FROMDISTRIBUTOR BODY WHEN TXV ISINSTALLED).3. Attach the TXV by connecting the female swivel nuton TXV outlet to the flowrator distributor (aligningTeflon seal first) and torque swivel nut to 10-30 ft. lb.4. Attach liquid line with female swivel nut to malerotalock fitting on TXV inlet (aligning Teflon sealfirst) and torque swivel nut to 10-30 ft. lb.8 O'CLOCK7/8 O.D. & SMALLER4 O'CLOCKLARGER THAN 7/8 O.D.Horizontal Bulb Locationsb.c.If bulb installation is made on a vertical run, thebulb should be located at least 6 inches from anybend, and on the tubing side opposite the planeof the bend. On vertical bulb installations, thebulb should be positioned with bulb capillarytube at the top.The bulb should be insulated using thermalinsulation to protect it from the effect of thesurrounding ambient temperature.LIQUID LINEzHEX NUTMust be at least6” between elbowand bulbCONECT TOSCHRADER PORTTEFLON SEALTail on bulbMust point upSENSOR BULBTUBEVertical Riser ApplicationEXPANSION VALVE KITFLOWRATOR DISTRIBUTORzLIQUI
air conditioning & heat pump indoor coils pressurized with nitrogen. they do not contain any all sweat connect coils are shipped from the factory hcfc22. all quick connect coils are shipped with a hcfc22 holding charge. caution! note! vexar coils and other accessories installed when air condit