Transcription
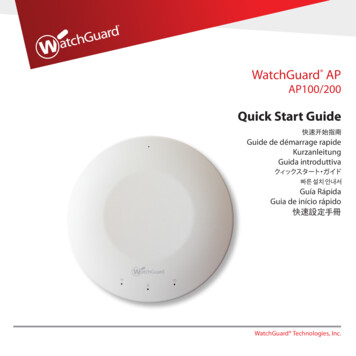
WatchGuard APSetup GuideAP 100AP 200
About WatchGuardWatchGuard offers affordable, all-in-onenetwork and content security solutions thatprovide defense-in-depth and help meetregulatory compliance requirements. TheWatchGuard XTM line combines firewall, VPN,GAV, IPS, spam blocking and URL filtering toprotect your network from spam, viruses,malware, and intrusions. The new XCS lineoffers email and web content security combinedwith data loss prevention. WatchGuardextensible solutions scale to offer right-sizedsecurity ranging from small businesses toenterprises with 10,000 employees.WatchGuard builds simple, reliable, and robustsecurity appliances featuring fastimplementation and comprehensivemanagement and reporting tools. Enterprisesthroughout the world rely on our signature redboxes to maximize security without sacrificingefficiency and productivity.For more information, call 206.613.6600 orvisit www.watchguard.com.Address505 Fifth Avenue SouthSuite 500Seattle, WA 98104Supportwww.watchguard.com/supportU.S. and Canada 877.232.3531All Other Countries 1.206.521.3575SalesU.S. and Canada 1.800.734.9905All Other Countries 1.206.613.0895
Copyright InformationCopyright 2012-2013 WatchGuard Technologies, Inc. All rights reserved.WatchGuard, the WatchGuard logo, LiveSecurity, and any other mark listed as a trademark in the“Terms of Use” portion of the WatchGuard web site that is used herein are either registeredtrademarks or trademarks of WatchGuard Technologies, Inc. and/or its subsidiaries in the UnitedStates and/or other countries. All other trademarks are the property of their respective owners.Part Number: 352-4257-001 Rev DRevised: July 18, 2013You can find all WatchGuard documentation online tice to UsersInformation in this guide is subject to change without notice. Updates to this guide are posted .aspCompanies, names, and data used in examples herein are fictitious unless otherwise noted. No part ofthis guide may be reproduced or transmitted in any form or by any means, electronic or mechanical,for any purpose, without the express written permission of WatchGuard Technologies, Inc.iii
IntroductionThe WatchGuard AP family of wireless access points provide secure, reliable, wirelesscommunications while delivering high performance and broad coverage—a perfectcombination of services that will meet the needs of enterprise-level customers, smallbusinesses, branch offices, campuses, and hotels alike.WatchGuard AP devices feature 2x2 MIMO (Multiple Input Multiple Output) capability and802.11 a/b/g/n wireless coverage and operate on both 2.4GHz (b/g/n) and 5GHz (a/n)spectrums, to provide users with enhanced reliability and performance. Internal antennas,slim cases, minimalist labeling, and small LEDs, coupled with wall and ceiling mountingoptions, make these devices ideal for low profile deployment scenarios. Power is providedvia an AC adapter or optional PoE injector when outlet access is not easily accessible.The WatchGuard AP is managed and controlled directly from a WatchGuard XTM device toprovide centralized, secure management and configuration of all WatchGuard wirelessdevices on your network.The WatchGuard AP product line includes these models: AP 100 — Single-radio 2.4/5Ghz switchable 2x2 MIMO 802.11n, provides up to300Mbps data rateAP 200 — Dual-radio 2.4GHz and 5GHz 2x2 MIMO 802.11n, provides up to600Mbps data rate1
Requirements The WatchGuard AP device must be managed by a WatchGuard XTM device thatuses Fireware XTM OS v11.7.2 or higher.The WatchGuard AP device must be located on a Trusted or Optional network of theWatchGuard XTM device to allow communication between the two devices.Registration and ActivationYou must register your WatchGuard AP to activate the device and start your LiveSecuritysubscription. The WatchGuard LiveSecurity subscription activates your hardwarereplacement warranty, enables you to receive technical support, and provides access to thelatest OS updates and product news. 2Automatic Activation — After you pair a WatchGuard AP device with an XTMdevice, the XTM device automatically connects to the WatchGuard web site andsends the information necessary to activate the AP device on the same WatchGuardaccount where the XTM device was activated.Manual Activation — You can activate the AP device in your WatchGuard accountjust as you would activate an XTM device or add-on feature. Go to http://www.watchguard.com/. Log in with your WatchGuard account user name and password. On the Support Home tab, click Activate a Product. Type the serial number of the WatchGuard AP device (including hyphens). Follow any remaining prompts to complete activation of your AP device.
Mount the WatchGuard AP DeviceAll of the items necessary to install your WatchGuard AP device are included in the package.These items include: WatchGuard AP deviceSetup GuideWall/Ceiling Mounting KitT-rail Ceiling Mounting KitMounting bracketAC adapter (12V) with US, EU, UK, AU region-specific adapters3
Ceiling/Wall Mounting Instructions1. Position the mounting bracket on the wall or ceiling where you want to install theWatchGuard AP device.2. Use the mounting bracket as a guide to mark the position of the WatchGuard APdevice on the wall or ceiling.3. Remove the mounting bracket and insert the large mounting screws into the marksyou made on the ceiling or wall.4. Insert the long 5x32 screws through the bracket and into the mounting screws.5. Insert the short 6x12 screws partway into the bottom of the device. Do not tightenthe screws completely. Keep the heads of the screws exposed to attach the deviceto the mounting bracket.If extra space is required between the device and the mounting bracket, use thespacers and long 6x25 screws from the T-rail mounting hardware kit.6. To attach the device to the mounting bracket, insert the screw heads from the deviceinto the slots in the mounting bracket, and rotate the device clockwise to lock thedevice in place.4
T-rail Mounting InstructionsTo mount your WatchGuard AP device on a suspended ceiling, you can use one of the twoT-rail connectors included in the mounting hardware kit: 15/16in (2.38cm) and 9/16in(1.43cm). Before you mount your WatchGuard AP device, make sure you select the correctT-rail connector size.If you require additional space between the device and the ceiling, you can use the providedspacers and long 6x25 screws.To mount the device on a suspended ceiling with the T-rail connectors:1. Attach the T-rail connectors to the bottom of the WatchGuard AP device with theshort 6x10 screws.5
2. Press the device into the ceiling T-rail until the clips snap securely into place.To protect your device from theft, use the Kensington security slot to attach acable lock (not included).6
Connect the WatchGuard AP DeviceTo connect the WatchGuard AP device:1. Insert an Ethernet cable into the Ethernet interface on the WatchGuard AP device.2. Connect the other end of the Ethernet cable to your network.If you must connect to the local Web UI of the AP device, connect the Ethernet networkcable directly to the computer you will use to configure the AP device.7
3. Connect the power adapter to the DC power connector on the WatchGuard APdevice. For more information, see AC Power Adapter on page 16.If you use a PoE adapter, make sure that the Ethernet cable is connected to thecorrect port on the PoE adapter. For more information, see Connect the EthernetPower Injector on page 18.The device will power on. The Power/Status light flashes amber while the device boots upand then changes to steady green when the device is ready.Assign an IP Address to the WatchGuard APThere are two ways you can assign an IP address to the WatchGuard AP to connect thedevice to your network: Automatic IP address configuration by DHCP (default)Manual IP address configurationAutomatic IP Address Configuration by DHCPWhen first powered on, the WatchGuard AP is configured to automatically receive an IPaddress from the network via DHCP. After the AP device receives an IP address, theWatchGuard XTM can connect to the AP device through automatic discovery.Manual IP Address ConfigurationIf you do not use DHCP on your network, you must directly connect to the WatchGuard APand assign an IP address to the device from its local Web UI.8
To connect directly to your WatchGuard AP device, you must physically connect an Ethernetcable between the AP device and a computer, then connect to the Web UI on the AP devicewith a web browser. After you have connected to the WatchGuard AP, you can configure thedevice with an IP address to integrate with your network.To configure the AP device, you must have these items: Computer with an Ethernet interfaceWeb browser (Internet Explorer, Firefox, Safari, or another similar application)Before You BeginThe default IP address of the WatchGuard AP device is 192.168.1.1.To make sure you can connect to the WatchGuard AP device and complete theconfiguration procedure, you must first configure your computer to use these settings: IP address: 192.168.1.2Subnet mask: 255.255.255.0Gateway: 192.168.1.1Connect to the WatchGuard AP1. On your computer, open a web browser and type https://192.168.1.1 in thelocation bar.2. To log in to the WatchGuard AP, type the default password: wgwap3. Configure your WatchGuard AP with an IP address and appropriate network settingsso that the device is on the same network as your WatchGuard XTM device.When the WatchGuard AP is assigned an IP address, the WatchGuard XTM can connect tothe AP device by automatic discovery.9
Pair the AP Device with the WatchGuard XTMYou must now use the WatchGuard XTM to pair the WatchGuard AP device with the XTMand add the device to the wireless network.1. Use Policy Manager or the Fireware XTM Web UI to edit the XTM deviceconfiguration.2. Select Network Gateway Wireless Controller.3. Enable the Gateway Wireless Controller, and save the configuration to the XTMdevice.4. In the Gateway Wireless Controller, on the Access Points tab, click Refresh todiscover the AP device.5. Select the unpaired Access Point and click Pair.6. In the Pairing Passphrase dialog box, type the passphrase on the AP device. Thedefault passphrase is wgwap.For detailed information about WatchGuard AP pairing, management, and configuration withyour XTM device, see the Wireless section of the Fireware XTM Web UI or WSM Help .asp.10
Hardware SpecificationsWatchGuard AP SpecificationsMCU ProcessorAtheros AR9344 533MHzMemory: Flash16 MBMemory: RAM128 MB (64MB x 2)RadioAP 100(Radio 1) Atheros AR9344 for switchable 2.4Ghz/5GHzAP 200(Radio 1) Atheros AR9344 for 5GHz(Radio 2) Atheros AR9382 for 2.4GHzGigabit PhysicalLayer (PHY)Atheros AR8035Radio Type andFrequency Band2.4GHz, 802.11b/g/n, 5GHz, 802.11a/nAP 100: 300 Mbps data rateAP 200: 600 Mbps data rate (300 Mbps per radio)AntennaModular High Efficiency PIFA AntennaPeak Gain:2.4 to 2.5GHz / 3dBi5.150-5.875GHz / 4dBiEthernet Interface1 RJ45 connector for 10/100/1000 Gigabit EthernetPower InterfaceDC jack (12V DC input)Power Supply12V 1.25A11
Environmental RequirementsTo safely install your WatchGuard AP device, we recommend that you: Install the device indoors.Make sure the device has adequate clearance for air flow and cooling.Connect the device to a surge-protected power supply to prevent damage fromsudden power changes.Operating temperature32 to 104 F (0 to 40 C)Operating relative humidity5% to 90% Non-condensingStorage temperature-40 to 158 F (-40 to 70 C)Non-operating relative humidity5% to 90% Non-condensing12
Device Connections and ButtonsEthernet Network InterfaceStandard RJ45 connector that supports link speeds of 10/100/1000 Mbps.Power InputA 12V AC adapter is included with your device. Connect the AC adapter to thedevice and to a power source. Use only the supplied AC power adapter.If you use the optional PoE adapter, make sure that the PoE adapter complies withthe IEEE 802.3af PoE specification. Do not use any PoE adapters that are notIEEE 802.3af compliant as they may damage your device.Reset ButtonTo reset the WatchGuard AP device to factory default settings, disconnect thepower from the device. Press and hold the Reset button while you reconnect powerto the device. Continue to hold the Reset button for at least ten seconds while thedevice initializes. When the device completes its initialization, it will be reset tofactory default settings.If you reset the WatchGuard AP to factory settings, you must perform the pairingprocedure again to pair the AP device with the XTM device.13
Device Indicators14
IndicatorIndicator colorInterface StatusPower/StatusNot litNo powerAmberDevice bootingGreenPower on and readyNot litWireless off or disabledAmber2.4GHz and 5GHz wireless networkactiveWirelessEthernetAmber flashingTransmitting and receiving dataGreen5GHz wireless network activeGreen flashingTransmitting and receiving dataRed2.4GHz wireless network activeRed flashingTransmitting and receiving dataNot litNo link or disabledAmberLink speed at 10/100MbpsAmber flashingTransmitting and receiving dataGreenLink speed at 1000Mpbs (Gigabit)Green flashingTransmitting and receiving data15
AC Power AdapterThe included AC power adapter supplies 12V DC power to the WatchGuard AP and includesUS, EU, UK, and AU region-specific adapter disk plugs.To connect a region-specific disk plug to the AC power adapter:1. Insert the round disk plug in the AC power adapter at an angle to align with the slots.2. Rotate the disk clockwise until it clicks into position.To remove a disk plug from the AC power adapter:1. Press the Push button on the round disk plug.2. Rotate the disk counter-clockwise and pull it away from the adapter.16
Ethernet Power InjectorYou can also power the WatchGuard AP device with an optional Ethernet Power Injector.This Power over Ethernet (PoE) device allows you to power the WatchGuard AP through anexisting ethernet connection. With this feature, you do not have to position your WatchGuardAP device near a power outlet.The Ethernet Power Injector provides 56V/15.4W power over a single 10/100 Ethernet port,and also includes region-specific plugs (US, EU, UK, AU) for connection to a wall outlet.This device complies with the IEEE 802.3af PoE specification. Do not use anyPoE adapters that are not IEEE 802.3af compliant as they may damage yourdevice. This device is to be connected only to PoE networks without routing tothe outside plant.17
Connect the Ethernet Power InjectorTo connect an Ethernet Power Injector to the WatchGuard AP device:1. Attach a region-specific plug to the Ethernet Power Injector.2. Plug the Ethernet Power Injector into an AC power source.3. Connect a straight-through Ethernet cable from your network backbone (forexample, a router, switch, or hub) to the IN connector on the Ethernet Power Injector.4. Connect a straight-through Ethernet cable from the WatchGuard AP device Ethernetinterface to the OUT connector on the Ethernet Power Injector.Ethernet Power Injector SpecificationsEthernet Power InjectorWatchGuard Part #WG003000SpecificationIEEE 802.3afAC Input Voltage Rating100 to 240VACOutput Voltage56VOutput Power15.4WEthernet InterfacesIn: RJ-45 for 10/100 MbpsOut: RJ-45 for 10/100 Mbps and 56V DCVoltage on pins 4-5 ( ) and 7-8 (-).Region-specificAdapter PlugsUS, EU, UK, AU18
Ethernet Power InjectorIndicatorGreenValid IEEE802.3af load detected and connected.Flashing Green/RedInvalid load connected.RedFault detected.TemperatureOperating 0 to 40 CStorage -25 to 65 CHumidityOperation 5 to 90%DimensionsL 80mm (3.15in)W 45mm (1.77in)H 33mm (1.29in)Weight95g (3.35oz.)19
Documentation and ResourcesFor additional information about the WatchGuard AP and other WatchGuard products, seethese online resources:Product Documentation WatchGuard AP — You can view and download the most currentdocumentation for the WatchGuard AP on the WatchGuard AP ProductDocumentation page asp WatchGuard XTM — The WatchGuard AP is managed by a WatchGuard XTMdevice. For detailed information about WatchGuard AP pairing, management,and configuration with your XTM device, see the Wireless section of the FirewareXTM Web UI or WSM Help .aspTraining ResourcesFor training presentations and additional training resources go to the WatchGuardProduct Training page at hGuard User ForumAn interactive online user forum moderated by senior support engineers. Go to theWatchGuard forum at http://www.watchguard.com/forumKnowledge BaseYou can view and search the knowledge base for information on specificWatchGuard product issues at http://customers.watchguard.comWatchGuard Products and ServicesFor more information on WatchGuard products and services, visit the WatchGuardproduct information page at http://www.watchguard.com/products20
Limited Hardware WarrantyThis Limited Hardware Warranty (the “Warranty”) applies to the enclosed hardware product, not including anyassociated software, which is licensed pursuant to a separate end-user license agreement and warranty (the“Product”). BY USING THE PRODUCT, YOU (either an individual or a single entity) AGREE TO THE TERMSHEREOF. If you do not agree to these terms, please return this package, along with proof of purchase, to theauthorized dealer from which you purchased it for a full refund. WatchGuard Technologies, Inc.(“WatchGuard”) and you agree as set forth below or on the reverse side of this card, as applicable:1. LIMITED WARRANTY. WatchGuard warrants that upon delivery and for one (1) year thereafter (the“Warranty Period”): (a) the Product will be free from material defects in materials and workmanship, and (b)the Product, when properly installed and used for its intended purpose and in its intended operatingenvironment, will perform substantially in accordance with WatchGuard applicable specifications.This warranty does not apply to any Product that has been: (i) altered, repaired or modified by any party otherthan WatchGuard except for the replacement or inclusion of specified components authorized in, andperformed in strict accordance with, documentation provided by WatchGuard; or (ii) damaged or destroyed byforce majeure events, accidents, power spikes or similar events, or by any intentional, reckless or negligentacts or omissions of any party. You may have additional warranties with respect to the Product from themanufacturers of Product components. However, you agree not to look to WatchGuard for, and herebyrelease WatchGuard from any liability for, performance of, enforcement of, or damages or other relief onaccount of, any such warranties or any breach thereof.2. REMEDIES. If any Product does not comply with the WatchGuard warranties set forth in Section 1 above,WatchGuard will, following the receipt of the product you claim is defective and at its option, either (a) repairthe Product, or (b) replace the Product with a like or similar product; provided, that you will be responsible forreturning the Product and for all costs of shipping and handling. Repair or replacement of the Product shallnot extend the Warranty Period. Any Product, component, part or other item replaced by WatchGuardbecomes the property of WatchGuard. WatchGuard shall not be responsible for return of or damage to anysoftware, firmware, information or data contained in, stored on, or integrated with any returned Products.3. DISCLAIMER AND RELEASE. THE WARRANTIES, OBLIGATIONS AND LIABILITIES OFWATCHGUARD, AND YOUR REMEDIES, SET FORTH IN PARAGRAPHS 1 AND 2 ABOVE AREEXCLUSIVE AND IN SUBSTITUTION FOR, AND YOU HEREBY WAIVE, DISCLAIM AND RELEASE ANYAND ALL OTHER WARRANTIES, OBLIGATIONS AND LIABILITIES OF WATCHGUARD AND ALL OTHERRIGHTS, CLAIMS AND REMEDIES YOU MAY HAVE AGAINST WATCHGUARD, EXPRESS OR IMPLIED,21
ARISING BY LAW OR OTHERWISE, WITH RESPECT TO ANY NONCONFORMANCE OR DEFECT IN THEPRODUCT (INCLUDING, BUT NOT LIMITED TO, ANY IMPLIED WARRANTY OF MERCHANTABILITY ORFITNESS FOR A PARTICULAR PURPOSE, ANY IMPLIED WARRANTY ARISING FROM COURSE OFPERFORMANCE, COURSE OF DEALING, OR USAGE OF TRADE, ANY WARRANTY OFNONINFRINGEMENT, ANY WARRANTY OF UNINTERRUPTED OR ERROR-FREE OPERATION, ANYOBLIGATION, LIABILITY, RIGHT, CLAIM OR REMEDY IN TORT, WHETHER OR NOT ARISING FROM THENEGLIGENCE (WHETHER ACTIVE, PASSIVE OR IMPUTED) OR FAULT OF WATCHGUARD OR FROMPRODUCT LIABILITY, STRICT LIABILITY OR OTHER THEORY, AND ANY OBLIGATION, LIABILITY,RIGHT, CLAIM OR REMEDY FOR LOSS OR DAMAGE TO, OR CAUSED BY OR CONTRIBUTED TO BY,THE PRODUCT).4. LIMITATION AND LIABILITY. WATCHGUARD'S LIABILITY (WHETHER ARISING IN CONTRACT(INCLUDING WARRANTY), TORT (INCLUDING ACTIVE, PASSIVE OR IMPUTED NEGLIGENCE ANDSTRICT LIABILITY AND FAULT) OR OTHER THEORY) WITH REGARD TO ANY PRODUCT WILL IN NOEVENT EXCEED THE PURCHASE PRICE PAID BY YOU FOR SUCH PRODUCT. THIS SHALL BE TRUEEVEN IN THE EVENT OF THE FAILURE OF ANY AGREED REMEDY. IN NO EVENT WILL WATCHGUARDBE LIABLE TO YOU OR ANY THIRD PARTY (WHETHER ARISING IN CONTRACT (INCLUDINGWARRANTY), TORT (INCLUDING ACTIVE, PASSIVE OR IMPUTED NEGLIGENCE AND STRICTLIABILITY AND FAULT) OR OTHER THEORY) FOR COST OF COVER OR FOR ANY INDIRECT, SPECIAL,INCIDENTAL, OR CONSEQUENTIAL DAMAGES (INCLUDING WITHOUT LIMITATION LOSS OFPROFITS, BUSINESS, OR DATA) ARISING OUT OF OR IN CONNECTION WITH THIS WARRANTY ORTHE USE OF OR INABILITY TO USE THE PRODUCT, EVEN IF WATCHGUARD HAS BEEN ADVISED OFTHE POSSIBILITY OF SUCH DAMAGES. THIS SHALL BE TRUE EVEN IN THE EVENT OF THE FAILUREOF ANY AGREED REMEDY.5. MISCELLANEOUS PROVISIONS. This Warranty will be governed by the laws of the state of Washington,U.S.A., without reference to its choice of law rules. The provisions of the 1980 United Nations Convention onContracts for the International Sales of Goods, as amended, shall not apply. You agree not to directly orindirectly transfer the Product or use of the product or associated documentation to any country to which suchtransfer would be prohibited by the U.S. Export laws and regulations. If any provision of this Warranty is foundto be invalid or unenforceable, then the remainder shall have full force and effect and the invalid provisionshall be modified or partially enforced to the maximum extent permitted by law to effectuate the purpose ofthis Warranty. This is the entire agreement between WatchGuard and you relating to the Product, andsupersedes any prior purchase order, communications, advertising or representations concerning the ProductAND BY USING THE PRODUCT YOU AGREE TO THESE TERMS. IF THE PRODUCT IS BEING USED BYAN ENTITY, THE INDIVIDUAL INDICATING AGREEMENT TO THESE TERMS BY USING THE PRODUCT22
REPRESENTS AND WARRANTS THAT (A) SUCH INDIVIDUAL IS DULY AUTHORIZED TO ACCEPT THEWARRANTY ON BEHALF OF THE ENTITY AND TO BIND THE ENTITY TO THE TERMS OF THISWARRANTY; (B) THE ENTITY HAS THE FULL POWER, CORPORATE OR OTHERWISE, TO ENTER INTOTHE WARRANTY AND PERFORM ITS OBLIGATIONS UNDER THE WARRANTY AND; (C) THEWARRANTY AND THE PERFORMANCE OF THE ENTITY'S OBLIGATIONS UNDER THE WARRANTY DONOT VIOLATE ANY THIRD-PARTY AGREEMENT TO WHICH THE ENTITY IS A PARTY. No change ormodification of the Warranty will be valid unless it is in writing and is signed by WatchGuard.All WatchGuard products are designed and tested to meet strict safety requirements. These requirementsinclude product safety approvals and other global compliance standards. Please read the followinginstructions carefully before operating the product, and refer to them as needed to ensure the continued safeoperation of your product. Additional information can be found in the electronic Hardware Guide.Product Safety CertificationsThe WatchGuard product is safety certified under the following standards: CAN/CSA C22.2 No.60950-1-07 A1:2011IEC 60950-1 Amd1 2nd Edition (2005)UL 60950-1:2007 R12.11EN 60950-1:2006 A11 A1 A12Safety Warning Do not place objects on the power cord.Do not obstruct the ventilation openings. These openings prevent overheating of the machine.Never push objects of any kind into slots or openings on this equipment. Making a contact with avoltage point or shorting out a part may result in fire or electrical shock.When removing or installing an appliance, follow the general installation safety instructions.DisclaimerWatchGuard shall not be held liable if the end user alters, modify, or repairs any WatchGuard hardwareappliance.23
HINWEISE ZUR SICHERHEITAlle WatchGuard Produkte werden entwickelt und getestet, um strenge Sicherheitsanforderungen zu erfüllen.Diese Anforderungen umfassen Produktsicherheit Zulassungen und andere globale Compliance-Standards.Bitte lesen Sie die folgenden Anweisungen sorgfältig, bevor Sie das Produkt, und bezeichnen sie alsnotwendig, um den sicheren Betrieb des Geräts zu gewährleisten. Weitere Informationen finden Sie in derelektronischen Hardware Guide.Die WatchGuard Produkt ist Sicherheit unter den folgenden Normen zertifiziert: CAN/CSA C22.2 No.60950-1-07 A1:2011 IEC 60950-1 Amd1 2nd Edition (2005) UL 60950-1:2007 R12.11 EN 60950-1:2006 A11 A1 A12Sicherheitshinweis Legen Sie keine Gegenstände auf das Netzkabel.Verdecken Sie nicht die Lüftungsöffnungen. Diese Öffnungen verhindern eine Überhitzung derMaschine.Stecken Sie niemals Gegenstände jeglicher Art in die Schlitze oder Öffnungen des Geräts stecken.Der Kontakt mit einem spannungsführenden Punkt oder das Kurzschließen eines Bauteils kann zueinem Brand oder elektrischen Schlag führen.Beim Entfernen oder Installieren eines Gerätes, nach den allgemeinen InstallationSicherheitshinweise.AVISO DE SEGURIDADTodos los productos WatchGuard están diseñados y probados para satisfacer estrictos requisitos deseguridad. Estos requisitos incluyen la homologación de productos de seguridad y otras normas decumplimiento global. Por favor, lea atentamente las siguientes instrucciones antes de utilizar el producto, y serefieren a ellos como sea necesario para garantizar el funcionamiento seguro y continuo de su producto.Información adicional se puede encontrar en la Guía del usuario electrónica.Certificación de seguridad del productoEl producto tiene certificación de seguridad WatchGuard bajo las siguientes normas: 24CAN/CSA C22.2 No.60950-1-07 A1:2011IEC 60950-1 Amd1 2nd Edition (2005)UL 60950-1:2007 R12.11
EN 60950-1:2006 A11 A1 A12Advertencia de seguridad No coloque objetos sobre el cable de alimentación.No obstruya las aberturas de ventilación. Estas aberturas evitan el sobrecalentamiento de lamáquina.Nunca introduzca objetos de ningún tipo en las ranuras o aberturas del equipo. El contacto conpuntos de voltaje o el cortocircuito de una pieza podría provocar un incendio o una descargaeléctrica.Al extraer o instalar un electrodoméstico, siga las instrucciones generales de instalación deseguridad.FCC CertificationThis device complies with part 15 of the FCC Rules. Operation is subject to the following two conditions: (1)This device may not cause harmful interference, and (2) this device must accept any interference received,including interference that may cause undesired operation.This device has been tested and found to comply with the limits for a Class A digital device, pursuant to Part15 of the FCC Rules. These limits are designed to provide reasonable protection against harmful interferencein a residential installation. This equipment generates uses and can radiate radio frequency energy and, if notinstalled and used in accordance with the instructions, may cause harmful interference to radiocommunications. However, there is no guarantee that interference will not occur in a particular installation Ifthis equipment does cause harmful interference to radio or television reception, which can be determined byturning the equipment off and on, the user is encouraged to try to correct the interference by one or more ofthe following measures: Reorient or relocate the receiving antenna.Increase the separation between the equipment and receiver.Connect the equipment into an outlet on a circuit different from that to which the receiver isconnected. Consult the dealer or an experienced radio/TV technician for help.* FCC Caution: Any changes or modifications not expressly approved by the party responsible for compliancecould void the user's authority to operate this equipment.Operations in the 5.15-5.25GHz band are restricted to indoor usage only.25
IMPORTANT NOTE:FCC Radiation Exposure Statement:This equipment complies with FCC radiation exposure limits set forth for an uncontrolled environment. Thisequipment should be installed and operated with minimum distance 20cm between the radiator & your body.Dieses Gerät wurde getestet und entspricht den Grenzwerten für ein Digitalgerät der Klasse A gemäßTeil 15 der Federal Communications Commission (FCC) Regeln einhalten. Diese Grenzwerte solleneinen angemessenen Schutz vor schädlichen Störungen, wenn das Gerät in einer kommerziellenUmgebung betrieben wird. Dieses Gerät erzeugt, verwendet und kann Hochfrequenzenergieabstrahlen, und wenn nicht installiert und in Übereinstimmung mit der Bedienungsanleitung, kann esStörungen im Funkverkehr verursachen. Der Betrieb dieses Gerätes in einem Wohngebiet wirdwahrscheinlich schädliche Interferenzen in dem Fall muss der Benutzer die Störungen auf seine / ihreeigene Kosten zu beheben.CE NoticeThe CE symbol on your WatchGuard Technologies equipment indicates that it is in compliance with theElectromagnetic Compatibility (EMC) directive and the Low Voltage Directive (LVD) of the European Union(EU).Industry Canada CertificationThis device complies with RSS-210 of the Industry Canada Rules. Operation is subject to the following twoconditions: (1) This device may not cause harmful interference, and (2) t
2. To log in to the WatchGuard AP, type the default password: wgwap 3. Configure your WatchGuard AP with an IP address and appropriate network settings so that the device is on the same network as your WatchGuard XTM device. When the WatchGuard AP is assigned an IP address, the WatchGuard XTM can connect to the AP device by automatic discovery.