Transcription
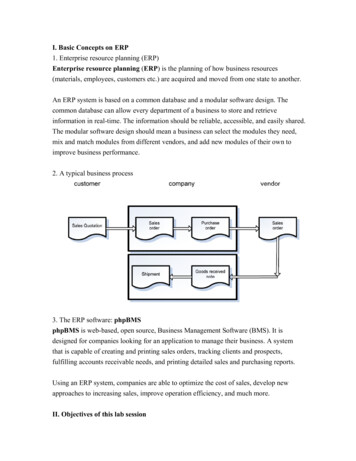
I. Basic Concepts on ERP1. Enterprise resource planning (ERP)Enterprise resource planning (ERP) is the planning of how business resources(materials, employees, customers etc.) are acquired and moved from one state to another.An ERP system is based on a common database and a modular software design. Thecommon database can allow every department of a business to store and retrieveinformation in real-time. The information should be reliable, accessible, and easily shared.The modular software design should mean a business can select the modules they need,mix and match modules from different vendors, and add new modules of their own toimprove business performance.2. A typical business process3. The ERP software: phpBMSphpBMS is web-based, open source, Business Management Software (BMS). It isdesigned for companies looking for an application to manage their business. A systemthat is capable of creating and printing sales orders, tracking clients and prospects,fulfilling accounts receivable needs, and printing detailed sales and purchasing reports.Using an ERP system, companies are able to optimize the cost of sales, develop newapproaches to increasing sales, improve operation efficiency, and much more.II. Objectives of this lab session
1. Use phpBMS ERP to simulate a basic business process;2. Generate and check the key reports in the process.III. Experiencing phpBMSLog on phpBMS and configure basic information1. Open the link http://localhost/phpBMS/index.php in the web browser.2. Log on the system with the administrator account:User: adminPassword: 111111113. The main menu will display after logging onsuccessfully4. Press “System” and select “Configuration”5. Change the application name6. Press “Account” and select “Log Out”
7. Re-log in the system as described in 2.8. The application name has been changed.9. Press “System” and select “Configuration” as described in 4.10. Press “company” and input the information of your company.11. Press “localization” to change the phone, date, and currency format.12. For security, the “encryption seed” and “log in security” properties can be changed.
13. Press “BMS Module” to unfold the options14. Set client default properties, and press “save”15. Press “sales order”. Set sales order default properties, and press “save”
16. Press “shipping”. Set shipping default properties, and press “save”17. Press “accounts receivable”. Set accounts receivable default properties, and press“save”Manage account and create users1. Press “Account” and select “My Account”
2. Input new password and press “change password”3. Press on “Account” in the main menu, and then select “Users”.4. Create a sales userPress on. Input the user’s name and “log in” name.Input other user info and select departmentThen press “save”
UserRoles allows administrators to restrict access to many areas of phpBMS,including what screens users can view, what columns and search items they can see,and what functions they have access.To assign roles for the sales person, select “shipping” and “sales”, and then press“add role”Press “save”5. Create a sales managerPress on “Account” in the main menu, and then select “Users”. Press on. Input theuser’s name and “log in” name. (Note: don’t select administrator attribute).Select departmentThen press “save”Select “sales manager” and “upper manager” then press “add role”
Press “save”6. Create an accounting userPress on “Account” in the main menu, and then select “Users”. Press onuser’s name and “log in” name.Select departmentThen press “save”Select “accounts receivable” then press “add role”Press “save”. Input the
7. Press “System” and select “System Log” to check the system log8. Press “Tools” and select “Notes”, “Tasks”, or “Events” to record daily notes, tasks oreventsManage products, clients and sales propertiesA. Create products1. Press “Product” and select “Product Categories”2. Clickto create a new product category3. Input product category name, e.g. “ThinkPad”, and then press “save”4. Press “Product” and select “Products”
5. Clickto create new product, and fill in identification description, e.g., name“ThinkPad W510” and part number “1111”6. Select the master category (“ThinkPad” you created in step 3)7. Input the unit cost and mark-up, then press “calculate price”8. Input weight and shipping information9. Pressto save the new product record.10. Press “Product” and select “Product Categories”. Select product category “ThinkPad”,and the related record “products”
11. Products in the select categories are shownB. Set up sales properties1. Press “sales”, select “discounts” and pressto specify the special discount (e.g.,“student discount”). Then press2. Press “sales”, select “Tax Area” and pressto specify the kind of tax. Then press.C. Create clients1. Press “Client” and select “Clients”2. Input the client’s information, and then select attributes as “client”
3. Input contact information, e.g. address4. Type the sales person’s name and select order defaultsManaging sales ordersA. Create sales quote1. Press “Sales” and select “Sales Orders”. Then pressto create a sales order2. Type the client name (that you created before) then select the client
3. Select type as “Quote” and fill in other information4. Set shipping address as billing address5. Type product name to select product6. Change quantity, then press7. Clicking on “shipping” and input “tracking number”, e.g. 3210.
8. Clicking on “payment” and input credit card details9. Press “save”B. Create sales order1. Press “Sales” and select “Sales Orders”. Clicking on “find” and select “Quotes”. Thenpress “search”2. Double click on the newly created quote3. Change attributes of “type” as “Order”
4. Assign the order to a sales person (e.g., “sales user a” created before)5. Press “save”C. Log in as a sales person and follow the order1. Log out the system and then log in as a sales user, i.e., the account that you createdbefore2. Press “Sales” and select “Sales Orders”. Point to “find” and select “Orders”. Thenpress “search”.
3. Select the sales order. If the client has paid the money, pressfull”, “due” will become zero.and select “pay in4. Pressselect “mark ready to post”, if the products are ready.5. Pressselect “mark as shipped”, “status” will become “shipped”.D. Create invoice from sales order1. Log out from the sales user account, and log in with the administrator account2. Press “Sales” and select “Sales Orders” to view the sales orders. Point to “find” andselect “Orders”. Then press “search”.3. Double click on the sales order.4. The invoice date is automatically generated
5. Press “Sales” and select “Sales Orders” to view the sales orders. Select the order.Pressselect “post as invoice”. Then the sales order disappears.6. Point to “find” and select “invoices”. Then press “search”.7. The order’s type is changed to invoice.Note: A full payment must be entered before posting an order. If no payment hasbeen made and you still wish to post a sales order (convert it to an invoice), you must
select an Accounts Receivable (AR) payment method such as Net 30. Once an AR or fullpayment has been made, it is possible to post the sales order. Once a sales order has beenposted, it will be impossible to change any information on the sales order.E. Create Accounts Receivable items1. Press “Client” and select “Clients”. Then press “search” to search clients.2. Double click on the client3. Press “credit”4. Select “has credit” and set the credit limit, e.g. 200,000. Then press “save”5. Press “Sales” and select “Sales Orders”. Press6. Type client name e.g. “hkbu”, then select clientto create sales order7. Type product name, e.g. “thinkpad w510” and select product. Then press8. Point to “payment” and then select “Net 30”. Then press “save”
9. Repeat the processes described in C 3 to C 5 and D 510. Press “Sales” and select “AR Items”11. Press “search”12. Press the application name13. Check “Accounts Receivable” on the homepageF. Create receipts1. Press “Sales” and select “Receipts”
to create receipts2. Press3. Input the client name, receipt amount and selection “payment type”4. Select “status” as “collected” and mark as “ready to post”5. Press6. Press “add”7. Press “auto-apply”
8. Press “save”9. Press “Sales” and select “Receipts”. Select the receipt, pressreceipt”, then select “post10. Press on the application name11. Check the “Accounts Receivable”Note: the difference between “invoice” and “receipts” --- If you customer wants to knowwhat he is paying for he should be able to read the invoice which will have all theinformation about the transaction including quantity and description of the goods orservice, price, additional charges including shipping and taxes, the total price and thepayment terms.The receipt should show date of payment, method of payment, amount of payment and areference to the invoice the payment relates to. It should also show any balance still due.G. Printing invoice and purchase history1. Print invoice: select the invoice, then press
2. Select available reports as invoice, then press “print”3. Press “done” to return to the main menu.4. Print client’s purchase history: press “client” and select “clients”. Then pressselect “select all”.,
5. Press6. Select available reports as “Purchase History”, then press “print”7. Press “print” to generate report.Try the online demo with different types of users1. Open the link http://www.phpbms.org/trial/index.php
2. log in with different rolesShipping Personnelusername: shippingpassword: shippingSales Personnelusername: salespassword: salesSales Managerusername: salesmanagerpassword: salesmanager3. repeat the functions described before and check the accessing rights of different roles
AppendixTry STATISTICA free trialSTATISTICA provides the most comprehensive array of data analysis, data management,data visualization, and data mining procedures. Its techniques include the widest selectionof predictive modeling, clustering, classification, and exploratory techniques in onesoftware platform.Introduction to data mining:http://www.youtube.com/watch?v 1VQ1qzgdRSs&p B804A810436AFB03&index 1Download the free trial from trial/by clicking “download the free 30 day STATISTICA version 9 Trial” and install thedownloaded file.Then try the following two data mining tools:1. Classification analysisFollow sessions 3 & 17:Session 3 (introduction to the data set)http://www.youtube.com/watch?v mTDD5W70CnE&p B804A810436AFB03&index 3Session 17 (decision tree for classification):http://www.youtube.com/watch?v f0eCYQY4gcQ&p B804A810436AFB03&index 17Find dataset through “Help” - “Open examples”, and then open “datasets” folder toopen the file named “CreditScoring”Find the classification analysis tool from “Statistics” - “Mult/Exploratory” - “Classification Trees”2. Clustering analysisFollow sessions 27 & 28:Session 27 (introduction to the data set and data cleaning):http://www.youtube.com/watch?v WvR 0Vs1U8w&p B804A810436AFB03&index 28
Session 28:http://www.youtube.com/watch?v f1nP7BizrSA&p B804A810436AFB03&index 27Find dataset through “Help” - “Open examples”, and then open “datasets” folder toopen the file named “Marketing”Find the clustering analysis tool from “Statistics” - “Mult/Exploratory” - “Cluster”Try Openbravo ERP online demo (and compare with phpBMS)Openbravo ERP is a web-based open source ERP, improving the world’s efficiency bymaking modern ERP accessible to all companies worldwide. The system’s functionalityenables a company to automate a wide range of business processes such as IntegratedAccounting, Sales & CRM, Procurement, Inventory, Production, and Project & ServiceManagement.1. Go to n FS.html (username andpassword are preset), and click on “Login” button.2. Click on3. Press “OK”to configure the company information
View sales orders1. Click onbutton to expand the menu2. After the menu is expanded, press “Ctrl” “F” to search for the function “Sales order”3. Click on “Sales Order”
4. A form of a sales order is shown. Press5. Press6. Pressto view orders in form of tableto export or print the data.to view previous or next order.
open the file named "Marketing" Find the clustering analysis tool from "Statistics" - "Mult/Exploratory" - "Cluster" Try Openbravo ERP online demo (and compare with phpBMS) Openbravo ERP is a web-based open source ERP, improving the world's efficiency by making modern ERP accessible to all companies worldwide.