Transcription
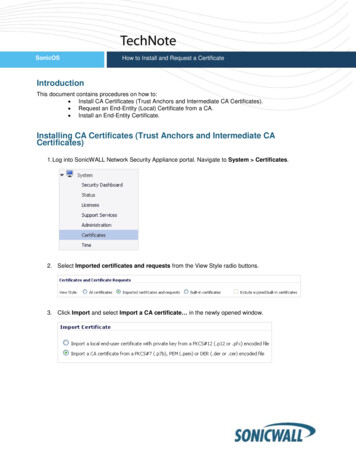
SonicOSHow to Install and Request a CertificateIntroductionThis document contains procedures on how to: Install CA Certificates (Trust Anchors and Intermediate CA Certificates). Request an End-Entity (Local) Certificate from a CA. Install an End-Entity Certificate.Installing CA Certificates (Trust Anchors and Intermediate CACertificates)1. Log into SonicWALL Network Security Appliance portal. Navigate to System Certificates.2. Select Imported certificates and requests from the View Style radio buttons.3. Click Import and select Import a CA certificate in the newly opened window.
4. Click Browse to find and select your certificate.5. After your certificate has been selected, click Import.2
6.The imported certificate will appear with a green arrow icon next to it in the Configure column. Ifdesired, click the green arrow to import a CRL.You will have the option to import a .PEM or .DER file, or point to a URL for periodic import. If theCRL import fails, an option is available to invalidate all certificates issued by this CA. The defaultoption is to not require CRL processing.3
Requesting an End-Entity (Local) Certificate from a CA1. Click the New Signing Request button.2. Fill in the desired form fields. The Subject Distinguished Name field will populate as you fill in variousfields of the form. We suggest completing: Country, Organization, Department (Organizational Unit),and Common Name. Your site’s security policy will determine the information needed.3. Go to the Subject Key Size drop list and select the desired key size. Please be aware that a largekey size will take an extensive amount of time to generate (especially on the smaller devices).Once the key is generated, the status will update to Pending Request.4
4. There are two options available:A. Manually export the CSR (as PEM-encoded PKCS #10 file) by selecting the export icon.If you manually export the CSR, you can then import the signed certificate as a .PEM or .DER fileby clicking the import icon.B. Select the SCEP button to send to your CA via SCEP.5
Installing an End-Entity CertificateIf you are importing a certificate matching a pending CSR, then import a .PEM or .DER file containing thecertificate stated in previous procedures.If you are importing a PKCS#12 independently issued by your CA, click the Import button and enter yourchoice of name and password. Then click the Browse button and select your file.6
Specifying that a Remote Peer will be Authenticating with Certificates1. Navigate to VPN Settings.2. Click the Add button to bring up a VPN Policy configuration window.3. In the Authentication Method drop list, select IKE using 3rd Party Certificates.4. Specify your certificate in the Local Certificate drop list.7
5. Specify the Local IKE ID Type from the drop list. UserFQDN, FQDN, and IPv4 types always use the Subject Alt Name. DN is always the Subject Name. Default ID from Certificate will send the first Subject Alternative Name found of UserFQDN,FQDN, or IPv4 type. Otherwise, it will send the Subject Name as DN.6. Specify the Peer IKE ID Type. UserFQDN, FQDN, and IPv4 are onlyfrom subjectAltName.7. Enter the Peer IKE ID – this is a string for UserFQDN, FQDN, or IPv4.8. From the Network tab, select the appropriate networks for local and remote proxy.9. In the Proposals tab, the Exchange drop list will provide three modes to choose from – Main,Aggressive, or IKEv2. Specify the mode and fill in IKE and IPsec parameters accordingly.8
10. In the Advanced tab, OCSP Checking can be enabled if desired. Currently, only HTTPprotocol is supported. The OCSP option is not available for IKEv2.In IKEv2 mode, you can configure Hash & URL certification types if desired.9
Request an End-Entity (Local) Certificate from a CA. Install an End-Entity Certificate. Installing CA Certificates (Trust Anchors and Intermediate CA Certificates) 1.Log into SonicWALL Network Security Appliance portal. Navigate to System Certificates. 2. Select Imported certificates and requestsfrom the View Style radio buttons. 3.