Transcription
Munson GoToMeeting TrainingMunson Healthcare TrainingMunson Medical Center utilizes the web collaborative tool GoToMeeting We currently have six GoToMeeting licensesEach license has the capacity for 25 participants per sessionMeetings must be requested and scheduled through REMEC – due to thecredentialing required for each session by Citrix, we are not hosting ad hocmeetingsMeetings may be requested as one-time or recurring meetings (withinthe calendar year)Complete and submit the information on the following form to schedule aGoToMeeting Session: http://www.munsonhealthcare.org/?id 2316&sid 22To Request/Schedule a GoToMeeting SessionAll meetings must be scheduled.Because we must obtain the meeting credentials from Citrix for each session,we cannot utilize these licenses for ad hoc meetings. If you have never facilitated a GoToMeeting session you will need to schedule GoToMeeting trainingwhich is provided by the REMEC department. Please plan to allow 45-60 minutes for this training.For new users, REMEC requires the following minimum lead time: 2 business days (Monday-Thursday, 8am-4pm; Friday, 8am-12pm)Please Note: This is subject to the availability of the REMEC staff for training.1 Page
Munson GoToMeeting Training When scheduling a GoToMeeting session, REMEC requires the following lead time to schedule yourmeeting: 1 business day (Monday-Thursday, 8am-4pm; Friday, 8am-12pm)Scheduling your Session:1. Submit your request for a GoToMeeting session by filling out the form on the REMECwebsite: http://www.munsonhealthcare.org/?id 2316&sid 222. You will need the following information to schedule your meeting: Your email address, name and contact telephone number Name of the meeting # of conference call connections needed Meeting organizer phone #, if other than the person requesting Is this a one-time or recurring meeting? All dates you are requesting Start and end time of the meeting Audio preference: GoToMeeting Integrated Audio, VoIP, Local REMEC issued number3. Once submitted, you will receive an email response confirming your request has beenreceived. If you do not receive an email response, double check to make sure you havefilled in all required fields before submitting the form.4. Once scheduled, REMEC will email you your GoToMeeting invitation and instructions. Thiswill include a link to the meeting as well as meeting ID, audio numbers and any passcodesneeded to access the meeting.5. Copy and paste this invitation in to the body of an Outlook meeting request and send toyour attendees. Please Do Not share the facilitator login information with your attendees.Roles Associated With Your GoToMeeting Session 2 PageOrganizer – The organizer is the individual responsible for scheduling, starting,managing and ending a session.Presenter – The presenter is the individual who is presenting or sharing their screenwith the attendees. The GTM Organizer is always designated as the initial presenter;however the presenter role may be passed to another organizer or attendee.Attendee – An attendee is any person who attends a session, including theorganizer(s) and presenters. By default, attendees can view the presenter’s screen.The organizer/presenter may grant other control rights to the attendees as theydeem necessary.
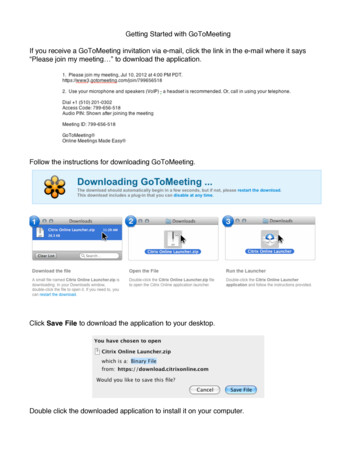
Munson GoToMeeting TrainingHow to Start Your Scheduled GoToMeeting SessionWhen you are ready to start your meeting:1. Go to www.gotomeeting.com or click on the link provided in your facilitator email.2. Click on “Sign In” located in the upper right hand corner of the screen.Note: If you click on the link in your facilitator email, it will take youdirectly to the Secure Sign In window.3. When the Secure Sign In window pops up, enter the email address and password providedby REMEC to log in. Once entered, click “Sign In”. Please answer “No” when asked if youwant the system to remember your password.Do not check the Remember Me boxIf this appears on the bottom ofyour screen, Do Not select YesSelect, Not for this site4. On the MY MEETINGS page, locate your scheduled meeting under the upcoming meetingstab. (The meeting title will begin with your name followed by the title you provided.)Recurring or Meet Anytime meetings appear at the top of the list. One-time appear at thebottom of the list in date order.5. When you are ready to start your meeting, clickbutton.NOTE: Please make sure that you only click on your meeting.3 Page
Munson GoToMeeting Training6. Once you have started your meeting, the Control Panel will appear on your computer screen.At this point you will have full access to its features and may begin sharing your screen.NOTE: If you do not “start” your meeting until after the scheduled start time, it may appearunder the MEETING HISTORY tab.7. Attendees who have joined the meeting before you begin sharing your screen will be placedin a “waiting room”.8. If at any point you stop sharing your screen, attendees will return to the waiting room.9. If an attendee logs in to the meeting before you start the meeting they will receive amessage on their screen letting them know they have successfully connected and arewaiting for the Organizer (aka - you). This is sometimes referred to as the “Hallway”.4 Page
Munson GoToMeeting TrainingThe GoToMeeting Control PanelOnce you start your meeting, the Organizer/Control Panel appears on the right side of your screen. Thispanel gives you access to the various GTM functions. The different panes (sections) are: Options (Session Controls)o Audio Messages from the organizer Correct phone number for the meetingo Screen Share Your Screen Change Presenter Share Keyboard and Mouse Controlo Webcam Share Your Webcam Audience Viewo Shows what Attendees are seeing Attendeeso View and Manage Attendeeso Invite Others Chato Send Chat MessagesEach pane can be opened and closed as needed. The Control Panel itself may be moved to any spot onyour desktop simply by clicking in the top gray bar and dragging to a new location. If you utilize dualscreens, it may also be dragged to your second screen. NOTE: Your attendees will not see this panel.You may also minimize the Control Panel byclicking on the double-arrow icon on the topright of the gray bar. This reduces the ControlPanel and places it at the top of your screen.Minimized Control PanelTo bring the Control Panel back to full size,click the double-arrow icon again.We will discuss each pane in detail later in this training manual.5 Page
Munson GoToMeeting TrainingPrior to Sharing Your ScreenPrior to sharing your screen with attendees it is important to take a few minutes to set up your desktopand decide what you will share screen and what functions you will want your attendees to see and/orhave access to. On the Control Panel:1. Click the down arrow next to the GoToMeeting icon. A dropdown menu appears which will allowyou to customize what your attendees see.2. Make your selections from the options on the dropdown menua. Edit Your Name and Email – By default, the name of the meeting and the email will come upwith your information. If wish to change it, you may do so from this screen, entering yourinformation and clicking OK. NOTE: Do Not check the Remember name and email box.How to manage your GoToMeeting Session using your Control Panel6 Page
Munson GoToMeeting Trainingb. Options – as the organizer/presenter, you control whether or not your attendees have access tothe chat function, ability to see who else is attending and whether or not your attendees mayshare their webcam. Make your selections by checking or unchecking the different options.c. Drawing Tools – There are several drawing tools available for document annotation. Theseshould show in a tool bar that resides under the Chat tool bar. These may also be used whenyou utilize the Give Keyboard and Mouse Control option (covered in a later section). You havethe option of allowing your attendees to annotate any documents you are currently sharing.The Drawing Tools will be covered in depth in a later section.If the drawing toolbar does not automatically appear on your control panel, access the drop downmenu on the control panel, hover over Drawing Tools and select Open. When finished, click anywherein your desktop and the dropdown will minimize.7 Page
Munson GoToMeeting TrainingAdditional Tips for Setting Up Prior to your Session Shut down any applications you do not wish your attendees to see.Disable any automatic pop ups, such as Outlook or other email notifications and any instantmessaging applications.Open any documents you plan to share and minimize for easy access.Options PaneAUDIO DROP DOWNSelecting this drop down menu gives you access to any messages from the organizer as well as listingwhat the audio choices are that have been selected for your meeting. We will discuss individual audiochoices in another sectionSCREEN DROP DOWNSharing Your Desktop:When you are ready to start sharing your desktop, your may either click the Share my Screenicon on the Control Panel.ORUnder the Screen tab, access the drop down menu. Check the option of your choice. This starts,stops or pauses what you are showing to your attendees. NOTE: Whatever is on your desktop atthat time will now be seen by anyone who is attending.Selecting What to Share1. Select the preferred screen setting by selecting the Screen tab. Select the Start Sharing my:dropdown list to access the list of sharing choices. NOTE: This is very important if you havemore than one monitor.2. If you hover over any of the choices, a gray frame will appeararound what your attendees will see.3. Check to select your choice4. You may change this at any time during your meeting byaccessing the dropdown under the Screen tab.5. Selecting the CLEAN option hides all icons, backgrounds andtoolbars.6. If you have documents or applications open and minimizedthey will appear in the list as well. NOTE: The default will sharewhatever screen is listed as the main screen for your computer.8 Page
Munson GoToMeeting Training7. The ON AIR Showing screen message will appear at thetop of your Screen pane.Pausing/Resume Sharing Your Screen:Pausing your screen sharing will freeze the image of the screen that attendees see.1. To Pause your screen, hover over the Screen icon on the Control Panel so that the pause buttonappears.2. Click the Pause button. The Screen icon will start flashing when screen sharing is paused.3. When ready to resume sharing your screen, hover over the Screen icon, click the Play button.Stop Sharing Your ScreenWhen you stop sharing your screen, attendees will be sent back to the waiting room or hallway, and amessage that the organizer’s screen is not being shared will appear.1. To Stop sharing your screen, hover over the Screen icon, the words “Stop sharing your screen”will appear.2. Click the icon. It will turn from green to gray and the message Stopped No one sees yourscreen will appear at the top of the Screen tab.3. Attendees will be sent back to the waiting room until the organizer chooses to resume sharingtheir screen.9 Page
Munson GoToMeeting TrainingChange Presenter:The Organizer/Presenter has the ability to make another attendee the presenter at any time.NOTE: This does not automatically make them the organizer.1. Access the dropdown box under Change presenter to: Check the attendee you wish tobecome the new Presenter. Confirm the new Presenter by clicking Yes in the VerifyPresenter Change pop up.Make sure the “Request keyboard and mouse control” box ischecked.The person you selected to be the new presenter will receivea notification that they have been selected as the presenter.2. The new presenter will need to selecton the pop up. They will begiven choices as to what and how they would like to show their screen similar to what youexperienced earlier.3. The new Presenter may choose to select a different presenter at any time by following the samesteps as above.NOTE: You may also change presenters by right clicking on the attendees name and selecting fromthe drop down menu that appears.10 P a g e
Munson GoToMeeting TrainingShare Keyboard and Mouse ControlYou may give other attendees shared control of your keyboard and mouse at any time during yoursession. This allows them to move the mouse about your shared screen and use their own keyboard totype on it, which aids in the collaboration process. As presenter, your mouse always has priority. Youcan override other attendees’ mouse movements to regain control without removing their access.Share keyboard and mouse control:1. Under Screen tab, access the Share keyboard & mouse with: dropdown menu.2. Select “Everyone” or an individual attendee. A check mark will appear next to anyone in yourattendee list who you have given keyboard and mouse control to.3. Attendees will see a notification on their screen next to their Control Panel that they have beengiven access to the presenter’s keyboard and mouse4. To temporarily re-gain control of your keyboard and mouse, simply type on your screen ormove your mouse. This will override anyone else who you have given control to.Remove keyboard and mouse control from others:You can remove keyboard and mouse control by using the same steps used to grant control1. Under the Screen tab, access the Share keyboard & mouse with: dropdown menu2. Deselect those you wish to no longer grant keyboard and mouse control to. The check marknext to their name in the attendee list will disappear.11 P a g e
Munson GoToMeeting TrainingWEBCAM DROP DOWNShare Your WebcamGoToMeeting features a Webcam option called HD Faces . Meeting participants can share upto 6 high-resolution video conferencing streams while viewing the presenter’s screen. If yourcomputer has a webcam, you can share your live image with other attendees. NOTE: If youchoose to share your webcam image, others in the session will be able to see you whether theyhave a webcam or not.1. Select the Webcam tab. A preview of your camera view will appear in the Previewwindow. You can choose to share it as Normal or Widescreen.2. To begin sharing your webcam, either click on the 3 dots on the right side of the controlpanel and select Share My Webcam or click on the Webcam icon.3. The Webcam icon on your Control Panel will nowappear green. A green box will also appear aroundyour preview image.12 P a g e
Munson GoToMeeting Training4. Images from all shared webcams will show in a larger screen on your monitor. From thispop up image, you layout and control options of those using webcams by selecting thedrop down menu under Layout or Webcams.Layout – This allows you to customize thewebcam image(s) on your screen only.This does not change the view for others.They can customize their individual screensaccording to their preference.Webcams – This gives you the ability to: Stop Sharing Your Webcam Hide All Webcams Hide Your WebcamNOTE: If you choose to hide your webcam, the following pop up message appears.13 P a g e
Munson GoToMeeting TrainingStop or Pause Sharing Your Webcam/Other Webcam ControlsYou have the following Webcam options:1. Pause your webcam. If you hover over the Webcam icon on your control panel, thePause your webcam option appears. If you click on theicon, attendees will see ablacked out box where your image appeared. It will state that the image has beenpaused. NOTE: This does not free up a webcam spot.2. Restart sharing your webcam. While paused, hover over the webcam icon, click on theResume webcam sharing or Play icon. Your image will now replace the black pausedbox on your screen.3. Stop sharing your webcam. When you stop sharing your webcam, whether it ispaused or live, your webcam box will disappear and you will free up a spot for anotherwebcam.4. You can access the same webcam controls (not Layout controls) as discussed above byagain clicking on the three dots to access the webcam drop down menu.14 P a g e
Munson GoToMeeting TrainingAudience ViewThis section shows what you are sharing with your audience (attendees). This section may beleft open or collapsed according to the presenter’s preference.Managing Your AttendeesAttendee ListThe Attendee List on your Control Panel: Provides you with a list of all attendees Shows how many attendees you have logged in Gives you the ability to make any one of them thePresenter or to give over keyboard and mouse control by rightclicking on their name and selecting from the drop down menu Allows you to add attendees “on the fly”15 P a g e
Munson GoToMeeting Training Adding AttendeesTo add attendees after the meeting has started or “on the fly”:Click thebutton at the bottom of the Attendees sectionFrom the pop up message, select the Email optionOR Click theicon next to the Meeting ID Select Email Meeting Invitation An email box will open up, type in your attendees email address in the “To” box and click “Send”.The information your attendee needs to join the meeting is automatically displayed in the body ofthe email. You may also give an attendee the Meeting ID and they can join from www.gotomeeting.com byclicking on the JOIN A MEETING tab, entering the Meeting ID and selecting16 P a g e
Munson GoToMeeting TrainingChatThe chat function works like any other instant messaging application. Type your message in the Enter your message space Select who you wish to send the message toNOTE: The default is “Everyone” Click SendThe chat log will display all public chat and chat between attendees.In addition, by clicking on the 3 dots, you may customize yourwelcome message Check the “When attendees arrive .” box Type message Click OKDrawing/collaborative toolsWhen working on a document together, you may choose to allow attendees access to the drawingtools. This allows them to “mark” or annotate parts of the document. These marks or drawings arevisible to all attendees. You may choose a different ink color for each attendee, as well as severaldevices such as: Pointer Pen Highlighter Spotlight Erase all drawingsAs the presenter, you control who can draw or annotate.If the drawing toolbar does not automatically appear on your controlpanel, access the drop down menu on the control panel, hover overDrawing Tools and select Open. When finished, click anywhere inyour desktop and the dropdown will minimize. The drawing toolbarwill now appear in your control panel.17 P a g e
Munson GoToMeeting TrainingTo allow attendees annotate Select the 3 dots Click OFF to turn the function on NOTE: The default is OFF Attendees can now annotate the documentTo take away annotation rights, reverse the process, accessing the menu from the 3 dots andclicking the ON button to turn off the function.AudioAudio options for a GoToMeeting session are: Use GoToMeeting’s integrated audio. The audio number is provided by GoToMeeting and is along distance number (not toll free/800#) for all participants. Use VoIP – This allows users to have the audio portion come directly through the speakers ontheir computer. In order to utilize this choice, your computer must have speakers and amicrophone. A VoIP headset is preferred and will offer a superior user experience. Use GoToMeeting integrated audio and VoIP. This is what your options look like: Use the REMEC provided conference call (bridge line) number.This number 231-213-0100 or 30100 5-digit dialing is availableat your facility. You will be prompted to enter the conference IDfollowed by the # sign to access the audio portion of the meeting18 P a g e
Munson GoToMeeting TrainingPlease note: If you anticipate more than 25 callers in one session, you will be required to use theGoToMeeting integrated audio.If you wish to record your session, you will need to use the GoToMeeting integrated audio andhave a VoIP headset.If you wish your participants to have the option of using VoIP, you will need to use theGoToMeeting integrated audio.If you are using the GoToMeeting integrated audio and VoIP in combination, attendees mayswitch between the telephone line and the VoIP connection if necessary. A USB headset shouldbe used with the VoIP connection.Recording Your SessionIf you are interested in recording your session, please contact the REMEC office at231-935-7944 or remec@mhc.net for further training.Ending Your Meeting Organizers/Presenters may choose to either leave the meeting while allowing the meeting tocontinue or end a meeting completely.If prompted, when you end a meeting, DO NOT say yes to “remember me on this computer”To leave the meeting and allow the session to continue:1. From the GoToMeeting drop down menu, selectExit – Leave Meeting, OR click the X in the upper right-handcorner of your Control Panel.2. On the Leave Meeting or End Meeting? pop up window clickChoose an Organizer & Leave.3. From the drop down list, select an attendee to become the newpresenter. NOTE: The same steps will be followed as covered in athe above section on changing presenters.19 P a g e
Munson GoToMeeting TrainingTo end the meeting for all:1. From the File menu, select Exit – End Meeting, or click the X inthe upper right-hand corner of the Control Panel.2. On the Leave Meeting or End Meeting? pop up window clickChoose an Organizer & Leave, select End Meeting for All3. The following dialog box will pop up. If you truly want to end the meeting, select Yes andthe session will end. If you select No, you will be returned to your active session.Logging Out of GoToMeetingBefore shutting down your computer: Return to the GoToMeeting Login screen Select the drop down menu in the upper right-hand corner Select SIGN OUT Exit GoToMeeting20 P a g e
Munson GoToMeeting TrainingItems Worth Noting 21 P a g eIf you are logged in to a GoToMeeting license, no one else can log in to that particularlicense until you end your session. Pay attention to your end time.You may not use the credentials of a scheduled meeting as an ad hoc meeting.A one-time session cannot be started, stopped, and then started again. (i.e. to use as apractice session). If this happens, your meeting will be lost. Contact REMEC at 231-9357944 or 57944 to reschedule the session. A new session will need to be created; with newcredentials and all attendees will need to be re-invited.Because of this, please make sure you are selecting your meeting from the list. If you startsomeone else’s session in error, and then end it, their session will need to be recreated.If you need to schedule a room to host this meeting, you must go through the standardroom scheduling process. Scheduling GoToMeeting does NOT schedule a physical meetingroom.If using a physical meeting room, please arrive at least 15 minutes prior to your start time toallow for prep time and to check the monitor resolution settings. If you are using acomputer you have not previously logged on to, we suggest 20-30 minutes prep time beallowed.If you have issues getting to the GoToMeeting website on the computer you are using,contact the Help Desk immediately at 231-935-6053 or 56053. Please Note: Your computermust be running Internet Explore version 9 or higher or you may use Chrome.If you have trouble logging in, check to make sure you have entered the information sent toyou as the facilitator. After 3 failed login attempts you will be locked out of theprogram. Please note: You cannot log in as the facilitator using the participant information.Start on time – End on time. There may be someone else scheduled to use this license. Ifyour meeting goes over, they cannot start theirs until you log out of the license.Schedule enough time. This application is not very forgiving if you “go over”Remind all participants to disconnect the audio line they are using and exit out ofGoToMeeting.DO NOT save the login information on your computer as you may not be issued the samelicense for your next meeting.The audio number you are using is specific to the GoToMeeting session you have beenassigned and should not be used at any other time. If you need an audio conference set up,contact the REMEC office or utilize the audio scheduler on the REMEC website underServices.If you have any issues or problems, contact REMEC immediately – don’t wait!Call us at 231-935-7944 or 57944. Or page us through the Helpdesk at 56053.
Munson GoToMeeting Training 1 P a g e Munson Medical Center utilizes the web collaborative tool GoToMeeting We currently have six GoToMeeting licenses Each license has the capacity for 25 participants per session Meetings must be requested and scheduled through REMEC - due to the credentialing required for each session by Citrix, we are not hosting ad hoc