Transcription
January 2022NovaBACKUP CMon v19.8User ManualFeatures and specifications are subject to change without notice.The information provided herein is provided for informational and planningpurposes only. 2022 NovaStor. All Rights Reservedwww.novabackup.com
Table of ContentsIntroductionSystem RequirementsInstallationSetting up the backup clientLogging InThe DashboardAgents & GroupsAgentsDetailsDevicesCreate DeviceCloud DeviceCreate Cloud DeviceCreate Cloud Device From Existing Cloud Storage AccountView Cloud Device DetailsEdit Cloud DeviceNetwork DeviceCreate Network DeviceView Network Device DetailsEdit Network DeviceTroubleshooting managing devicesJobsFile Backup JobDestinationSettingsScheduleLog Viewer2
Notification TriggersAccount ManagementSet PasswordPasswordTime ZoneLanguageCloud Storage AccountsCreate an accountConnect to an accountView details of an accountView computersEdit cloud storage accountChange the passwordChange the license keyDelete an accountDelete a computerStorage ServerSettingsAgent SettingsSecurity SettingsNotification SettingsUsersUser registrationUser registration and creating a cloud storage account in one stepCreate a userView a userEdit a userDelete a userUser RegistrationRolesStorage ServersAdd a storage server3
Web HookUpdateApplicationServer Administration Desktop ApplicationScheduled TaskWeb Configuration FileWeb Hook IP FilterApplication Programming Interface (API)HelpDocumentationAboutKnown IssuesTroubleshooting TipsWindows Service LoggingStandalone Web Server LoggingWeb Site LoggingScheduled Task LoggingGlossary4
IntroductionThank you for choosing NovaBACKUP CMon by NovaStorCMon (Central Monitoring Console) is an application that works along side your NovaBACKUP PC,Server, and Business Essentials backup software. The CMon can be utilized to monitor the associatedbackup jobs in your entire backup environment, all from a single pane of glass style website interface.CMon is accessible via web browser and can be viewed via Internet Explorer 9 , Google Chrome,Mozilla Firefox as well as most smart phone web browsers.NovaBACKUP CMon is composed of 2 components.1. The CMon (Central Monitoring Console) application enables the capability to monitor backupagents from any edition of NovaBACKUP PC, Server, or Business Essentials, version 18.0 andabove. Typically CMon is installed on a Windows Server machine which does not haveNovaBACKUP backup software installed on it. CMon can run on the same server thatNovaBACKUP backup client is installed but it may perform better on a separate server. Read theSystem Requirements section for more information.2. Your installations of NovaBACKUP PC, Server and Business Essentials, version 18.0 or higher,which are installed on your systems to backup critical data, such as SQL and Exchangedatabases, as well as virtual environments. This quick start guide will describe how to setup theCMon, along with how to connect one installation of NovaBACKUP (referred to as an agent) tothe CMon. Subsequent installations of NovaBACKUP PC, Server and Business Essentials willrequire configuration to connect to the CMon in the same manner.5
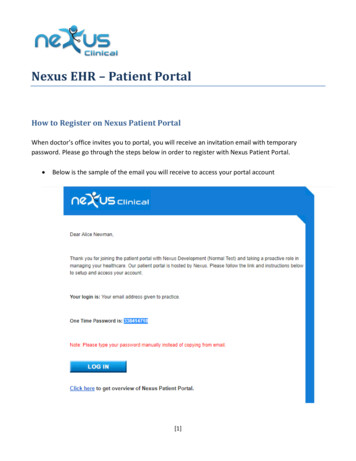
System RequirementsHardwareIntel Dual Core CPU or better4 GB of RAM minimum3 GB free hard drive available space on OS driveOperating SystemMicrosoft Windows Server 2012 R2Microsoft Windows Server 2016Microsoft Windows Server 2019Microsoft Windows Server 2022Microsoft .NET FrameworkMicrosoft .NET Framework 4.7.2 or higherSQL Server (Optional)Microsoft SQL Server is recommended when using more than 5 backup agents.Microsoft SQL Server 2017 Download Microsoft SQL Server 2017 ExpressMicrosoft SQL Server 2016 Download Microsoft SQL Server 2016 SP2 ExpressMicrosoft SQL Server 2014 Download Microsoft SQL Server 2014 SP2 ExpressMicrosoft SQL Server 2012How to determine the version, edition, and update level of SQL Server and its componentsWeb Server (Optional)IIS with IIS 6 compatibilityNetworkingTCP/IP networkWeb BrowserModern HTML5 supported desktop web browsers such as Internet Explorer 9 and above,Chrome, Firefox, Safari, Opera, EdgeModern HTML5 supported mobile web browsers such as Android 5.0, iOS 9.0, Windows 10,BlackBerry 10, Opera Mobile, Amazon SilkNote: To test HTML5 compatibility with your current browser please test it here:https://html5test.com/. A points score closer to 500 is optimal.6
7
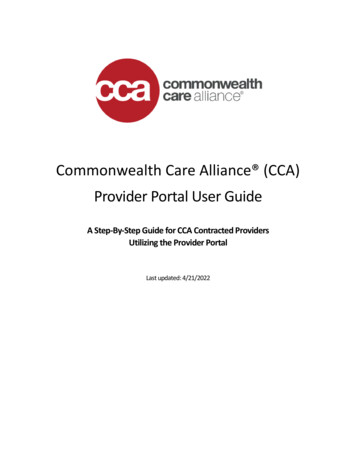
InstallationPlease make sure the machine meets the System Requirements before continuing.Run the setup executable to begin the installation wizard.Download InstallerThe Download Installer dialog indicates the missing required prerequisites and automaticallydownloads and installs them.Click the Install button to continue.WelcomeAfter the prerequisites are installed, the CMon installation wizard's Welcome dialog is displayed.8
Click the Next button to continue.End-User License AgreementCheck-mark the I accept the terms in the License Agreement check-box and click the Next buttonto continue.Custom Setup9
Click the Next button to continue.SQL Database Server ProviderSelect the sever provider on which the database will be installed.Microsoft SQL Server is recommended for better performance and an improved experience.Click the Next button to continue.SQL Database Server Instance10
If Microsoft SQL Server was selected, the SQL Database Server Instance dialog is displayed.Enter the required values and click the Next button to continue.SQL Database Server Windows AuthenticationIf Microsoft SQL Server was selected, the SQL Database Server Windows Authentication dialog isdisplayed.Enter the required values and click the Next button to continue.11
Web Server ProviderSelect the server provider on which the web application will be installed.Microsoft IIS is recommended for better performance, an improved experience, and greater security.Web Server ConfigurationIf Standalone Web Server is selected, the Web Server Configuration dialog is displayed.The setup installer will automatically open this port on the Windows firewall.Make sure network traffic on the selected port is allowed to enable accessing the CMon webapplication from a web browser.12
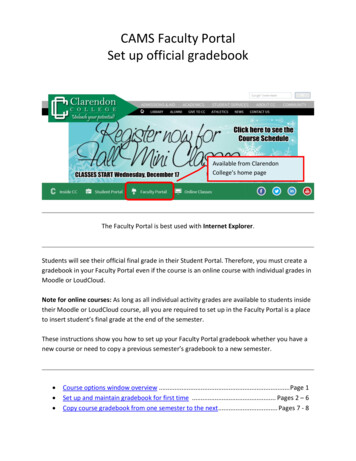
Click the Next button to continue.IIS Web ApplicationIf Microsoft IIS was selected, the IIS Web Application dialog is displayed.Make sure network traffic on the web server ports are allowed to enable accessing the CMon webapplication from a web browser.Check-mark the Redirect HTTP to HTTPS check-box to enforce requests to use HTTPS.13
Using HTTPS is recommended for greater security.The IIS Web Site in Microsoft IIS must be configured to support HTTPS.Enter the required values and click the Next button to continue.Management ServerThe Public Server Address (IP address, DNS, or computer name) and Port need to be configured inbackup client agents in order to connect to CMon.The setup installer will automatically open this port on the Windows firewall.Make sure network traffic on the selected port is allowed to enable backup client agents fromcommunicating with the CMon service.Click the Next button to continue.Ready to Install14
Click the Install button to start the installation.FinishAfter a successful installation, the Finish dialog is displayed.Check-mark the check-boxes to start the required services.Click the Finish button to exit the installation.Application Installed Successfully15
Click the OK button to close the installer.Next StepsLogging inSetting up the backup client16
Setting up the backup clientNow that you have the CMon successfully installed it's time to connect an agent to it. This section willcover how to setup the backup client software to connect to CMon.1. The first thing you need to do is install a backup client (NovaBACKUP PC, Server, or BusinessEssentials) on the machine you'd like to back up. For instructions on how to do this pleaseconsult the NovaBACKUP Quick Install Guide. By accepting all default options duringinstallation, all necessary items will be installed. Once NovaBACKUP PC, Server, or BusinessEssentials is installed we need to configure the connection to CMon. NovaBACKUP PC, Server,and Business Essentials clients require a setting to be configured in order for the backup clientto become an Agent.2. Start the NovaBACKUP client and click on the Home tab.3. From the main menu click the large circle NovaStor logo button highlighted at the top left, andthen click " Default Settings ". This will open a screen with a series of additional tabs.4. Once in " Default Settings " you will click on the " Management Server " tab. You will berequired to configure the " Server name " and " Port number " variables on this screen. Enterthe server address or IP address of the machine where CMon is installed in the "Server name"field. Enter the port number CMon is configured to use in the "Port number" field. These values17
should be the same values entered during the CMon installation. The default port number is4502. The "Default group" option on this screen will automatically place this agent into thegroup specified on the CMon. In general you do not need to enter anything in the DefaultGroup option at this point. If you do not choose a Default group this agent will be placed in the"Pending" group in CMon. 5. Click the "Start Service" button to start the service. "The service is started" is displayed whenthe service has started successfully which is required in order to connect to CMon. Click the"OK" button to save the changes. Now you have the CMon installed, the backup client installed,and the agent connected to CMon. You should now be able to login to the CMon and see theagent.6. To verify the service is an automatically starting service, open up Windows Services. Once in theServices screen, find the service named "Backup Client Agent Service". This is the service thatactually connects to the CMon so you can monitor your agent. By default this service is set toManual, go to the properties of this service and set it to Automatic (Delayed Start), and [Apply].You may now exit out of Windows Services.7. Additional agents may be connected using these same steps.18
Logging InLogging in to the CMon is as simple as opening a web browser on your computer and browsing tothe IP address, DNS name, or computer name along with the port number that you configured duringthe CMon installation; the default web port is 80. A shortcut to the website is installed on thecomputer where CMon was installed in the Start Menu in the "NovaStor" group for convenience.The CMon website should work with any modern web browser including Internet Explorer 9 andabove, Google Chrome, Mozilla Firefox as well as most smart phone web browsers.The default login Username is admin with a Password of admin.After logging in for the first time, it's recommended to change your password using the AccountManagement page.If the number of times a user fails to log in because of an invalid password exceeds the maximumnumber configured in the Web Configuration File, the user will be locked out. Use the Users page tounlock an account. To unlock the admin account, use the Server Administration Desktop Application.Users logging in or registering from the embedded web browser in the backup client willautomatically be redirected to view or create a new cloud storage account if permitted.If the "Remember me?" check box is checked, a cookie will be created which allows the user to remainlogged in for up to 7 days of inactivity by default.19
DashboardThe CMon can be utilized to monitor all of the NovaBACKUP clients and the associated backup jobs inyour environment, all from a single pane of glass interface. CMon is accessible via web browser andcan be viewed via Internet Explorer 9 , Google Chrome, Mozilla Firefox as well as most smart phoneweb browsers.The Dashboard is displayed just after login. It is an overview of your NovaBACKUP environment.The "Menu" that is displayed on the top of each page shows the various functions that can be quicklyaccessed. If the browser's width is too narrow, the menu will be collapsed and in order to expand themenu, click on the 3 horizontal lines near the top right corner of the page.On the Dashboard screen you can perform various functions.To view more details about a particular NovaBACKUP Agent in your environment, you can doubleclick on an "Agent" via the Dashboard screen. An Agent is simply a computer that is runningNovaBACKUP backup client software that was configured to utilize the CMon application formonitoring.You can hover over the circular pie-chart graphic near the bottom right of the screen to see your jobstatuses. To display jobs with all of the various types of status including Failed, Successful, Warning,Stopped, and Started jobs. PERMISSIONS REQUIREDView Dashboard20
Agents and GroupsAgents and Groups is the area in CMon where you will view all of your client software that has beenconfigured to connect to the CMon. You can create Groups here as well as print a Report of thecontents of the Agents & Groups area.Agents and Groups - Add new group function example:Adding a Group is performed by clicking the " Add new group " button as seen in this example.21
PERMISSIONS REQUIREDView Agents and GroupsEdit Groups22
Agent Details PERMISSIONS REQUIREDView Agents and Groups23
Agent DevicesThe Devices tab of the Agent's details view lists the devices on the agent.Users with permissions to edit the agent can add a new device.Double-click on the row or click the View button to view the details of a device.Related TopicsCreate DeviceView Network Device DetailsView Cloud Device Details PERMISSIONSO n e of t h e f o l l o w i n g p e r m i s s i o n s a re re q u i re d :V i e w A g e n t s a n d G ro u p sEdit Agents24
Create Agent DeviceTo add a new device, select the type of device in the Create Agent Device view.A cloud device can only be added if the agent doesn't already have a cloud device because an agentis limited to one cloud device.If a storage server is configured and the user has permissions to view cloud storage accounts, a clouddevice can be added from an existing cloud storage account.If the agent is disconnected, the device will be pending its addition until the agent reconnects.If the agent is connected and the backup client service is running, the device will get createdimmediately.Related TopicsCreate Cloud Device From Existing Cloud Storage Account Create Cloud DeviceCreate Network Device PERMISSIONS REQUIREDEdit Agents25
Create Agent Cloud DeviceTo add a cloud device to the backup client, enter the server address and user credentials, and click theAdd Device button to create the device.AccountDevice nameRequiredMaximum length is 99Default value: Cloud StorageServer addressRequiredMaximum length is 64Server portRequiredMust be between 1 and 65535Default value: 308Use Windows login credentials26
Default value: Do not use Windows login credentialsUser nameRequired if "Use Windows login credentials" is checkedMaximum length is 64PasswordRequired if "Use Windows login credentials" is checkedMaximum length is 64SecurityUse logon password as encryption keyDefault value: Use logon password as encryption keyEncryption keyRequired if "Use logon password as encryption key" is checkedMaximum length is 64Encryption key hintMaximum length is 64Advanced27
Send deleted file lists to the Backup ServerDefault value: Do not send deleted file lists to the Backup ServerLimit network bandwidthDefault value: Do not limit network bandwidthMaximum network bandwidth (kilobytes per second)Required if "Limit network bandwidth" is checkedMust be between 1 and 2097151Default value: 97Maximum CPU utilization (percentage)Must be between 1 and 100Default value: 100Temporary files folderRead-onlyDefault value: [DefaultTemporaryDirectory]The default value, [DefaultTemporaryDirectory] , will automatically get converted to an actualpath after the device is created by the agent (ex.28
C:\ProgramData\NovaStor\NovaStor NovaBACKUP\Cloud Storage\Backup )Block backups if the administrator can recover dataDefault value: Do not block backups if the administrator can recover dataTest ConnectionThe Test Connection button is available only when the agent is currently connected. PERMISSIONS REQUIREDEdit Agents29
Create Agent Cloud Device From Existing CloudStorage AccountSelect an existing cloud storage accountTo add a cloud device from an existing cloud storage account, first select the existing cloud storageaccount and click the Next button to continue.Account30
Device nameRequiredMaximum length is 99Default value: Cloud StorageUse Windows login credentialsDefault value: Do not use Windows login credentialsPasswordRequired if "Use Windows login credentials" is checkedMaximum length is 64SecurityUse logon password as encryption keyDefault value: Use logon password as encryption keyEncryption keyRequired if "Use logon password as encryption key" is checkedMaximum length is 64Encryption key hintMaximum length is 64Advanced31
Send deleted file lists to the Backup ServerDefault value: Do not send deleted file lists to the Backup ServerLimit network bandwidthDefault value: Do not limit network bandwidthMaximum network bandwidth (kilobytes per second)Required if "Limit network bandwidth" is checkedMust be between 1 and 2097151Default value: 97Maximum CPU utilization (percentage)Must be between 1 and 100Default value: 100Temporary files folderRead-onlyDefault value: [DefaultTemporaryDirectory]The default value, [DefaultTemporaryDirectory] , will automatically get converted to an actualpath after the device is created by the agent (ex.32
C:\ProgramData\NovaStor\NovaStor NovaBACKUP\Cloud Storage\Backup )Block backups if the administrator can recover dataDefault value: Do not block backups if the administrator can recover dataTest ConnectionThe Test Connection button is available only when the agent is currently connected. PERMISSIONS REQUIREDEdit AgentsView Cloud Storage Accounts33
Cloud Device DetailsAccountSecurityAdvanced34
StatusUsers with the Edit Agents role permission may edit and delete the cloud device. The device can't bedeleted if it's currently being used as the destination for a job.Test ConnectionThe Test Connection button is available only when the agent is currently connected.Related TopicsCreate Cloud Device From Existing Cloud Storage Account35
PERMISSIONS REQUIREDView Agents and Groups36
Edit Cloud DeviceAccountDevice nameRequiredMaximum length is 99Default value: Cloud StorageThe device name can only be modified if the device hasn't already been added.Use Windows login credentialsDefault value: Do not use Windows login credentialsUser nameRequired if "Use Windows login credentials" is checkedMaximum length is 64PasswordRequired if "Use Windows login credentials" is checked37
Maximum length is 64SecurityUse logon password as encryption keyDefault value: Use logon password as encryption keyEncryption keyRequired if "Use logon password as encryption key" is checkedMaximum length is 64Encryption key hintMaximum length is 64Advanced38
Send deleted file lists to the Backup ServerDefault value: Do not send deleted file lists to the Backup ServerLimit network bandwidthDefault value: Do not limit network bandwidthMaximum network bandwidth (kilobytes per second)Required if "Limit network bandwidth" is checkedMust be between 1 and 2097151Default value: 97Maximum CPU utilization (percentage)Must be between 1 and 100Default value: 100Temporary files folderRequiredMaximum length is 256Must be a valid Windows pathIf this is a local path and doesn't end with \Backup , \Backup will be appended to it.39
If this is changed to a UNC path, the contents of the previous directory will not be moved.The temporary files folder can only be changed after the device has been created on the agent.The temporary files folder can only be changed by browsing the file system, with theMove Folder. button, when the agent is connected.The temporary files folder can only be emptied, with the Empty Folder button, when the agentis connected.Block backups if the administrator can recover dataDefault value: Do not block backups if the administrator can recover dataTest ConnectionThe Test Connection button is available only when the agent is currently connected. PERMISSIONS REQUIREDEdit Agents40
Create Agent Network DeviceTo add a new network device, enter the appropriate values in the required fields marked in bold andclick the Save button.Device nameRequiredMust be uniqueMust not equal "Network"Maximum length is 99PathRequiredMust begin with a double back slashMaximum length is 259DomainMaximum length is 127User nameMaximum length is 127PasswordMaximum length is 12741
If the agent is disconnected, the device will be pending its addition until the agent reconnects.If the agent is connected and the backup client service is running, the device will get createdimmediately.The network connection must be available at the time the device is added to the agent. PERMISSIONS REQUIREDEdit Agents42
Network Device DetailsUsers with the Edit Agents role permission may edit and delete the network device. The device can'tbe deleted if it's currently being used as the destination for a job.Related TopicsCreate Network Device PERMISSIONS REQUIREDView Agents and Groups43
Edit Network DeviceThe device name can only be modified if the device hasn't already been added. PERMISSIONS REQUIREDEdit Agents44
Error updating deviceandError deleting device Error updating deviceError deleting deviceBackup clients with versions 19.4 and older may not allow the CMon to remotely control its devices.In this case, the backup client can be configured to explicitly allow the CMon to manage its devices asfollows:1. Stop the NovaStor NovaBACKUP Backup/Copy Engine (nsService) Windows service.2. Open C:\ProgramData\NovaStor\NovaStor NovaBACKUP\Profiles\nsconfig.ini in a text editorsuch as notepad for example.3. Set the following key/value pair in the [configuration] section: CMCDeviceControl 14. Save nsconfig.ini .5. Start the NovaStor NovaBACKUP Backup/Copy Engine (nsService) Windows service.Test connection fails and displays messages on themachine running the backup clientBackup clients with version 19.6.1012 and older may not be able to complete a test connectionsuccessfully, specifically when the backup client tray control is running.When the backup client tray control is running, messages on the machine running the backup clienttray control may appear with the result of the connection test.45
Agent JobsThe Jobs tab displays the jobs configured for the agent, inherited policies from its parent groups, andalso scheduled or virtual machine jobs in the backup client that aren't managed by CMon.Jobs with multiple schedules will be displayed for each schedule.If the backup client agent is disconnected, unmanaged scheduled or virtual machine jobs aren'tdisplayed.By default, the data is sorted on the Name column and has a page size of 10 records.The grid's column headers can be used to sort and filter the data.ViewClick the "View" button to view the details of a job.Currently, only the details of a file backup job can be displayed.AddClick on the Add Job button to add a new job.Currently, only file backup jobs can be added.The Add Job button is disabled if the user doesn't have permissions to edit jobs.46
DeleteClick on the Delete button to delete the job.Currently, only managed file backup jobs can be deleted.The user must confirm deleting a job.The Delete button is disabled if the user doesn't have permissions to edit jobs.If the agent is online, the job will be deleted promptly.If the agent is offline, the job will be deleted when the agent reconnects to CMon.Jobs are only marked as deleted, and will still remain in the CMon database. PERMISSIONSO n e of t h e f o l l o w i n g p e r m i s s i o n s a re re q u i re d :View Jobs and Job Histor yView Jobs LogsEdit Jobs47
JobThe Job page displays the details of a job configured for the agent managed by CMon, or scheduledor virtual machine jobs in the backup client that aren't managed by CMon.At least one selection is required.Paths have a maximum length of 512 characters.Unmanaged jobsUnmanaged jobs can't be modified so the Save button isn't displayed.Managed jobsThe job's name itself can't be modified, but the job's session name can be modified.The Save button is disabled for users without permissions to edit jobs.DestinationThe job's destination path is displayed in the destination device button.A destination must be selected in order to view the job's settings.Check boxesCheck boxes are disabled for users without permissions to edit jobs.The check boxes have three states: checked, unchecked, and mixed.48
Check-marked items and their children are included as part of the backup job.Unchecked items are not included as part of the backup job.Check boxes for items with some children included and some not included as part of the backup jobwill be displayed as a mixed check-mark.New items which exist within items that are checked or mixed checked at the time of the backup willbe included as part of the backup job.Connected agentsBy default, the tree and grid display all root backup sources available for the backup job.The available backup sources are displayed based on the agent's backup client license.Files are not displayed in the tree, and are only displayed in the grid.By default, the tree displays folders first, then followed by plug-in folders.By default, the grid displays folders first, then followed by plug-in folders, then followed by files.The Modified date and time format of folders and files are displayed in the grid according to theuser's preferences.The Size of files are also displayed in the grid.Clicking on an item in the tree displays it's children in the grid.Clicking on an item in the tree without children, or if the agent doesn't have access to that folder,doesn't display any items in the grid.Double-clicking on a row in the grid expands the item in the tree and displays its children in the grid.NetworkCheck boxes for the Network node and computers one level under the Network node are notdisplayed.When scanning the network for computers running file and folder sharing services, the backup clientagent will only detect computers which respond on port 445 within 3 seconds.The account the backup client agent service is running as will need to have permissions for thenetwork shares in order to browse to and access them.Network CredentialsThe backup client agent service queries the Windows Credential Manager to retrieve storedcredentials that can be used to connect and enumerate protected network shares, which must meet49
the following requirements:1. Credentials must be stored for the same user as the user account used to run the backup clientagent windows service (i.e. the log on user account).2. Credentials must be stored as a "Generic" type.3. Credentials must be stored using the "Local Machine" or "Enterprise" persistence type.4. The target name must match the display name (i.e. fully qualified host name) of the computer.Credentials can be saved to the Windows Credential Manager in any one of the following ways:1. Using a graphical user interface:a. Open Control Panel (User Accounts) Credential Manager.b. Click "Windows Credentials".c. Click "Add a generic credential".d. Enter the "Internet or network address", "User name", and "Password", and then click OK.2. Use a command line interface by opening an elevated Windows PowerShell and running thefollowing commands: TIPTo run PowerShell as the "Local System" (NT AUTHORITY\SYSTEM) account, PsExec can be used with thefollowing command:PsExec.exe -i -s powershell.exea. Install the PowerShell NuGet Package Provider, if it's not already installed:Install-PackageProvider -Name NuGet -Forceb. Install the CredentialManager PowerShell Module, if it's not already installed:Install-Module -Name CredentialManager -Forcec. Add a generic credential:New-StoredCredential -Type Generic -Persist LocalMachine -Target computerName -UserName userName -Password password TIPTo remove stored credentials, run the following PowerShell command:Remove-StoredCredential -Type Generic -Target computerNameIn order for the backup client service to be able to access the network resources during a backup, oneor more of the following may be required:1. Use a Network Device as the target destination of a backup job.2. Save the network credentials in the Network Credentials settings of the job.50
3. Configure the job to Run As an account with permissions to access the network resources.4. Map the network path to a network drive.5. Use a symbolic link to a network path.6. Configure the backup client service to "Log On" and run as a different user account.Disconnected agentsIf the backup client agent is disconnected, unmanaged jobs can't be displayed.Click on the Add button on the tree list tool bar to add a new item to the root.Click on the button on a tree list item to add a new child item.New items added to the tree list are check-marked by default.Click on the pencil icon to edit an item.In edit mode, click on the cancel icon to cancel editing an item.Click on the trash can icon to delete an item.The Name field is required and must be unique on the same hierarchical level.51
By default, the data is not sorted and has a page size of 10 records.The tree list's column headers can be used to sort and filter the data, and column separators to resizethe columns. PERMISSIONSO n e of t h e f o l l o w i n g p e r m i s s i o n s a re re q u i re d :View Jobs and Job Histor yView Jobs LogsEdit Jobs52
DestinationThe Path is required and has a maximum length of 256 characters.The device specified in the Path must already exist on the agent.The Media Name is required and has
IIS Web Application If Microsoft IIS was selected, the IIS Web Application dialog is displayed. Make sure network traffic on the web server ports are allowed to enable accessing the CMon web application from a web browser. Check-mark the Redirect HTTP to HTTPS check-box to enforce requests to use HT TPS.