Transcription
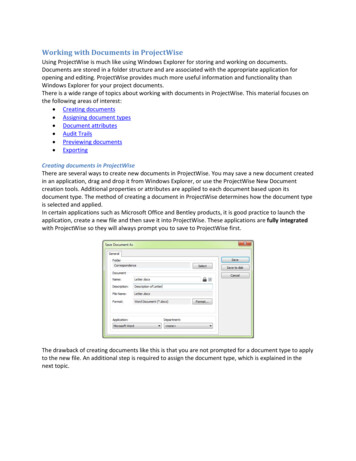
Working with Documents in ProjectWiseUsing ProjectWise is much like using Windows Explorer for storing and working on documents.Documents are stored in a folder structure and are associated with the appropriate application foropening and editing. ProjectWise provides much more useful information and functionality thanWindows Explorer for your project documents.There is a wide range of topics about working with documents in ProjectWise. This material focuses onthe following areas of interest: Creating documents Assigning document types Document attributes Audit Trails Previewing documents ExportingCreating documents in ProjectWiseThere are several ways to create new documents in ProjectWise. You may save a new document createdin an application, drag and drop it from Windows Explorer, or use the ProjectWise New Documentcreation tools. Additional properties or attributes are applied to each document based upon itsdocument type. The method of creating a document in ProjectWise determines how the document typeis selected and applied.In certain applications such as Microsoft Office and Bentley products, it is good practice to launch theapplication, create a new file and then save it into ProjectWise. These applications are fully integratedwith ProjectWise so they will always prompt you to save to ProjectWise first.The drawback of creating documents like this is that you are not prompted for a document type to applyto the new file. An additional step is required to assign the document type, which is explained in thenext topic.
You may also use the ‘drag and drop’ method of adding documents into ProjectWise. Files that arestored outside of ProjectWise can be dragged into the appropriate folder in ProjectWise. You can drag inmultiple files simultaneously. You will see a Document Info window pop up with three pick list menusfor Document Group, Document Category and Document Type.After entering the appropriate information in those pick list menus for your document, you will beprompted to Select a Wizard.Note: If you have checked the box in the past to make one of the wizards the default, this window willnot display but your default choice will be used.
Selecting No Wizard will just import the document into ProjectWise and not ask for any furtherinformation. You will need to open the Document Properties (right click on the document and selectProperties or select the document and hit the spacebar) to fill in specific document attributes basedupon the document type.
Selecting Advanced Wizard will step you through several screens of information you need to enter. Thisis the recommended wizard. The first screen sets the location. It will default to the folder where thedocument was dropped, but you may change it if that location was incorrect. Click Next.The next screen sets the template to use for the new ProjectWise document. The file you dropped intoProjectWise is automatically selected as the template. Click Next.
The next screen displays the Document Attributes. The specific attributes shown and the layout of themis based upon the document type selected earlier. The Document Group, Document Category andDocument Type fields may be blank but do not fill them in at this time. They will be automatically filledin upon completion of the wizard. The information under the Project Properties heading isautomatically filled in from other databases such as TPro and TrnsPort. You should fill in any field listedunder the Document Properties area on this screen if that information is known. You can always comeback to these attributes later using Document Properties. Click Next when complete.Do Not Fill InFill In if Known
The next screen gives you the opportunity to rename the document, give it a description, and set anoriginal version name if desired. The Application pick list should automatically choose the appropriatesoftware to use when the document is opened for viewing or editing. Click Next when complete.The next screen displays the summary of all the choices made on previous screens. When you click Nexthere, the document will be created.
The final screen displays the success of the document creation. Click Finish to complete the wizard.Note: If multiple files are dragged into ProjectWise, the same document type will be applied to all ofthem, so select your group to drag in wisely.The last method of creating documents in ProjectWise is using the built in tools in ProjectWise Explorer.This method is not recommended since this will only create a database record for the document. Theactual file itself would still need to be created using one of the methods above and then a link wouldneed to be created between the new document and the file.Assigning Document TypesIf a document was created in ProjectWise directly from an application, such as Microsoft Office or anyBentley products, you were not given the opportunity to assign a document type. You can assign thedocument type after the document is in ProjectWise by selecting the document in ProjectWise Explorer,right click on it, and select Assign Document Type.
The Document Info tool will appear with the three pick list menus for Document Group, DocumentCategory, and Document Type. Select the appropriate values and click OK.The Assign Document Type tool can be used on any existing documents in ProjectWise, such asdocuments in pilot projects that were in place prior to the availability of the tool. It can also be used tochange a document from one type to another if needed.The tool can be used to set the Document Type for multiple documents simultaneously. Select the set ofdocuments you wish to assign a type, right click, and select Assign Document Type. The choices made inthe Document Info pick lists will be applied to all of the documents in your selection.Document AttributesEach document type has a specific set of attributes. If you created documents using the AdvancedWizard as explained above, you were prompted to input the attributes for the document duringcreation. You can always view and edit the Document Attributes any time in ProjectWise by looking atthe Document Properties.To access the Document Properties, simply select the document, right click, and select Properties. Oryou can select the document and press the Spacebar on your keyboard.
The attributes are found on the Attributes Tab.As you can see by comparing the Attributes tab in the image above and the image below, the amountsand types of attributes change due to the document type.
The Document Properties area at the bottom of the window contains the attributes that need to befilled in with the appropriate information for that specific document. This information is important foruse in searching for documents throughout the ProjectWise system. Refer to the Using ProjectWiseSearches training document for more information.Document Audit TrailsEvery action taken on every document and folder stored in ProjectWise is captured in the Audit Trail.The data captured includes check in, check out, copying out, exports, and comments. The data and timeof the event and who was responsible is also captured.To access the Audit Trail of a document or folder, simply select it, right click, and select Properties. Oryou can select it and press the Spacebar on your keyboard. Click the Audit Trail tab at the top.The Comments column on the far right shows any information entered upon document check in orwhen Add Comments is selected from the right-click menu in ProjectWise Explorer.
To alter the date range, columns, and other information the audit trail displays, click on the Customize button near the bottom left corner of the window.Previewing DocumentsIn ProjectWise Explorer, the bottom right part of the application window is named the Preview Pane.This area displays valuable information about the documents or folders selected in the upper areas ofthe ProjectWise window. Information such as properties, attributes, and file dependencies are availablein their specific tabs. A visual preview of most file types is also available using Photo Preview orNavigator tabs.The Navigator tab will only preview V7 and V8 DGN files. It will allow you to zoom, pan, change leveldisplay, and view saved views. It will also display all references files attached.The Photo Preview tab will preview many other file types. It can display PDF, Word, Excel and imagefiles. It will also display V8 DGN files, but V7 DGN files are not supported.
Exporting Documents from ProjectWiseThere are occasions when a document needs to be saved outside of ProjectWise. The main reasonwould be to use an application that is not integrated into ProjectWise.ProjectWise Explorer provides two methods for exporting documents: managed and unmanaged. It isrecommended to use the managed method if possible to easily enable importing of modified documentsback into ProjectWise.To export a document from ProjectWise, select the document in ProjectWise Explorer, right click andchoose Export.The Document Export Wizard will display, offering two options.The first option is Export, which is the managed and preferred method. The document is locked inProjectWise for editing for everyone once exported and can be imported back into ProjectWise later.The second option is Send to Folder, which makes a separate copy of the document in the location ofyour choosing. The ProjectWise version remains editable since it is completely disconnected from theexported copy. This method does not allow importing of the document back into ProjectWise. Youwould need to drag and drop it back into ProjectWise.
After making your selection and clicking Next, the next step is to determine the location of the exporteddocument. Click the Browse button to set the appropriate folder for the Export. Click Next to start theexporting process.Once the export process is complete, you will see the success screen. Click Finish to exit.
If you chose the first Export option (managed), and you are ready to import the modified document backinto ProjectWise, there are two ways to perform the operation. First, you can locate the exporteddocument in ProjectWise Explorer, right click, and select Import.You will be prompted for a comment as in any document check in procedure. When you click OK thedocument will be imported back into ProjectWise.The other method to import the document back into ProjectWise is to use the Local DocumentOrganizer. This is useful for importing multiple documents from several locations in ProjectWise since allexports will be listed together.Click on the Exports icon to see a list of all your exported documents. Select the documents in the listyou wish to import, right click on them, and choose Import. The comments window will display allowingyou to add comments upon the check in of the document.
Windows Explorer for your project documents. There is a wide range of topics about working with documents in ProjectWise. This material focuses on the following areas of interest: Creating documents Assigning document types Document attributes Audit Trails Previewing documents Exporting . Creating documents in ProjectWise