Transcription
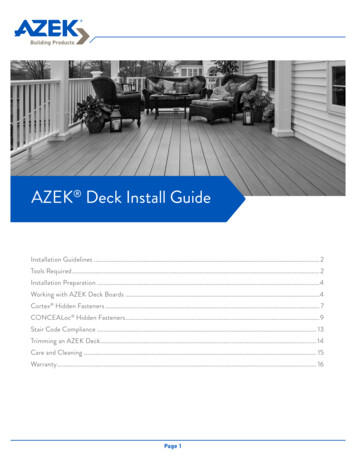
AZEK PaversAZEK Pavers Install GuideInstallation Guidelines.2Expansion and Contraction, Care and Cleaning.3Installation Instructions - All Applications. 4-8Installation Instructions - Flat Roof. 9-10Installation Instructions - Deck Resurfacing. 11-12Installation Instructions - Concrete Resurfacing.13Installation Instructions - Non-Permeable Applications. 14-18Installation Instructions - Permeable Applications. 19-20Installation Instructions - Bullnose and Transition Pavers. 21-22
Installation Guidelines for AZEK PaversVisit AZEK.com/azek-deck/installation/ to view AZEK installation videos.Installation GuidelinesAZEK Pavers should be installed in accordance with the local building codes and the installation guidelinesincluded below. AZEK Building Products, Inc. accepts no liability or responsibility for the improper installationof this product. AZEK Pavers may not be suitable for every application and it is the sole responsibility of theinstaller to be sure that AZEK Pavers are a fit for the intended use. Since all installations are unique, it is alsothe installer’s responsibility to determine specific requirements for each application. AZEK Building Productsrecommends that all applications be reviewed by a licensed architect, engineer or local buildingofficial prior to installation.Tools RequiredNOTE: Some items are application specific Landscape Applications Only Hammer 4' Level Broom Shovel Metal Spikes Hand or Vibratory Plate Compactor (2) 3/4" Pieces of Conduit Safety Glasses,Gloves, & Ear Plugs Marker Hand Dolly Edging Caulking Gun Adhesive (forrecommended types)AZEK.com/gluingpavers Utility Knife Jigsaw or Miter Saw 5-6 tpi jigsaw blade 10" 24 tooth mitre sawblade 12" 32 tooth mitre sawblade AZEK.com/cuttingpaversSTOP! Read this section before you start!For most current care and cleaning, technical information and more, visit AZEK.com. Do not install where standing, above-ground waterconditions are anticipated. Proper sub base gradingand other storm-water management designs shouldprevent the appearance of water at grade-level. Inareas where small pooling occurs, adhesive canbe used to affix the pavers to the grids to increaseinstallation integrity. Do not install where high volume vehicle traffic isexpected (e.g. crosswalk). AZEK Pavers are designedfor low volume, low speed vehicle traffic (e.g.driveways, parking lots). Do not install for use as a fire pit. Grills and fire bowlsmay be used when placed over a fire mat to preventany damage from burning embers. Failure to install AZEK Pavers in accordance withapplicable building codes and this InstallationGuide may lead to personal injury, affect productperformance and void the product warranty.Please call AZEK Customer Service at1-877-ASK-AZEK or visit our Support Centerat AZEK.comExtreme Heat WarningBe aware of excessive heat on the surface of AZEK products from external sources, such as but not limited to, fire orreflection of sunlight from energy-efficient window products. Low-emissivity (Low-E) glass can potentially harm AZEKproducts. Low-E glass is designed to prevent passive heat gain within a structure and can cause unusual heat buildup on exterior surfaces. This extreme elevation of surface temperatures, which exceeds that of normal exposure, canpossibly cause AZEK products to melt, sag, warp, discolor, increase expansion/contraction, and accelerate weathering.Current or potential AZEK customers that have concerns about possible damage by Low-E glass should contact themanufacturer of the product which contains Low-E glass for a solution to reduce or eliminate the effects of reflectedsunlight.Page 2
Working with AZEK PaversExcessive Construction DebrisIt is important during construction, the Paver surface stay clear from excessive build-up of dirt, sand, and dust fromtile, concrete, landscape blocks, or any other masonry products. If these materials are not removed immediately, thePaver surface will become difficult to clean and can potentially damage the Paver's surface finish.Do not use AZEK Pavers as a work surface.If a build-up does occur please refer to the Care and Cleaning section in AZEK’s installation guide or website,AZEK.com.Expansion and ContractionAZEK Pavers will expand and contract with temperature change (similar to other composite materials). Below is a tablewith measures to account for this expansion.APPLICATIONSTANDARD PAVERPERMEABLE PAVER Leave 1" gap between all damageableprotrusionsFLAT ROOF Leave 1/2" gap between rigid protrusionsN/ARESURFACING PAVER Below 70 F, leave a 5/8" gap between allprotrusions. Above 70 F, leave a 1/2" gap between allprotrusions Leave 1" gap between all damageable Leave 1" gap between all damageableprotrusionsprotrusionsLANDSCAPE Place 4" concrete ribbon between pavers and Place 4" concrete ribbon betweenasphaltpavers and asphaltRESURFACEN/AN/AN/A Below 70 F, leave a 5/8" gap between allprotrusions. Above 70 F, leave a 1/2" gap between allprotrusionsCare and CleaningStorage & Handling Store AZEK Paver products on a flat and level surface. Units of AZEK Pavers are shipped from the manufacturer in a protective cover. Replace the cover over any remainingproduct if it is removed. If the covering is no longer available, take care to keep the product free from dirt and debris. If stored outdoors, the product must be covered with non-translucent material.Care & Maintenance AZEK Pavers require virtually no maintenance other than occasional replenishment of joint sand and any necessaryclean-up from spills or periodic maintenance cleanings as desired. Most surface spills and stains can be cleaned using household cleaners and warm water. Chemical spills (e.g. petroleum, paint) should be cleaned as soon as possible with an appropriate industrial cleaner andrinsed thoroughly with water. Chemical spills or stains left untreated over long periods of time may degrade the surfacefinish and integrity of the product and are not covered under warranty. AZEK Pavers can be cleaned using a pressure washer. Be sure to use a wide fan and keep tip far enough away from thesurface to not score the product. Always check the compatibility of cleaning products with plastics and rubber prior to using on AZEK Pavers.Page 3
Installation Instructions - All Applications1DESIGN, PATTERN & COLOR CHOICECalculate Square-Footage:Measure the dimensions of the area to be resurfaced and calculate the total squarefootage. Be sure to add extra to the measured square footage to allow for scrap and tohave a few extras on hand in case of future damage.Calculate Amount of AZEK Paver Product Required:A full grid of AZEK Pavers includes a 16.0" x 16.0" grid filled with pavers (4 to 16pavers depending on their size). Each grid covers 1.78 square feet. To calculate howmany grids are needed, divide the total square footage of the project by 1.78.MEASUREMENTSREQUIRED NUMBER OF GRIDSlength x width sq. ft.SINGLE COLOR BLENDTWO COLOR BLENDTHREE COLOR BLEND50 sq. ft.29 grids30(15 of each color)30(10 of each color)100 sq. ft.5857 grids(29 of each color)57(19 of each color)250 sq. ft.141 grids142(71 of each color)141(47 of each color)500 sq. ft.282 grids282(141 of each color)282(94 of each color)Pick Colors:AZEK Pavers come in five brilliant colors that can be used by themselves orcombined to create unique blends. To help select the colors for your project, videos/browse-photos.aspxNOTE:AZEK Paversallow for anyshape installation,including straightand curved edges.Page 4
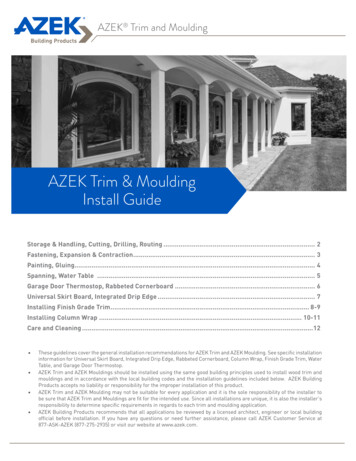
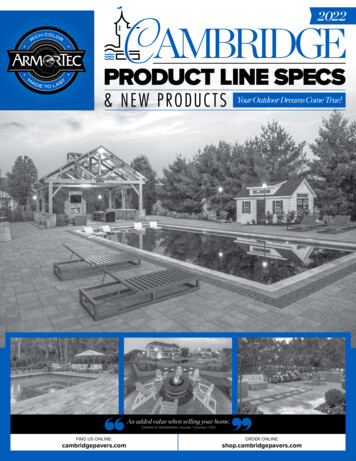
Installation Instructions - All ApplicationsIMPORTANT:Choose Pattern:At least one pavermust connecttwo grids in eachdirection.AZEK Pavers can be installed in a multitude ofdifferent patterns and combinations. Designs caninclude small and large repeating patterns. Someexample patterns are provided below:At least one paver must connect two grids in eachdirection. The herringbone pattern does this withoutneeding to specially orientatethe grids.Here is how the grids must be orientated to assureoverlap in all directions for other patterns:Herringbone:This is the most popular and easiest to install pattern.Pavers will interlock grids in both directions. Lay the installation grids as illustrated at left. Start laying pavers at the starting corner.Basketweave:This is the simplest installation method for aBasketweave pattern, but it will require extrainstallation grids. (Visit spx to learn how to installwithout extra grids) The starting paver must be laid 4" down and 4" overfrom the top left corner of the grid. This will shiftthe pattern over and assure at least one paver willconnect two grids in both directions. The leftover grid can either be trimmed off, or a 4"border can used to fill in the extra space.Running Bond:This pattern will require the staggering of gridsto assure the pavers will connect them in bothdirections. The starting paver can be laid in the top left corner,but the next column of grids must be staggeredhalfway down the starting row. Every other columnwill need one half grid at the top. Each half of the cut grid can be used.Page 5
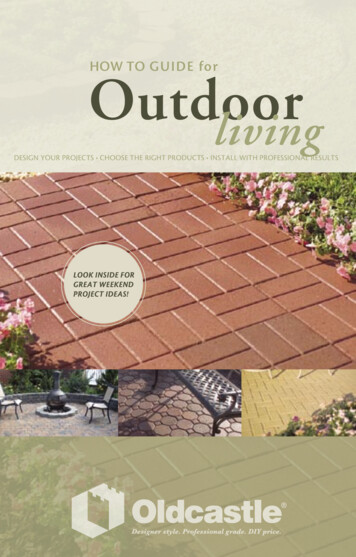
Installation Instructions - All Applications8x8, 4x8, and 4x4 Paver PatternsIMPORTANT:At least one pavermust connecttwo grids in eachdirection.STARTING CORNERChoose Pattern:AZEK Pavers can be installed in a multitude of different patterns and combinations.Designs can include small and large repeating patterns. Some example patterns areprovided below:At least one paver must connect two grids in each direction.STARTING CORNERPlain Weave: 8 x 8 - 57.1% 4 x 8 - 28.6% 4 x 4 - 14.3% Lay the installation grids as illustrated at left. Start laying pavers at the starting corner. Compatible with 4" and 8" soldier course borders.STARTING CORNERSTARTING CORNERBlock Lattice: 8 x 8 - 44.4% 4 x 8 - 44.4% 4 x 4 - 11.1% Lay the installation grids as illustrated at left. Start laying pavers at the starting corner. Perimeter 8" x 8" pavers can be replaced with4" x 8" pavers to create an 8" soldier courseborder.STARTING CORNERSTARTING CORNERSoldiered: 8 x 8 - 25% 4 x 8 - 50% 4 x 4 - 25% Trim Grids as illustrated at left. All parts of quarter Grids and half Grids can be used. Lay the installation grids as illustrated at left. Start laying pavers at the starting corner. Adding 4" or 8" soldier course would eliminate theneed to cut grids.Page 6
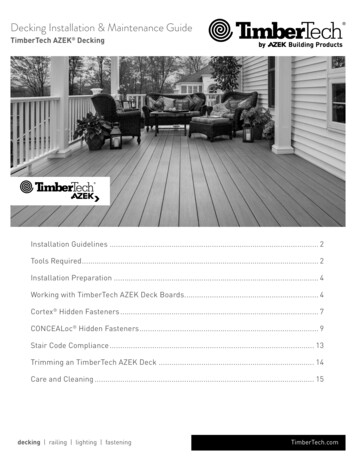
Installation Instructions - All Applications2LAYING AZEK PAVERS Choose your starting point based on the project dimensions and desiredlook, keeping in mind any cutting that may need to happen.NOTE:Mix multiple palletsof the same colorwithin an installationto disperse anypotential slightvariations in shade. Begin by laying a handful of AZEK’s patented installation grids in thearrangement that matches your pattern to ensure pavers overlap grids inboth directions. To increase installation speed, order extra installation grids to get started. Bring over grids full of pavers, dump them next to where they will be placedinto the grid, and place the empty grids into place. If mixing colors, bring over the ratio of colors being used and dump themin front of the person laying pavers. For example, for a pattern using 40%Boardwalk, 40% Olive, and 20% Waterwheel. The carrier would bring over 2grids of Boardwalk, 2 grids of Olive, and 1 grid of Waterwheel each time. Begin laying pavers in the desired pattern; ensuring pavers are overlappinggrids in both directions. When the edge is reached, grids can be cut to fit using a jigsaw or mitersaw, and a low tooth count wood ripping blade. Continue laying pavers until all full pavers (i.e. not cut or trimmed) areinstalled. If the perimeter grid is less than 4", cut 4" or 8" off of the interior adjacentgrid to increase the size of the perimeter grid. See example below.One example of cutting grids for optimal layout16” Grid 3” GridREMINDER:Installation grids mustbe orientated to allowthe pattern of pavers tointerlock grids in bothdirections.Page 78” Grid 11” Grid
Installation Instructions - All Applications3CUTTING INDIVIDUAL GRIDS AND PAVERS Pavers can be cut to any shape using a jigsaw or miter saw, and a low tooth countwood ripping blade. If using a miter saw, it works best to place the paver on a grid while cutting it. Thisallows the person cutting the product to both have more support holding the paverand keeps their fingers farther away from the blade. Short, quick motions with amiter saw also work better. Slow, continuous cuts may cause binding and warpingof the blade. For pavers cut to dimensions smaller than half a paver, adhere the paver to the gridusing a recommended adhesive. Use the recommended cutting equipment (see page 2). For more info, tIMPORTANT:Always wear safetyglasses and ear plugswhen trimming paversor grids. Obey allsafety and operationalinstructions thatcame with the cuttingequipment.Page 8
Installation Instructions - Flat RoofAZEK Resurfacing or Standard Pavers OnlyIMPORTANT:AZEK Pavers are a luxurious, low-maintenance covering that installs over an existing or new flat roof.AZEK Pavers are not a structural replacement for flat roof surfaces, and are not suited for all flat roofapplications. Please consider wind-uplift and fire rating guidelines, along with the weight capacity of theroof when designing a project. Always consult your AZEK Representative for the recommended rooftopadhesion guidelines for your specific project.IMPORTANT:AZEK Pavers are designed to be a flat roof covering installed over a waterproofed, structural flat roofsurface. AZEK Pavers are NOT a structural replacement for flat roof surfaces, and therefore, should NEVERbe used as the structural element of the roof, as a ballast system, or in pedestal applications. Prior toinstalling, be sure to verify that the flat roof can support the addition of AZEK Pavers.Sub-Structure Requirements The roof structure must meet all required codes. The system is designed for installation over a “low-sloped” roof (between 1/8" per foot and 1/2" slopeper foot). The rooftop surface must have adequate drainage to meet local codes. The surface must be free from substantial undulations or “waves”. Door and other thresholds must be able to accommodate the minimum added height.PAVERS ONLYDRAINAGE MATCOMBINED HEIGHT(Installed on Grids)(EnkaDrain 3801)(Pavers & Drainage Mat)RESURFACING PAVERS1.75"0.30"2.05"STANDARD PAVERS2.38"0.30"2.68"Importance of Sheet DrainA drainage mat is required for flat roof applications over waterproofing membranes. It serves to both protect themembrane from abrasion and allows a pathway for water to escape to the drains. AZEK Pavers recommends usingEnkaDrain 3801 or another comparable sheet drain.**Helpful Hint: For small undulations in the flat roof surface, scrap pieces of rubber membrane can beused as shims. This will help create a smoother top surface once the AZEK Paver system is installed.Page 9
Installation Instructions - Flat RoofAZEK Resurfacing or Standard Pavers Only1INSTALL DRAINAGE MATIMPORTANT:Follow drainagemat manufacturers’installationrecommendation Before beginning installation, inspect and approve quality of subsurfacewaterproofing and insulation to ensure that it is acceptable for subsurface draininstallation and that the plaza has adequate slope to drain the area properly. Clean the area of any loose debris. Start at the edge and install the drainage mat with the fabric flap facing theperimeter edge, and the length of the roll going with the slope of the roof. Cut it to length so that there is a 1/2" gap between the material and all walls andprotrusions. Apply a bead of construction adhesive 0.125" to 0.25" in a zigzag pattern along theedge of the strip of drainage mat without the fabric overlap. Install the next strip ofdrainage mat — overlapping and bonding the fabric flap onto the previous strip. Repeat procedure until entire plaza deck floor is covered. Remove excess material from last strip without eliminating the fabric overlap. Be sure to cut drainage mat around any drains or where water must escape. DO NOT adhere the material to the waterproofing membrane.2ADHERING PAVERS TO GRIDIn certain cases, pavers must be adhered tothe grid for security (e.g. cut pavers, winduplift conditions, around drains or wherepotential standing water could exist, stairs).Consult your AZEK Paver representative in allapplications where wind uplift is a concern forrecommendations. Using a recommended adhesive (see page2) place a 1/4" bead across the top ribs ofthe grid. Place the paver in the grid and press downfirmly. Let pavers sit undisturbed for duration ofadhesive cure time. A 28 oz. tube of adhesive will coverapproximately 25 square feet.Page 103SECURING PERIMETER PAVERSEach application is different, and theperimeter must be secured accordingly. AZEKPavers recommends adhering a minimum of16" around the perimeter. For applicationsthat do not end at a wall or parapet, AZEKResurfacing Bullnose Pavers or AZEKResurfacing Transition Pavers can be used tofinish off the open perimeter. See pages 21 or22 for installation details.
Installation Instructions - Deck ResurfacingAZEK Resurfacing Pavers OnlyDo not sweepsand in paverjoints on flatroofs.Finishing The ProjectAZEK Pavers should NOT be filled with joint sand when installed on a flat roof. Forspecific application questions please call (877) ASK-AZEK.IMPORTANT:AZEK Pavers are designed to be a deck covering installed over a structural deck surface. AZEK Pavers areNOT a structural replacement for a deck surface, and should NEVER be used as the structural element ofthe deck. Prior to installing, be sure to verify that the deck can support the addition of AZEK Pavers.Sub-Structure Requirements The deck structure must meet and maintain all local codes. Any existing deck boards must be flat and have no protruding or loose fasteners. The boards should be made from rot / mildew resistant materials. Consider using a water sealant where appropriate. A 5/4" treated deck board is recommended for a new deck surface under thepavers. Door and other thresholds must be able to accommodate the 1-3/4" added height. Refer back to page 7 for laying AZEK pavers.Edging and TrimTo secure the perimeter, there are a couple common methods:Use AZEK Resurfacing Bullnose Pavers: Refer to page 21 for installation guidelines.Use AZEK Resurfacing Transition Paver: Refer to page 22 for installation guidelines.Use a Skirt Board Around the Perimeter: A skirt board can be installed around the open perimeters (not against the house). Install the skirt board 1-3/4" above the deck surface to meet up with the height of thepavers. Fasten the skirt board with the appropriate fasteners. Remember to leave the appropriate expansion gap between the paversand the skirt board. Refer to the “Account for Expansion” section on page 3 for moreinformation.Page 11
Installation Instructions - Deck ResurfacingAZEK Resurfacing Pavers OnlyCovering StairsIMPORTANT:Do not sweepsand in paverjoints on decksDeck stairs can be covered in a similar fashion as the deck surface, but a few moresteps are needed.Screw Grids to the Stair Treads:In all stair applications it is required tofasten the grid to the stair tread withdeck screws. Use 1.5" deck screws. Screw each grid to the stair tread withfour screws, each placed approximately 2" in from the corners.Adhering Pavers to Grid:OPTIONAL: To reduce movement of the pavers, a recommended adhesive can beused between the pavers and the grid. Some customers may prefer this in hightraffic areas (e.g. outside of doors, at the top of steps). Using a recommended adhesive (see page 2) place a 1/4" bead across the top ribsof the grid. Place the paver in the grid and press down firmly. Let pavers sit undisturbed for duration of adhesive cure time. A 28 oz. tube of adhesive will cover approximately 25 square feet.Edging and Trim:In a similar fashion as edging the surface of the deck, the stairs must also be edgedto secure the pavers in place and give them a finished look.Use a Skirt Board for the Riser and Side Trim: Run the skirt board up 1-3/4" above the deck surface to meet up with the height ofthe pavers. Fasten the skirt board with the appropriate fasteners.Use AZEK Resurfacing Bullnose Pavers: Refer to page 21.AZEK Pavers should not be filled with joint sand when installed on a deck. Forspecific application questions, please call 1-877-ASK-AZEK or visit our SupportCenter at AZEK.com.Page 12
Installation Instructions - Concrete ResurfacingAZEK Resurfacing Pavers OnlyIMPORTANT:Water will flow out underneath the AZEK Paver system. The surface being covered shouldbe sloped appropriately (typically 1 inch every 6 feet).AZEK Resurfacing Pavers and Resurfacing Accessories are not designed nor recommendedfor vehicular traffic.Sub-Structure RequirementsAZEK Pavers are designed to cover an existing hardscape free from major undulations.AZEK Pavers will contour to the surface in which they are resting, and will reflect anyimperfections. The following techniques can be used to reduce undulations: A self-leveling concrete or similar product can be used to fill in anylow areas. High areas can be knocked down and evened out to create a smooth surface. It does not need to look good, as the resurfacing pavers will cover it. Door and other thresholds must be able to support 1-3/4" added height. Refer to page 7 for laying AZEK Pavers.Edging the PerimeterTo secure the perimeter, there are a couple common methods when the perimeter isup against a penetrable surface (e.g. dirt, grass):IMPORTANT:Do not sweepsand in paverjoints on decksUse AZEK Resurfacing Bullnose or Transition Pavers: Refer to pages 21 or 22 for installation guidelines.Use a Paver Restraint: A paver restraint (e.g. plastic, aluminum) can be used around any perimeter notbordered by an existing structure. Pound 10 inch metal spikes through the edging and into the ground every 6 to 12inches. Back fill up to the edging with dirt, sod, or other landscaping material.Use a Recommended Adhesive:An alternative way to edge the pavers is to adhere the pavers to the grid 12" aroundthe perimeter. Do not adhere the grid to the substructure. Using a recommended adhesive (see page 2) place a 1/4" bead across the top ribsof the grid. Place the paver in the grid and press down firmly. Let pavers sit undisturbed for duration of adhesive cure time. A 28 oz. tube of adhesive will cover approximately 25 square feet. Back fill up to the edge of the pavers with dirt, sod, or other landscaping material.AZEK Pavers should not be filled with joint sand when used in a resurfacingapplication. For specific application questions, please call1-877-ASK-AZEK or visit our Support Center at AZEK.com.Page 13
Installation Instructions - Non-Permeable LandscapeAZEK Standard Pavers Only1SITE PLANNING AND MARKINGMark Project Area:Once the project layout has been determined, mark or spray paint the overalloutline, approximately twelve inches wider than the planned installation area. Thiswill provide the additional excavation area needed for installing edging. Any paversthat abut structures or other paved areas will not require installed edging andtherefore do not require the additional twelve inches of excavation.IMPORTANT:Locate Utilities. Prior to beginning the installation, ensure all underground utilities(e.g. electrical lines, phone lines, water lines) have been properly located and identified.2BASE MATERIAL DESIGN (Non-Permeable)The subgrade is the existing soil or surface that the installation will be built upon.Subgrades that are primarily clay or silt are the weakest subgrades and typicallyrequire additional base material.Geotextile material can be used to help prevent poor subgrade conditions frommixing with the base material. Heavy foot or vehicular traffic conditions are alsogood conditions for using geotextiles. The geotextile will be placed between thesubgrade and the base material.Base material should be a dense graded aggregate. Aggregate graded to 3/4" minusis a commonly used base material, often referred to as “class 5” or “road base.”Please refer to local requirements and specifications or ASTM D 2940 for furtherinformation. Do not use stone dust or screedings.IMPORTANT:The preparation of the site and base material is critical to a long lasting, flat and premium lookinginstallation. Also, a properly prepared site will reduce installation time. Please contact a landscapeprofessional if required.Page 14
Installation Instructions - Non-Permeable LandscapeAZEK Standard Pavers OnlyIMPORTANT:These are general guidelines only and all base requirements vary by soil conditions, weatherconditions, and other site-specific conditions. Areas that see freeze-thaw cycles or have wet, clay or silttype subgrades generally require a deeper base. Consult a landscape professional for more customizedbase recommendations.Patios, Walkways, Plazas, Other Foot Traffic4 to 6 inchesDriveways, Other Light Traffic6 to 12 inchesParking Lots, Fire Lanes, Other Heavy TrafficConsult Landscape ProfessionalThe base material needs to be compacted every 2" as it is spread out. This willreduce any chance of the base material settling over time making the installationuneven.Additional resources for base design can be found at:ICPI Project Drawings (www.icpi.org)Slope:It is very important to slope the base in the direction that water is preferred to go.The typical slope is approximately 1 inch over 6 feet.Sand Bed:A layer of bedding sand is spread out on top of the compacted base material. Thislayer should be a maximum of 3/4" to 1". This will create a workable surface for thepavers to be installed upon and will make it easier to make the installation even. Use coarse sand that is washed and conforms to ASTM C 33. Do not use mason sand, stone dust, or sands with excess fine particles.3EXCAVATIONTo install the necessary base material, the existing ground material must be takenout. To calculate how deep to excavate, add up these layers:Excavation Depth Base Material Thickness Sand Bed Thickness 2.38"(Pavers) - 1/4"Once the excavation depth is known: Excavate site to the appropriate depth. Try not to disturb the subgrade beneath the required depth. The subtraction of 1/4" leaves room for compaction that occurs during the finaltamping. Level and compact the subgrade to a 95% proctor density (ASTM D 698) Always have the compaction formally tested to ensure it meets the requiredstandards.Page 15
Installation Instructions - Non-Permeable LandscapeAZEK Standard Pavers Only4INSTALL BASE MATERIAL AND SAND BEDInstall and Compact Base: Add base material 2" at a time. Compact each layer completely with a plate compactor or hand tamper. Compact to 95% proctor density (ASTM D 698).IMPORTANT:Be sure to installbase material atthe proper slope.This should beapproximately 1inch over 6 feet toensure sufficientwater drainage.Do not use sand tolevel depressionsin the base layer.Instead, add basematerial to levelthe area. Be sure to compact all edges and corners thoroughly as these are at the mostrisk to degradation. Limit any undulations to under 1/4" to limit any dips or humps in thefinal installation.Install and Level Sand Bed: Add a 3/4" to 1" layer of bedding sand. Lay down two parallel pieces ofconduit (3/4" or 1" diameter). Place bedding sand between the twopieces of conduit and pull a screedboard or straight edge down theconduit to level the sand out. Add sand to areas that are uneven and re-level. Pull the conduit out and fill in the area, leveling with a trowel or float. Do not compact the bedding sand. Refer back to page 7 for laying of AZEK Pavers.Decide on Border / Soldier Course:The AZEK Paver system allows for several border and soldier course options. Thesecan either be straight or curved. The accessory pavers can help limit the cutting andgive a finished look to the project.Page 16
Installation Instructions - Non-Permeable LandscapeAZEK Standard Pavers Only5INSTALL BORDERS AND ACCESSORY PAVERSIf the project requires curved or straight borders the accessory pavers can eliminatemuch of the cutting. These include legless full pavers and wedge pavers. Draw the shape of the desired border onto the pavers that will need to be cut.Laying the accessory pavers on top of the other pavers and tracing the interioredge is the easiest. A string line may also be used. Cut the pavers on the line in place using a jigsaw (do not cut through the grid), orusing a miter saw. Place the legless full and/or wedge pavers on top of installation grids to create theborder. To calculate the number of full and wedge pavers needed for a given radius,visit AZEK.com/technical-center/installations/pavers Use a recommended adhesive between the accessory pavers and the grid(see page 2).6INSTALL EDGINGEdge Restraints:IMPORTANT:When installed upagainst asphalt,a 4" wide ribbonof concrete thedepth of thebase material isrecommended. Ifabutted directly toasphalt, expansionof the AZEK Paversystem may pushthe asphalt andcause it to buckle.AZEK Pavers require the use of an edge restraint around the perimeter. Edgerestraints help ke
Page 6 Choose Pattern: AZEK Pavers can be installed in a multitude of different patterns and combinations. Designs can include small and large repeating patterns. Some example patterns are provided below: At least one paver must connect two grids in each direction.