Transcription
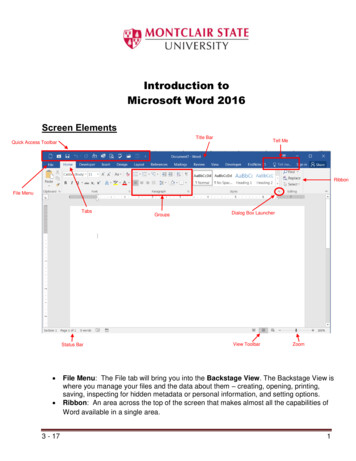
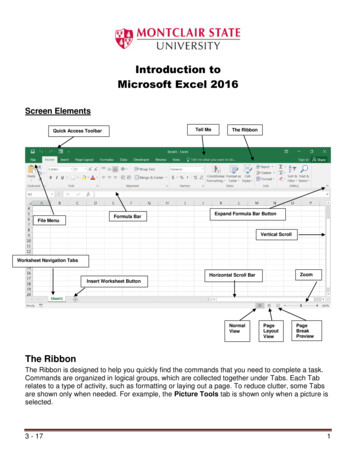
Introduction toMicrosoft Excel 2016Screen ElementsTell MeQuick Access ToolbarFile MenuFormula BarThe RibbonExpand Formula Bar ButtonVertical ScrollBarWorksheet Navigation TabsZoomLevelHorizontal Scroll BarInsert Worksheet ButtonNormalViewPageLayoutViewPageBreakPreviewThe RibbonThe Ribbon is designed to help you quickly find the commands that you need to complete a task.Commands are organized in logical groups, which are collected together under Tabs. Each Tabrelates to a type of activity, such as formatting or laying out a page. To reduce clutter, some Tabsare shown only when needed. For example, the Picture Tools tab is shown only when a picture isselected.3 - 171
File MenuHere you will find the basic commands such as open, save, print, etc.Quick Access ToolbarThe place to keep the items that you not only need to access quickly, but want to be immediatelyavailable regardless of which of the Ribbon's tabs you're working on. If you put so many items onthe Quick Access Toolbar that it becomes too big to fit on the title bar, you can move it onto its ownline.Tell MeThis is a text field where you can enter words and phrases about what you want to do next andquickly get to features you want to use or actions you want to perform. You can also use Tell Me tofind help about what you're looking for, or to use Smart Lookup to research or define the term youentered.Formula BarA place where you can enter or view formulas or text.Expand Formula Bar ButtonThis button allows you to expand the formula bar. This is helpful when you have either a longformula or large piece of text in a cell.Worksheet Navigation TabsBy default, every workbook starts with 1 sheet.Insert Worksheet ButtonClick the Insert New Worksheet button to insert a new worksheet in your workbook.Horizontal/Vertical ScrollAllows you to scroll vertically/horizontally in the worksheet.Normal ViewThis is the “normal view” for working on a spreadsheet in Excel.Page Layout ViewView the document as it will appear on the printed page.Page Break PreviewView a preview of where pages will break when the document is printed.Zoom LevelAllows you to quickly zoom in or zoom out of the worksheet.2
Navigating in the Excel EnvironmentBelow is a table that will assist you with navigating/moving around in the Excel environment.KeyDescriptionARROW KEYSMove one cell up, down, left, or right in a worksheet.SHIFT ARROW KEY extends the selection of cells by one cell.BACKSPACEDeletes one character to the left in the Formula Bar.Also clears the content of the active cell.In cell editing mode, it deletes the character to the left of theinsertion point.DELETERemoves the cell contents (data and formulas) from selectedcells without affecting cell formats or comments.In cell editing mode, it deletes the character to the right of theinsertion point.ENDMoves to the cell in the lower-right corner of the window whenSCROLL LOCK is turned on.Also selects the last command on the menu when a menu orsubmenu is visible.CTRL END moves to the last cell on a worksheet, in the lowestused row of the rightmost used column. If the cursor is in theformula bar, CTRL END moves the cursor to the end of the text.CTRL SHIFT END extends the selection of cells to the last usedcell on the worksheet (lower-right corner). If the cursor is in theformula bar, CTRL SHIFT END selects all text in the formula barfrom the cursor position to the end—this does not affect theheight of the formula bar.ENTERCompletes a cell entry from the cell or the Formula Bar, andselects the cell below (by default).ESCCancels an entry in the cell or Formula Bar. Closes an openmenu or submenu, dialog box, or message window.HOMEMoves to the beginning of a row in a worksheet.CTRL HOME moves to the beginning of a worksheet.PAGE DOWNMoves one screen down in a worksheet.PAGE UPMoves one screen up in a worksheet.SPACEBARIn a dialog box, performs the action for the selected button, orselects or clears a check box.CTRL SPACEBAR selects an entire column in a worksheet.SHIFT SPACEBAR selects an entire row in a worksheet.CTRL SHIFT SPACEBAR selects the entire worksheet.TABMoves one cell to the right in a worksheet.3
Highlighting/Selecting Areas Using the MouseSelect cells:Moves a cell’s contents:Activate the Autofill feature:.To Select a Column: Click on the column letterTo Select a Row: Click on the row numberTo Select the Entire Worksheet: Click above row 1 and to the left of column A or hit CTRL A onthe keyboardEntering TextAny items that are not to be used in calculations are considered, in Excel’s terminology, labels.This includes numerical information, such as phone numbers and zip codes. Labels usually includethe title, column and row headings.To Enter Text/Labels:1) Click in a cell2) Type text3) Press EnterNOTE: By default, pressing the Enter key will move you to the cell below the active cell.The label actually “lives” in the cell you typed it into. If you type long text it might appear to be inmultiple columns. It is important to understand this concept when trying to apply formatting to acell. Using the formula bar will confirm where the label actually “lives.”AutofillFrequently, it is necessary to enter lists of information. For example, column headings are often themonths of the year or the days of the week. To simplify entering repetitive or sequential lists ofinformation, Excel has a tool called Autofill. This tool allows preprogrammed lists, as well ascustom lists, to be easily added to a spreadsheet.4
Entering ValuesNumerical pieces of information that will be used for calculations are called values. They areentered the same way as labels. It is important NOT to type values with characters such as “,” or“ ”.To Enter Values:1) Navigate to a cell2) Type a value3) Press EnterCreating FormulasFormulas perform calculations or other actions on the data in your worksheet. A formula starts withan equal sign ( ). It is possible to create formulas in Excel using the actual values, such as“4000*.4” but it is more beneficial to refer to the cell address in the formula, for example “D1*.4”.One of the benefits of using a spreadsheet program is the ability to create a formula in one cell andcopy it to other cells. Most spreadsheet formulas use a concept called relative referencing.This is the explanation of relative referencing from Excel’s help file:“A relative cell reference in a formula, such as A1, is based on the relative position of the cell thatcontains the formula and the cell the reference refers to. If the position of the cell that contains theformula changes, the reference is changed. If you copy the formula across rows or down columns,the reference automatically adjusts. By default, new formulas use relative references. For example,if you copy a relative reference in cell B2 to cell B3, it automatically adjusts.”It is also important to know the operators Excel uses for formulas:Operator (Key) */FunctionBegins all Excel functions and o Create a Formula:1) Click in a cell2) Press the key3) Type the formula4) Press EnterCopying FormulasLike many things in Excel, there is more than one way to copy formulas. Feel free to choose whatworks best for you.To Copy Formulas Using Autofill:1) Click in the cell that contains the formula2) Position the mouse on the Autofill handle (a thin black cross will appear)3) Click and drag to copy the formula5
To Copy Formulas Using Copy and Paste:1) Click in the cell that contains a formula2) Select Copy on the Home Ribbon in the Editing group3) Highlight the cell where you would like to paste the formula4) Select Paste on the Home Ribbon in the Editing groupALTERNATE METHODSKeyboard:Ribbon:Press CTRL CMouse:Right-click and chooseCopyAutosum FunctionThe most common formula in Excel is SUM, or the addition of multiple values. In this example, wecould create a formula that reads C6 D6 E6 F6 G6 H6. That’s a lot of typing! Instead, we canuse the SUM function and specify a range of cells.Functions are more complex formulas that are invoked by typing their name. In this example, wewill use the SUM function. Excel has over 200 functions that can be used. Because SUM is themost common function, it is the only one with its own toolbar button.When working with functions, the cells used in the formula are referred to as the range. A range isa group of cells that are specified by naming the first cell in the group and the last cell. Forexample, A1:D1 is a range that includes cells A1, B1, C1 and D1.To Create the Total Column’s Values Using Autosum:1) Click in the cell where you would like the Total to be located2) Press the Autosum button on the Home Ribbon6
The Autosum function automatically looks for cells that have values in them. It will read values untilit finds the first blank cell. Autosum will always look for values in the cells above it first, then to theleft. This means that you need to be aware of what cells will be in the formula. Autosum will selectthe range of cells to use in the formula by highlighting the range.3) Press EnterSaving a WorksheetWhen working in Excel it is necessary to save your files. It is also very important that whileworking, your file is saved frequently. When naming a file, you are restricted to 255 characters.Avoid most punctuation; spaces are acceptable.To Save the File:1) Click on the File tab2) Click Save3) Choose the destination4) Type a file name5) Click SaveEditing CellsExcel provides a major enhancement over earlier spreadsheet products in its ability to edit cellseasily. There are various methods for cell editing, including double-clicking in the cell, using the F2key, and typing in the formula bar.To Edit a Cell in the Worksheet:1) Position yourself in the cell you would like to edit2) Press the F2 key on the keyboard or double-click in the cell3) Use the backspace or delete keys to edit the cell4) Press Enter when you have finished editing the cell OR 5) Click in the cell you would like to edit6) Click in the formula bar and make any necessary changes7) Press Enter when you have finished editing the cellUndoExcel and other Windows applications have a convenient method of correcting mistakes known asUndo. In many applications, including Excel, you can undo an almost limitless number ofcommands. The Undo button has a small down-pointing arrow next to it. When pressed, it willdisplay a list of actions that can be undone. Redo works in the same way, allowing you to repeatactions.Excel will undo actions in reverse chronological order, meaning that the most recent command isreversed first, then the one prior to that, and so on. You cannot reverse an earlier action usingUndo without first undoing the actions that were performed after it.7
NOTE: The list of commands to undo is reset after the file is saved. You cannot use Undo tofix an error after the file is saved.To Undo a Command:Click UndoClearing CellsAs we begin to look at formatting, it is important to understand what makes up the contents of acell. There are three distinct items that can be in a cell: ContentsFormatsCommentsThese allow items to be formatted properly, even if the values change. However, when trying todelete or clear a cell, it can be a bit tricky. Excel stores formats and contents separately, simplydeleting the contents does not delete the format.To Clear a Cell Format:1) Click in the cell that contains formatting2) Click the drop-down arrow next to the Clear button on the Home tab in the Editing group3) Click Clear Formats8
Formatting ValuesApplying formats to any cell(s) can be done either using the Font, Alignment and Number groupsor using the dialog box which will include all the formatting options.To Apply the Currency Format:1) Highlight the cell(s)2) Click on the Currency Style buttonon the Home tab in the Number group3) If necessary, click on the Increase or Decrease Decimal buttonon the Number groupTo Apply the Comma Format:1) Highlight cells2) Click on the Comma Style buttonon the Number group3) If necessary, click on the Increase or Decrease Decimal buttonon the Number groupFormatting LabelsA Label, or text formatting is applied virtually the same way it is done in word processingprograms.To Format the Title Labels:1) Highlight the cell(s)2) Select a font from the Font group3) Select a point size from the Font group9
Using the Dialog Box:1) Highlight the cells2) Click on the arrow in the corner of one of the formatting groups (Font, Alignment, Number) toopen the Format Cells dialog box and click on one of the tabsFormat PainterFrequently, you will need to take a format that is applied to one cell and apply it to other cells. Aquick way to do this is by using the Format Painter .To Apply a Format to Cells:1) Highlight cell(s)2) Format the cell(s) to the desired format3) Select the formatted cell(s)4) Click the Format Painterfrom the Clipboard group of the Home tab5) Highlight the cells you wish to formatTips and Tricks: If you would like the Format Painter to remain active, double-click the FormatPainter. It will remain active until you press the Esc key.Centering Text Across ColumnsWhen it comes to titles, it may be preferable to have the information centered across thedocument, rather than in only one cell. Excel uses the feature Merge Cells to accomplish this.To Center the Title Across Columns:1) Highlight cell(s)2) Click the Merge and Center buttonon the Alignment groupNOTE: Each cell must be done individually. Excel will delete the contents of all but the topmost cell if multiple cells are selected.This option basically takes all the cells in the highlighted range and merges them into one largecell. For example, the range A1:F1 became cell A1 after the Merge Cells button was selected.There is no cell B1, C1, etc. any longer.10
Creating a Basic Chart1) Highlight the data to be charted2) Click on the Insert tab3) Click on a Chart Type in the Charts group4) Click on a Chart StyleTo Move your Chart:Click and drag the ch
Microsoft Excel 2016 Screen Elements The Ribbon The Ribbon is designed to help you quickly find the commands that you need to complete a task. Commands are organized in logical groups, which are collected together under Tabs. Each Tab relates to a type of activity, such as formatting or laying out a page. To reduce clutter, some Tabs are shown only when needed. For example, the Picture Tools .