Transcription
Home Security System Using Raspberry PiA Design Project ReportPresented to the School of Electrical and Computer Engineering of Cornell Universityin Partial Fulfillment of the Requirements for the Degree ofMaster of Engineering, Electrical and Computer EngineeringSubmitted byJingyi Wang (jw2527), Haodong Ping (hp394), Manquan Fang (mf734)Meng Field Advisor: Bruce Land, Joe SkoviraDegree Date: December, 20191
AbstractMaster of Engineering ProgramSchool of Electrical and Computer EngineeringCornell UniversityDesign Project ReportProject Title: Home Security System Using Raspberry PiAuthor: Jingyi Wang, Haodong Ping, Manquan FangAbstract:This project is designed to develop a home security system based on Raspberry Pi whichrealizes the function of providing residence with security and alarm information throughremote sensing. To complete this project, team members use temperature and humiditysensor and PIR sensor to detect the temperature, humidity and motion information of a house,and then report any potential unusual or dangerous situations to the owner. In order to ensurethat the owner can get the potential unusual or dangerous situations in time, securitynotifications will be by email, and all information will be by WiFi to a commodity wirelessrouter. The final products are robust, packaged, and powered by mains. The goal of thisproject is to replace the current DLINK security system with a system that does not need togo out to the cloud for information sharing and control.2
Executive SummaryThis home security system is aimed to use temperature and humidity sensor and PIR motionsensor to detect the temperature, humidity and motion information of a house. If it detectsany potential unusual or dangerous situations, it should report to the owner via email. What’smore, it is packaged within a required size and powered by mains. Users can start this systemfrom PC via SSH.In order to complete this project, our team members should do several things. For softwaredesign, we should get data from sensors. Then we should check if anything unusual isdetected by sensors and send out notification via emails. We should also set our equipmentto automatically work when powering by mains. For hardware design, we should connectPIR motion sensor and temperature and humidity sensor directly to Raspberry Pi. Formechanical design, we should integrate hardware part and software part, then package thisequipment within a required size.After integrating software part and hardware part and packaging it, we plug it and make itwork for one week. The result proves that this system can work successfully.3
Distribution of WorkFor the report, individual distribution is shown as below:IntroductionDesign IssuesHaodong PingÖÖManquan FangÖÖÖÖJingyi WangÖResultsFuture WorkConclusionÖÖÖÖFor the project, individual distribution is shown as below:Software DesignHaodong PingHardware DesignMechanical DesignPosterÖÖÖManquan FangÖJingyi Wang4
1. Introduction . 62. Design . 72.12.22.3Software Design . 72.1.1Sensor . 72.1.2Email Sending . 92.1.3Main Program . 10Hardware Design . 112.2.1PIR Sensor . 112.2.2Temperature and Humidity Sensor . 132.2.3Connect Sensors to Raspberry Pi . 14Mechanical Design . 183. Issues. 293.1Software Part Issues. 293.2Hardware Part Issues . 303.3Mechanical Part Issues . 314. Results. 335. Future Work . 376. Conclusion . 37Appendix . 355
1. IntroductionNowadays, people attach much more importance to home security. Home security is relatedto both the security hardware in place on a property and personal security practices. Securityhardware includes doors, locks, alarm systems, lighting, motion detectors, security camerasystems, etc. that are installed on a property. However, current home security devices needto update the personal data to the cloud, which brings users the risk of losing privacy. What’smore, since all data are processed in the cloud server, it is inconvenient for users to changecontrol conditions.In this project, team members use Raspberry Pi as the server to replace the cloud server inorder to solve the data privacy problem. Raspberry Pi is a credit card-sized single-boardcomputer and a very powerful control unit. Users can connect the sensors to the Pi, anddesign programs to make it deal with those data. When Raspberry Pi detect some abnormalsituation, like the temperature is too low and the movement of strangers, it can send emailto users directly. Raspberry Pi is also very cheap. It costs 35 dollars to buy a Raspberry Pi 3and only costs 5 dollars to buy a Raspberry Pi 0. As a result, we use Raspberry Pi 3 to designand then transfer from Raspberry Pi 3 to Raspberry Pi 0.In the designed home security system, all the sensors, including PIR sensor, temperature andhumidity sensor, will be connected to Raspberry Pi directly and Raspberry Pi will be workedas server to process all the data collected by sensors. When Raspberry Pi detects somethingwrong, it can send a warning email to user directly instead of going out to the cloud for6
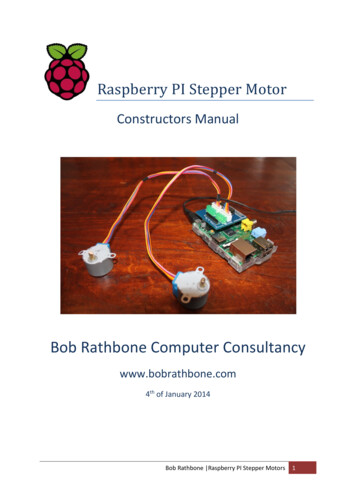
information sharing and control.2. Design2.1 Software DesignIn our project, the system is based on Raspberry Pi, all the sensors will be connected to Pidirectly and Pi will be worked as server to process all the data collected by sensors. WhenPi detect something wrong, it can send a warning email to user directly. The whole systemdesign of the solution is as shown below.FIG 12.1.1Pin map of HC-SR501 PIR motion sensorSensorIn our project, there are two sensors we need to handle, the PIR sensor and the temperature7
and humidity detection sensor. In the programming part, we apply the idea of object-orientedprogramming and regard every sensor as an object. In their constructor, the parameter weneed to allocate a PIN number and initialize the corresponding IO state. There is also amethod used to run itself to detect environment parameters and the programming part is notvery difficult since we have the whole document of those sensors. Take the PIR class forexample, we can use the following code to initialize this class:p pir.pir(PIN NUM)Then a PIR sensor object was created in our program. And it is almost the same code for theDHT11 sensor. To make those sensors work, we could call the detecting function, it requiresno parameters and it can return the data we want. The detecting function is the mostimportant part in the class, for the PIR sensor, we just read the voltage from GPIO, for theDHT11, its communication protocol is 1-wire protocol, it can read data from only one GPIO.In this protocol, low level 50us followed by a high level of 26-28us represents 0 and lowlevel 50us followed by a high level of 70us represents 1. So we got the basic timing sequence,the idle state of the bus is high. The host pulls down the bus and waits for DHT11 to respond.The host pulls down the bus more than 18 milliseconds to ensure that DHT11 can detect thestarting signal. After DHT11 receives the start signal of the host, it waits for the end of thestart signal of the host, and then sends 80us low-level response signal. After the start signalof the host is sent, the response signal of DHT11 is read after waiting for 20-40us. After thehost sends the start signal, we can switch it to the input mode. We implement this part byreading the official document of DHT11 [8] instead of using the standard library, becausewe find it reads a lot of invalid data and it would be more flexible to implement it by8
ourselves, we will introduce this part with more detail in Issue section. For the PIR sensor,the detecting function returns a Boolean value and for the DHT11, it returns an array withonly two float number, in which the first one is the temperature and the second one is thehumidity. To make those sensors work continuously, we should call the detecting functionin a loop. And the example code of PIR are list below:while True :p.detect()From the code we can see that we only need only three lines of code to make the sensorwork, so it brings a lot of flexibility to do the unit test and makes whole programmaintainable.2.1.2Email SendingIt is pretty easy to implement the email sending part using the standard library in Python,but there is still a lot of lines of code. To make our program cleaner, we also regard it as anobject. In the constructer, the program will initialize the customer’s email address. Theexample code are list below.se sendemail.sendEmail(the customer’s email address)Then we have an email sending class in our program. When we need to send an email, wecan invoke the method called mail, this function contains 7 parameters, which is the currentPIR state, current temperature and humidity, the maximum and the minimum temperaturethe customer allowed, and the maximum and minimum humidity limitations.9
In the main loop, we can get those current value by the sensors and get the limitations fromthe configuration file. Finally, this function returns a Boolean value indicting if we have sentthe email successfully. After we have all those parameters, we can send the email, theexample code is list below:ret se.mail(temp,min temp, max temp, humid, min hum, max hum, pir detect)From the code, we can easily send the email to the customer and customer get can get theemail in about 20 seconds. We can print the value of “ret” if we hope to test the currentnetwork condition.2.1.3Main ProgramIn the main program, there are mainly two part, the initialize part and the main loop forcollecting the data from the environment and analysis the data to decide if we need to sendan alerting email.The initialize part initialize build all the models of the sensors and email sending part usingtheir own constructor, initialize some flag value and get the parameters from theconfiguration file.The main loop is an infinite loop and in the loop, we call the detecting function of the sensorobject and collect the data. According to those data, we update the corresponding flag valueand decide to send the email or not according to those value. Every time after the systemsend the alerting email, the system will reset all the flag value and sleep for about 5 minutes10
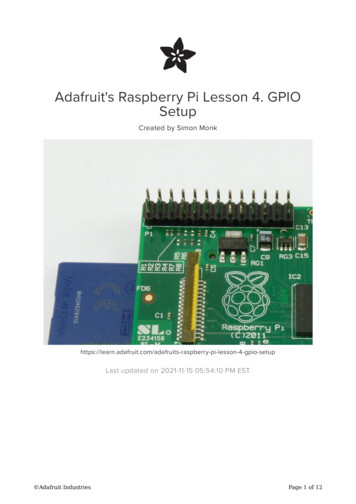
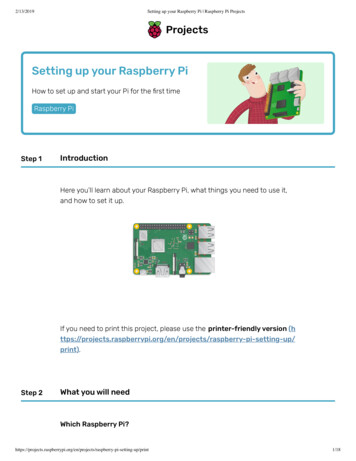
to avoid sending redundant emails.2.2 Hardware DesignIn our project, all the sensors will be connected to Raspberry Pi directly and Raspberry Piwill be worked as the server to process all the data collected by sensors. When Raspberry Pidetects something wrong, it can send a warning email to users directly. As a result, thecentral part of hardware design is to choose proper sensors and connect them to RaspberryPi directly.The main function of our project is to detect and report the unusual temperature, humidityand motion information of the house. In order to detect the temperature, humidity andmotion information of a house, we use PIR motion sensor and temperature and humiditysensor, and connect them to the Raspberry Pi through GPIO.2.2.1PIR SensorPIR sensors, often referred to as, "Passive Infrared" sensors, enable you to sense motion.Everything emits a small amount of infrared radiation, and the hotter something is, the moreradiation is emitted. As a result, PIR sensors work by detecting movement of infraredradiation emitted from warm objects.In this project, we choose to use HC-SR501 PIR motion sensor because it is not expensiveand easy to use. The inner of HC-SR501 PIR motion sensor is shown as below:11
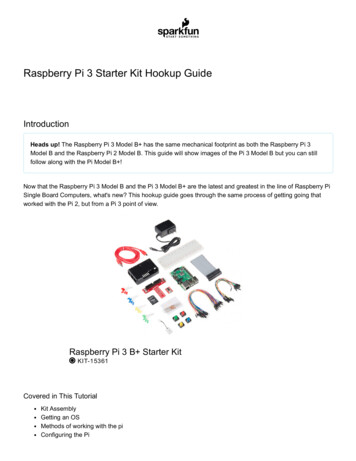
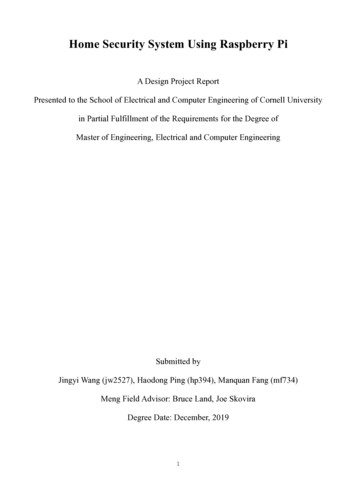
FIG 2HC-SR501 PIR motion sensorIt has three pins: GND, power and high/low output. At idle, when no motion has beendetected, the digital out will remain low. However, when motion is detected, the digital outwill pulse high (3.3V) and we’ll use our Raspberry Pi to sense this. We use the sensor todetect the motion of people.The pin map of HC-SR501 PIR motion sensor is shown as below:12
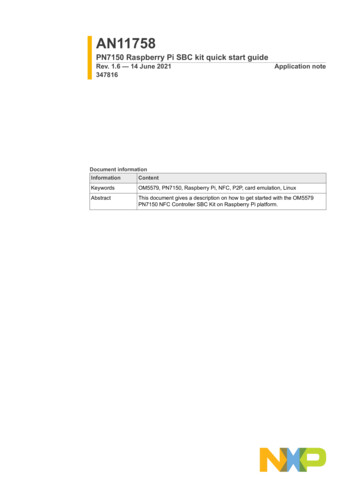
FIG 32.2.2Pin map of HC-SR501 PIR motion sensorTemperature and Humidity SensorIn our project, we choose to use DHT11 temperature and humidity sensor in order to obtainthe humidity and temperature information of the house. DHT 11 temperature and humiditysensor is a little module that provides digital temperature and humidity reading.DHT11 temperature and humidity sensor uses a humidity sensor and a thermistor to measurethe surrounding air, and sends a digital signal to the specific data pin. We choose to useDHT11 temperature and humidity sensor since it only needs one wire for the data signal.The pin map of DHT11 temperature and humidity sensor is shown as below.13
FIG 4 Pin map of DHT11 humidity and temperature sensor2.2.3Connect Sensors to Raspberry PiAfter choosing the proper sensors, we need to connect them to Raspberry Pi directly. At first,we used Raspberry Pi 3 to design. Raspberry Pi 3 GPIO pinout is shown as below:14
FIG 5Raspberry Pi 3 GPIO pinoutWe connect PIR motion detector to GPIO19 in Raspberry Pi. The PIR will always outputlow (0v) unless movement is detected, in which case it will output high (3.3V). Therefore,we can set our PIR-OUT GPIO pin as an input, and use Python to detect any voltage change.15
DHT11 temperature and humidity sensor only requires three connections to the Pi, that is3.3v, ground and one GPIO pin. In this project, we connect humidity and temperature sensorto GPIO13. We use bread board to design and test, which is shown as below:FIG 6Test with bread board in Raspberry Pi 3After we finished design part, we translated from Raspberry Pi 3 to Raspberry Pi 0. As aresult, we should also connect two sensors to Raspberry Pi 0 directly. Raspberry Pi 0 GPIOpinout is shown as below:16
FIG 7Raspberry Pi 3 GPIO pinout17
What’s more, in order to package them, we need to change from bread board to a much morecompact board. In this project, we choose Perma-Proto Quarter-sized Breadboard. Wedirectly used the jumper wires instead of soldering them on the board. The designed boardwith two sensors is shown as below:FIG 8Raspberry Pi 0 W H (From Second Prototype)2.3 Mechanical DesignThe mechanical part is as important as any other parts. The software and hardware parts canbe straightforward, but mechanical part requires strategically planning. The possibleproblems can be: which parts to use; what is the best size for a home security system; what18
is the limit of both the components and out group members; does the packaging processrequire group members to change the design constantly (for example, the size of the boxrequires us to change the pin, or how we solder the sensors); how to place the components;where to put the sensors, etc. Therefore, we have solid reason to believe that mechanicalpart is strategical and requires the coordination and cooperation of group members.Here is how we built it: After we chose the wanted sensors, we should decide the board andbox we would use. For the board part, we first tried to start from the bread board, since itwas easy to do and moderate, and below was our first prototype. In our first prototype, weused Raspberry Pi 3. After that, we switched to Raspberry Pi 0 W for our second prototype.The reason why we chose Raspberry Pi 0 was that Raspberry Pi 3 is over qualified for whatwe were trying to do: it has higher price and higher cost for more USB ports, betterperformance and Ethernet port, which are things that we do not necessarily need. Besides,it is larger than Raspberry Pi 0, which is in fact a disadvantage to our project. Therefore, weswitched to Raspberry Pi 0. For Raspberry Pi 0, we did not need that size of bread boardany more as well. We again, started with a bread board. This time, we chose a much compactboard, which was Perma-Proto Quarter-sized Breadboard. For the second prototype, wedirectly used the jumper wires instead of soldering them on the board, so we could easilychange the wiring. Accordingly, we used the Raspberry Pi 0 H version, which by factoryhas a header installed on it, so we can directly plug the jumper wires on it. As shown belowin Figure 9.19
FIG 9Raspberry Pi 0 W H (From Second Prototype)Then, after it worked with the jumper wires, we moved on to the core breadboard wires. Itturned out that breadboard with core wires were definitely good enough for this device towork, and much easier to be put into mass production in future as desired. Therefore, wedecided to abandon the PCB design idea.In order to package them, we also need a power supply for the components and a box forthe whole device. For the box, material could be ABS plastic, since it is light, easy to dealwith (drill holes, etc.), relatively cheap, and a large amount of selections. The selected boxshould be at appropriate size, which is too big for a home security device, but not too smallto put all these components in. For the power supply, it needs to be sending out the power20
under 5V 2A, which was the required kernel for the Pi 0. Below is the component we choseand the mechanical properties of them:PIR Motion sensor (SR501): 32mm * 24mm * 25mm. As shown below in Figure 3.3.2, thePIR sensor is consisted of two parts: lower part has some pin foots which cannot be removed,which will take some space when we are placing them; upper part is a hemisphere, and ithas to be placed outside through a round hole.FIG 10 Dimension of SR501 PIR SensorHumidity & Temperature Sensor DHT11: 15.1mm * 25mm * 7.7mm. As show below inFigure 12, the blue part of DHT11 sensor needs to be placed outside, and its four pins hasto be stuck inside of the box without being directly exposed.FIG 11 Dimension of DHT11 Sensor21
Raspberry Pi 0: 65mm * 30mm, as shown below in Figure 12FIG 12 Dimension of Raspberry Pi 0Quarter-sized Breadboard: 44mm * 55mmBox: 111.25mm * 82.55mm * 35.56mm.After choosing the components, we started to package them in the box. To mention that, weneed to know that these sensors should be placed outside of the box, since the PIR motionsensor needs to directly sense the motions using its lenses, and temperature sensor needs toavoid the heat caused by the components in the box. Therefore, we still need to use longwires to make them separate from the board, instead of attaching on the board.For these two sensors, they need to be not close to each other, so that the wires would notbe interacted with each other. Also, the humidity and temperature sensor would be placedto the top or the bottom, so it would not be “standing” out of the device and easily be snapped.For the power supply, due to the same reason, the plugs have to be at the back of the box,so the whole box could be steadily attached and plug in to the wall. Since the charger wouldtake almost half of the box size, it also needs to be placed on the other half of the box inopposite of the Raspberry Pi, board and sensors. Therefore, Figure 13 is our original design22
of placing:FIG 13 Design of Placing of ComponentsAfter that, we decided to make holes for sensors and charger plugs. For the PIR motionsensor, I need to drill a relatively large hole for its lens. The best way of doing that is to usea mechanical punch. Mechanical punch could allow us to drill a hole with diameter of 1inch, which is approximately the diameter of the lens of the PIR sensor. Below in the Figure14 is the hole we slugged out:FIG 14 Hole Drilled by Mechanical Punch23
For the humidity and temperature Sensor, we would place it at the bottom of the box,therefore the sensor would be placed outside of the box and the pin foot would be stuck intothe box and wired to the Proto board. In order to drill four tiny holes for the Humidity &Temperature Sensor, we used 1mm drill bits. Avoid of drifting away the drill bits during thedrilling, we would use knife, rasp or screw driver to cut four pre-drill holes before drillingit. Finally, the holes would eventually look like it in the Figure 15:FIG 15 Shape of Hole Drilled by 1mm Drill BitAfter that, we would wire them up to the Proto Board. For these pins, we did not want todirectly expose them out, so we would need to use core wire to wrap them up. Here was thetrick we used: we firstly cut a section of a hot shrink tube to the length of slightly shorterthan the pin foot, then put it on the foot. After, we soldered the core wire to the pin foot,then moved that section of hot shrink to the place we connected the pin foot and the wire tocover them up, then used a heat gun to heat it, so the shrink tube would be shrunk to wrapthem up. We did this to all the other pin foots.24
Then, we would move on to the power supply plugs. The power supply needs to be attachedto the back of the box from inside, so the plugs can be standing out enough to be pluggedinto the power. Here, we measured the position and size of the power supply plugs, markedthem on the back of the box, then used rasp to cut holes for the plugs, as shown below.Similarly, we used hot glue here to attach the power supply to the back of the box, and itturned out the height of the plugs were good enough to be plugged in. Another thing tomention was, the plugs could not be loosely standing, or it would easily affect the reliabilityof the device. Again, we used hot glue to fix the plugs so it won’t loosely lie down. Also, asshown below in the Figures 16, there is a window that can cover the back up. The windowcan always be removed to do more customizations. Figure 18 shows the hole we cut for theplugs.FIG 16 Back of the Box (With Window)25
FIG 17 Back of the Box (Without Window)After setting up the sensors, we need to place the Pi 0, Proto board and the power supply.As stated before, the power supply as well as its cable took almost half of the space of thebox and the cable of the power supply too strong that its position could not be easily changed.For our first try, we put the board and the Pi 0 on the two sides of the port, as shown belowin the Figure 18, as our first version of packaged prototype. However, that suddenly causeda problem that these two had to be far away from each other, and the wires for both twosensors could not get to the board, and even the wires between the board and the Pi 0 wereeasily be snapped. Therefore, we had to abandon this plan.26
FIG 18 One Way of Placing the Board and Pi 0For the second try as shown in the Figure 19, we move both the board and the Pi 0 to thesame side (near the plugs side), so it would give enough space for the wiring of the twosensors, and it also won’t bring much heat to the temperature sensor. Also, we used a paperas an insulator to separate them, so the wires and the components won’t be short-cut.FIG 19 Second Way of Placing the Board and Pi 027
Finally, they could be all put into the box, and worked as an entire packaged device. Asmentioned before, this part required all team members to actively communicate with eachother and constantly changed the design and the work we have done: specifically, forexample, when we switched to the plan that the board and the Pi 0 would be at the same sideof the charger instead of on the two sides, all these wires need to be re soldered at thehardware part, also the pin number would be probably changed at the software part. Allthese wires and pins needed to be redesigned and redone at every step. Below is the finalproduct we have made.FIG 20 Interior of the Device28
FIG 21 Appearance of the Device3. Issues3.1 Software Part IssuesIssue: temperature and humidity sensor read zero value sometimesThe DHT11 detecting program sometimes will return zero values. For the reason why thedetecting program of standard library read zero value sometime, we check its source codewhich list below:if t -100.0 and t 150.0 and hum 0.0 and hum 100.0:return [t, hum]else:return [float('nan'),float('nan')]From the source code, we see that it may return nan when the value sensor read is out ofrange. For the reason why DHT11 may read an out of range value, we search it on theInternet and got the theory that the probability of encountering a bad reading increases as29
time passes and that’s why people need to design a filter system. For DHT11, itscommunication protocol is 1-wire protocol which has a very high requirement of the timingsequence and Python is not very good to deal with such situation. In ECE5725, we do theexperiment and find that when the required output frequency is about 10 kHz, there wouldbe 5% to 10% frequency error sometimes if we write in python code and from the 1-wireprotocol, 1 lasts about 120µs and 0 lasts 76µs, whose frequency is approximate to the 10kHz.Then we got the reason why it may read some erratic values, first, it is due to the pythonprogram do not have as good performance as other static language like C. Secondly, it maydue to the environment noise.To solve this problem, we have two solutions, one is to rewrite the whole sensor part withC code and use python to integrate them with other parts. The second solution is that we canchange the DHT11 detecting program. For solution 1, it is a lot of work to rewrite almostthe whole project and we may also need to design a filtering system for the C program.Considering that situation does not happen frequently, we choose solution 2 and we onlyneed to change one line of code to make the detecting function recursive. If the collectingdata is out of range, we can call the detecting function recursively instead of returning zerovalues.3.2 Hardware Part IssuesIssue: Whether to use PCB boardInitially, we planned to use PCB design in hardware part. However, after finished quartersized breadboard design, it turned out that breadboard with core wires were definitely good30
enough to work, and much easier to be put into mass production in future as desired.Therefore, we decided to abandon the PCB design idea.Issue: How to connect sensors directly to Raspberry PiThe purpose of our project is to connect sensors directly to Raspberry Pi, so that whenRaspberry Pi detects something wrong, it can send a warning email to user directly insteadof going out to the cloud for information sharing and control. We connected sensors toRaspberry Pi through GPIO. We need to check whether the desired pin is free or not, thespecific function for several GPIO pin, and so on.Issue: How to place two sensors properly in one boardIn addition to wire two sensors and let them work, we should also consider how to placethem properly in one board in order to make it convenient for mechanical design. Wedesigned several times and used several boards until we got the final product.3.3 Mechanical Part IssuesIssue: Header on Raspberry Pi 0We started with the Raspberry Pi 0 W H version, where H means the header is installed byfactory. Though we would not use it as the final prototype, this Header version was wayeasier to build and change the design if needed. Therefore, we chose to build the device onthe Header version, then switch to the original version.31
Issue: Wiring placingThe wiring between the board, the sensors and the Pi 0 is critical. We had to designstrategically about where to put the wires and how long should the wires be. We started thatby placing wires on different quadrant of the breadboard before designing the place thesecomponents should be by their components. Then, we worked on the hardware part.Issue: Electrical insulationWe used a name card to separate components inside, since they were good enough as aninsulator, and the heat caused by device would not achieve the burning point of it.Issue: Cable of Power SupplyIn the United States, almost all the cables is at least 25 cm, which is way longer than whatwe needed. In order to do that, we brought a mini 10 cm cable from China before thissemester, which was almost the shortest cable available all over the world.Issue: Hot GlueInstead of using the tape, we used hot glue to attach all these components together, since hotglue was strong enough to hold things together, but really easy to redo the design (it meltedafter heated again).Issue: Power supply alternativesThough we considered other power supply, even a self-made or modified power supply.However, that does not increase the complexity of this project, but more importantly,32
dramatically reduce the possibility of customization and mass production of it. For example,every time
to users directly. Raspberry Pi is also very cheap. It costs 35 dollars to buy a Raspberry Pi 3 and only costs 5 dollars to buy a Raspberry Pi 0. As a result, we use Raspberry Pi 3 to design and then transfer from Raspberry Pi 3 to Raspberry Pi 0. In the designed home security system, all the sensors, including PIR sensor, temperature and