Transcription
Adafruit's Raspberry Pi Lesson 4. GPIOSetupCreated by Simon -pi-lesson-4-gpio-setupLast updated on 2021-11-15 05:54:10 PM EST Adafruit IndustriesPage 1 of 12
Table of ContentsOverview3The GPIO Connector4Adafruit Pi Code5Configuring I2C6 Installing Kernel Support (with Raspi-Config) Testing I2C79Configuring SPI Installing Kernel Support (with Raspi-Config)Test and Configure Adafruit Industries101012Page 2 of 12
OverviewOne of the great things about the Raspberry Pi is that it has a GPIO connector towhich you can attach external hardware.The GPIO connector actually has a number of different types of connection on them.There are: True GPIO (General Purpose Input Output) pins that you can use to turn LEDs onand off etc. I2C interface pins that allow you to connect hardware modules with just twocontrol pins SPI interface with SPI devices, a similar concept to I2C but a different standard Serial Rx and Tx pins for communication with serial peripheralsIn this tutorial, you are not actually building anything, but you will learn how toconfigure your Raspberry Pi and install useful libraries ready to start attaching someexternal electronics to it. Adafruit IndustriesPage 3 of 12
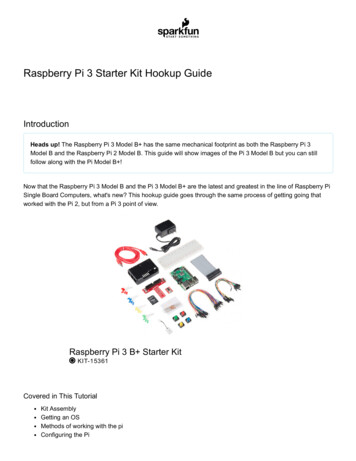
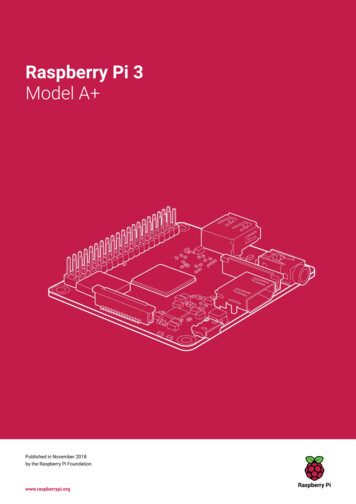
This tutorial is written for Raspbian based distributions.The GPIO ConnectorThe diagram below show GPIO pinouts used on different models of the Raspberry Pi.The earlier revisions of the Raspberry Pi were 26-pin based while the newer modelsare 40-pin.As well as supplying power (GND, 3.3V and 5V) all the GPIO pins can be used aseither digital inputs or outputs. The pins labelled SCL and SDA can be used for I2C.The pins labelled MOSI, MISO and SCKL can be used to connect to high speed SPIdevices.All the pins have 3.3V logic levels and are not 5V-safe so the output levels are 0-3.3Vand the inputs should not be higher than 3.3V. If you want to connect a 5V output to aPi input, use a level shifter (https://adafru.it/aM5)A popular way to actually make the connections to the Raspberry Pi is to use a PiCobbler Plus (https://adafru.it/Bsr)or a Pi T-Cobbler Breakout (https://adafru.it/ECS) forolder 26-pin versions.This uses a ribbon cable to connect the GPIO connector to solderless breadboard,where you can add your own components. Adafruit IndustriesPage 4 of 12
Make extra extra double-check sure that the PIN 1 indicator is in the corner of thePi. If you have a gray cable its probably a red stripe, for black cables, a whitestripe. That pin must not be next to the TV connector. Turn around or twist thecable until it is rightAdafruit Pi CodeTo make life easy for those wishing to experiment with attaching electronics to theirPi, Adafruit have produced an extensive and extremely useful collection of code. Thisincludes simple CircuitPython Libraries (https://adafru.it/EQa) for a large number ofmodules, including displays, sensors, actuators and more.To fetch this code, you need to use some software called 'git'. .You will find the icon for a Terminal on your desktop. Adafruit IndustriesPage 5 of 12
Before we go any further, issue the following commands in a Terminal. This will ensureyour packages are up to date. It does not matter which directory you are in.sudo apt-get updatesudo apt-get upgrade -ysudo apt-get dist-upgrade -yRun the following command to install the adafruit blinka CircuitPython Libraries.pip3 install adafruit-blinkaConfiguring I2CI2C is a very commonly used standard designed to allow one chip to talk to another.So, since the Raspberry Pi can talk I2C we can connect it to a variety of I2C capablechips and modules. Adafruit IndustriesPage 6 of 12
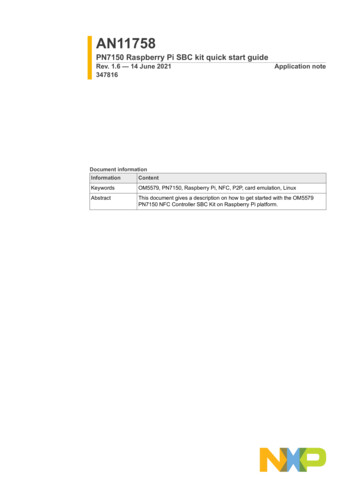
The I2C bus allows multiple devices to be connected to your Raspberry Pi, each witha unique address, that can often be set by changing jumper settings on the module. Itis very useful to be able to see which devices are connected to your Pi as a way ofmaking sure everything is working.sudo apt-get install -y python-smbussudo apt-get install -y i2c-toolsInstalling Kernel Support (with Raspi-Config)Run sudo raspi-config and follow the prompts to install i2c support for the ARM coreand linux kernelGo to Interfacing OptionsOn older versions, look under Advanced Adafruit IndustriesPage 7 of 12
then I2CEnable!sudo reboot Adafruit IndustriesPage 8 of 12
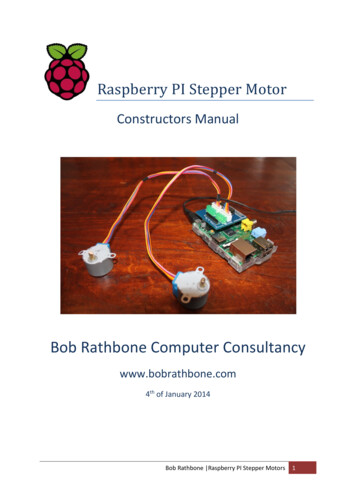
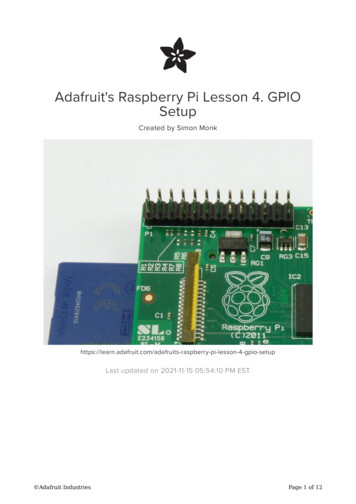
Testing I2CNow when you log in you can type the following command to see all the connecteddevicessudo i2cdetect -y 1This shows that two I2C addresses are in use – 0x40 and 0x70.These values will be different for you depending on what is currently attached to theI2C pins of your Raspberry PiNote that if you are using one of the very first Raspberry Pis (a 256MB Raspberry PiModel B) then you will need to change the command to:sudo i2cdetect -y 0The Raspberry Pi designers swapped over I2C ports between board releases. Justremember: 512M Pi's use i2c port 1, 256M ones use i2c port 0!When you are finished in raspi-config reboot for the i2c modules to automatically loadinto the kernel. Adafruit IndustriesPage 9 of 12
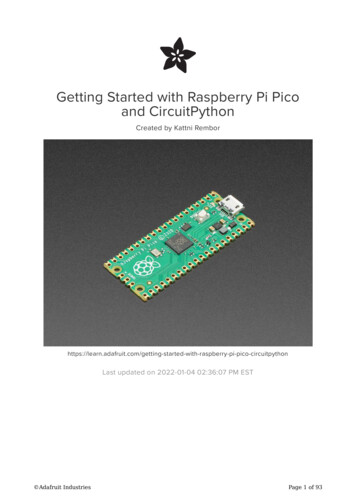
Configuring SPIInstalling Kernel Support (with Raspi-Config)Run sudo raspi-config and follow the prompts to install i2c support for the ARM coreand linux kernelGo to Interfacing OptionsGo to Interfacing OptionsThen select SPI Adafruit IndustriesPage 10 of 12
When asked if you want to enable selectYESThat's it!Now reboot your Pi to make the SPI interface appearNext time you log in you can check that you can see the devices withls -l /dev/spidev*you should see two 'devices' one for each SPI bus Adafruit IndustriesPage 11 of 12
The /dev/spidev0.x will not show up when using the PiTFT screens as it is usingthe SPI interface.Test and ConfigureThe best way to test what you have done is to pick one of the projects (perhaps afairly simple one to start with) and give it a try.Here are some of the tutorials I would recommend as a first project: fier-using-leds (https://adafru.it/aJ5) -buttons-with-raspberry-pi (https://adafru.it/aTD) kpack-with-the-raspberry-pi (https://adafru.it/aPj) lesson-12-sensing-movement/overview (https://adafru.it/sdr) lesson-13-power-control/hardware (https://adafru.it/EQQ)Click Here for the Next Lessonhttps://adafru.it/aUA Adafruit IndustriesPage 12 of 12
Nov 15, 2021 · I2C pins of your Raspberry Pi Note that if you are using one of the very first Raspberry Pis (a 256MB Raspberry Pi Model B) then you will need to change the command to: sudo i2cdetect -y 0 The Raspberry Pi designers swapped over I2C ports between board releases. Just remember: 512M