Transcription
Developer Study GuideUsing BlueZ as a Bluetooth Mesh ProvisionerRelease:1.4.1Document Version:1.4.1Last updated18th December 2020:
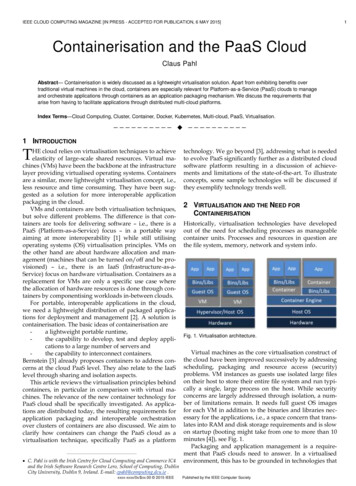
ContentsContentsRevision History . 31. Introduction . 42. Prerequisite . 43. Rebuilding the Kernel for BlueZ. 53.1 Remote Access Board Through SSH . 53.2 Install Dependencies for BlueZ . 53.3 Check-out Source Code . 53.4 Configuring the kernel . 53.5 Building the kernel . 93.6 Installing the kernel, Modules, and Device Tree Blobs . 93.7 Verifying the kernel . 94. Installing BlueZ . 104.1 json-c installation . 104.2 Get BlueZ Source Code. 104.3 Build and Install BlueZ . 104.4 Tell systemd to use the new Bluetooth daemon . 105. Provisioning . 135.2 PB-GATT . 135.2 PB-ADV . 14Appendix A - meshctl available commands . 17menu main command list. 17menu config command list . 18menu onoff command list . 19Appendix B - mesh-cfgclient command list . 20main menu command list. 20menu config command list . 21
Revision HistoryVersion Date1.0Author18th June 2018 Kai RenCommentsInitial DraftBluetooth SIG1.11.21.35th August2018Kai Ren9th March2019Kai Ren26th July 2019Kai RenBluetooth SIG1.4.116th March2020Updated the name to Developer Study Guide.Bluetooth SIG Use the latest Raspberry Pi release instead of main tree.BluetoothSIG1.4Upgrade BlueZ installation to v5.50.Kai RenBluetooth SIGth18 December Martin2020WoolleyBluetooth SIGAdd the support for Raspberry Pi 4 and update the kernel to raspberrypikernel 1.20190709-1.Upgrade this guide to support BlueZ v5.54 which adds the new support for PBADVLanguage changes
1. IntroductionBlueZ is the official Linux Bluetooth protocol stack. From the release notes of BlueZ v5.47:“This release comes with initial support for it in the form of a new meshctl tool.Using this tool, it’s possible to provision mesh devices through the GATTProvisioning Bearer (PB-GATT), as well as communicate with them (e.g. configurethem) using the GATT Proxy protocol.”This developer study guide explains how to install the latest release of BlueZ on Raspberry Pi and useBlueZ as a Bluetooth mesh Provisioner.2. PrerequisiteThis study guide has been tested on the following boards, calling them verified boards in thisdocument: Raspberry Pi 2BRaspberry Pi 3BRaspberry Pi 3B Raspberry Pi 4BIf you have one of above-verified boards, please make sure that you: Follow this guide to setup your Raspberry PiCheck if the operating system on your verified board is ready, and, if not, follow thisguide to set up the software on your Raspberry PiFollow this guide to enable SSH to access the board remotely. The picture belowshows the use of Tera Term on a Windows10 laptop through SSH to access theboard remotelyThe board has been issued apt-get update and apt-get upgrade successfully, thesetwo commands will ensure your board has the latest updates
3. Rebuilding the Kernel for BlueZThere are two main methods for building the Raspberry Pi kernel. You can build locally on a RaspberryPi, which will take a long time, or you can cross-compile, which is much quicker but requires moresetup. This guide outlines the local-build method.3.1 Remote Access Board Through SSHAs mentioned in the Prerequisite, you should remote login into the board through SSH.3.2 Install Dependencies for BlueZsudo apt-get install -y git bc libusb-dev libdbus-1-dev libglib2.0-dev libudev-dev libical-devlibreadline-dev autoconf bison flex libssl-dev3.3 Check-out Source Codecd wget errypi-kernel 1.20200212-1.tar.gztar -xvf raspberrypi-kernel 1.20200212-1.tar.gz3.4 Configuring the kernelcd cd ./linux-raspberrypi-kernel 1.20200212-1/Depending on Raspberry Pi board models, run the following commands alternatively. Raspberry Pi 2, Pi 3, Pi 3 , and Compute Module 31 default build configurationKERNEL kernel7make bcm2709 defconfigmake menuconfig Raspberry Pi 4KERNEL kernel7lmake bcm2711 defconfigmake menuconfig
After typing menuconfig, kernel configuration menu will pop up. make menuconfig shows thedescriptions of each feature, gives the user an ability to navigate forwards or backwards directlybetween features and adds some dependency checking.Route and select Cryptographic API menu:1 ComputeModule 3 haven’t been verified on this document, but theoretically, it shall works.Include CCM support
Include CMAC supportInclude User-space interface for hash algorithms
Include User-space interface for symmetric key cipher algorithmsInclude User-space interface for AEAD cipher algorithmsOnce you are done making the changes you want, press Escape until you're prompted to save your newconfiguration. By default, this will save to .config file. You can save and load configurations by copyingthis file around.
3.5 Building the kernelmake -j4 zImage modules dtbsThis process takes a long time, maybe 2 3 hours.3.6 Installing the kernel, Modules, and Device Tree Blobssudo make modules installsudo cp arch/arm/boot/dts/*.dtb /boot/sudo cp arch/arm/boot/dts/overlays/*.dtb* /boot/overlays/sudo cp arch/arm/boot/dts/overlays/README /boot/overlays/sudo cp arch/arm/boot/zImage /boot/ KERNEL.imgsudo reboot3.7 Verifying the kernelAfter the board restart, issue below commanduname -aIn the image below, you can see the build time is on Thu Mar 19 11:17:18 CST 2020. That time anddate were exactly when the kernel was built and it means the kernel building and installation weresuccessful.
4. Installing BlueZOnce the recompiled kernel is setup correctly, you can start to install BlueZ.4.1 json-c installationcd wget https://s3.amazonaws.com/json-c releases/releases/json-c-0.13.tar.gztar -xvf json-c-0.13.tar.gzcd json-c-0.13/./configure --prefix /usr --disable-static && makesudo make install4.2 Get BlueZ Source Codecd wget 54.tar.xztar -xvf bluez-5.54.tar.xzcd bluez-5.54/4.3 Build and Install BlueZ./configure --enable-mesh --enable-testing --enable-tools --prefix /usr --mandir /usr/share/man -sysconfdir /etc --localstatedir /varsudo makesudo make install4.4 Tell systemd to use the new Bluetooth daemonsudo vi /lib/systemd/system/bluetooth.serviceAfter opening this file, bluetooth.service, make sure the ExecStart line points to your new daemon in/usr/libexec/bluetooth/bluetoothd, as shown in the screenshot below.
It’s still not enough. You still need to create a symlink from the old bluetoothd to the new one. First,rename the old file for backup. Type below command.sudo cp /usr/lib/bluetooth/bluetoothd /usr/lib/bluetooth/bluetoothd-550.origCreate the symlink using the command below and double check the version of bluetoothd, meshctl andmesh-cfgclient.sudo ln -sf /usr/libexec/bluetooth/bluetoothd /usr/lib/bluetooth/bluetoothdsudo systemctl daemon-reloadcd /.config/mkdir meshctlcp /bluez-5.54/tools/mesh-gatt/local node.json /.config/meshctl/cp /bluez-5.54/tools/mesh-gatt/prov db.json /.config/meshctl/bluetoothd -vmeshctl -vmesh-cfgclient -vAs shown in the screenshot below, bluetoothd, meshctl and mesh-cfgclient are all v5.54.
Cheers! BlueZ installation is successful. 22 Aboutupgrading bluetoothd, reference this tions/66540/installing-bluez-5-44-ontoraspbian
5. ProvisioningThis section includes the instructions that: how to use meshctl to provision a device over PB-GATT;how to use mesh-cfgclient to provision an unprovisioned device over PB-ADV;5.2 PB-GATTmeshctl is a tool that provides Provisioner functionality and it’s over PB-GATT.Launch meshctlcd meshctlDiscover unprovisioned devicesStart the process of discovering unprovisioned devices.discover-unprovisioned on/off on/off mean start or stop discovering unprovisioned device.When an unprovisioned device is found, the message will pop-up as below the picture shown, the“Device UUID” in the red box will be used in the next section.You also can stop the process of discovering unprovisioned devices by using the below command.discover-unprovisioned off
ProvisionCopy the “Device UUID” and paste it after the provision command, as shown below, to initiate theprovisioning process.provision Device UUID If provisioning is successful, you can find the primary element address in the red box of “Compositiondata for node XXXX”, XXXX is the primary element.ConfigurationSince provisioning is completed, it’s time to perform model configuration. Type in below command toswitch menu config submenu.menu configSelect the target device to perform the model configuration.target primary element address Usually, model configuration operations include: add AppKey for the nodebind element index, AppKey and target modelpublish/subscribe setupPlease refer to the section of “meshctl available commands” to get the full commands list.5.2 PB-ADVmesh-cfgclient is a tool that provides Provisioner functionality and it’s over PB-ADV.Launch mesh-cfgclientOn the RPI, we need to have full ownership of the controller, so stop bluetoothd: Stop bluetoothd andstart bluetooth-meshd.
sudo systemctl stop bluetoothsudo /bluez-5.54/mesh/bluetooth-meshd -ndOpen a new SSH and make it connect to Raspberry Pi board, type below commands and you will seemesh-cfgclient starts to work.cd mesh-cfgclientWhen you run mesh-cfgclient for the first time, the tool will notify you of a warning:“Warning: config file “/home/pi/.config/meshcfg/config db.json” not found”.Use the below command to create a new mesh network3.createAdd AppKey and NetKeyappkey-create 0 0Discover the unprovisioned devicediscover-unprovisioned on/off [seconds] on/off mean start or stop discovering unprovisioned device.3 Afterthat, no need to issue this create command again until you want to create a new mesh network.
[seconds] means how many seconds the discovering process is going on.When an unprovisioned device is found, the message will pop-up as below picture shown, the “UUID” inthe red box will be used in the next section.ProvisionCopy the “UUID” and paste it after the provision command, as shown below, to initiate the provisioningprocess.provision UUID When provisioning is completed, you can find the primary element address in the red box of the belowpicture.ConfigurationSince provisioning is completed, it’s time to perform model configuration. Type in below command toswitch menu config submenu.menu configSelect the target device to perform the model configuration.target primary element address Usually, model configuration operations include: add AppKey for the nodebind element index, AppKey, and target modelpublish/subscribe setupPlease refer to the section of “mesh-cfgclient available commands” to get the full commands list.
Appendix A - meshctl available commandsThis section lists all the commands meshctl supports, meshctl has 3 command menus: main menumenu configmenu onoffmenu main command listCommandDescriptionconfigConfiguration Model SubmenuonoffOn/Off Model SubmenulistList available controllersshow [ctrl]Controller informationselect ctrl Select default controllersecurity [0(low)/1(medium)/2(high)]Display or change provision security levelinfo [dev]Device informationconnect [net idx] [dst]Connect to mesh network or node on networkdiscover-unprovisioned on/off Look for devices to provisionprovision uuid Initiate provisioningpower on/off Set controller powerdisconnect [dev]Disconnect devicemesh-infoMesh networkinfo (provisioner)local-infoLocal mesh node infomenu name Select submenuversionDisplay versionquitQuit programexitQuit programhelpDisplay help about this programexportPrint environment variables
menu config command listCommandDescriptiontarget unicast Set target node to configurecomposition-get [page num]Get composition datanetkey-add net idx Add network keynetkey-del net idx Delete network keyappkey-add app idx Add application keyappkey-del app idx Delete application keybind ele idx app idx mod id [cid]Bind app key to a modelmod-appidx-get ele addr model id Get model app idxttl-set ttl Set default TTLttl-getGet default TTLpub-set ele addr pub addr app idx per (step res) re-xmt (cnt per) mod id [cid]Set publicationpub-get ele addr model Get publicationproxy-set proxy Set proxy stateproxy-getGet proxy stateident-set net idx state Set node identity stateident-get net idx Get node identity statbeacon-set state Set node identity statebeacon-getGet node beacon staterelay-set relay rexmt count rexmtsteps Set relayrelay-getGet relayhb-pub-set pub addr count period ttl features net idx Set heartbeat publishhb-pub-getGet heartbeat publishhb-sub-set src addr dst addr period Set heartbeat subscribehb-sub-getGet heartbeat subscribe
sub-add ele addr sub addr model id Add subscriptionsub-get ele addr model id Get subscriptionnode-resetReset a node and remove it from networkbackReturn to main menuversionDisplay versionquitQuit programexitQuit programhelpDisplay help about this programexportPrint environment variablesmenu onoff command listCommandDescriptiontarget unicast Set node to configuregetGet ON/OFF statusonoff 0/1 Send "SET ON/OFF" commandbackReturn to main menuversionDisplay versionquitQuit programexitQuit programhelpDisplay help about this programexportPrint environment variables
Appendix B - mesh-cfgclient command listThis section lists all the commands mesh-cfgclient supports, mesh-cfgclient has 2 command menus: main menumenu configmain menu command listCommandDescriptionconfigConfiguration Model Submenucreate [unicast range low]Create new mesh network with one initialnodediscover-unprovisioned on/off [seconds]Look for devices to provisionappkey-create net idx app idx Create a new local AppKeyappkey-import net idx app idx key Import a new local AppKeyappkey-update app idx Update local AppKeyappkey-delete app idx Delete local AppKeysubnet-create net idx Create a new local subnet (NetKey)subnet-import net idx key Import a new local subnet (NetKey)subnet-update net idx Update local subnet (NetKey)subnet-delete net idx Delete local subnet (NetKey)subnet-set-phase net idx phase Set subnet (NetKey) phaselist-unprovisionedList unprovisioned devicesprovision uuid Initiate provisioningnode-import uuid net idx primary ele count dev key Import an externally provisioned remotenodenode-delete primary ele count Delete a remote nodelist-nodesList remote mesh nodeskeysList available keysmenu name Select submenuversionDisplay versionquitQuit programexitQuit programhelpDisplay help about this programexportPrint environment variables
menu config command listCommandDescriptiontarget unicast Set target node to configuretimeout seconds Set response timeout (seconds)composition-get [page num]Get composition datanetkey-add net idx Add NetKeynetkey-update net idx Update NetKeynetkey-del net idx Delete NetKeynetkey-getList NetKeys known to the nodeappkey-add app idx Add AppKeyappkey-update app idx Add AppKeyappkey-del app idx Delete AppKeyappkey-get net idx List AppKeys bound to the NetKeybind ele addr [vendor id] app idx unbind ele addr [vendor id]mod-appidx-get[vendor id] app idx ele addr model id Bind AppKey to a model model id Remove AppKey from a model model id Get model app idxttl-set ttl Set default TTLttl-getGet default TTLpub-set ele addr pub addr app idx per Set publication(step res) re-xmt (cnt per) model id [vendor id]pub-get ele addr model id [vendor id]Get publicationproxy-set proxy Set proxy stateproxy-getGet proxy stateident-set net idx state Set node identity stateident-get net idx Get node identity statebeacon-set state Set node identity statebeacon-getGet node beacon staterelay-set relay rexmt count rexmt steps Set relay
relay-getGet relayfriend-set state Set friend statefriend-getnetwork-transmit-getGet friend statenetwork-transmit-set count steps Get network transmit stateSet network transmit statehb-pub-set pub addr count period ttl features net idx Set heartbeat publishhb-pub-getGet heartbeat publishhb-sub-set src addr dst addr period Set heartbeat subscribehb-sub-getGet heartbeat subscribevirt-addGenerate and add a virtual labelgroup-listDisplay existing group addresses and virtuallabelssub-add ele addr sub addr model id [vendor]Add subscriptionsub-del ele addr sub addr model id [vendor]Delete subscriptionsub-wrt ele addr sub addr model id [vendor]Overwrite subscriptionsub-del-all ele addr model id [vendor]Delete subscriptionsub-get ele addr model id [vendor]Get subscriptionnode-resetReset a node and remove it from networkbackReturn to main menuversionDisplay versionquitQuit programexitQuit programhelpDisplay help about this programexportPrint environment variables
Raspberry Pi 2B Raspberry Pi 3B Raspberry Pi 3B Raspberry Pi 4B If you have one of above-verified boards, please make sure that you: Follow this guide to setup your Raspberry Pi Check if the operating system on your verified board is ready, and, if not, follow this guide to
