Transcription
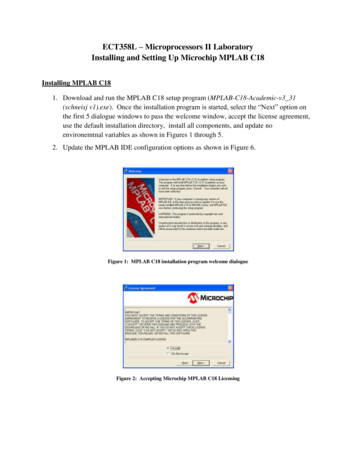
Installing and ConfiguringInformatica Intelligent CloudServices in Azure Cloud Copyright Informatica LLC 2019. Informatica, the Informatica logo, and Informatica Intelligent cloud servicesare trademarks or registered trademarks of Informatica LLC in the United States and many jurisdictionsthroughout the world. A current list of Informatica trademarks is available on the web athttps://www.informatica.com/trademarks.html
AbstractYou can use all the features of Informatica Intelligent cloud services through the secure agent on anAzure instance. This article describes how to install and set up Informatica Secure Agent with an Azurevirtual Instance to use Informatica Intelligent cloud services.Supported VersionsInformatica Intelligent Cloud Services.Table of ContentsOverview. .2Installation Methods 2Deployment Prerequisites . .3IICS Deployment in Azure Cloud Marketplace . .4Supported Configuration . .4Architecture Diagram . .5Deployment Steps .5How to register with Informatica Intelligent Cloud Services Account .11Steps to be followed to create secure agent group in IICS account 112
OverviewInformatica Secure Agent on Azure virtual instance allows you to connect to your Informatica Intelligentcloud services account to leverage your computing needs. Use as many secure agents as your licensepermits using this solution. Provide IICS registration account details and add a new agent in your IICSaccount.Installation MethodsTo install Informatica Secure Agent, use one of the following installation methods: Marketplace deploymentDeployment PrerequisitesBefore you deploy Informatica Intelligent cloud services in the Azure cloud, verify that you have performed thefollowing steps: Make sure that you have a valid account with Microsoft Azure Marketplace. Verify that you have a valid subscription in Microsoft Azure Marketplace to create resource Create new IICS account ported ConfigurationsOperating SystemWindows Server 2012 R2 DatacenterRed Hat Enterprise Linux 7.6Instance sizeStandard D2 v3Standard D4 v3Standard DS11 v23
Informatica Intelligent cloud services on Azure Architecture DiagramThe following diagram shows the Informatica Intelligent cloud services on Azure architecture with the AzureMarketplace:4
Informatica Intelligent cloud services Deployment in the Azure Cloud withthe Azure MarketplaceYou can deploy Informatica Intelligent cloud services in the Azure cloud with the Azure Marketplace. With theAzure Marketplace or Azure portal, you can ensure automatic and quick deployment of all the infrastructureto run in the Azure cloud.To deploy Informatica Intelligent cloud services in the Azure cloud with the Azure Marketplace, performthe following steps:1.Click on given link rch Informatica Intelligent Cloud Services – BYOL3.Click on Get it now - continueTo deploy Informatica Intelligent cloud services in the Azure cloud with the Azure Portal, perform thefollowing steps:1. Click on given link - https://portal.azure.com/#home2. Choose to create a resource option from top-left corner in azure portal.3. Search for Informatica Intelligent Cloud Services – BYOL4. Click on create5
Deployment Steps:Step 1. Configure Basic Settings to deploy IICSParameter label (name)DefaultDescriptionSubscriptionRequires inputSelect the subscription associated with youAzure accountResource GroupRequires inputCreate new resource group or choose existingresource group from dropdown list.RegionRequires inputSelect the required regional location where youwant to deploy IICS from the Region drop-downlist.6
Step 2. Configure IICS secure agent settings.Parameter label (name)DefaultDescriptionOperating SystemRequires inputVirtual machine nameRequires inputChoose deployment operating system.Windows Server 2012 R2 DatacenterRed Hat Enterprise Linux 7.6Name of the virtual machine where iicsdeployment resides.UsernameRequires inputVirtual machine username.PasswordRequires inputVirtual machine passwordSizeRequires inputSize of your machine i.e. number of cores and thememory size for deploying IICS.IICSUsernameRequires inputUsername of Informatica intelligent cloud servicei.e. while registering with IICS you have provided ausername, specify same username in box.7
Parameter label (name)DefaultDescriptionIICS PasswordRequires inputSecure agent group nameOptionalPassword of Informatica intelligent cloud servicei.e. while registering with IICS you have provided apassword, specify same password in IICSpassword textbox.This is optional. Name of the group that youwant the SecureAgnet to join to. If your accountdoesn’t have the group mentioned in this inputthe agent will be added to an unnamed group. Ifthis field is kept empty, then the agent will createits own group.NOTE: If IICS Username and Password is incorrect then, connection with secure agent will not work. To establishthe connection with secure agent, follow the steps provide in log file (for Linux - /home/iics/iics log.log and forwindows - C:\Informatica\secureagent.log).Step 3. Configure Infrastructure setting8
Parameter label (name)Virtual networkDefaultRequires inputSubnetsRequires inputCIDR IP Address RangeRequires inputStep 4. Summary of deployment.9DescriptionClick Virtual network. The Choose virtualnetwork pane appears with the list of virtualnetworks associated with the subscription andlocation you specified.Select the required virtual network or clickCreate new to create a new virtual network. Configure the following parameters if you wantto create a new virtual network: Name. Specify a unique name for the newvirtual network. Address space. Specify the range of IPaddresses for the virtual networkClick Subnets to specify the subnets that mustinclude all resources such as clustercomponents and virtual machines. The Subnetspane appears.Configure the following properties for theSubnets: Subnet name. Specify a unique name for thesubnet. Subnet address prefix. Specify a range of IPaddresses for the subnets.The CIDR public IP address range that you canuse to access the secure agent. For example:108.124.81.10/32
The summary page display all the inputs provided. The template validates the properties and values that youprovided for correctness. If any of the properties is incorrect and the validation fails, you cannot proceed furtherwithout correcting the property values Click Create to deploy IICS on Microsoft Azure Marketplace. The deployment progress appears on the top rightcorner of your screen.1. The template deploys the components in the following order:2. vnetSetup is for VPN and setups is for network security group3. nodesSetup is for Linux or Windows virtual machine and to install secure agent in it.10
How to register with Informatica Intelligent Cloud Services Account.Go to https://dm1-us.informaticacloud.com/ma/register and fill up the form. You will get a registration confirmation mailwith link to create your password.Once new password generation is done log in to your account using the region of pod you chose at thetime of registration.NOTE: There is only one datacenter location for IICS in Azure i.e. in US location.11
Steps to be followed to create secure agent group in IICS account.Click on Administrator.Then choose Runtime environments. There you will see your secure agents if any added.Create secure agent groups:12
Click on “New Runtime Environment” then create a new group.Authors Informatica Market Place R&D Team13
To deploy Informatica Intelligent cloud services in the Azure cloud with the Azure Marketplace, perform the following steps: 1. Click on given link https://azuremarketplace.microsoft.com/en-us. 2. Search Informatica Intelligent Cloud Services – BYOL 3. Click on Get it now - continue

