Transcription
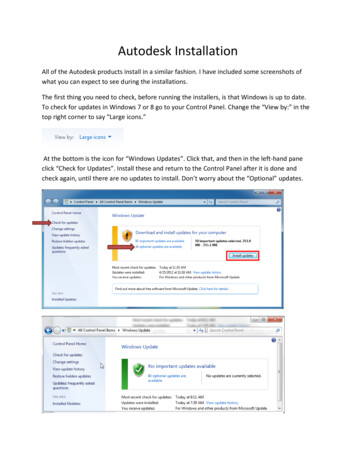
Autodesk InstallationAll of the Autodesk products install in a similar fashion. I have included some screenshots ofwhat you can expect to see during the installations.The first thing you need to check, before running the installers, is that Windows is up to date.To check for updates in Windows 7 or 8 go to your Control Panel. Change the “View by:” in thetop right corner to say “Large icons.”At the bottom is the icon for “Windows Updates”. Click that, and then in the left‐hand paneclick “Check for Updates”. Install these and return to the Control Panel after it is done andcheck again, until there are no updates to install. Don’t worry about the “Optional” updates.
If you have Windows 10 the process is a little different. You need to open the “Settings” app.You can type “Settings” in the search bar at the bottom by the Start button.Click the icon for “Update & security.” Then “Check for updates.”
Once that is done you can go to http://students.autodesk.com/ and create an account, or useyour existing account. Be sure to use your @huskers.unl.edu email account. This is how theyknow you are a student.Click on “Sign In” at the top of the page to get started. Click “Educational Community.”This opens a logon box to enter your credentials again or click “Signing up” to create anaccount.
If you have to create an account you will need to fill out this form.
They will email you and have you click a link to confirm your @huskers.unl.edu email address islegitimate.Once you have done this you will be able to logon and you will see your name at the top alongwith the “SIGN OUT” option.On the left side of the screen click “Free software.” This only gives you a “Featured” sample ofproducts. To get a list of all the packages they offer to students click the tab for “All Products.”
Here are the three packages you will need.
Click each package and select the options seen below to get your serial number and productkey before beginning the download process. They will email them to your @huskers.unl.eduemail address, but it is a good idea to write them down too.Click the little text balloon to expand download options. I recommend you select “BrowserDownload” to download the installer package. By default it will place the installer package inyour “My Downloads” folder. You then run the install manually. The “INSTALL NOW” optionuses an Autodesk software you install first, it then download’s the software installer and helpsstart the installation for you. HOWEVER, it does not always work. If you keep the default“INSTALL NOW” you will see the following, or something very similar.
First you install the Autodesk Download Manager.At the bottom of your browser you will see this. Click “Run” to begin installing the downloadutility. This will vary by which browser you are using.You may get the following installation windows and warnings from Windows. They may lookdifferent depending on your version of Windows and Firewall software. Click “Allow”Once the Download Manager is installed it will prompt you for the location to download theactual installer file. You can change it or leave it as the default.
NOTE: If you selected the “BROWSER DOWNLOAD” option (recommended above), this is whatyou will see when you double‐click the installer file you downloaded. After this, it will be theinstallation splash screen below.Notice that the file size just for Revit is 2Gb. This is going to take a while to download fromhome. If you have the option to do these downloads while plugged into the UNL campus’sEthernet instead of over wireless on campus or at home, I recommend doing it that way. Youwill not be able to download a 2Gb file from home in 7 minutes. This will decrease the chanceof you losing the download part way through. I would also only download one at a time toincrease your success rate.If you left the previous step at its default download location this process is going to create afolder directly off of the C:\ drive called Autodesk. What they don’t make clear is that inside ofthis Autodesk folder will be another nest of folders for each individual program. So for 3ds MaxDesign, for instance, there will be a folder named “3ds Max Design.” Inside that there is yetanother 3ds Max folder. If you ever need to re‐install, this is where to look for the installationfiles.When it finishes downloading the installer may start on its own, or you may have to click the“install” button that appears. This process is what creates another folder one rung deeper andthen extracts the actual installer files to that location. When it is done it automatically deletesthe original file you downloaded to save hard drive space and then begins the installation.
During the installation there may be more screens that you have to go through, but I haveincluded a couple of interest.Make sure the bubble for “Stand‐Alone” and “I have my product information” are the onesselected. This is where you enter your “Serial number” and “Product key.” You will get greencheck marks when the correct codes are entered. Click “Next.”
Now the install will begin. It will take approximately 30 minutes to finish, depending on whichsoftware package you are installing.When it is finished you will get this screen. Sorry the “Finished” box did not show up in thescreenshot below.
After the install is complete it is a good idea to check for updates. As part of the installAutodesk installs an update software package. To have it check for updates look for the blue‐green triangle in the system tray. Right‐click it and select “Check Now.” If there are updates youwill be prompted to open the program. You can open it the same way by right clicking andselect “Open.”From here you can select “Install Selected” at the bottom of the window. This process mayprompt more screens to click “OK” in order to get all the updates installed.
this Autodesk folder will be another nest of folders for each individual program. So for 3ds Max Design, for instance, there will be a folder named “3ds Max Design.” Inside that there is yet another 3ds Max folder. If you ever need
