Transcription
BOOKS and BROCHURES – User guideBOOKS and BROCHURESPhotoshop actionsFor Adobe Photoshop CC, CS6, CS5, CS4User Guide
BOOKS and BROCHURES – User guideCONTENTS1.2.3.4.5.6.THE BASICS . 11.1.About the actions . 11.2.How the actions are organized . 11.3.Installing and loading the actions in Photoshop . 1THE “SOFTBACK” AND “MAGAZINE” SETS . 22.1.About the effects. 22.2.Running the “Step 1” action . 42.3.Adding the graphics . 52.4.Running the “Step 2” action . 6THE “HARDBACK” SET . 73.1.About the effects. 73.2.Running the actions. 8THE “BROCHURES” SET . 94.1.About the effects. 94.2.Running the actions. 10THE “OPEN BOOK” SET . 115.1.About the effects. 115.2.Running the actions. 12THE “SPIRAL BOUND” SET . 136.1.Overview . 136.2.Working with the wirebound effects . 156.3.Working with the coil bound effects . 16
BOOKS and BROCHURES – User guide1. THE BASICS1.1. About the actionsThe “BOOKS and BROCHURES” Photoshop actions create a wide variety of hardback & softback books, magazines,open books and booklets, brochures, as well as spiral bound pads.1.2. How the actions are organizedThe product is a bundle of 6 Photoshop actions sets:Depending on the type of the effect that you wish to create, navigate to the folder where you saved the actionsand load the respective set in Photoshop.When you finish working with a particular set, you can unload it from the actions panel by selecting it and clickingthe panel’s trash icon. This won’t delete any files in your hard disk. It will merely unload the action fromPhotoshop and free up some memory.1.3. Installing and loading the actions in PhotoshopIf you don’t know how to install and use Photoshop actions, please refer to this leshooting/installing-photoshop-actions1 Panos Efstathiadis all rights reserved
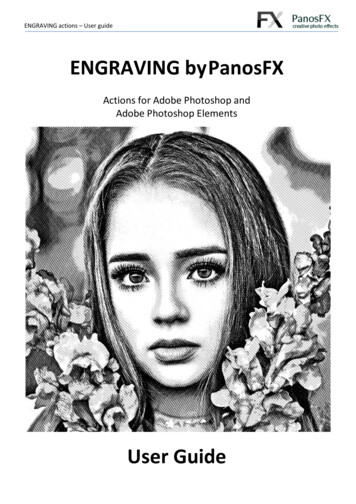
BOOKS and BROCHURES – User guide2. THE “SOFTBACK” AND “MAGAZINE” SETS2.1. About the effectsThese two sets produce a range of standing and laying softback books and magazines. As you can see in the abovescreenshots, the structure of the “Softback” and “Magazine” sets is identical. The actions work the same way inboth sets. We will therefore discuss both sets, in the following section.2 Panos Efstathiadis all rights reserved
BOOKS and BROCHURES – User guideEach set creates 3 different softcover books / magazines, with respect to the aspect ratio of the cover page: PORTRAITLANDSCAPESQUAREFor each of these 3 aspect ratios, the actions create 5 different Photoshop documents: A standing version, viewed from left.A standing version, viewed from right.A laying version, viewed from left.A laying version, viewed from front.A stack of 5 books / magazines.Therefore these actions produce 15 different magazines and 15 different softback books!3 Panos Efstathiadis all rights reserved
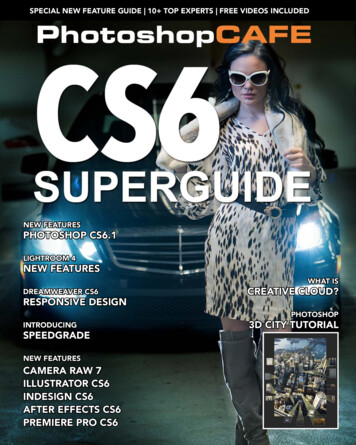
BOOKS and BROCHURES – User guide2.2. Running the “Step 1” actionEach effect involves two steps: Step 1 and Step 2.Depending on the kind of cover you wish to create, you must run the “Step 1”action first. Then you need to add your artwork manually and finally run the“Step 2” action to create the book / magazine.The actions begin with asking you to enter the preferred size for the cover page: You may change the default width or height.You may change the measurement units and the document resolution.You may not uncheck the “Resample” box.When you finish, hit OK to move on.4 Panos Efstathiadis all rights reserved
BOOKS and BROCHURES – User guideThe action will create a document, which is actually a ‘map’ of the cover and spine, projected in two dimensions:The 5 guidelines define the boundaries of the spine and the cover page.TIP: To change the color of the guidelines press Ctrl-K (Mac: cmd-K) and then click the “Guides, Grids and Slices” tab.2.3. Adding the graphicsThis part involves some manual work from your side. You must place your artwork on the cover and spine. Thisartwork may include: Photos, that you can import using the “File Place” command.Custom Text (press T).Vector shapes (press Shift-U).Solid Color, Gradient, and Pattern adjustment layers.3D layers.When you finish, do not flatten the image. Simply run the “Step 2” action below. Although it is not necessary, Irecommend you save the 2D template into a temporary location, before running the “Step 2” action.5 Panos Efstathiadis all rights reserved
BOOKS and BROCHURES – User guide2.4. Running the “Step 2” actionDepending on the size of the cover page, Photoshop may take from a few to several seconds to create thevarious books / magazines. When the action finishes you should have 6 different Photoshop documents open onyour work area: The first document is called the “Template”. It is actually the 2D ‘map’ you created earlier. It is stillavailable in case you wish to go back and make some changes. In this case close all documents except forthe “Template”; apply your changes and run the “Step 2” action again.The other 5 documents are fully layered Photoshop images that show the book / magazine from differentviewing angles.All layers are grouped under a group which is called “Group of layers”. Expand the group to reveal its contents.You may modify the opacity of the shadow and reflection to your preference.If you wish to modify / replace the background, click the “Background” layer. Then you may: Modify its style.Delete this layer and create a new background.TIP: Read the following tutorial to find out how to add interesting textured backgrounds to your impressive-textures-in-the-background6 Panos Efstathiadis all rights reserved
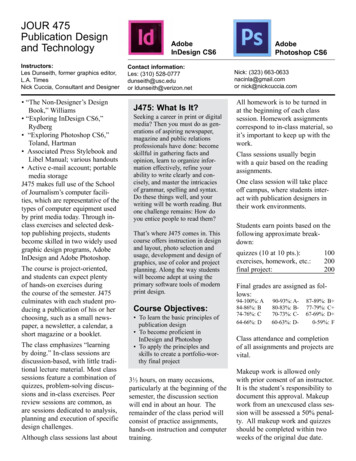
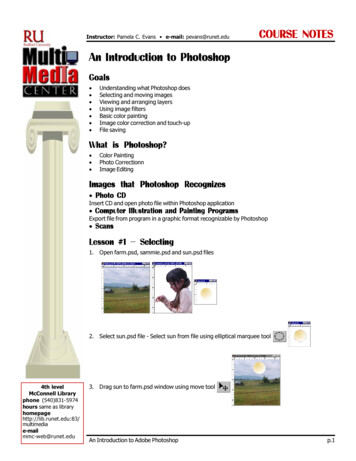
BOOKS and BROCHURES – User guide3. THE “HARDBACK” SET3.1. About the effectsAs the set name indicates, the “Hardback” actions create varioushardback books.The first action (“PORTRAIT”) creates 4 different versions of a book: A standing version, viewed from left.A standing version, viewed from right.A laying version, viewed from left.A stack of 5 books / magazines.The second action (“BOTH COVERS”) creates an openhardback book, with both cover pages visible:7 Panos Efstathiadis all rights reserved
BOOKS and BROCHURES – User guide3.2. Running the actionsYou must start with running the “Step 1” action first. The action will ask you to enter the preferred page size. Formore information please refer to section 2.2When the “Step 1” action finishes, you must add your artwork manually. For more information please refer tosection 2.3When you finish adding your graphics to the template you must run the “Step 2” action. Depending on the size ofthe cover page, it will take Photoshop some time to create the different the books / magazines.8 If you use the “PORTRAIT” effects, Photoshop will create 5 different Photoshop documents on your workarea.o The first document is called the “Template”. It is available in case you wish to go back and makechanges. In this case close all documents except for the “Template”; apply your changes and runthe “Step 2” action again.o The other 4 documents are fully layered Photoshop images that show the hardback book fromdifferent viewing angles. If you use the “BOTH COVERS” effects, Photoshop will create 2 different Photoshop documents on yourwork area.o The first document is called the “Template”. It is there in case you wish to go back and makechanges. In this case close all documents except for the “Template”; apply your changes and runthe “Step 2” action again.o The other document is the fully layered Photoshop image of an open hardback book. Panos Efstathiadis all rights reserved
BOOKS and BROCHURES – User guide4. THE “BROCHURES” SET4.1. About the effectsThe “BROCHURES” set contains three actions, executed into twosteps.9 The “Twofold” effects create brochures that are folded in half. The actions create two different versions: The “Threefold” effects create brochures that are folded in three equal parts. The actions create threedifferent versions: Finally, the “Roll (right)” action creates a twofold brochure whose right half is curved, forming a roll: Panos Efstathiadis all rights reserved
BOOKS and BROCHURES – User guide4.2. Running the actionsYou must start with running the “Step 1” action first. The action will ask you to enter the preferred page size. Formore information please refer to section 2.2When the “Step 1” action finishes, you must add your artwork manually onto the brochure. For more informationplease refer to section 2.3When you finish adding your graphics, proceed with running the respective “Step 2” action.When the actions finish, all layers are grouped together. Go to the actions panel and expand the layers group toreveal its contents. Then you may: Adjust the opacity of the “Gradient” layers (in the “Twofold” and “Roll-right” actions).Adjust the opacity of the “Folds” layers (in the “Threefold” action).Adjust the opacity of the “Shadow” layers.Double click the Gaussian blur smart filter in the “Shadow” layer, to change the default settings.Modify / replace the background.If you wish to go back and make any changes, close all open documents except for the “Template”. Apply yourchanges and run the “Step 2” action again, to recreate the brochures.10 Panos Efstathiadis all rights reserved
BOOKS and BROCHURES – User guide5. THE “OPEN BOOK” SET5.1. About the effectsThese actions create a variety of open book and booklets. Eachaction is executed into two steps.11 The “SOFTBACK” effects create two softback books, open in the first and middle pages, respectively: The “BOOKLET” effects create two booklets that are open in the middle pages: Panos Efstathiadis all rights reserved
BOOKS and BROCHURES – User guide5.2. Running the actionsYou must start with running the “Step 1” action first. The action will ask you to enter the preferred page size. Formore information please refer to section 2.2When the “Step 1” action finishes, you must add your artwork manually onto the pages. For more informationplease refer to section 2.3When you finish, proceed with running the respective “Step 2” action.When the actions finish, all layers are grouped together. Go to the actions panel and expand the layers group toreveal its contents. Then you may: Adjust the opacity of the “Glow” layers.Adjust the opacity of the “Shadow” layers.Modify / replace the background.If you wish to go back and make any changes, close all open documents except for the “Template”. Apply yourchanges and run the “Step 2” action again, to recreate the brochures.12 Panos Efstathiadis all rights reserved
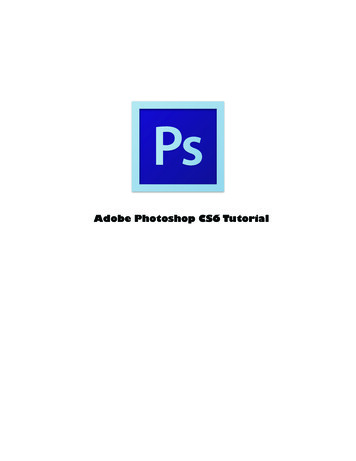
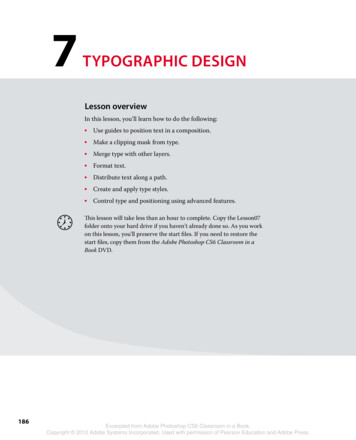
BOOKS and BROCHURES – User guide6. THE “SPIRAL BOUND” SET6.1. OverviewThese actions create several notepads, bound with a wire or a spiral coil.Overall, there are 6 wirebound effects and 4 coilbound effects.The WIREBOUND effects include:13 The two “Desktop” pads (facing left and right): The four “On the wall” effects: Panos Efstathiadis all rights reserved
BOOKS and BROCHURES – User guideThe COIL BOUND effects include:14 The “Landscape pad (1 page)” action: The “Portrait pad (2 pages)” action: The two “Square pad” actions, with one and two pages respectively: Panos Efstathiadis all rights reserved
BOOKS and BROCHURES – User guide6.2. Working with the wirebound effectsThe “Desktop” actions create a standing (desktop) wire bound pad. There are two versions, with the pad facing tothe left and to the right respectively.The “On the Wall” actions create a wirebound pad with a metallic spine. There are four different versions(portrait, landscape, wide landscape, square).Start with running one of these 6 actions.The action will ask you to enter the preferred page size. For more information please refer to section 2.2 . PressOK and the pad will be ready in a few seconds.To add your graphics to the front page:Double click the “Add your graphics” layer thumbnail: This will open a new, blank document that represents the graphics on the pad’s cover page. Add yourown artwork as was discussed in section 2.3 . When you finish, select File Save and then File Close from Photoshop’s menu. Alternatively, you canpress Ctrl-W (PC) or cmd-W (Mac) and save on exit. Your artwork will be added to the front page.To add a texture to the front page:Double click the "Front page" layer thumbnail and: Click the “fx” button and add a 'Pattern overlay' layer style. Alternatively you can select “Layer New Fill Layer Pattern” from the menu to add a 'Pattern Fill’ adjustment layer. I recommend you try Photoshop’s preset'Grayscale paper’ set of patterns. When you finish, select File Save and then File Close from Photoshop’s menu. Alternatively, you can pressCtrl-W (PC) or cmd-W (Mac) and save on exit.15 Panos Efstathiadis all rights reserved
BOOKS and BROCHURES – User guide6.3. Working with the coil bound effectsThese actions create a pad bound with a spiral coil. There are four different versions (landscape or square, with 1or two photos).Start with running one of the four actions.The action will ask you to enter the preferred page size. For more information please refer to section 2.2 . PressOK; in a few seconds the pad will be created.To add your graphics to the front page:Double click the “Add your graphics” layer thumbnail:This will open a new, blank document that represents the graphics on the pad’s cover page. Add your ownartwork as was discussed in section 2.3 .You will notice 4 guidelines: basically they show the margins that should be left between your artwork and thepage edges. Although it’s not compulsory to fit your artwork within this area, it is recommended to do so.When you finish, select File Save and then File Close from Photoshop’s menu. Alternatively, you can press CtrlW (PC) or cmd-W (Mac) and save on exit.To add a texture to the front page:Double click the "Front page" layer thumbnail and: Click the “fx” button and add a 'Pattern overlay' layer style. Alternatively you can select “Layer New Fill Layer Pattern” from the menu to add a 'Pattern Fill’ adjustment layer. I recommend you try Photoshop’s preset'Grayscale paper’ set of patterns. When you finish, select File Save and then File Close from Photoshop’s menu. Alternatively, you can pressCtrl-W (PC) or cmd-W (Mac) and save on exit.If you have any questions, please use the contact form on my site, or use the site forum.Panos Efstathiadis - www.PanosFX.com16 Panos Efstathiadis all rights reserved
BOOKS and BROCHURES – User guideThe photos used in this guide were kindly provided by Shutterstock. The Shutterstock IDs are as 220082257.jpg306667841.jpg Panos Efstathiadis all rights reserved
BOOKS and BROCHURES – User guide . BOOKS and BROCHURES . Photoshop actions . For Adobe Photoshop