Transcription
G-Code EditorQuick Start GuideRhinoCAM 2020Published: March 2020MecSoft Corpotation Copyright 1998-2020
RhinoCAM-G-CODE Editor 2020 Quick Start Guideby MecSoft CorporationUser Notes:
Contents3Table of ContentsQuick Start5Resource Guide8About this Guide91 Useful .Tips92 About.this Module103 Using.this Guide104 Watch.the Video!12Getting Ready131 Running.RhinoCAM132 About.the RhinoCAM Display133 Load .the G-Code Edit Module144 Load .the G-Code Files155 G-Code.Editing Strategy20Edit the G-Code File221 How Tools.are Used222 Add Character.Spaces223 Load .Your Tool Library244 Define.Your Tool Crib255 Add Line.Numbers286 Saving.Changes30G-Code Simulations331 Tool Motion.Simulation332 The Simulate.Tab343 Define.Your Stock354 Cut Material.Simulation39More G-Code Edits411 Estimate.Machining Time412 More .Edits43Where to go for more help47 MecSoft Corporation3
4RhinoCAM-G-CODE Editor 2020 Quick Start GuideIndex49 MecSoft Corporation
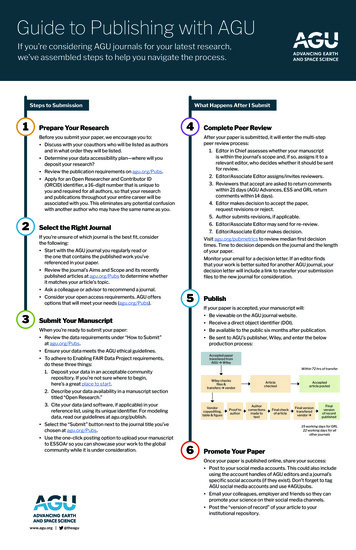
Quick Start5Quick StartRHINOCAM2020Prefer Printed Documentation? Check Here!Quick Start Guides for each RhinoCAM module are available in both PDF and Video format. Referto the following information to access these resources:What's New!You can find out What's New in the latest release of RhinoCAM here:What's New in RhinoCAM 2020Watch the What's New in 2020 Webinar!The Complete Quick Start Video Play ListHere is a link to the complete 2020 Video Play ListHow to Access the Quick Start Guide DocumentsTo help you quickly get started in working with each module, select one of the Helpbuttons located on the RhinoCAM Learning Resources dialog.You will find:· Quick Start Guides· What's New documents· Online Help linksThe Quick Start Guides will help you step through an example tutorial which willillustrate how to use the module. To access the Learning Resources dialog:1. From the Rhino Main Menu, drop down the Main menu and select Learn . MecSoft Corporation
6RhinoCAM-G-CODE Editor 2020 Quick Start GuideTo access the Learning Resources dilog in RhinoCAM2. Select a document from the Learning Resources dialog to get started using themodule of your choice.You can also select the Open Quick Start Files Folder button located at the bottomof the dialog to open the Quick Start folder where the source files (start andcompleted versions) are located. MecSoft Corporation
Quick StartLearning Resources Dialog MecSoft Corporation7
8RhinoCAM-G-CODE Editor 2020 Quick Start GuideResource GuideDownload this PDF Guide for a list of the available RhinoCAM Resources.2020 RhinoCAM Resource GuideThe 2020 RhinoCAM Resource Guide!18 PagesLists PDF downloads and Online resources including Quick StartGuides, Reference Guides, Exercise Guides, Tutorials andMore.Click Here to download this Free guide! MecSoft Corporation
About this Guide9About this GuideRHINOCAM2020On-line help compiled on: Wednesday, March 11, 20203.1Useful TipsHere are some useful tips that will help you use this guide effectively.1. For purposes of brevity, Rhino refers to both Rhinoceros 5 or Rhino 6.2. Copy the tutorial files to a location other than the installation folder to make sure youhave read/write privileges to the files.3. Once you start working with the tutorial file, save your work periodically!4. Don’t stress out too much if you are having trouble with the tutorial. Call us or send usemail and we can help you out.5. Most of all have fun! MecSoft Corporation
103.2RhinoCAM-G-CODE Editor 2020 Quick Start GuideAbout this ModuleG-CODE Editor is a companion module that runs inside of . G-CODE Editor assists users withediting g-code files created with RhinoCAM or from other systems that produce ISO standard gcode files. You can also define tool libraries, tool cribs to perform tool motion and cut materialsimulations.3.3Using this GuideIf you have installed RhinoCAM successfully on your computer and are now looking at the blankscreen of Rhino and wondering what to do next, this is the guide for you. This guide will explainhow to get started in using the RhinoCAM G-CODE EDITOR module to edit a simple g-code filethrough an example.This guide has associated Rhino files that you can find located in the QuickStart folder under theinstallation folder of RhinoCAM. These files are shown and listed below.List of Included Source Files·Source G-Code File:G-CODE-EDITQuickStartGuide.nc·Source Part File:G-CODE-EDITQuickStartGuide.3dm·Source Tool Library File:G-CODE-EDITQuickStartGuide.csv·Source Part File (Completed):G-CODE-EDITQuickStartGuide Completed.3dm·Note: Source part files are not required to view or edit G-Codefiles in the G-Code Editor module.Included Source Files MecSoft Corporation
About this GuideSource G-Code File:G-CODE-EDITQuickStartGuide.ncSource Part File:G-CODE-EDITQuickStartGuide.3dmSource Tool Library File:G-CODE-EDITQuickStartGuide.csv MecSoft Corporation11
12RhinoCAM-G-CODE Editor 2020 Quick Start GuideSource Part File (Completed):G-CODE-EDITQuickStartGuide Completed.3dm3.4Watch the Video!Want to see a video demonstration of this quick start guide? Just click on the image below.G-Code Editor Quick Start in RhinoCAM 2020 MecSoft Corporation
Getting Ready13Getting Ready4.1Running RhinoCAMLocate the Rhinoceros 5 (or Rhinoceros 6) shortcut on your desktop and double click to launch theapplication.Alternatively you can also click on the Windows Start button and select All Programs. Go to theprogram group containing Rhinoceros 5 (or Rhinoceros 6). (The name of this program group willusually be called Rhinoceros, unless you specified otherwise during setup.)Once you locate the program group, select it and then select Rhinoceros to launch the application.If the installation was successful, upon launching of Rhino you should observe a menu entry calledRhinoCAM 2020 in the main menu bar of Rhino.If you do not see this menu entry then please check the On Line Help document of the product(found in the installation folder) for help with trouble shooting the installation.4.2About the RhinoCAM DisplayBefore we begin, let's talk a bit about the RhinoCAM display. When you run RhinoCAM for thevery first time, your screen may look this.These windows on the left belong to plug-in modules that are currently loaded. For now, let'sclose all of them. MecSoft Corporation
14RhinoCAM-G-CODE Editor 2020 Quick Start GuideWith all plug-in modules closed your screen will look like this:4.3Load the G-Code Edit ModuleNow, let's begin by launching the RhinoCAM G-CODE EDITOR module.1. From the Rhino main menu bar, drop down the RhinoCAM 2020 main menu and select GCODE EDITOR. MecSoft Corporation
Getting Ready152. Docked on the left you will see the G-CODE Editor Browser. You can move or re-size thebrowser as desired.4.4Load the G-Code FilesYour G-Code files can be created from RhinoCAM or you can load G-Code files created from anyother CAM system that supports ISO standard g-code. For this guide we will be loading a part fileand a G-Code file created from RhinoCAM.You DO NOT need to have a part geometry file loaded in orderto edit G-Code files! It is loaded in this guide because this isthe part file the G-Code was posted from. You can load anystandard ISO G-Code file into the G-CODE Editor and perform edits,tool simulations without a part file loaded!Load the Part File1. From the Rhino Main Menu, select File / Open.2. From the Open dialog box, select the G-CODE-EDITQuickStartGuide.3dm filefrom the C:\ProgramData\MecSoft Corporation\RhinoCAM 2020 for Rhinox.x\QuickStart\ folder. As mentioned before, it is advisable to make a copy ofthis part at a suitable alternative folder so that you have write privileges tomodify the part.By default, the ProgramData folder is "hidden" from view. Here arethe steps to Show hidden files and folders: MecSoft Corporation
16RhinoCAM-G-CODE Editor 2020 Quick Start Guide1. For Windows 8 users: Go to Control Panel Appearance andPersonalization Folder Options.For Windows10 users: Go to Control Panel Appearance andPersonalization File Explorer Options.2. Select View tab and under advanced settings select Show Hidden filesand folders, clear the check boxes for:· Hide extensions for known file types· Hide protected operating system files (Recommended)3. Click Apply and OK.When the Load Settings from File dialog appears, pick No for this file. In thefuture you may have older files whose CAM System Preferences you wish to useso leave the box Do not display dialog again unchecked for now.The part appears as shown below MecSoft Corporation
Getting Ready17Source Part File:G-CODE-EDITQuickStartGuide.3dm3. From the Rhino display, double-left-click on the Perspective View tab tomaximize it.Load the G-Code File1. From the Project tab of the G-CODE Editor Browser, select Load.2. From the Open dialog box, select the G-CODE-EDITQuickStartGuide.nc file fromthe C:\ProgramData\MecSoft Corporation\RhinoCAM 2020 for Rhinox.x\QuickStart\ folder. As mentioned before, it is advisable to make a copy ofthis part at a suitable alternative folder so that you have write privileges tomodify the part.The G-Code file is loaded into the Project tree of the G-Code Editor Browser. MecSoft Corporation
18RhinoCAM-G-CODE Editor 2020 Quick Start GuideNotice that the G-Code file name appears in the Project tree with each toolreferenced by the file listed below it.Why are the tools flagged? The flag on the tool iconsindicatethat the tool numbers referenced within the loaded G-Code file could notbe found in the Tool Crib. These flags do not need to be resolved in order toperform edits to your G-Code file!Refer to the Load Your Tool Library section for more information.3. The backplot of the G-Code file is also displayed in the graphics screen coincidentwith the part geometry.As we mentioned previously, you DO NOT need to have a part geometryfile loaded in order to edit G-Code files! It is loaded in this guide becausethis is the part file the G-Code was posted from. You can load any standard ISOG-Code file into the G-CODE Editor and perform edits, tool motions andsimulations without a part file loaded!4. If the backplot of your G-Code file displays arc motions incorrectly as shownbelow, select the Preferences icon. MecSoft Corporation
Getting Ready195. From the Preferences dialog select Toolpath from the left. Here you can set theCircle center (I,J,K) format to match the G-Code file that you load. For example ifthe CAM system that generated the G-Code has arc centers formatted usingVector from Start to Center, the backplot of the G-Code file may show arcs beingdisplayed incorrectly. If this occurs you can set the same option here and pick OKor Apply and see that the arcs display properly. MecSoft Corporation
20RhinoCAM-G-CODE Editor 2020 Quick Start Guide8. Your part and G-Code backplot should now look like this:4.5G-Code Editing StrategyThe G-Code editing strategy you employ at any given time may be dictated by your preferences orhow your CNC machine controller expects the G-Code files to be formatted. The majority of the MecSoft Corporation
Getting Ready21format adjustments can be addressed within the post definition file using the PPG (PostProcessor Generator) included with RhinoCAM.However, there will be times when you may want or need to make manual edits to your G-Codefiles without having to revert back to the CAM system. Our editing strategy for this guide isoutlines below.G-Code Edit StrategyWe will follow the steps listed below for editing our G-Code file:1. Load the G-Code file into the G-Code Editor Browser.2. Perform some quick formatting edits and then output and save the G-Code file.3. Load a Tool Library and define a Tool Crib in preparation for G-Code simulations.4. Perform Tool Motion Simulations.5. Define a Stock model and perform Cut Material Simulations.6. Perform addition G-Code edits, estimate machine time and then save ourchanges to the G-Code file. MecSoft Corporation
22RhinoCAM-G-CODE Editor 2020 Quick Start GuideEdit the G-Code File5.1How Tools are UsedG-CODE Editor allows you to load a Tool Library and setup a Tool Crib. This allows you to match thetools that are referenced by the G-Code file. The Tool Library file (*.csv) can be generated andsaved from within the MILL module while the part file with the CAM toolpaths is loaded. The ToolCrib is defined from within G-CODE Editor.You DO NOT need to have a Tool Library or a Tool Crib loaded inorder to edit G-Code files! You can load and edit any standard ISOG-Code file with the G-CODE Editor.5.2Add Character SpacesYou can make edits to your G-Code file as soon as it is loaded into the editor. As mentionpreviously, you do not need a Tool Library or Tool Crib defined in order to edit the G-Code file. Inthis step we will add character spaces to the G-Code file.1. Right-click on the selected G-Code file located in the Project tree and select Edit.2. Pick Yes from the message that is displayed. Because no tools are defined yet, a defaulttool is used and displayed in the graphics window.3. You will see that the Project tab is replaced with Edit & Simulate tabs and the G-Code fileis loaded into the editor. The Edit tab contains all of the edit commands available in thecurrent update of RhinoCAM. MecSoft Corporation
Edit the G-Code File4. From the Edit tab, select23.5. Character spaces are inserted into the G-Code file as shown.6. When you want to return to the Project tab just select the icon shown below.7. You see now that the G-Code file is also flagged. This indicates that an edit was made andthat the file was not saved. We will make some additional edits so let's continue. MecSoft Corporation
245.3RhinoCAM-G-CODE Editor 2020 Quick Start GuideLoad Your Tool LibraryIn this step we will load a Tool Library containing the tools that are referenced from the G-Codefile. The Tool Library file for this guide was generated from the MILL module and saved in theQuickStart folder of your RhinoCAM install path.1. From the Project tab selectand then Load from the menu.2. From the Open dialog box, select the G-CODE-EDITQuickStartGuide.csv file from the C:\ProgramData\MecSoft Corporation\RhinoCAM 2020 for Rhino x.x\QuickStart\ folder andthen pick OK to load the file.As mentioned previously, it is advisable to make a copy of this file at a suitable alternativefolder so that you have write privileges to modify it if needed.The MILL module supports two types of Tool Library files (*.vkband *.csv) G-CODE Editor requires the *.csv file format.3. The Tool Library is then displayed allowing you to preview in the Tool information. MecSoft Corporation
Edit the G-Code File254. Now pick OK to close the Tool Library dialog. You will notice that the tools listed in theProject tree under the G-Code file and still flagged. That's because we need to setup theTool Crib.5.4Define Your Tool CribIn this step we will define our Tool Crib. The Tool Crib allows you to select the Tools from yourTool Library that are listed in the G-Code file. The reason for the Tool Crib is to two fold, (1) itmimics how tools are defined and selected for your CNC machine and (2) because a Tool Librarycan have multiple tools with the same Tool# , the Tool Crib allows you to define which tool to usefor the current G-Code file(s).1. From the Project tab select MecSoft Corporationto display the Tool Crib dialog.
26RhinoCAM-G-CODE Editor 2020 Quick Start Guide1. From the Tool Crib dialog select.The Tool Library dialog will display. MecSoft Corporation
Edit the G-Code File272. Our G-Code file references ALL of the tools in this library so you can drag a selectionwindow encompassing all of the tool records until they highlight.3. Now pick OK from the Tool Library dialog and the Tool Crib dialog will reappear with thetools listed. This will be the Tool Crib for this guide. Now pick OK from the Tool Cribdialog to close it.4. Now you will notice in the Project tab that all of the flags on each tool listed under the GCode file are gone! This means that each tool was located in the Tool Crib. MecSoft Corporation
285.5RhinoCAM-G-CODE Editor 2020 Quick Start GuideAdd Line Numbers1. Right-click on the selected G-Code file located in the Project tree and select Edit.2. You will see that the Project tab is replaced with Edit & Simulate tabs and the G-Code fileis loaded into the editor as shown below. MecSoft Corporation
Edit the G-Code File293. You can navigate quickly thru the G-Code by accessing the right-click menu shown below.The upper portion of the menu provides go to navigation commands. For exampleselecting Tool will move the cursor to the next line containing a Tool# call. You can alsomove quickly to the Top and Bottom of the file and to the next Feedrate and Spindlecodes. MecSoft Corporation
30RhinoCAM-G-CODE Editor 2020 Quick Start Guide4. You will notice that line numbers are displayed in the left side column of the G-CodeEditor. These are for reference only and are not in the G-Code file. To add Line Numbersto your G- Code file, selectfrom the Edit tab.5. Line numbers are appear in the G-Code file as shown.5.6Saving ChangesUse the following techniques to save your G-Code files.1. To save and write over your original G-Code file, selectfrom the Edit tab. MecSoft Corporation
Edit the G-Code File312. Pick OK to save over the original G-Code file. If you do not want to overwrite your originalfile, make sure to make a copy of it first using standard Windows copy/paste commandsfrom the file browser.3. Now return back to the Project tab.4. You will notice that the G-Code file is flagged because it has not been saved.5. You can also save your G-Code file from the Project tab by selectingProject tab menu. MecSoft Corporationfrom the
32RhinoCAM-G-CODE Editor 2020 Quick Start Guide MecSoft Corporation
G-Code Simulations33G-Code Simulations6.1Tool Motion SimulationNow that we have a Tool Library loaded and a Tool Crib defined all simulations that we do willdisplay the correct tool. Our first simulation will be a Tool Motion simulation. The tool will bedisplayed in the graphics screen as it follows each line in the G-Code file.1. Select the G-Code file from the Project tab, right-click and select Simulate.2. The G-Code file is loaded into the Simulate tab and the cursor begins at the top of the fileand proceeds to the bottom of the file while a graphical display of the tool is shown in thegraphics screen at each line in the G-Code file.3. Here are some operations tips when running a Tool Motion Simulation:A. During the tool motion simulation, you can use the icons on the Simulate tab toPause, Stop and Start the simulation. MecSoft Corporation
34RhinoCAM-G-CODE Editor 2020 Quick Start GuideB. Once the simulation is Paused, Stopped or reaches the end of the G-Code file, you canthen manually move the cursor to any line in the G-Code file to see the exact toolposition at that line. This is very helpful for locating the exact line of code that iscausing a problem.C. If you are getting an error message from your CNC machine controller and it reports aline # where the error occurred, you can analyze the G-Code and tool position at thatline number. This is very helpful for understanding the error and how best to takecorrective action.6.2The Simulate TabThe Simulate tab provides commands for running simulations and access to simulationpreferences. Here is a brief description of the Simulate tab. These commands work in the samemanner as those in the MILL module.1. Select the G-Code file from the Project tab, right-click and select Simulate.2. While the Tool Motion Simulation is running you can select the Pause button to stop thesimulation at the current line in the G-Code file. Selecting Play will continue thesimulation. Step will run the simulation incrementally. You can also select Preferences toaccess the Simulation Preferences. These are the same Preferences located in thePreferences dialog.Optionally you can Pause the simulation and then use the Up and Down Arrow Keys onyour keyboard to move the simulation Forward or Reverse line by line. MecSoft Corporation
G-Code Simulations6.3Define Your StockIn order to run a Cut Material Simulation you must have a Stock defined.1. Pause or Stop any simulation that is currently running by selecting the appropriatecommand from the Simulate tab. MecSoft Corporation35
36RhinoCAM-G-CODE Editor 2020 Quick Start Guide2. Return to the Project tab.3. From the Project tab selectand then select Box Stock . from the menu. MecSoft Corporation
G-Code Simulations4. This will display the Box Stock dialog similar to the MILL module. MecSoft Corporation37
38RhinoCAM-G-CODE Editor 2020 Quick Start Guide5. Select the Copy Model Bounding Box button. The stock model will be displayed in thegraphics window that matches the size of the part model. MecSoft Corporation
G-Code Simulations396. Now enter 1.125 for the Height (H) dimension in the Box Stock dialog. This will add 0.125to the height of the Stock model.7. Now pick OK to close the Box Stock dialog.6.4Cut Material SimulationWith our Stock defined we can now perform a Cut Material Simulation. With Stock defined,selecting Simulate will now display the in-process cut stock at each line in the G-Code file!1. First let's hide the display of the Part model to see the Cut Material Simulation moreclearly.Select the Part model from the graphics screen and then press the (Ctrl H) keyboardshort cut to hide the Part model.Now only the Stock model and the G-Code backplot are displayed in the graphics window. MecSoft Corporation
40RhinoCAM-G-CODE Editor 2020 Quick Start Guide2. Now select the G-Code file from the Project tab, right-click and select Simulate.3. The G-Code file is loaded into the Simulate tab and the cursor begins at the top of the fileand proceeds to the bottom of the file while a graphical display of the tool is shown in thegraphics screen at each line in the G-Code file. MecSoft Corporation
More G-Code EditsMore G-Code Edits7.1Estimate Machining TimeYou can get additional Information about the G-Code files currently loaded into the G-CODEEditor.1. Select the Edit tab to return to the Edit menu.2. Now select MecSoft Corporationfrom the Edit menu to display the Information dialog.41
42RhinoCAM-G-CODE Editor 2020 Quick Start Guide3. You can also perform this task from the Project tab. Return to the Project tab, select the GCode file and then selectdialog.from the Project menu to display the InformationYou can also right-click on the G-Code file and select Info to display the Informationdialog. MecSoft Corporation
More G-Code Edits7.243More EditsLet's perform one additional edit before we complete this guide.1.Right-click on the selected G-Code file located in the Project tree and select Edit.1. If you recall back in the section Add Line Numbers, you were warned that no appropriatetools were found. That's because we did not have a Tool Library and Tool Crib loaded yet.Now when you go to the Edit tab, the first tool # is loaded and displayed in the graphicsscreen at the beginning of the first tool motion.2. You will see that the Project tab is replaced with Edit & Simulate tabs and the G-Code fileis loaded into the editor as shown below. MecSoft Corporation
44RhinoCAM-G-CODE Editor 2020 Quick Start Guide3. One edit than many users find useful is to retract the tool to a higher Z height once cuttingis completed.From the Edit tab right-click on any line in the G-Code file and select Bottom to go directlyto the end of the file.4. Now place the cursor on the last G0 line and notice where the tool is position in thegraphics screen. MecSoft Corporation
More G-Code Edits5. Now change Z1.5 to Z5.0 and notice that the tool rises up to the Z5.0 location. MecSoft Corporation45
46RhinoCAM-G-CODE Editor 2020 Quick Start Guide6. Refer to the section Saving Changes to update your external G-Code file will all of thelatest changes. MecSoft Corporation
Where to go for more help47Where to go for more helpDownload this PDF Guide for a list of the available RhinoCAM Resources.2020 RhinoCAM Resource GuideThe 2020 RhinoCAM Resource Guide!18 PagesLists PDF downloads and Online resources including Quick StartGuides, Reference Guides, Exercise Guides, Tutorials andMore.Click Here to download this Free guide! MecSoft Corporation
IndexIndex-S--AAboutthe G-Code Editor Module10the RhinoCAM Display13This Guide9using this Guide10Add Character Spaces22Add Line Numbers28-EEditAdd Character Spaces22Add Line Numbers28Tool Retract Z Height43-L14Machining Time Estimates-P8, 47-Q5-RResource Guide8Running RhinoCAM13 MecSoft CorporationStrategy393920-TToolsDefine a Tool Crib25How that are Used22Load a Tool Library24-U-WWhere to go for more help-M-Quick Start5Quick Start GuidesSaving Changes30SimulationsCut Material SimulationsDefine Stock for35In-Process Stock DuringThe Simulate Tab34Tool Motion33Useful Tips9Using this Guide and Associated Part FilesLearning Resources5Loadthe G-Code Edit Modulethe G-Code Files15Print Media Archive49414710
1. For purposes of brevity, Rhino refers to both Rhinoceros 5 or Rhino 6. 2. Copy the tutorial files to a location other than the installation folder to make sure you have read/write privileges to the files. 3. Once you start workin