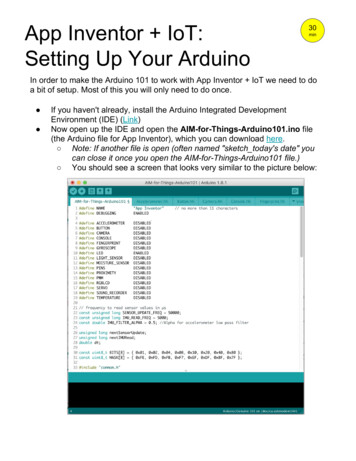
Transcription
Arduino Comparison Guide a learn.sparkfun.comtutorialAvailable online at: http://sfe.io/t122ContentsIntroductionTotally TabularATmega328 BoardsATmega32U4 BoardsWearable ArduinosMegas, ARMs, Yúns.Oh My!Resources and Going FurtherIntroductionLet's face it, there are a a lot of different Arduino boards out there. How do you decide which oneyou need for your project? In this tutorial, we'll take a look at the diverse world of Arduino boards.We'll begin with a tabular overview of the features each board has. Then we'll delve deeper intoeach board, examining the pros, cons, and example use-cases.Page 1 of 27
Arduino is an open-source electronics prototyping platform based on flexible, easy-to-use hardwareand software. It's intended for artists, designers, hobbyists, and anyone interested in creatinginteractive objects or environments. Or more simply, you load on some code and it can readsensors, perform actions based on inputs from buttons, control motors, and accept shields to furtherexpand it's capabilities. Really, you can do almost anything.All Arduino boards have one thing in common: they are programmed through theArduino IDE. Thisis the software that allows you to write and upload code. Beyond that, there can be a lot ofdifferences. The number of inputs and outputs (how many sensors, LEDs, and buttons you can useon a single board), speed, operating voltage, and form factor are just a few of the variables. Someboards are designed to be embedded and have no programming interface (hardware) which youwould need to buy separately. Some can run directly from a 3.7V battery, others need at least 5V.Check the chart on the next page to find the right Arduino for your project.Suggested ReadingIf you don't know what Arduino is but found yourself here, you may want to start with ourWhatis an Arduino tutorial.You should also have a good understanding of the Arduino IDE. If you need help installing it,visit this tutorial.Totally TabularPage 2 of 27
For a quick cross-comparison of the available Arduinos, here's a (totally tubular) tabular look at thevariety of boards. The boards are sorted by their main microcontroller, which is what defines mostof the characteristics for each of them.ItemSystem Clock Digital AnalogPWM UARTVoltage SpeedI/OInputsProgrammingInterfaceCostATmega328 Boards — 32kB Program Space // 1 UART // 6 PWM // 4-8 Analog Inputs // 9-14Digital I/O5V16MHz14661USB viaATMega16U2 29.955V16MHz14661USB viaATMega16U2 29.955V16MHz14661USB via FTDI 24.953.3V8MHz14661FTDI-CompatibleHeader 14.955V16MHz14661FTDI-CompatibleHeader 14.95Arduino Uno R3Arduino Uno R3SMDRedBoardArduino Pro3.3V/8MHzArduino Pro5V/16MHzPage 3 of 27
5V16MHz14861FTDI-CompatibleHeader 33.953.3V8MHz14861FTDI-CompatibleHeader 9.955V16MHz14861FTDI-CompatibleHeader 9.955V16MHz14661FTDI-CompatibleHeader 59.95Arduino Mini 05Arduino ProMini 3.3V/8MHzArduino ProMini eHeader orWirelessly via 24.95XBee†Arduino Fio3.3V8MHz146LilyPadArduino 328Main BoardPage 4 of 2761FTDI-CompatibleHeader 21.95
3.3V8MHz9450‡FTDI-CompatibleHeader 19.95LilyPadATmega32U4 Boards — 32kB Program Space // 1 UART // 5-7 PWM // 12 Analog Inputs // 9Arduino Simple20 Digital I/OBoard5V16MHz20*1271Native USB 24.955V16MHz121251Native USB 19.953.3V8MHz121251Native USB 19.955V16MHz91250Native USB 24.95ArduinoLeonardoPro Micro5V/16MHzPro Micro3.3V/8MHzLilyPadArduino USBATmega2560 Arduino Mega's — 256kB Program Space // 4 UARTs // 14 PWM // 16 AnalogInputs // 54 Digital I/O5V16MHz5416Arduino Mega2560 R3Page 5 of 27144USB viaATMega16U2 58.95
3.3V8MHz5416144FTDI-CompatibleHeader 44.955V16MHz5416144FTDI-CompatibleHeader 44.953.3V8MHz5416144FTDI-CompatibleHeader 49.95Mega Pro 3.3VMega Pro 5VMega Pro Mini3.3VAT91SAM3X8E Arduino Due — 512kB Program Space // 4 UARTs // 12 PWM (2 DAC) // 12Analog Input // 54 Digital I/O3.3V84MHz5412124USB native 49.95Arduino Due*The Arduino Leonardo has the same GPIO pin-count as the other "Uno" style boards, but more ofthe pins play "double duty" as both analog and digital pins, hence the higher numbers.†TheminiUSB connector on the Arduino Fio is used for battery charging only. An Xbee module isnot included with this board.‡TheLilyPad Simple Board does have one UART but the pins aren't broken out to pads. Serialcommunication can be achieved through the FTDI header.Glossary of Terms:Microcontroller (MCU): The microcontroller is the heart (or, more appropriately, the brain) of theArduino board. The Arduino development board is based on AVR microcontrollers of different types,Page 6 of 27
each of which have different functions and features.Input Voltage: This is the suggested input voltage range for the board. The board may be rated fora slightly higher maximum voltage, but this is the safe operating range. A handy thing to keep inmind is that many of the Li-Po batteries that we carry are 3.7V, meaning that any board with aninput voltage including 3.7V can be powered directly from one of our Li-Po battery packs.System Voltage: This is the system voltage of the board, i.e. the voltage at which themicrocontroller is actually running. This is an important factor for shield-compatibility since the logiclevel is now 3.3V instead of 5V. You always want to be sure that whatever outside system withwhich you're trying to communicate is able to match the logic level of your controller.Clock Speed: This is the operating frequency of the microcontroller and is related to the speed atwhich it can execute commands. Although there are rare exceptions, most ATmega microcontrollersrunning at 3V will be clocked at 8MHz, whereas most running at 5V will be clocked at 16MHz. Theclock speed of the Arduino can be divided down for power savings with a few tricks if you knowwhat you're doing.Digital I/O: This is the number of digital input/output (I/O) pins that are broken out on the Arduinoboard. Each of these can be configured as either an input or an output. Some are capable of PWM,and some double as serial communication pins.Analog Inputs: This is the number of analog input pins that are available on the Arduino board.Analog pins are labeled "A" followed by their number, they allow you to read analog values usingthe analog-to-digital converter (ADC) in the ATMega chip. Analog inputs can also be configured asmore digital I/O if you need it!PWM: This is the number of digital I/O pins that are capable of producing aPulse-width modulation.(PWM) signal. A PWM signal is like an analog output; it allows your Arduino to "fake" an analogvoltage between zero and the system voltage.UART: This is the number of separate serial communication lines your Arduino board can support.On most Arduino boards, digital I/O pins 0&1 double as your serial send and receive pins and areshared with the serial programming port. Some Arduino boards have multiple UARTs and cansupport multiple serial ports at once. All Arduino boards have at least one UART for programming,but some aren't broken out to pins that are accessible.Flash Space: This is the amount of program memory that the chip has available for your to storeyour sketch. Not all of this memory is available as a very small portion is taken up by the bootloader(usually between 0.5 and 2KB).Programming Interface: This is how you hook up the Arduino board to your computer forprogramming. Some boards have a USB jack on-board so that all you need to do is plug them into aUSB cable. Others have a header available so that you can plug in an FTDI Basic breakout or FTDICable. Other boards, like the Mini, break out the serial pins for programming but aren't pincompatible with the FTDI header. Any Arduino board that has a USB jack on-board also has someother hardware that enables the serial to USB conversion. Some boards, however, don't needPage 7 of 27
additional hardware because their microcontrollers have built-in support for USB.This table serves to overview all of the Arduino boards. You may have an idea of which Arduinoboard is right for you now. On the next few pages we'll split into different categories of Arduinos andexplore their differences more closely.ATmega328 BoardsThe ATmega328 (and the ATmega168 before that, and ATmega8 before that,.) is a staple of theArduino platform. 32kB of flash (program space), up to 23 I/Os -- eight of which can be analoginputs -- operating frequencies of up to 20 MHz. None of it's specifications are flashy, but this is stilla solid 8-bit microcontroller. For many electronics projects, what the 328 provides is still more thanenough.The Arduino boards on this page all feature the ATmega328 as their main MCU brain. Themicrocontroller alone makes every board on this page nearly identical in terms of I/O count andmemory. Their differences stem from things like programming interfaces, form factors, andoperating voltages.The Main Event: Arduino UnoThe Arduino Uno is the "stock" Arduino. It's what we compare every, other, Arduino-compatibleboard to. If you're just getting into Arduino, this is the board to start with.Page 8 of 27
The Uno comes in two flavors, through-hole and SMD, which use either a through-hole or surfacemount ATmega328. The through-hole version (pictured above) is nice because you can take thechip out and swap in a new one (in case the magic, blue smoke is released), but the SMD versionhas the potential to be more readily available (PTH chips are increasingly being phased out ofexistence).The Arduino Uno can be powered through either the USB interface, or an external barrel jack. Toconnect it to a computer you'll need a type-B-to-A USB cable (like the USB connector on mostprinters).A Modification: RedBoardOne of the greatest things about Arduino is the fact that the entire project is open-source. Theschematics, hardware design files, and source code are all freely available for viewing andmodification. Released under a Creative Commons Share Alike license, anyone is free to riff on thehardware design and produce their own version. That's how a product like the RedBoard comes tobe. It still looks and acts just like an Arduino Uno, but is slightly modified to make the board bettersuited to certain purposes.Page 9 of 27
The RedBoard is nearly identical to the Uno, but there are a few key differences:USB connector: The Redboard uses the smaller mini-B connector, so you'll need a mini-B-toA USB cable to connect it to your computer.USB-to-Serial Transciever: The Arduino Uno uses an ATmega16U4 loaded with customfirmware to convert between USB and serial. The RedBoard uses the FTDI FT232RL. Thisdifference is only really prevalent when installing drivers because each requires a differentdriver file.SMD vs PTH: The RedBoard is only offered in a SMD version, and it takes SMD a step furtherby making every component surface-mount. No sharp edges on the bottom of the board!Color: True to it's name, the RedBoard comes inFerarri SparkFun red. It won't have any realinfluence on the operation of the Arduino, but it certainly affects the board's swag-factor.Price: Because we manufacture the board in-house, here in Boulder, CO, we can afford tokeep the price-tag a tad lower.Like the Uno, the RedBoard is great for beginners. On the whole, it should offer the same Arduinoexperience as an Uno might. For a deeper comparison between the RedBoard and Uno, check outour RedBoard vs. Uno tutorial.For the ProsArduino Pros are a scaled-down version of the Uno. There's still an ATmega328 on there, butremoved are the connectors and USB-to-serial-converting circuitry. Basically, this is the barePage 10 of 27
minimum an Arduino needs to still be an Arduino. As the name would imply, these boards areintended for use by more experienced Arduino-ers.You'll need more than just a USB cable to program an Arduino Pro; an external board is required toconvert USB from your computer to serial that the Arduino understands. There are various boardsand cables that can accomplish this task, we recommend the FTDI Basic Breakout.This board mates up to the 6-pin, right-angle connector on the edge of the board. When you'redone programming and ready to stick the board into a project, just unplug the FTDI Basic.Page 11 of 27
The smaller form factor and absence of connectors means this board can be morecustom-tailoredto fit into a project. You can solder wires or connectors directly onto the pins you need. Then again,it has the same pin footprint as the Uno, so it's still shield compatible.The Pros come in two varieties: 5V/16MHz and 3.3V/8MHz. The 5V/16MHz board runs at the samevoltage and speed as the Arduino Uno. The 3.3V/8MHz board is unique, though, because it canoperate at a lower voltage. A lower operating voltage makes the board easier to power withbatteries (LiPos specifically), but it also means the clock speed has to be turned down. The3.3V/8MHz board runs at half the speed a regular Arduino Uno.but 8MHz is still pretty darn fast formany applications. You can still turn an LED on and off more than a million times per second!Of course, if this board is still to big, you can shrink it down even further.Pro Mini'sThe Mini boards pack all of the remaining punch of the Arduino Pro into a much smaller footprint.Every pin is still broken out (actually, more pins are broken out), they're just in a very differentfootprint.An Arduino Pro Mini attached to an FTDI Basic, which provides power and uploads code.Page 12 of 27
Obviously, these boards aren't shield-compatible, but they are breadboard-compatible. You cansolder male headers into the Pros, and straddle it across the breadboard's middle strip. The smallform-factor also makes them very conducive to embedding into projects (like in the H2O pH Probe).Like the regular Pro boards, these are offered in5V/16MHz and 3.3V/8MHz varieties. And you stillhave to program them with an FTDI Basic.The Arduino Mini 05 could also be lumped into this category. It shares a lot in common with theProMinis, except it comes with male headers pre-soldered in.EtceteraThere are innumerable Arduino-compatible boards out there which make use of the ATmega328.Many, like the Arduino Pros, require an FTDI Basic to receive code, but they add on extra hardwareto make them unique. The Arduino Ethernet, where the Arduino Uno and an Ethernet Shield aresmashed onto a single board, is a good example of this.Page 13 of 27
And, the Arduino Fio too. This board wires up the ATmega328 to an XBee (or XBee-compatible)wireless transceiver, so your Arduino can communicate wirelessly with other devices.Page 14 of 27
The list could go on and on. If you see a board with that recurring, six-pin, serial header, and anATmega328 doing all of the processing, its specifications probably aren't all that different from anArduino Pro.ATmega32U4 BoardsThe next step in the Arduino evolutionary chain was merging the USB-to-Serial programming partof the board onto the main MCU. That meant we had to leave the ATmega328 behind -- becuase itdoesn't natively support USB -- in favor of the ATmega32U4. Aside from the additional USBsupport, the 32U4 is largely similar to the 328. Both are 8-bit AVRs with 32kB of flash memory, 22ish I/O lines, ADCs, UARTs, timers, etc.These ATmega32U4 boards often have the benefit of being cheaper than the ATmega328-basedboards -- there's one less costly IC to put on there. They can also do things regular Arduino boardscan't, like emulate a USB keyboard/mouse. On the downside, they can be less reliable, and moredifficult to use.Arduino LeonardoPage 15 of 27
The Leonardo is the patriarch of all ATmega32U4 Arduino boards. It shares the same form factorand I/O placement (analog, PWM, I2C pins in the same place) as the Arduino Uno, so it remainsshield compatible.Differences between the Leonardo and the Uno? Aside from the new microcontroller, and lack of asecond USB-to-Serial-converting IC, there's not many. The USB connector is different, theLeonardo connects to a computer via a micro-B USB cable. The driver installation process is also abit more involved -- sometimes it can take a little extra fidgeting to get the board installed on yourcomputer.Pro MicroJust as the Pro Mini took the guts of the Arduino Uno and shrunk them down, the Pro Micro worksas a miniature version of the Leonardo. Unlike the Pro Mini, the Pro Micro doesn't require anexternal board to upload a sketch -- the 32U4 takes care of everything!Page 16 of 27
The Pro Micro comes in the standard 5V/16MHz operating range or a more unique 3.3V/8MHzvariant.Pro Micros are among the more complicated Arduino boards to get up and running. There areextrasteps required to enable them in your Arduino environment, and a misstep can (at least temporarily)"brick" the Pro Micro.These boards are a good choice if you're an advanced Arduino-er and have a small USB-orientedproject in mind (a mini USB keyboard/mouse?).More Variants!There are plenty of other riffs on the Leonardo design as well. There's theFio v3, for any ArduinoLeonardo project you might want to add an XBee to.Page 17 of 27
And there are more unique Leonardo-compatible boards, like theMaKey MaKey, which can turnalmost anything (from tin foil to Play-Doh to bananas) into a keyboard key.The ATmega32U4 can make some very cool USB-integrated Arduino projects.Wearable ArduinosThe e-textiles segment of the Arduino market is ruled by LilyPads. These are identifiable as uniquepurple, flowery-looking, circular boards. The pins on LilyPads are called "petals", they have biggerPage 18 of 27
holes and copper filled to the edge of the board. These are designed so conductive thread can besewn through the holes, and make electrical contact with the exposed copper on the petal.LilyPads are great for e-texitles -- projects which combine electronics and fabric wizardy. They canbe used to make nifty talking aprons, dice gauntlets, or more simple trinkets like light-up firefly jars.ATmega328 LilyPadsThe O.G. LilyPad is the LilyPad Arduino. This is basically a purple Arduino Pro 3.3V/8MHz.All ofthe pins -- 14 digital and six analog -- are arranged around the outer edge of the board. There arealso inputs for power at the ' ' and '-' pins.Page 19 of 27
Like the Arduino Pro, the ATmega328 LilyPads are all programmed using an external FTDI Basic.There's even a purple one especially for LilyPads!Keep it SimpleTrue to its name, the LilyPad Arduino Simple is an easier-to-use version of the standard LilyPadArduino. Fewer pins are broken out -- nine digital and four analog -- but the LilyPad Simple hassome added functionality too. This board is designed specifically to be powered by a LithiumPolymer battery. There's an on-board JST connector for the battery to plug into, and there's evena special circuit dedicated to charging the battery.Page 20 of 27
This Board is recommended for beginners and experts alike. As long as you're OK with having lessI/O pins, the extra functionality of the Simple makes it well worth it.Make it SnappyThe LilyPad Arduino SimpleSnap is an offshoot of the Simple. The layout is the same, the batterycharging functionality is still there, but instead of an array of petals around the board there aresnaps.These snaps can be plugged into the mating snaps on a SimpleSnap ProtoBoard, or any size 1/0snap already sewn into a fabric.Page 21 of 27
A permanently attached battery on the SimpleSnap also sets it far apart from other LilyPadboards. Just flick the switch to "ON" and the board should start running its sketch. To charge thebattery, plug an FTDI Basic into the SimpleSnap.This board is an awesome choice if you want the added ability of easily removing your LilyPad froman e-textiles project. You can unsnap the board and wash your textile, or even share it with anotherproject.LilyPads with USB Built-InThe boards above -- all with an ATmega328 as the brain -- all require an external FTDI Basic tohave code uploaded to them. The LilyPad Arduino USB -- which uses an ATmega32U4 -- has all ofthe USB functionality on-board. It has a micro-B USB connector, so you just plug the cable in,attach it to your computer, and program away!The LilyPad Arduino USB is comparable to other ATmega32U4 boards, like the Leonardo. It's gotnine digital I/O's and 12 analogs. Like the LilyPad Simple, this board has an on-board JSTconnector and LiPo battery charge circuit. So it's very easy to pair with a LiPo battery and embedinto your project.Megas, ARMs, Yúns.Oh My!Need some extra "beef" in your Arduino? Need more I/O pins, or a faster processor? That's wherePage 22 of 27
Arduino's like the Mega or the Due come into the picture.Arduino Mega: The Souped Up UnoThe Arduino Mega is what you might get if you packed four Arduino Uno's into one board. There are54 I/O pins, instead of the 14 an Uno gives you. That's a whole lot of extra LEDs! Instead of onehardware serial port, there are four. And the Mega sports a whopping 256 kB of flash programspace. Not to mention 16 analog inputs, and 14 PWM outputs. The Mega just has more ofeverything.The brain of the Mega is an ATmega2560, a fully souped up ATmega328. Aside from the massiveprocessor overhaul, the Mega still shares a lot in common with the Arduino Uno. There's asecondary IC on-board (an ATmega16U2) to convert USB-to-serial to allow USB programming. Itruns at the same speed -- 16 MHz. All of the pins are broken out in a way that keeps the boardshield-compatible. Because of these similarities, the Mega is a good option for Arduino beginnersand experts alike.If your Arduino project is hitting a wall because you don't have enough I/O, or if you're running outof program space, consider stepping up to the Mega.Mega ProsThis seems to be a trend, doesn't it? If you're looking for a stripped-down version of the Mega -- noUSB-to-serial converter, no connectors -- there's the Mega Pro 5V and 3.3V/8MHz variants.Page 23 of 27
With all of those I/O's it's hard to make a "mini" version, but theMega Pro Mini 3.3V gets close. Thisboard breaks out each of the pins to sets of small 8-pin connectors. A special cable is required tointerface with them.Page 24 of 27
Like other Pro Arduinos before them, the Mega Pros all require an FTDI Basic for programming.Arduino Due: Arduino HarderYou thought the Mega was powerful? TheArduino Due is a revolutionary take on the Arduinoplatform. It sports an entirely different processor architecture -- ARM instead of AVR. It's a 32-bitprocessor, clocks in at 84 MHz, and has native USB support.This thing sports many unique features that other boards don't have. Stuff like:Two digital-to-analog converters (DACs), which allow the board to output true analog values(instead of PWM). This means you can play audio out it!USB on-the-go (OTG) capability allows the Due to act as both a USB device and a host. Soyou can hook up other USB devices -- like flash drives, WiFi modules, or phones -- to the Due.Direct Memory Access (DMA) allows the microcontroller to offload memory-access tasks, soit can perform other operations at the same time.There are also some new things to watch out for. The Due's processor -- an ATSAM3X8E -- can'twork at 5V, so the board only runs at 3.3V This means it may not be compatible with all shields.The Due has some amazing functionality, but it's also a moreadvanced board. It's notrecommended for beginners, but if you have a project that might take advantage of the Due'sunique characteristics, check it out!Page 25 of 27
Arduino YúnThe Arduino Yún has true microprocessor power. It actually runs Linux! It works over WiFi! It'sawesome.The Yún combines an ATmega32U4 (the same MCU on Leonardos) and an embedded Linuxmachine running the OpenWRT Linux OS. The two processors are "bridged" together. You programthe ATmega32U4, just like you program an Arduino Leonardo, over USB. The 32U4 can sendcommands to the Linux processor, just as you might send commands to your Linux computer in aterminal.This board is packed full of all sorts of neat features. It can be programmed over-the-air, as long asyour computer is on the same WiFi network. It's designed to easily interact with the Internet, so ifyour intend on making an "Internet-of-Things"-type project, the Yún may be the perfect Arduino.Resources and Going FurtherHave you picked the perfect Arduino for your project? Looking for more Arduino tutorials? Checkthese out:Installing Arduino -- Gotta get the software and drivers installed before you can startprogramming!Data Types in Arduino -- Learn the difference between int, char, float , and long .Page 26 of 27
Arduino Shields -- Give your Arduino a little extra something with a shield. You could give theArduino GPS, or allow it to communicate wirelessly with other devices.E-Textile Basics -- If you're intrigued by the possibilities of the wearable LilyPad Arduinos,check out this tutorial to learn the basics of e-textiles.learn.sparkfun.com CC BY-SA 3.0 SparkFun Electronics Niwot, ColoradoPage 27 of 27
Arduino is an open-source electronics prototyping platform based on flexible, easy-to-use hardware and softwar