Transcription
Simulator for ArduinoCopyright 2014-2020 Virtronics. All Rights Reserved.
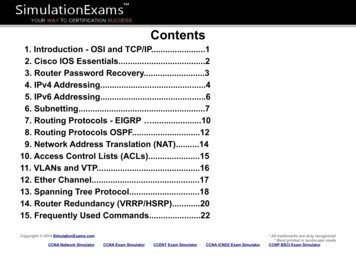
Simulator for ArduinoTable of contentsIntroduction . 4What's new . 4Free Version Differences . 5Simulator or Arduino . 5Help . 6Getting Started . 6System requirements . 6Getting help . 6Unlocking the Simulator . 7Using the IDE . 7Program Window . 8Legend . 9Program Popup Menu . 9BreakPoint . 10Loading a Sketch . 11Running a Sketch . 11Hidden code . 11Stimulus File . 12 Graphics.h virtual Library . 12Variables Area . 13Variables Popup Menu . 14Arduino Area . 14Arduino Popup Menu . 15Menu System . 15File Menu . 16Run Menu . 16View Menu . 17Hardware . 17Tools . 19Logic Analyzer . 19Serial Monitor . 20Unit Testing . 21Trace . 22Options . 23Help . 23Dialog Windows . 24Edit Window . 24Bare Minimum . 25EEPROM Window . 26Input/Output Window . 27Simulation Popup Menu . 28View Subroutines . 29Call Stack . 292 / 36
Simulator for ArduinoClass Explorer .Error Message .Shortcut Toolbar .Shortcut keys .Example Sketches .Test Sketches .Language Processing .Keywords .Custom Libraries .Millis .Troubleshooting .Registry Settings .Version Info .Credits .3 / 363030303132323232333333343436
Simulator for ArduinoIntroductionThe Arduino development system is a powerful tool but has no debugging or emulation capabilities. TheSimulator for Arduino is the best debugging tool available and is ranked #1 on most review sites.Simulator for Arduino is an Arduino Simulator which may be downloaded or purchased fromwww.virtronics.com.au. The Free version has a 30 minute trial, a thirty day trial period (or 300 seconds untilunlocked) or 100 sketches then a 30 second incrementing delay on opening sketches and is code limited to200 lines. The Pro Version has no limitations, and is supplied with updates until the end of the calendaryear. A subscription option with 50% discount is then available to renew the Pro licence for another year.The benefits and features of an Arduino Simulator are:· Use Arduino without needing the hardware· Teach, educate and investigate the basics of Arduino sketches by stepping through code· Debug a sketch, step through or run with a breakpoint and see the variables change· Speed up Arduino designs and trial other Arduino boards first and see the pin-out configurations· Demonstrate a project to a potential customer remotely· Discover number overruns such as setting a byte to 256, assigning a new value to a const variable, oruse library routines without including the library· Graphically view LCD and colour screens with the inbuilt Graphics Library· Trace and Error logs· Many Tools such as an Improved Serial Monitor, a Simple logic analyser to view digital pins graphicallyand Automated self testing (Unit Testing)· Variable insight which allows for variables values to be viewed by clicking on them in the Sketch Window(ensure Menu Option is turned on)· Design a new board inside the Simulator using the Hardware Save Settings and Load Settings items.· Many real-world user sketches to provide inspiration found in the Sim Test folder· Many more features and continuous improvements with regular updates plannedThe SIMFORARDUINO Pro Version license is licenced to one user only for use on only two computers, witha condition that any other user can use the Simulator for up to one hour for educational use only. SiteWidelicences with generous discounts are available to Educational institutions for 25 or more seats. EmailVirtronics for more info (support@virtronics.com.au)Press F1 inside the Simulator to open context sensitive help.What's newVersion 1.11 May 2018- fix on led timer- fix String conversion not printing out past decimal pt sometimes- fix if/else conundrum- fix registry access - Run as admniistrator no longer needed- check language updates for francais- send errors to new 1.11 php page- change unlock settings4 / 36
Simulator for ArduinoFree Version DifferencesThe Free Version is identical to the Pro Version, apart from the addition of a timer delay window and a CodeLimit of 200 lines. The Free version is supplied as a demo version to allow users to trial the Simulator forArduino program. The logic and operation of the Simulator for Arduino program is identical apart from thelimitations. The Pro Version License comes with the latest Simulator version and Upgrades until the end ofthe Calendar year, and has been purchased by over 7000 users and many educational institutions. TheFree version users may receve more emails.Click the Get Unlock key to receive a free 30 day trial with no timer but with the 200 line limit and 100sketches. After Unlocking, the Simulator will appear with the time and sketch loads left on the Status bar asshown here. After 30 days the timer will be reset to 30 seconds for each new sketch loaded or edited.Enter a valid email address to receive emails about updates, or click the noemails checkbutton otehrwise.Simulator or ArduinoSimulator or Arduino is a good question and Simulator and Arduino or even Arduino and then Simulator is agood answer. The Simulator was not designed as a replacement for Arduino but an add-on product to theArduino development kit and has been designed as a training/demo/debugging tool. It has not beendesigned as a development or compiling tool. We fully support the Arduino project and encourage new usersto buy and try a real Arduino kit first and then purchase the Simulator as needed. For first time users,please refer to the book "Getting Started with Arduino" by Massimo Banzi.To develop code for Arduino, a good starting point is to use the Arduino Uno together with the Arduino IDE.For larger projects, the Arduino Mega or Due may be more suitable. This Simulator has not been designedto check for syntax errors, and we recommend only using the Simulator for debugging only after the Arduinosketch compiles in the Arduino IDE but there is still some issue preventing correct operation.Official Arduino kits are recommended since these are well designed and support for the Arduino projectleads to more great new development boards and IDE upgrades. Please note that the official arduino websiteis www.arduino.cc and we recommend following Massimo Banzi and David Cuartailles on Twitter for the5 / 36
Simulator for Arduinolatest Arduino news.HelpThe Simulator for Arduino is designed to be as easy to use as possible and bug-free. However, this dependson the level of complexity of the Arduino sketch being simulated and from time to time, the Simulator maynot work as expected. In these rare and very infrequenct cases, please email support@virtronics.com.au orelse post on the forum at forum.virtronics.com.au and someone at Virtronics will try to reply as soon aspossible - usually withni a few days.Getting StartedGetting Started.Download the zip file, extract the setup.exe file. When finished, run this program to install the Simulator forArduino program and click yes to accept the EULA (End User Licence Agreement). For the Free Version,there is a 30 minute trial period then an unlock process. To Unlock the Simulator, enter the email address,the serial number will be auotmatically read fromthe computer, and then click on the Get Unlock Key button.Copy the Unlock Key back to the Simulator and clicking Unlock. Please email us if there are any issueswith this process.Afetr purchasing a Pro Version Licence, an email wil be sent with instructions on how to download theseparate Pro Version. This is done by a third party partner SWPAL.com and the email should be sent outsoon. If the email is not received within a reasonable time, please check in Junk or SPAM mail. Otherwise,email us at support@virtronics.com.au and we will try to reply as soon as possible with download andinstallation instructions.System requirementsThe System Requirements are a PC Pentium II or later.The Simulator for Arduino program will run on the following systems:WINDOWS· Windows· Windows· Windows· Windows· Windows· Windows· Windows2000MEXPVista78 and 8.110MAC· Windows using Parallels· Windows using VMWare FusionLINUX· Wine on Linux (windows emulator) for version 16.04Getting helpFor help, please email support@virtronics.com.au and please attach the sketch, or click the email buttoninside any Error Message. Replies will be sent as soon as possible.Also, please make use of the forum (http://forum.virtronics.com.au/) . Subscribe to the thread at the lowerleft of the webpage to be emailed about any replies. There are already many questions and answers on the6 / 36
Simulator for Arduinoforum and threads can be subscribed to in order to be emailed about new replies. Click the little box in thelower part of the screen to subscribe to a thread.Before emailing, please check that the sketch compiles in the Arduino IDE first.Unlocking the SimulatorThe Unlock process was originally added to stop pirates from cracking the Simulator. It allows a list ofuser's email addresses to be gathered and then an email is sent out to this mailing list for each updatewhich usually happens at the end of each quarter. If an email update is not required, click the noemailsbutton or enter a random email.With the Unlock, the email address and serial number are required. If the serial number is empty, pleaserestart the Simulator. The serial number is read from the computer hard drive and should be automaticallyread by the Simulator on startup. Another option is to select Help Unlock key. When these fields arefilled, click the Get Unlock button. A webpage will then open with the Unlock key - this may take a fewseconds for the web browser to open and load the webpage. Copy and paste this back into the Simulatorand press Unlock. The same process is required for the Free and Pro versions. Please watch the videobelow for a real-wrold Unlocking of the Free versionhttps://youtu.be/z3tUEiG3Ts4?list PLvqNIsdvRBNTDAZkUYAwc3cWYRo5wPvLKUsing the IDEThe Simulator for Arduino IDE has several sections. These are:· The Menu system which contains options and settings· The Shortcut Toolbar provides single click action for commonly used operations· The Program or Sketch window· The Variables area· The Arduino AreaThe order of the Program window, Variables are and Arduino picture may be swapped by Selecting View Arduino on Left. The preferred method is to have the Program Window on the left so that the work flow isinput,data and output. The Arduino picture and/or Variables area may be hidden by selecting Options Show Arduino and/or Show Variables and clicking on it to uncheck these options.When the Simulator for Arduino IDE is resized, the Variables window will disappear first since this is seenas the least important window. If the main screen is made smaller, the Program window will then disappearand the Arduino Screen will always be on top. This allows for sketches to be simulated as they wouldappear for real. There is also a Minimize button designed for this purpose.Note that the Variables Area and the Arduino picture can be undocked by using the Allow Dock/Undock inthe Variables Area right click popup menu.7 / 36
Simulator for ArduinoProgram WindowThe Program window area shows the program listing, and the cursor will always be in the vertical center ofthe screen. The Program Window allows for the program to be stepped through. When selected, thefollowing keys may used to run the program:· F2 may be used to force a reset· F3 may be used to open the Find window to search for text· F6 may be used to edit the sketch· F7 key may be used to step through the program and· F8 can be used to step over subroutines while still executing all the code inside the subroutine.· Shift F8 may be used to step out of a routine· F9 may be used to run the program· See the Shortcut Toolbar for more info on the step and run icons8 / 36
Simulator for ArduinoA new line may be selected by right clicking anywhere in the Program or Sketch window and selecting SetNext Statement.The Statusbar shows the Line number, Last Line number and the next code to be executed. If the AutoSteptime is set to less than 2ms, the Status-Bar will not update until Run or AutoStep is stopped.Special Simulator hidden code may be used to setup a particular hardware configuration, and this allows thesetup configuration to be saved inside the comments of the sketch. See Hidden code for more detail.LegendThe Legend may be turned on by selecting View Legend or right clicking onteh Arduino picture andselecting Legend.The Legend shows the colours and states of the Digital output. The AnalogWrite value of a digital pin will bedisplayed to the left of the digital pin when the analogWrite() routine is used.Program Popup Menu9 / 36
Simulator for ArduinoThe Program Area Popup menu has these options:· Set Next Statement - change the program line···Breakpoint1-4 - right click to add a breakpoint in red or clear it. Left click on the breakpoint to see whichnumber it is. Also refer to breakpoint condition in the Edit Window.Clear All breakpoints - clears all breakpoints with one click··View Line Numbers - turn on the line numbers in the Program Window - this is useful for checkingsubroutinesEdit Sketch - allows the sketch to be edited in the Edit WindowSyntax Colouring - show comments as light gray, #if hash commands in medium grey, definitions ingreen, constants in Olive and subroutines as blueMatch Braces - find the opening or closing bracket for the current lineTabs On Top - places the tab with the filename at the top if checked or else the bottom·Find - open the Find window to find text inside the sketch····Show Arduino - uncheck to hide the Arduino picture and allow more screen area for your super sketchErrors Enabled - turn off to prevent any annoying errors, and hope for the best. Please note this must bemanually turned on again to show any sketch errors.BreakPointA breakpoint can be set by right clicking anywhere in the program window.The pop-up menu has an option which can be clicked to add or clear the breakpoint. Please note that abreakpoint condition can be added in the Edit Window to only break at the red line on a certain conditionsuch as when a variable is above a certain level such as i 17.If a BreakPoint is added, the breakpoint line will be shown in red. This is commonly used with the AutoStepor F9 command. The breakpoint can also be saved inside a comment using Hidden Codethe syntax10 / 36
Simulator for Arduino// breakpoint(20)will set a breakpoint on line 20. If a breakpoint is set on a new line, the previous breakpoint will be cleared.To turn off a breakpoint, select the same line and select Breakpoint.Left click on a set Breakpoint to find out which number it is. Right click to clear it.Loading a SketchTo load a sketch, select File Load Sketch, press the Load Sketch button at the top left or press F4.Navigate to the correct folder and select the *.ino file (or *.pde for previous Arduino versions). C files can nowbe simulated since the C and Arduino syntax is compatible.Running a SketchAfter a sketch has been loaded, the first executable line of code will be highlighted. Now press the Step Intobutton or the down arrow. Alternately, the F7 single step or F8 button may be pressed. The F9 button allowsthe program to be autorun with a 5ms interval (adjustable -see AutoStep in Edit Window) between steps.The interval can be set to 500ms to demonstrate in slow motion the operation of a sketch, or 1ms to run asfast as possible with minimal refresh.The middle section of the screen displays the variables grid, and these are organised into Bytes, Chars,Int(eger)s, Long, Strings and Defines. Any value in the grid can be changed by selecting it and typing in anew number.Hidden codeHiiden code is code which is hidden inside comments. In this way, the Arduino IDE will skip thesecomments, but the Simulator will pick up the commands and perform special actions such as setting theSerial input data with a special character string. Hidden code may be used to setup a particular hardwareconfiguration.This hidden code can be one of these formats:11 / 36
Simulator for Arduino······// Simulate(Uno) - Simulate the particular Arduino board - please note that Simulate(Uno LCD.txt) willalso work if the text file is found// breakpoint(line,tab, condition) - will setup a breakpoint at the line on the correct Tab, (leftmost 1) withthe condition. If the condition is left blank, it will not be set// SimulateLCD(x,y,width,height,pixel width,pixel space, backlight color, on color, off color) will setup aLCD area on the Arduino picture. The colors are 24bit in a BGR format where 255 Red.The pixel widthshould be no more than 5)// SimulateLED(x,y,width,height,color ) where color os the color of LED segments for a 7 segmentdisplay// SerialIn(data) will load the Serial Port input data with the data inside the parentheses// Stimulus(stim.sti) will load a Stimulus file. Stimulus actions are shown in the statusbar after the Nextline data and will happen at set times. View the Sim Test\v98g\test.sti file for a sample. See here formore info.Stimulus FileThe Stimulus file is a text file which allows for digital pins to be set or cleared and predetermined times.Since the Stimulus file accepts any Arduino code, any combination of actions can be set to happoen atspecific microsecond runtimes.The Stimulus file consists of one record per line, with a microsecond time setting, and an expressionseparated by a commaSample Stimulus file20,pinMode(1,OUTPUT); // at 20us make digital Pin1 an output50,pinMode(5,OUTPUT); // at 50us make digital Pin5 an output100,digitalWrite(5,HIGH); // at 100us turn on digital Pin5Note that there is also a virtual library Graphics.h which allows for colour screen rendering. See theGraphics.ino demo sketch under Sim Test\v0.98 checks Graphics.h virtual LibraryThe Graphics library is a virtual library that can simulate real world graphics. For example, in the folder SimTest\99f , there is a sketch called UTFT. ino which uses the UTFT or Universal TFT colour LCD displaylibrary. SInce it is difficult to simulate a fhigh level LCD controller like the SSD1289 in real-life, the virtualgrpahics library makes this much easier. Simply define the Graphics library to have the left,top,width, andheight and then the brush and pen colors.//UTFT myGLCD(SSD1289,11,13,10,8,9);Graphics (col)circle(x,y,r) // draw a filled circleclear() or clrScr()drawCircle(x,y,r) // draw an outline of a RectfillCircle(x,y,r)// draw a filled circlefillRect(x,y,w,h)fillRoundRect(x,y,w,h,r)12 / 36
Simulator for ArduinofillScr(R,G,B)InitLCD() // dummy routine (does nothing at this stage)line or el or drawPixel(x,y,col)print(x,y,s) // print a line of size)text(x,y,s) // print a line of texttextSize(size)//textWidthtextColor(col) // set the pen colour to colVariables AreaThe Variables area shows the status of all the variables used in program and their current value. The Valuemay be changed by clicking in the relevant cell and changing the value. Please note that having a lot ofvariables shown can slow the program execution. Either select Watch or Select Options Show Variablesand turn this off to hide the variables to make program execution faster.Double click in the first four columns to auto-resize the variable area.Rigth Click and select Binary, Dec, Hex, or Char to change the way teh Value is displayed. For Char mode,arrays can be minimized by pclicking in the W column and the value shown will be string for the char array.Double Click in the Qualifier column or right click and select Watch to turn on Watch mode. This allows onlyselected variables to be watched.The Qualifier column typically shows if the value is a const, unsigned, static, volatile or pointer type (Notethat Pointers are not fully supported). The qualifier number in a heading row (shown by the gray shading)shows how many variables of that type have been defined.When returning from a subroutine, the stack will be returned the the original state, and any variables definedin the subroutine or passed as arguments will be cleaned or removed.Right Click in the Variables area to bring up the Pop-up Menu.The second column is the watch column, and clicking in this column will show a w. The right click Pop-upmenu can then be selected to show only Watched variables. This is useful when only a few variables arerelevant amongst several hundred. The gray area in the W column may be clicked to show or hide all the13 / 36
Simulator for Arduinovariables for that type. The last variable changed will always be shown for the last program step.Arrays can be folded by clicking in the second or Watch column and a sign will show that the Array hasbeen folded. When folded, only the first element of each array will be shown and for character arrays, thestring value of the whole array can be easily viewed. Alternately, the array may be folded at any element ofthe array and in this case, the elements above will be shown, but the elements below will be hidden. Clickthe again to unfold the arrayClicking in the Qualifier column will enable or disable the watch, and the W in the second column indicatesif the Watch is on (W) or off (blank). The last variable changed will always be shown.Variables Popup MenuThe Variables Area Popup menu has four options:· Watch - only display variables which have a w or in the second column of the grid········Bin - display Variable value in binaryDecimal - display Variables value in decimalHex - display Variables value in hexadecimalChar - display Variables value in Character format and hexadecimal - also show char arrays as stringswhen the array is minimized by clicking in the w columnFind - open the Find window to find text inside the variables areaClear All Variables - useful for header files which have a #ifdef FILE H at the beginning. Clearing thevariables, then allows the header file to be stepped through. NOTE: doing this in the middle of steppingthrough a sketch will cause errors since the Simulator will no longer be able to find or set variables.Allow Undock/Dock - select this to undock or redock the Variables area from the main SImulatorwindow. If unchecked, the cvolumns may be resized.Minimize Column Widths - reduce Column Widths to sensible values to see all Variable AreasArduino AreaThe Arduino picture area allows for the digital inputs and outputs to be displayed along with the Analog inputand output values. The digital pins are defined up to D53 for the Mega and D13 for the Uno.The Analog Pins are defined as A0 to A5 for the Uno with A0 equal to 14. Other boards are setup accordingto the Arduino configuration.The Simulator also allows for custom boards to be setup.14 / 36
Simulator for ArduinoArduino Popup MenuThe Arduino Area Popup menu has these options:· Arduino on Left - display the picture of the Arduino on the left and the Program window on the right· Legend - display the digital pin legend on the top right of the Arduino picture· Show Volts - this option allows for the analog number to be displayed as volts in the format x.xx(accurate to 0.01V)· Minimize - turn off the Tool bar and menu to make the Arduino picture as minimal as possible. theprogram can be resized to then only show the Arduino picture and the Title (which shows the sketchname).··Load Sketch - load a sketch into the program window - useful in minimize modeInput/Output - show the input/output window - useful in minimize mode············Uno - set the Arduino board to a Uno typeDuePapilio - great value FPGA platform for under 50EsploraMega - set the Arduino board to a Mega typeMega 75% - same as above but with a small picture to fit most laptop screensLeonardoLilyPad - wearable ArduinoNanoUno32 - Microchip Chipkit - a copy of the Arduino Uno but running a Micrchip 32bit processorYun - Arduino YunOther - configure your own boardMenu System15 / 36
Simulator for ArduinoThe Menu system has eight sub-menus. These menus allow the Simulator to be customised.Note that right clicking in the toolbar will bring up a Language popup menu.File MenuThe File Menu Items are:· Load Sketch F4 - Load a Sketch into the Program Window· Edit Sketch F6 - Edit a Sketch in the Edit Window· Close Sketch - close the sketch so on startup Simulator is empty·······Print Setup - open the Printer Setup Dialog BoxPrint - print a scaled picture of the programPrint Text - print the sketch as a text file with no formattingOpen Sketch in Notepad - this opens the sketch in Notepad for quick viewing and editing of the sketchOpen Sketch in Arduino - this opens the sketch in the Arduino IDE if Arduino is the default pro
We fully support the Arduino project and encourage new users to buy and try a real Arduino kit first and then purchase the Simulator as needed. For first time users, please refer to the book "Getting Started with Arduino" by Massimo Banzi. To develop code for Arduino, a good starting point is to use the Arduino