Transcription
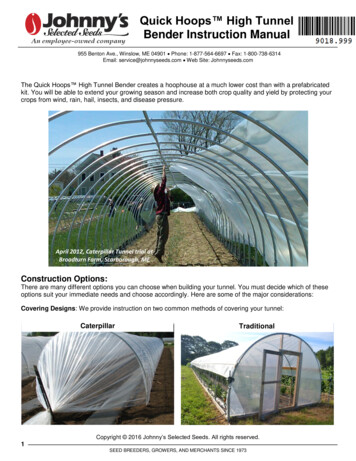
Quick Hoops High TunnelBender Instruction Manual955 Benton Ave., Winslow, ME 04901 Phone: 1-877-564-6697 Fax: 1-800-738-6314Email: service@johnnyseeds.com Web Site: Johnnyseeds.comThe Quick Hoops High Tunnel Bender creates a hoophouse at a much lower cost than with a prefabricatedkit. You will be able to extend your growing season and increase both crop quality and yield by protecting yourcrops from wind, rain, hail, insects, and disease pressure.April 2012, Caterpillar Tunnel trial atBroadturn Farm, Scarborough, MEConstruction Options:There are many different options you can choose when building your tunnel. You must decide which of theseoptions suit your immediate needs and choose accordingly. Here are some of the major considerations:Covering Designs: We provide instruction on two common methods of covering your tunnel:CaterpillarTraditional1-3/8” Top RailCopyright 2016 Johnny’s Selected Seeds. All rights reserved.1SEED BREEDERS, GROWERS, AND MERCHANTS SINCE 1973
Caterpillar Style: This is typically a 3-season covering that allows growers to add incremental acreageof protection at the lowest possible cost. This is great for beginning growers, established growers whowant more reliable crops without the expense of a larger house, and protected cropping for those lowercash crops that could use the help of a hoophouse, but might be a long time providing an equal returnfor the investment. Caterpillars are also somewhat moveable, as the covering process is not asextensive, which is great for field rotation. Traditional Style: These are usually fixed structures with end walls and roll-up sides for easier venting.They serve as a great 4-season house option that is comparably lower priced than larger structures.These are also are great for use as a seedling house.Ground Posts (i.e.: Tunnel Height): Ground posts are made from 15/8-inch chain-link fence post material,which is commonly available in 6- or 8-foot lengths. You can make ground posts by cutting either of these sizesin half and predrilling. 6-foot fence posts are the cheapest option.They may be cut in half to produce 3-foot groundposts (with 2 feet in the ground and 1 footexposed), which results in a 7-ft. tall tunnel. 8-foot fence posts may be cut in half toproduce 4-foot ground posts (with 2 feet in theground and 2 feet exposed), which results in an8½-foot tall tunnel. The reason you gain anextra 6 inches on top of the obvious extra foot isbecause you are only inserting the bows 6inches into the taller posts, as opposed to 12inches into the shorter ones. They cost a littlemore and require some extra drilling, but theresulting extra elbow room for people and cropsand overall interior volume increase is veryadvantageous. It not only improves the tunnel’sthermal performance by slowing its overnighttemperature drop, but also allows the use of asmall tractor inside the tunnel, and allowstrellising three rows of vine crops as opposed totwo. Note: You will need wide plastic, which is alittle more expensive.March 2013, at Johnny's Research Farm, Albion, MEContents: Curved benderLever bar (for ―finishing‖ the bend)(2) ¼" x 5" lag screws for mounting to woodsurfaces and (2)¼" x 6" carriage bolts, nuts, andfender washers for mounting to metal or woodensurfacesDetailed instructionsBBeennddeerrLLeevveerr BBaarrCopyright 2016 Johnny’s Selected Seeds. All rights reserved.2SEED BREEDERS, GROWERS, AND MERCHANTS SINCE 1973
Additional Materials:For a complete list of additional materials needed, please consult our parts calculator located in the Grower’s Library onour website.3 1 /8‖ top rail for chain-link fence Tufflite IV Greenhouse Film53 1 /8‖ fence posts for chain-link fence Cross-Connector for 1 /8‖ pipe Pro 5 Weed Barrier Landscape FabricSITE SELECTION:We recommend taking a look at High Tunnels: Using Low-Cost Technology to Increase Yields, Improve Qualityand Extend the Season, a 74 page reference guide, by Ted Blomgren and Tracy Frisch and distributed by theUniversity of Vermont Center for Sustainable Agriculture.It has a section dedicated specifically to site selection for your high tunnel.MOUNTING:The Quick Hoops High Tunnel Bender may be mounted to any solid surface, such as a workbench, a picnictable, hay wagon, etc. It may be lag-screwed or thru-bolted into place. 5/16‖ mounting holes are provided on thebender and the hardware to mount it are also included. By securing the bender in a fixed position, and pullingthe tubing around the bender, the operator can maintain precise control of the tubing being bent.Wherever it is mounted, it is important to have both enough room to accommodate the infeed and outfeed ofpipe, as well as some type of support at the outfeed end about ¾‖ above the mounting surface. This willprevent corkscrewing and ensure that the hoophouse bows created are in a single plane. This can beaccomplished with 1‖ x 4‖ slats (actually ¾‖ thick), ¾‖ plywood (shown above), or some other similar material.Copyright 2016 Johnny’s Selected Seeds. All rights reserved.3SEED BREEDERS, GROWERS, AND MERCHANTS SINCE 1973
BENDING THE PIPES:1.After determining how many bows your hightunnel will have, set aside twice that manypipes to be bent.2.Mark these pipes with spray paint orpermanent marker on one end so that half aremarked on the male, or swaged, end and halfon the female end.3.Insert the unmarked end of a pipe into theholding strap at the end of the bender asshown. If this is the swaged end, insert justpast the swage to prevent canting or kinkingthat portion of the pipe.4.With a smooth motion, pull back as if on a longoar (do not push), and bend the pipe all theway around the bender until the pipe justtouches the end of the bender closest to you.Stop. Do not bend past the end, or the arc youcreate will not be smooth.5.Release tension until the pipe is loose in theholding strap, and move it through the holdingstrap about half the length of the bender itself.6.Repeat steps 4 and 5 until about 3 feet ofunbent pipe remain beyond the closest end ofthe bender or if bending becomes too difficult.7.Depending on the orientation of the pipe, insertthe lever bar into the female end or over theswaged end of the unbent end of the pipe. Thiseffectively makes the pipe longer and willinstantly give you more leverage for bendingthe rest of the pipe.8.Repeat steps 4 and 5 until the point where thelever bar meets the pipe is even with theclosest end of the bender. Pull back and bendonly half way around the bender. This will leavea straight portion that will easily slide into theground post later on.9.Repeat for all other unbent pipes, alwaysinserting the unmarked end of the pipe into thebender holding strap first.Copyright 2016 Johnny’s Selected Seeds. All rights reserved.4SEED BREEDERS, GROWERS, AND MERCHANTS SINCE 1973
ASSEMBLING THE BOWS:1. Find a flat surface on which to lay 2 benthoops. This could be the ground, a haywagon, greenhouse table, etc. Wehappened to use a utility trailer on the jobsite shown above.2. Insert the unmarked swaged end of onebent pipe into the unmarked female end ofthe other.3. About 1 inch from the end of the outerfemale end, secure with two #10 x ¾‖ selfdrilling tech screws. Remember to alwayskeep screw heads facing away fromwhere plastic will eventually be.4. The bow is now complete. You will noticethat the bow is actually 13–15-feet wide.That is perfect, because having preloadedstress on the bow when you compress itinto 12-foot spaced ground posts willmake the structure stronger.5. Repeat steps 1–3 for the rest of theprebent hoops.Copyright 2016 Johnny’s Selected Seeds. All rights reserved.5SEED BREEDERS, GROWERS, AND MERCHANTS SINCE 1973
GROUND POSTS:Refer to page 2 for information on the benefits of each ground post height to help make your decision.1. Determine the lengthand bow spacing youwould like your tunnelto have and plug thosevalues into ourspreadsheet calculator.Then choose whetheryou would like short ortall ground posts. Thecalculator will tell youhow many pieces andwhat size of line post tobuy.2. Cut them all in half witha band saw,reciprocating saw, orhack saw (if you're notdoing too many) tocreate two verticalground posts from eachline post.3. Predrill each per thediagram. Drill all theway through bothsides. Deburr the cutend and the predrilledholes of each groundpost to remove anysharp edges.4. Make a mark 24 inchesin from the bottom endas a guide for insertioninto the ground.Copyright 2016 Johnny’s Selected Seeds. All rights reserved.6SEED BREEDERS, GROWERS, AND MERCHANTS SINCE 1973
DESIGNING YOUR STRUCTURE:Use the following diagram to help determine the size, spacing, and layout of your structure. For thosethat are building a caterpillar tunnel, the red and green lines indicate individual pieces of lacing.Notes:(1) Determine thedesired overall lengthof tunnel. In thisexample, our tunnel is32-feet long.(2) Pick a distancebetween bows thatwill divide into thatnumber. We chose 4feet between bowsbecause we wantedto build a strongtunnel. This could beas close or as far(within reason) as youwant.(3) The width of thetunnel will be 12 feet.(4) Distances A and Bmust be equal for thetunnel to squared offand be a truerectangular shape.Copyright 2016 Johnny’s Selected Seeds. All rights reserved.7SEED BREEDERS, GROWERS, AND MERCHANTS SINCE 1973
TIPS FOR SETTING THE CORNER GROUND POSTS:Use the following diagrams to help you set the corner posts in a perfect rectangle.Copyright 2016 Johnny’s Selected Seeds. All rights reserved.8SEED BREEDERS, GROWERS, AND MERCHANTS SINCE 1973
SITE PREPARATION AND SETTING THE GROUND POSTS:1. Prepare the footprint of the tunnel as if you would open soil in a field. Do as much of the tilling, plowing,mulch-laying, etc. before the tunnel is erected to avoid having to resort to smaller equipment toaccomplish these tasks later.2. Create a gauge for setting posts by using one 2-in. x 4-in. x 12-ft. piece of wood, and simply cutting asmall notch in one end. This will be the gauge between ground posts for a single bow.3. Weed Barrier: An option to consider at this point is weed barrier along the edges of the tunnel. This istraditionally an area where weed control is difficult and some fabric that suppresses weeds can be veryeffective here. If you choose this option, proceed to step 5.34124. If you choose to forgo weed barrier, proceed as follows: Set the 4 corner ground posts first (refer tothe diagram, on page 8 for this part of the procedure).a. Place the first corner post (#1 pictured above) in the desired location with the predrilled hole closestto the top. Insert the mushroom-shaped ground post driver in the top and drive it in about 2 feet witha sledge-hammer until the mark is at the soil surface.b. Place the notched end of the 12-foot gauge you made in Step 2 against post 1. Swing the oppositeend the gauge to where you would like post 2 to be. Holding the new ground post against theunnotched end, drive it in place.c. Using a long tape, measure to where the opposite end of the tunnel will be. Mark approximatelywhere you expect to put post 3.d. Lay the notched end of the gauge down at that spot. Lay the opposite end where your think post 4will be. Measure from post 1 to the notch in the 12-footgauge. Then measure from post 2 to theunnotched end of the gauge. These measurements should be the same for the tunnel to be squareand true. Adjust the gauge until they are.e. Set corner posts 3 and 4.Copyright 2016 Johnny’s Selected Seeds. All rights reserved.9SEED BREEDERS, GROWERS, AND MERCHANTS SINCE 1973
f.Run the long tape from corner post 1 to corner post 4. Secure one end to post 1. Pull it tight andsecure the other end to post 4. Secure with duct tape, clamps, or something similar. This will serveas a gauge as well as a straight line for setting the other posts.g. Using the long tape measure as a guide, set the rest of the posts for this side of the tunnel.Ground Post Driverh. Repeat steps 4.f. and g. for the other side of the tunnel.i.Inspect the orientation of ground posts and adjust as necessary: Predrilled lacing bolt holes(near the ground) should be facing outward from the tunnel to minimize adjustment later on. On tallerground posts, bolt holes for the bolts that hold the bows in place (near the top of the ground posts)should be in line with the length of the tunnel. With a pipe wrench or similar tool, rotate any groundposts as needed so that they are correctly oriented.Copyright 2016 Johnny’s Selected Seeds. All rights reserved.10SEED BREEDERS, GROWERS, AND MERCHANTS SINCE 1973
5. If you do choose to use weedbarrier, proceed as follows:a. Perform steps 4.a. through e.b. If you have a pair of D-handlegarden forks or spades, you canquickly set up your weed barrier ona makeshift spool such as this. Thismakes handling and cutting tolength very easy. A piece of top railis used as the spindle. Position atone end of the tunnel location andoffset, so that it faces down the sideof what will eventually be thetunnel. Pull the weed barrier off theroll and walk with it down the side ofthe plot until you reach the oppositeend. Cut it to length, leaving about1 foot of overlap on each end.Cutting is most cleanly and easilydone with a utility knife with theweed barrier laying against theground, by drawing the knife's razorblade through it and the top of thesoil at the same time.c. Fold the 4-foot wide weed barrier inhalf, making it 2-feet wide. Positionso that the folded edge faces theinside of the tunnel.d. Make a 2-inch cut centeredbetween the sides of the fabric thatis about 1 foot in from one cut end.Make just a single cut in line withthe length of the fabric. Slip this endof the double-layered fabric overthe end post near it.With only a single slit, thefabric will be somewhat snugagainst the post, which helpsprevent weeds from growingup through the hole.A note about weed barrier:Keep the top of the weed barrierfabric free of soil as best youcan. If soil is allowed to collecton it, weeds will likely germinatein that soil and root through theweed barrier, which will makethem difficult to kill and removeby physical means.Copyright 2016 Johnny’s Selected Seeds. All rights reserved.11SEED BREEDERS, GROWERS, AND MERCHANTS SINCE 1973
e. Go to the opposite end of thefabric, pull it somewhat taught, andmake a similar cut that is even withthe corner ground post at that end.Slip it over the ground post andsmooth out the weed barrier alongthe length of the tunnel.f.Secure the edges of the weedbarrier to the ground with fabricstaples along its edges. A hammeris sometimes helpful in difficultsoils.g. Repeat steps 5.b through f. for theopposite side of the tunnel.h. Run a long tape measure down thecenter of one of the pieces of weedbarrier fabric and secure to thecorner posts with clamps, etc.i.Make 2-inch slits with a razor knifefor the rest of the ground posts onthat side of the tunnel. Forexample, make a cut every 4 feet ifyour tunnel will have 4-foot bowspacing.j.Drive ground posts in each of theslits.k. Repeat 5.h. through k. for theopposite side of the tunnel.l.For caterpillar tunnels, predrilledlacing bolt holes should be facingoutward from the tunnel tominimize adjustment later on. Forcaterpillars on long ground posts,preinstall J-bolts in the lower holesbefore driving them in. Fortraditionally covered tunnels, boltholes for the bolts that hold thebows in place should be parallel tothe length of the tunnel. With apipe wrench or similar tool, rotateany ground posts as needed sothat the predrilled lacing bolt holes(for caterpillar tunnels only) areperpendicular to the length of thetunnel (facing out and in).Copyright 2016 Johnny’s Selected Seeds. All rights reserved.12SEED BREEDERS, GROWERS, AND MERCHANTS SINCE 1973
FRAMING THE TUNNEL:1. Short Ground Post Procedure:a. Make a mark on each of the bowsabout 13 inches from the end. Thiswill be used as a guide for insertioninto the ground posts.b. Transport the first end wall bow tothe furthest corner posts and insertto the marks made above.c. Repeat for the rest of the bows,keeping all the bows oriented thesame with the swaged ends of eachbow on the same side of the tunnel.This will make alignment of the ridgepole much easier.d. Loosely attach the ridge pole.These instructions detail installationwith cross-connectors. You may alsothru-bolt the ridge pole to the bows ifdesired.i. Loosen the nuts on all the crossconnectors as much as possible,without taking them completelyoff. Slip one over the top centerof each bow.ii. Slide a section of 13/8‖ top railthrough the last 2–3 crossconnectors on one end of thetunnel with the female endpointing out and flush with theoutside end of the first bow'scross-connector.iii. Repeat Step c. above withswaged ends fitting into the nextpipe’s female end, until they arerun the entire length of thetunnel.iv. Similar to the bow construction,somewhere around the middle of theswaged area of each pipe (about 3inches from the end of the outer femaleend), secure through both pipes with aself-drilling tech screw. Repeat for allpoints where the ridge pole sectionscome together.v. At this point, the ridge pole is solid andpart will be extending out one end of thetunnel.Copyright 2016 Johnny’s Selected Seeds. All rights reserved.13SEED BREEDERS, GROWERS, AND MERCHANTS SINCE 1973
e. Stand back and view the structure critically fromthe sides and very ends. Adjust the bows up ordown within the ground posts until the structureis symmetrical and straight to the eye. Ensurethat you can still see the metal of the bowsthrough the predrilled holes in the ground posts.f.Using the predrilled holes in the ground posts asa guide, with a 5/16-inch drill bit, drill through theinserted portion of each bow.g. Bolt bows to the ground posts.i. For caterpillar tunnels: Select a J-bolt andthread its included 5/16-inch nut all the way on,leaving about ¼ inch of thread showing on theJ end of the bolt. Add a lock washer and insertthrough the 5/16-inch hole on the end of the halfbow. Add a lock washer and nut on theopposite side and tighten, leaving the tailof the J pointing down. Repeat for therest of the ground posts.ii. For traditional coverings: Lay a 1-inch x8-inch x 16-foot piece of ledger board upagainst the outside of edge the groundposts; this will serves as the baseboard.Note: This material is a suggestion only.Other materials are available that mayoffer better rot resistance, etc. Using thepredrilled holes in the ground posts andbows as a guide, drill through thebaseboard with a 5/16-inch drill bit. Selecta J-bolt and thread its included 5/16-inchnut all the way on. Add a flat washer andinsert through the 5/16-inch hole on theend of the half bow. Add a lock washerand nut on the opposite side and tighten,leaving the tail of the J pointing down.Repeat down both sides of the tunnel.Where individual pieces of board butttogether, join with a small piece of scrap that overlaps the butt joint and secure with woodscrews.Copyright 2016 Johnny’s Selected Seeds. All rights reserved.14SEED BREEDERS, GROWERS, AND MERCHANTS SINCE 1973
h. Tightening the crossconnectors:i. Once again stand back andview the structure criticallyfrom the ends.ii. Adjust the cross-connectorsfrom side to side until theridge pole runs straight downthe length of the tunnel.iii. Run the long tape measurethe length of the tunnel on topof the center of the bows.iv. Tighten cross-connector atthe end wall where youstarted. Add a tech screwthrough the cross-connectorinto the ridge pole to preventit from pulling out (see photobelow left).v. Secure the end of the tapemeasure to the crossconnector at that end with aclamp. Allow the weight of thetape to hold it taught on theopposite end.vi. Move to the next bow andusing the tape measure asyour guide, adjust the bowalong the ridge pole so that itis exactly the same distancefrom the end wall bow as thespacing of the ground posts –4 feet for us. Tighten thecross-connector.vii. Repeat until all crossconnectors have beentightened.viii. Add a tech screw to otherend wall bow as you did instep 1.i.iv. above.i.Cut off any excess ridge poleprotruding beyond the end of theend wall bow with a hacksaw orreciprocating saw.j.Install duct tape over the ends ofthe ridge pole and wrap the topsof each ground post to preventplastic from being torn on anymetal burrs that may be present.Copyright 2016 Johnny’s Selected Seeds. All rights reserved.15SEED BREEDERS, GROWERS, AND MERCHANTS SINCE 1973
2. Long Ground Post Procedure:a. Make a mark on each of the bowsabout 6 inches from the end. This willbe used as a guide for insertion intothe ground posts.b. Clamp large vise grips or springclamps onto each side of the bow justabove the mark to keep it from slippinginto the ground post.c. Transport the first end wall bow to thefurthest corner posts and insert to themarks made in step 2.a. above.d. Using the upper predrilled holes in theground posts as a guide, with a ¼-inchdrill bit, drill through the insertedportion of each side of the bow. Theseshould be aligned such that they are in linewith the length of the tunnel.e. Secure the bow to the ground post with ¼"20 x 2" hex bolts and ¼-inch nylock nuts.f.Repeat steps 2.a. through f. for the rest ofthe bows.Copyright 2016 Johnny’s Selected Seeds. All rights reserved.16SEED BREEDERS, GROWERS, AND MERCHANTS SINCE 1973
g. Loosely attach the ridge pole.One of the advantages of longerground posts is that it raises thecenter of peak of the tunnel to8½-feet tall. This convenientlyallows access with a pickup orsmall tractor. We made use ofthat benefit when putting theridge pole on a 200 foot.caterpillar tunnel, which madevery fast work of this job.Use the same procedure forattaching the ridge pole as forthe short ground posts: steps 1.d.-1.j.Skinning the Tunnel — Caterpillar Style: This part of the procedure describes how to create acaterpillar or walk-in style tunnel covering. Later in this manual we will discuss creating a more traditionalcovering style with poly latch wire, end-walls, and roll-up sides. If you would prefer that type of covering,proceed to page 23. Some growers create hybrids of both of these styles with tunnels that have end walls, butare laced and vent like a caterpillar tunnel. We encourage you to build the tunnel that best suits your ownoperational and financial needs.1. Obtain 4 T-posts from your local farm supply or home improvement store. Drive 2 T-posts, side-by-side,at about a 45 degree angle, 5 feet from each end of the tunnel, using a heavy cylindrical post pounder.Drive as close together as possible, with the ribs facing toward the other T-post.PostPounderRibsT-PostCopyright 2016 Johnny’s Selected Seeds. All rights reserved.17SEED BREEDERS, GROWERS, AND MERCHANTS SINCE 1973
2. Plastic: Save this step for the morning ifpossible since it is generally less windy,unless you have many hands to help and thewind is not that strong. If you have shortground posts, your greenhouse film should be20-feet wide; if you have tall ground posts,your film should be 24-feet wide. It should alsobe 15–20 feet longer than your tunnel.3. Unroll the plastic, along the side of the tunnel.You can do this by carrying the roll on a pieceof pipe while the T-posts serve as aconvenient clamp (as shown), or by creating amakeshift reel like we did for the weed barrier(as shown on page 11). Before you cut theplastic to length, ensure that the plastic iscentered lengthwise, and that there is at least7–10 feet beyond each end of the tunnel.4. If you have taller ground-posts, the tunnelpeak will be 8½-feet tall, which most peoplecan't reach. Therefore, before pulling theplastic over the tunnel, it's a good idea to addropes every 20 feet or so to aid in controllingthe plastic, especially if there is any wind at all.Do that by wrapping a tennis ball in plasticnear the edge that will go over the tunnel, tiesome rope around it, and cast the other endover the tunnel with a small weight tied to it.5. With everyone in place, at the ends and alongthe side, and some pulling on the tennis ballropes, raise the plastic up and over the tunnel.6. Once that plastic is on top, it will be like a bigsail, so controlling it and holding it down will bekey, especially on longer tunnels. Ensure thatyou have enough people to do so. The tennisball ropes can also be tied off to J-hooks totemporarily hold the plastic in place.Copyright 2016 Johnny’s Selected Seeds. All rights reserved.18SEED BREEDERS, GROWERS, AND MERCHANTS SINCE 1973
7. Adjust the plastic so an equal length drapes over each side along the entire length of the tunnel.8. Secure one end of the plastic with weights, clamps, people, or the roll itself if a lot remains on it.9. At the opposite end, with the plastic draped smoothly over the end and even laterally, gather the end ofthe plastic in a big pony tail. Start in the center, and work out to each side, pulling the plastic snug asyou go. You should have what looks like the end of a very large bread wrapper in your hands when youare done.10. Twist the pony tail, and with 2 helpers spreading the T-posts apart, insert the pony tail between themand slide it as close to the bottom as possible. Take care not to snag it on the ribs of the T-bars. Then,with it still twisted, wrap it around one of the T-posts and back through again.11. While still holding the pony tail, release the T-posts and compress them onto the plastic.12. Tie the end of the pony tail with parachute cord or rope to prevent it from uncurling. Then tie the T-poststightly together.13. Go to the opposite end of the tunnel. Repeat steps 10 through 12 except that this time, when yougather the plastic and insert it into the T-posts, pull it lengthwise as tightly as you can.14. At this point the tunnel should have plastic tied off at the ends and draping loosely, but smoothly over it.Copyright 2016 Johnny’s Selected Seeds. All rights reserved.19SEED BREEDERS, GROWERS, AND MERCHANTS SINCE 1973
15. Lacing:Parts of this process are not unlike lacing your shoes. Refer to the diagram on page 7 for the pattern.There are many lacing materials that you could use. We tested military parachute cord, which has greatavailability online and is low cost. It has a high tensile 550-pound test multi-strand core and a smoothover braid which slid over the plastic effortlessly. It tested very well for us, without one breakage, andwe highly recommend it. The following is a 2-person operation with each person positioned on oppositesides of the tunnel.a. Insert the end of the cord through afairly full roll of duct tape.b. Tie the end of the spool to alacing bolt on one of the cornersof the tunnel.Note: Do not throw the whole spool over to the otherside of the tunnel. The cardboard ends on these spoolsare typically weak and will easily come off, which result ina very unwanted, tangled mess.c. Put the spool on a large screwdriveror something similar and have oneperson hold it.d. Pull enough slack cord off the spoolto go over the tunnel and back, andthrow the duct tape over the tunnel.e. From the opposite side of the tunnel,the person who is not holding thespool must pull enough slack cord offthe spool to go over the tunnel andback, and then throw the duct tapeonce again over the tunnel.f.Loop the cord under the next bow’slacing bolt while holding some lighttension on the laced cord — enoughto prevent it from unhooking from thelacing bolts.g. Keep repeating these steps until youreach the last bow at the other end ofthe tunnel. Temporarily tie off the cordon the last corner lacing bolt on thatend.h. Repeat steps 15.a. through h.,starting at the same bow, but on theopposite side.Copyright 2016 Johnny’s Selected Seeds. All rights reserved.20SEED BREEDERS, GROWERS, AND MERCHANTS SINCE 1973
16. Tensioning:a. Start in the same positions youstarted at in step 15.b. on page 20.b. Pick one of the cords, and with oneperson keeping tension, while theother cinches up the cord, workingback and forth down the tunnel untilyou reach the end.c. Tension and tie off permanently onthe last corner's lacing bolt with atrucker's hitch, illustrated below.Copyright 2016 Johnny’s Selected Seeds. All rights reserved.21SEED BREEDERS, GROWERS, AND MERCHANTS SINCE 1973
17. Access and Venting are accomplished thesame way, by simply lifting up the plastic.a. Start at one end of the tunnel, grasp thebottom edge of the plastic between the firstand second bows, and raise it to thedesired ventilation level.b. Repeat down the entire length of thetunnel.c. Repeat for the opposite side of the tunnelto ensure good air circulation.18. Seasonal Caterpillar Operation:a. Early spring and late fall: You will generallywant to leave the tunnel sides fully closed,day and night for maximum warming.b. Mid-to-late spring and early-to-mid fall:Closed at night, vented a foot or two high during midday.c. Summer: Pretty much opened all the time, except for stormy days.This design relies on friction to hold the plastic at a given ventilationheight. We found that in the intense heat of the summer, the plasticexpands substantially, beyond the point of adjustment by tensioningthe lacing. To avoid having to readjust the pony tails within the Tposts, we found that spring clamps were the answer. They kept thenow loose plastic perfectly suspended at any height we desired. Theywere about 1 each at a home improvement store and well worth theinvestment. We also found that we could use them for extra security tohold the plastic to the bottom of the bows during storms. Shade clothis also an option for protecting crops from summer heat.d. Winter operation: If you are operating your tunnel during thewinter, you will want to seal the bottom outside edge. You cando that as follows if you have installed weed barrier fabric:i. At the base of each bow:1. Cut a slit in the weed barrier that is perpendicular to thetunnel.2. Release the lacing at the J-bolt and leave
wagon, greenhouse table, etc. We happened to use a utility trailer on the job site shown above. 2. Insert the unmarked swaged end of one bent pipe into the unmarked female end of the other. 3. About 1 inch from the end of the outer female end, secure with two #10 x ¾‖ self-drilling tech sc