Transcription
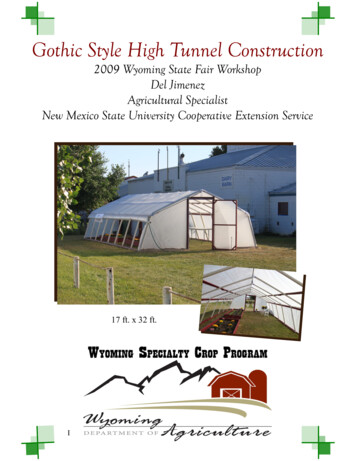
Gothic Style High Tunnel Construction2009 Wyoming State Fair WorkshopDel JimenezAgricultural SpecialistNew Mexico State University Cooperative Extension Service17 ft. x 32 ft.I
Gothic Style High Tunnel ConstructionWyoming State Fair Workshop2009We would like to thank Del Jimenez of the New Mexico StateUniversity’s Cooperative Extension Service for his time and expertisein high tunnel design, construction, promotion and educationaloutreach.This workshop presented by Mr. Jimenez was sponsored by theWyoming Department of Agriculture Specialty Crop Grant Programand the information in this handout is courtesy of Mr. JimenezAgricultural Specialist New Mexico State University. Instructionalphotos were provided by Dr. Allan Craig.SincerelyTed CraigAgricultural Production CoordinatorWyoming Department of Agriculture2
Gothic Style High Tunnel Construction17 ft. x 32 ft. Gothic Style GreenhouseGOTHIC STYLE HIGH TUNNEL GREENHOUSEThe Gothic Style High Tunnel Greenhouse, is a cold frame hoop house but with changes to thedesign. The Gothic Style High Tunnel Greenhouse gets its name from its shape, and isconstructed with straight lines using elbows to get the desired shape for the building. The shapeof the Gothic Style High Tunnel Greenhouse causes water and snow to be shed from its exteriorwhile permitting the sun’s rays to provide heat. Houses in this category are made with plasticPVC pipes as ribs that are covered with a single layer of polymer plastic covering. A second layermaybe added for better insulation when using a fan to push air between the plastic layers.REASONS TO BUILD GOTHIC STYLE HIGH TUNNEL GREENHOUSEGothic Style High Tunnel Greenhouses are ecosystems all in themselves and the environmentinside can be manipulated to a crop’s need. Gothic Style High Tunnel Greenhouses can extendthe growing season, since you can plant early, the collection of heat units with the plant ishigher resulting in earlier harvesting. Planting in late summer and early fall allows you to produce and harvest into the fall and winter months. Planting in a protected environment guardsthe crop from Mother Nature’s whims and control the crop’s quality. Using the hoop house forseason extension increases income over a longer period of the year and allows the use of different marketing strategies.FACTORS TO CONSIDER BEFORE BUILDING A GOTHIC STYLE HIGH TUNNEL GREENHOUSEGothic Style High Tunnel Greenhouses are relatively inexpensive to construct, costing around 1 per square foot, with low maintenance once constructed. They are easy to build and adapt tosmall land units to meet the needs of gardeners and farmers. Since plants need sunlight to grow,light penetration should be a concern in structure design. Grow lights can be used but requirean electrical source. In an area where wind and snow are part of nature, consider the load limitations the structure must have to endure stress. The height of the Gothic Style High TunnelGreenhouse can be adjusted so that one can walk and work inside comfortably, therefore, onemust think about height before construction starts.SELECTING A SITE FOR A GOTHIC STYLE HIGH TUNNEL GREENHOUSESelect a site that is moderately level with good drainage and good soil for planting. A site can bemodified by soil fill so that construction is on a pad. Select a site in an open area where treesand other obstacles will not affect sun penetration. Consider the surrounding area so thestructure will be protected against high winds and heavy snows, thus providing longer life. Waterand electricity maybe needed for the hoop house, so a source nearby should be considered.Security and protection against vandalism of the Gothic Style High TunnelGreenhouse and crop may also be a factor to consider when selecting a site.3
ORIENTATION OF THE GOTHIC STYLE HIGH TUNNEL GREENHOUSEPreferably, position the Gothic Style High Tunnel Greenhouse in a north southdirection. Air currents come from a south, southwest direction and will helpventilate the hot air buildup within the hoop house on hot days. The north southorientation also favors sun penetration, since the sun tracks from east to west goingdirectly over the hoop house for maximum lightpenetration.LAYING OUT THE GOTHIC STYLE HIGH TUNNEL GREENHOUSEBegin by choosing the size of a hoop house that meets your needs. Then square offthe corners of the Gothic Style High Tunnel Greenhouse using thePythagorean Theorem.A² B² C²(Length of Building) ² (Width of Building) ² (Hypotenuse of Building) ²Example:A (17 ft.) ² B (40 ft.) ² C²289 ft.² 1,024 ft.² 1,313 ft.² 1,313 36.23 ft.C 36.23 ft.C (36 ft. 3 in.)A(17 ft.)B (32 ft.)Squaring the building is critical so that the rest of the structure proceeds normallyin construction.4
SETTING STAKESAfter squaring the corners of the Gothic StyleHigh Tunnel Greenhouse, mark bysetting four stakes in the ground at each cornerusing ½-in. rebar 24 ins. long. Drive thesestakes 12 ins. into the ground at a 30-degreeangle from vertical pointing inward. Half thestake will now be underground and half thestake above the soil. Place a string around thefour corners to outline the Gothic Style HighTunnel Greenhouse foundation.Long both lengths of the Gothic Style High TunnelGreenhouse and inside the string, drive 24 in. rebarstakes every 4 ft. apart, 12 in. deep, at 30 degreeangles, until you reach the desired length.MAKING THE PLASTIC PIPE RIBSWe recommend the use of 2-in. PVC inmaking the ribs, because it holds up wellto the stress of wind and snow that comein the fall and winter. Use new plastic pipefor construction because weathered pipewill be brittle and break. The standardlength for PVC pipe is 20 ft. length. Fromnine (9) pipes you will cut two (2) pieces 7ft. 6 in. long and one piece 5 ft. long.5
This will give you 18 pieces 7 ft. 6 in. longwhich are the rafters and 9 pieces 5 ft. longwhich are the legs. You need to cut 9 morelegs that are 5 ft. long to give you a total of18 legs. Using a 2 inch elbow with a 45 curve connect one rafter that is 7 ft. 6 in.long and one leg 5 ft. long using primer andglue. When finished you will have 18primed and glued pieces.On a flat surface connect two of the 7 ft. 6in. rafters together using a 2 inch elbow witha 45 curve. This will give you one rib foryour straight line cold frame that is made upof 3 elbows of 2 inches, 2 legs 5 foot, and 2rafters that are 7 foot 6 inches long. Afterpriming and gluing all the pieces togetheryou will have 9 ribs.Set the ribs over the rebar stakes.This is accomplished by placing oneend of the PVC pipe over one of thestakes, Next place the opposite end ofthe pipe on the lateral stake on theopposite side.6
If the rebar stakes are perpendicular tothe ground, it is very difficult to placethe pipe on the spike. That is why stakesshould be placed at a 30-degree angle.Place all 9 ribs on the stakes.INSTALLING LATERAL TUBULAR BRACESThere are three (3) tubular braces running thelength of the inside of the hoop house that willbe used for stability and also for irrigation.The tubular braces will be made from ¾ inchPVC pipe. PVC pipe comes in 10 or 20 ft.lengths. Connect lateral tubular pipes tomeasure 32 foot. Prime and glue the ¾-in.PVC pipe together and mark every 4 foot.These markings will correspond with thedistance between each of the 2 in. ribs. Startattaching the tubular braces from the frontof the hoop house. Make sure the brace isflush with the outside of the first rib, andthat the markings should coincide with eachother. Attach the pipe above the 2 inch 60 elbows.7
If you are not using the tubular braces forirrigating, you can attach the tubular bracedirectly to the 2 in. pipe using a 2-in.decking screws. If you will use the tubularbrace for watering, you must use a ¾-in.one-hole or two-hole conduit clamp toattach the pipe.INSTALLING THE MIDDLE LATERAL TUBULAR BRACESThe third tubular brace will be put inside ontop in the middle of the hoop house and willalso be used for stability and irrigation. Cut5 pieces of ¾ inch PVC pipe 6 foot in lengthUsing glue connect the five joints to 6 plastictees ¾ inch. Make sure tee all point in thesame direction.Add 18 inches of ¾ inch PVC pipe to each side.Mark this pipe every 4 foot part and attach thetubular braces to the top of the structure usingconduit clamps. Cut off8
PLACING THE SIDEBOARDSSideboards are installed to give the hoop housestability, support for the plastic covering, and isalso where the plastic cover is attached. Thesideboards are made with 2 boards that are1 in. x 4 ins. x 10 ft. long, and 1 board that is are1 in. x 4 ins. x 12 ft. long.The 10 foot boards are on the outsideand the 12 foot board is in the inside.With a brace splice the wood together.There are 3 sideboards per side. Place aside board on the ground at the end ofthe legs.Make sure when putting on the sideboardsthat the screw tips are pointed downward.Attach the sideboards to the 2 inch plasticpipes using 2 inch screws. Place the firstsideboard under the 60 elbows of the legs.9
Place another sideboard half way in themiddle of the rafters, the length of thebuilding. Secure the bottom side board to a2 inch plastic pipe.SECURING THE COLD FRAMEOn the inside of the Cold Frame at the bottomattach 1inch x 4 inch wood 4 foot long to the frameusing 2 inch screws. Put these boards between the2-3 rib, 5-6 rib, and the 7-8 rib on each side.When boards are in place, drive two 24inch. Rebar stakes bent in a “J” designover each board. This will help keep thehoop house anchored during high velocitywindstorms. Repeat process on other side.10
DOOR FRAMESAt the end of each wall, door frames will beadded to hold the doors. Doors are used toaccess the building, to open for air circulation,and to release the heat from inside. Measureand find the center of your end wall.From the center measure two foot on eachside and mark where a hole will be dug 18inches deep. Inside the hole place a 2 inchx 4 inch x 10 feet. Cut to size so that theboard comes under the plastic pipe. Usinga post level, align and set post.Drill through the 2 inch pipe ontop and secure board using 4 inchscrews.11
On the ground set a 2inch x 4 inchboard from the door frame to thestructure. Secure these boards byusing 3 inch screws. This boardgives support to the hoop house andthe plastic will also be attached to it.Put a header between the door frame theheight you wish your door to be.The structure is now ready to beskinned.12
ATTACHING POLYETHYLENE GREENHOUSE PLASTIC COVERINGThe greenhouse plastic acts as the skin to the structure, letting light rays in andkeeping the weather out. There are different makes and grades of poly covering, buta 6-ml. weight works well for hoop houses. It is recommended to use polyethylenecoverings that have been treated with a UV inhibitor that is guaranteed to last atleast four years. Unprotected polyethylene plastics will break down over a growingseason. Greenhouse plastic coverings come in rolls 100 ft. in length and in widthsranging from 12 ft. to 52 ft. The length of the pipe that makes the hoop determinesthe width of the plastic covering, and it is recommended to add at least a foot oneach side of the house width. To successfully apply the plastic covering, take the following steps: have extra labor available; make sure there’s no wind; and work in theafternoon when the plastic can heat up and stretch.Lay out the greenhouse plastic in a clean workarea alongside of the hoop house, so you canmeasure and cut the plastic to the sizerequired. Using a knife or scissors cut theplastic the length of your building plus thelength of each end of your building with a onefoot overlap on each side. After the plastic iscut, find the edge of the cut piece of poly andcenter it over the hoops by dragging gentlyacross the top. Let the plastic rest on thehoops for at least 15 minutes to absorb theheat.Keeping the plastic stretched;attach one side starting in the middle of yourhoop house by sandwiching theplastic poly covering between a ¼ -in. x 2-in. x8-ft. long furring strip onto the baseboard,13
These furring strips can be cut out of a 2 x 4inch board and driving 1-in. screws every 2ft. (By using screws in the baseboard, it iseasy to remove or replace plastic covering ata later date)U channel and wiggle wire can also beused although it is more expensive.When one side is complete, attach theopposite side in the same manner.When complete, shovel dirt onto the extraplastic at the base of the hoop house. This willkeep wind and the draft from entering thehoop house.14
On the ends, stretch the plastic tight over the2 inch plastic pipe and sandwich the plasticpoly covering between the ¼ x 2 inch furringstripping and the pipe using 1 inch screws.ATTACHING POLYETHYLENE PLASTIC COVERING TO THE END WALLSBring the polyethylene covering over thehoops and attach along the door frameusing furring strips and making sure theplastic is smooth using 1 inch screws.Pulling your plastic covering outwardattach the plastic on the bottom to your 2inch x4 inch boards using furring strips. For the corners tent and cut the plastic in a flag shape.One of the flags will go into the inside and theother flag will be on the outside.15
Attach to the plastic pipe using furringstrips. Do this to each corner. Overthe top of the roof stretch the plasticout tent, cut and flag the plastic.Remove the furring strip that isholding the plastic down. Put one ofthe flags inside and the other outsideof the hoop house. Reattach the furring strip over both plastics. Repeat onall four sides. Cut excess plastic flagoff.Cut the plastic out of the door frame and setaside until making the door. On the bottomof the hoop house cut all excess plastic to1 foot out and remove the rest.Making the DoorsMeasure the high the of your door, thensubtract 1 inch from that number andcut two 2 inch x 4inch boards to thatlength. Measure the width of your doorthen subtract 4 ½ inch from thatnumber and cut three 2 inch x 4inchboards to that length. These boards gobetween the larger 2 inch x 4inch boards.Square the frame and set corner braces.16
Using the cut out plastic from the door frameattach this plastic using furring strips.Attach two 3 inch hinges to the side ofthe door and hang the door in the doorframe. On the inside of your hoop housedoor frame attach 1inch x 4 inch boards.This will keep air from entering aroundyour door.ConclusionHoop houses are practical tools to extend growing seasons and can be made to thesize you require by adding or subtracting plastic ribs. During the winter monthshoop houses can get to 80 F during the day and can drop to outside temperaturesat night without a heat source. During the summer temperatures can reach 130 Fduring the day if not ventilated. There is a learning curve when working withhoop houses but the practice of learning can be enjoyable and beneficial with theproduction of food.17
Gothic Style High Tunnel ConstructionMaterial List and Estimated Cost (3/2010)17 ft. x 32 ft. Gothic Style GreenhouseItem1.Plastic PVC Pipes2 in. x 20 ft. / Schedule 40Cost22.00Quantity122.Plastic PVC Pipe¾ in. x 20 ft. / Schedule 4010.0053.Rebar½ in. x 24 ins.1.60364.Plastic 2 in. PVC45º Elbows1.60275.2 Hole Conduit Straps 0.25¾ Pipe Straps6.Glue / Primer Set 16 oz.7.8.2720.00Total Cost 264.0050.0018 St.8 J Hook10 Tie Downs57.6043.206.75120.00Screws (Drywall Screws)1 in. Box 150 Screws (1 lb.)6.002 in. Box 150 Screws (1 lb.) 6.004 in. Box 150 Screws (1 lb.)8.0021110.005.007.00Wood Boards1 in. x 4 in. x 10 ft.1 in. x 4 in. x 12 ft.7.008.0012784.0056.009.Plastic Cover (6 mil)28 ft. x 100 ft.300.00½150.0010.Ply Wood½ in. x 4 ft. x 8 ft.17.00234.0011.Wood Studs2 in. x 4in. x 20.00240.0015.Poly Rope ¼ inch x100 ft.9.00327.00Sub Total2.0048.00 922.0518
Gothic Style Construction DesignFor Roll Up Sides16.Plastic PVC Pipes2 in. x 20 ft. / Schedule 4022.004 88.0017.Plastic 2 in. PVC90º Elbows1.6047.4018.Plastic 2 in. PVCTee2.50410.0019.Rebar⅜in. x 18 ins.1.6047.40Sub Total 112.80For Irrigation System20.Plastic Tee Joints¾ Slip Tee / Schedule 400.4062.4021.Male Reducer Bushing¾ - ½ (½ Side Threaded)0.5063.0022.Plastic PVC Pipe2.50¾ in. x 10 ft. / Schedule 4012.5023.PVC Spray Nozzles 360 ½ inch1.0033.0024.PVC Spray Nozzles 180 1.0022.0025.PVC Ball Valve¾ inch3.0013.0026.PVC Hose Connector 1.50¾ inch27.End Cap¾ inch0.3551.7528.Plastic ¾ in. 90 Elbow0.3010.3029.Plastic ¾ in. 45 Elbow0.3010.3011.50Sub Total 19.75Total Cost 1,054.6019
17 ft. x 32 ft. Gothic Style Greenhouse . G. OTHIC. S. TYLE HIGH. T. UNNEL. G. REENHOUSE. The Gothic Style High Tunnel Greenhouse, is a cold frame hoop house but with changes to the design. The Gothic Style High Tunnel Greenhouse gets its name from its shape, and is . constructed with straigh