Transcription
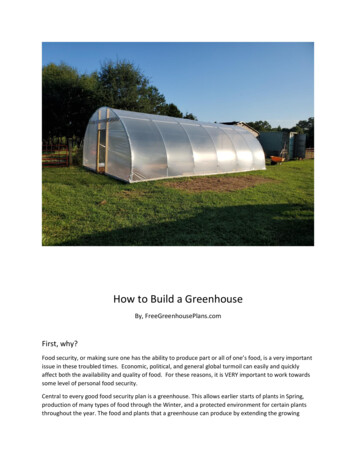
How to Build a GreenhouseBy, FreeGreenhousePlans.comFirst, why?Food security, or making sure one has the ability to produce part or all of one’s food, is a very importantissue in these troubled times. Economic, political, and general global turmoil can easily and quicklyaffect both the availability and quality of food. For these reasons, it is VERY important to work towardssome level of personal food security.Central to every good food security plan is a greenhouse. This allows earlier starts of plants in Spring,production of many types of food through the Winter, and a protected environment for certain plantsthroughout the year. The food and plants that a greenhouse can produce by extending the growing
season can quickly pay for the cost of the greenhouse, if done properly and diligently. Therefore, it iswise to have a greenhouse as part of a larger plan for food security.Hard or expensive?Building a very solid greenhouse that will last for decades is not complicated nor is it expensive. Ourdesire is to help you get the most greenhouse for the least cost. Following are free plans using parts youcan source at any local hardware store or lumber yard. The only difficult to get item, bent tubes for thehoops, we can provide for a very reasonable cost. If you prefer not to source your own parts, we canassemble and ship you a complete kit, minus a few pieces of lumber and you simply follow thisinstruction manual and assemble it yourself on your site.Assembly can be done by one person, though generally it is easier with two people, and it takes abouttwo full days, depending on the size of the greenhouse you build. Our hoops are 20 feet wide and youcan make the greenhouse as long as you want, though we recommend a minimum length of 20 feet.If you source and prepare all parts yourself and buy the hoops from us, your total outlay for a 20’ x 35’greenhouse will be about 1500. If we assemble and ship a complete kit to you, the cost will be about 1950. (Prices subject to change.) And, there are a few options you can purchase that are upgrades, orwe’ll gladly point you to places you can source other supplies. Our goal is to help others with foodsecurity. This is about taking care of our brother! Visit FreeGeenhousePlans.com for kits, parts, orquestions. We are here to help!!And, a final introductory note, my photography skills are lacking How to do it, the nuts and bolts!!Site Prep The ground does not need to be perfectly flat, free of grass, or any of the other normal considerationsfor a building. Those qualities may be desired, but can easily be overcome for a great greenhouse,depending on how you will use the interior. What is MOST important is the orientation of thegreenhouse relative to the path of the sun. You want the ends of the greenhouse facing roughly eastwest so the sun is on the side of the greenhouse all day, particularly in the Winter. This insurescapturing maximum warmth.
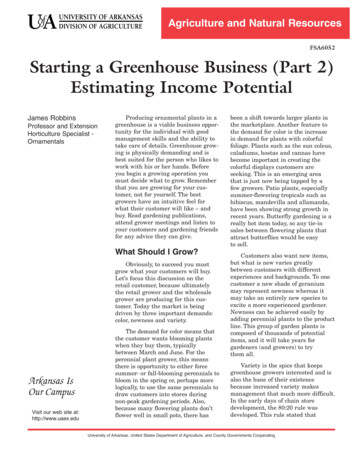
To prove the site does not need to be perfect, here is the site of a recent build. Lumpy ground and somelarge weeds, but it faces east (to left) - west (to right) and perfectly fits a space next to this barn andalong a fence.Because we were using ground cloth and raised beds, the grass was best left uncut so it would not growthrough our weed cloth. We did fill a few holes and trim the really tall weeds you see, center of photo.Additional considerations are whether you want water and/or electricity available in your greenhouse.In the case of this greenhouse, both are accessible under the corner of the barn. For daily simplicity, werecommend you plan a way to have both available as dragging a hose in and out, or extension cordsstretched out (if you want/need electricity) is not a good idea. This greenhouse will have one GFI outletand a hose hook up in the west end. A 50’ hose and spray nozzle will reach everywhere in the houseonce finished.
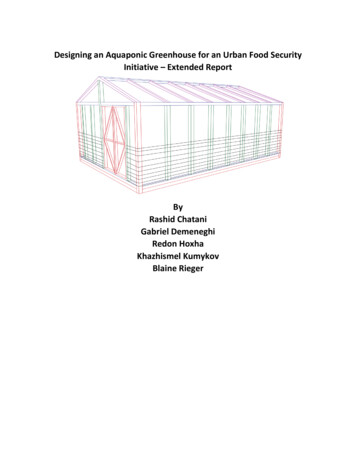
Locate the CornersOnce the site is selected and prepped, you will need to decide on the exact length of the greenhouse. Inthe case of the greenhouse in our illustrations, it is 32 feet long and will have five 6’ x 9’ raised beds, 2’side access paths, a wide center aisle and work area on one end for tables and pots, etc.Our hoops are made of 1 3/8” x 10’ 6” chainlink top rail tubing which fits nicely inside of the 1 5/8” x 7’chain link fence posts. Chain link posts are cut in half, on an angle, and driven into the ground as straightas possible until about 28” are above the ground. The top will mushroom, but that part will be cut off sothat all posts are the same height with a nearly level line down each side.Mark your corners first!! Then space your hoops in between as follows: Latitudes with a fair amount ofsnow, put hoops on 4’ or 5’ centers (four or five feet apart), latitudes with less or no snow can use 6’ oreven 7’ centers. For this project, with very little snow, we chose a little more than 5’ centers forruggedness and illustration. (This 32’ greenhouse has seven hoops.) See the following pics.Notice the mushroomed tops. The pipes that were not straight (to prove the most basic amateur can dothis) were gently pushed/pulled vertical. Also, notice that we went to the trouble of laying the weedcloth and putting the raised beds in place BEFORE putting up the hoops because tractor access with richsoil was easier than a wheelbarrow and shovel
The width should be exactly 20’. Length will be whatever you decide. You will need two end walls andthen a hoop every 5-7’, depending on your plan. We can bend an ship just hoops to you, or we cansupply complete kits with all hardware, etc Once the corners andside posts are in theground, trim allmushrooming off witha hacksaw or an anglegrinder with a cut offwheel (much faster,but wear eyerotection ). Then,locally source some5/4 decking and use2” pipe straps toattach it on theoutside of your postsat the ground level.This will provide asurface you can attachplastic to later on.Notice the raisedbeds. These aresimply repurposed 2’x’ 10” boards that wenailed together withsome minor cornerbracing. Also, noticethe weed clothextends out fromunder the side boardsso that weeds do notgrow between thebeds and the insidewall.Butt join, with a supporting board, the 5/4 decking boards. We do not recommend placing joints at themetal posts, rather, make your joints between posts. See inset pic.While we suppose it might be possible to bend your own hoops without a bender, our experience is thatpeople complain of uneven bends that look remarkably like a dog’s hind leg . Each hoop is assembledusing three 10’ 6” chail link fence top rails that have been through our hoop bender for 20’ hoops.
Take three of our hoop sections, lay them out on a flat surface and screw two self tapping TEK screwsinto each joint. VERY IMPORTANT: Place screws in SIDE of the hoop, not in the top. See following pic andinset.The hoops are now ready to install in the posts you drove into the ground.Be careful when handling the hoops at this point. Because you have not yet installed the strengtheningchord, they can be damaged by bending and flexing. Mark a line on each leg of each hoop 12-15” fromthe bottom, then use two people to move the hoops to the greenhouse and insert the legs, down to theline you marked, in the posts driven into the ground. Here are a couple pics
At this point, do not panic. The hoops may have a mind oftheir own as several in the left picture do. They can easily bepulled/pushed into place as the supporting horizontal andlongitudinal supports are installed. Some posts may need tobe adjusted as a couple in the above pic needed.See at left, the mark on the hoop that determined how far into the post we inserted it before puttingTEK screws on the inside surface. Two screws are sufficient to hold the hoop in place. In some cases,you may need considerable down pressure to sink the hoop far enough into the post.We recommend that you do not screw the hoops into place until all are installed in the posts in case onewill simply not go down far enough If that happens, just back all others up enough to keep all even.Then, screw them together. A cordless impact driver is priceless for driving these screws Each hoop now needs a supporting chord for real strength! We provide these in our full kit, or you canmake your own. You will need one for each hoop. Here is how to make your own:
Use a heavy hammer on a very solid surface (like an anvil) to pound the ends of a 10’ 6” section of 1 3/8”top rail flat. Then, drill a 3/8” hole about ¾” from the end.To mount these, you will need one 1 3/8”fence tension bands on each end and a 5/16”x 1 ¼” carriage bolt, usually found in thechain link fence section of the hardwarestore.DO NOT tighten these just yet. Put a level onthem and get them close to level, then leavewith a little play until the purlins are installed.It should be starting to looklike a greenhouse!!End walls can be installed atthis point. Many peoplechoose to do thesedifferent ways. Use our picsfor ideas, then adjust toyour plan and liking. Wechose a 36” door for eachend of the greenhouse topromote air flow through.Some will only have doors
on one end but may install a louvered vent that opens and closes with a temperature sensitive piston.We do recommend a post or two on each end to offer base board and horizontal board attachment toaffix the greenhouse covering to.
We used 4” x 4” x 12’ treated posts to frame our doorway with a top rail that is a 2” x 6” x 12’ brace. Wenotched the posts, see pic below, for the brace. Later, we will put an upper brace where the top of thedoor will be. Bent and drilled pipe straps, as in the pics above, were used in four places to secure thecross brace on the hoop to the 2 x 6. These pics were taken after the purlins were installedNotice the angled cuts on top of the posts to account for the slopeof the hoops. Also, the ends of the 2 x 6 were tapered to fit insidethe hoop. The goal, at this point is for all surfaces to be flat with noprotruding screw heads or pieces of wood or metal that will rubagainst the plastic.Once notched, the end base boards can beinstalled and screwed into the posts andwhere they meet at the corners.As in the pics above, we finished mulching the inside to prevent weed growth and to keep the weedguard from moving while we finished the exterior.
The final structural part to install are the purlins which provide great longitudinal strength. You willneed two that are 6” shorter than the total length of the greenhouse. They are made of 10’ 6” sectionsof top rail tube and the ends are made and shaped exactly like the cross members on the hoops.An important note: When screwedtogether with the TEK screws, insure theflat ends are parallel or on the sameplane, not twisted. Rather thanconnecting each together overhead, it iseasiest to lay these out on the ground,connect, then run them in the end of thegreenhouse, above the hoop brace, oneeach side inside the angle formed by hoop and brace.See pics.Notice that these are bound to the hoop by a 3” stainlesssteel hose clamp. Be careful when tightening this downto ensure the loose end of the strap and the screw clampitself will not be in contact with the plastic as they cancut or rub a hole in it.When tightening these into place, attach both ends first. Then check the distance between each hoop asyou work your way from one end to the other so that the distance at the purlin/chord intersection is the
same as at the base. I.e.,ensure they remain oncenter. Also, make surethe brace is level and isalso tightened at this time.Once all connections aretightened, you will findthat the structure is veryrigid.Frame the inside of thedoor openings for the sizedoor you will put in it. Theleast expensive option inthis build was to buyprefab screen doors atLowe’s and simply sealwith Thompson’sWoodSealer and coverwith plastic. These 36”doors were 35 each, off the shelf.Cheaper and nicer than building themourselves.Not done at this time, but a near futureproject is to add a self-opening vent inthe top of each end of the greenhouse.The next step, before covering thegreenhouse, was to install GreenhouseU Channel for spring wire. Thecheapest option for holding the plasticto the green hoop frame is wood stripstacked along the bottom. However, the long-term best option for tightening plastic, easy removal and
re-install or replacement of plastic is Greenhouse Uchannel and Spring wire. Having built multiplegreenhouses and replaced plastic on a few, this is thevery best option long term. Available fromgreenhouse supply stores (or through us) I highlyrecommend the extra investment. The channels arealuminum and the wire are coated and will last adecade or two. You will need to drill holes in thechannel to screw into the wood sides. The selftapping Tek Screws work just fine for attaching thechannel to the end hoops. [Note: No channel is usedon the middle hoops, only the end hoops.]The final step, before covering, is to put a heavyduct tape anywhere the plastic might rub againsta rough spot or uneven match between tubesand bracketry. Any luffing in the wind can wear ahole in the plastic if not properly protected. Hereare a few pics of the several places we taped inthis install.
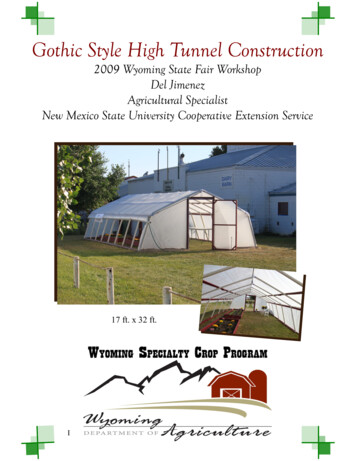
CoveringMeasure twice! Cut once!! Be sure to order enough plastic and plan carefully how and whereyou will cut it. For a 20’ wide hoop, you should have a piece of plastic that is about 36’ wide.(Remember, the width at the ground level is actually the diameter of a half circle.) The lengthshould be two to three feet longer than your greenhouse for the main section, then then twopieces for the end walls that are 23’ wide x 13’ or 14’ high.For the project in the picture, I used a piece of 4 year UV resistant clear greenhouse poly thatwas 36’ x 60’. We completely unrolled the length in the yard, but did NOT open it up. Imeasured off 35’ and cut that for a 32’ long greenhouse. Then, I cut a section 22’ long for theend walls and used the center fold as a guide to cut it in half length wise leaving me two 22’x18’ sections of plastic.The next portion of instructions require three to four people, several ladders, and a rather calmday.
We laid the end sections alongeach end and pulled the center(top) section down one side. Webegan by attaching the one side,then pulling the plastic over thetop and simply weighting it on theopposite side.We then attached the end wallsat the bottom then up around thedoor openings.Next, working one end at a time,we attached the end walls upover the end hoop. We tuckedthe plastic for the end wall underthe top cover and a helper on theinside of the greenhouse to pullthe end wall tight while someoneworks from the attached side upand over the top attaching thewiggle wire or other plasticattaching method. Work slowlyand keep the plastic pulled tightin each direction.After each end is finished, thenthe bottom of theremaining long sidecan be attached.Here are severalpictures to helpillustrate the process.
Final Thoughts, Tips, Tricks In really warm climates, vents above the doors are almost a must! Further, as we will illustrate in anarticle on our blog, building it so that you can roll up one or both sides is quite easy and very smart.Additional expense is minimal.
Observant readers will notice that I put 16’ cattle panels in the rafters of the greenhouse. These make avery sturdy and nice grid to hang line from for climbing plants such as cucumbers and pole beans as wellas supporting tomato vines.The easiest way to usethem is to straighten wirecoat hangers, bend a loopon one end and a hook onthe other. To the loop, tiea string that will nearlyreach the ground andweight with a heavy nut orsimilar item. Then, simplyhang it above the plant totrain and wrap the stringgently around the plant orstem. As the plant grows,just add a wrap or two totrain the plant straight up.When not in use, hang all inone area so they remainneat and accessible.I like a neat entrance, so Irepurposed some oldtreated lumber from agrow bed into a ‘landing’ ateach entrance. This helpskeep mulch in and grassout.Water and electrical accessin the greenhouse are veryconvenient, but be sure tohave a GFI circuit and don’tplace the two too close together.Materials ListMaterials will vary based on how long your greenhouse is. You will need two (2) end walls and then avariable number of hoops, based on a 5’ – 7’ center placement.
End Wall1 – 1 5/8” x 7’ Chain link fence post, cut in half on an angle for base post.4 – 1 3/8” x 10’ 6” Chain link fence top rail tube. Three for hoop, one for the cross brace (ends flattenedand drilled)6 – 1 ½” pipe hanging straps hammered into a U shape, or 6 1 3/8” fence tension straps6 – 5/16” x 1 ½” carriage bolts with nuts2- 2” pipe strap for base post to board connection.Lumber for end wall, NOT provided in our hardware kit. We recommend2 – 4 x 4 x12, treated1 – 2 x 6 x 12, treated2 – 5/4 x 6 x 10 decking for base board.Intermediate Hoop1 – 1 5/8” x 7’ Chain link fence post, cut in half on an angle for base post.4 – 1 3/8” x 10’ 6” Chain link fence top rail tube. Three bent for hoop, one for the cross brace (endsflattened and drilled)2 – 1 ½” pipe hanging straps hammered into a U shape, or 2 - 1 3/8” fence tension straps2 – 5/16” x 1 ½” carriage bolts with nuts2 – 3” stainless steel hose clamp2- 2” pipe strap for base post to board connection.PurlinsMultiple sections of chain link top rail to make each purlin. You need two purlins, each will be 6” shorterthan the total length of the greenhouse, ends flattened and drilled with 3/8” hole for mounting.Ex. For 32’ greenhouse, we used eight (8) pieces of top rail. With very careful planning on which ends toflatten, we could have saved a single piece of pipe.
Various other materialsFlat head wood screws for end walls.Short lag screws for attaching base board to posts.Box of TEK self-tapping metal to metal screws. #10 x ¾”Roll of heavy duct tapeFreeGreenhousePlans.com
Aug 20, 2020 · two full days, depending on the size of the greenhouse you build. Our hoops are 20 feet wide and you can make the greenhouse as long as you want, though we recommend a minimum length of 20 feet. If you source and prepare all parts yourself and buy the hoops from us, your total outlay for a 20