Transcription
Windows Server 2019Installation GuideNEC Express ServerExpress5800 SeriesExpress5800/T110j-S, T110jChapter 1Installing WindowsChapter 2MaintenanceChapter 3AppendixCBZ-002473-136-00 NEC Corporation 2019
ContentsContentsContents . 2Notations Used in This Document . 4Notations used in the text . 4Optical disk drive. 4Hard disk drive . 4Removable media . 4Abbreviations of Operating Systems . 5Trademarks . 5Warnings and Additions to This Document . 6Latest editions . 6Chapter 1 Installing Windows . 71. Before Starting Setup . 81.1 Supported Models . 81.2 Supported Windows OS. 81.3 Install Options . 81.4 Supported Mass Storage Controllers . 91.5 Supported Optional LAN boards . 101.6 In-place Upgrade to Windows Server 2019 . 101.7 Downloads . 112. Installing Windows Server 2019 . 132.1 Before Starting Setup. 132.2 Setting Up the Operating System . 192.3 Before You Start . 202.3.1 Preparation for Operating System Installation . 202.3.2 Creating drivers installation media . 212.4 Clean Install . 223. Applying Starter Pack . 314. Setting Up Device Drivers . 334.1 Installing the LAN drivers . 334.1.1 LAN drivers . 334.1.2 Optional LAN board . 334.1.3 Network adapter name . 344.2 Setting up LAN drivers . 354.2.1 Setting link speed . 354.2.2 Configuring Flow Control . 354.2.3 When using N8104-150/151/152 . 364.3 Graphics accelerator driver . 364.4 Using Optional Graphics Accelerator Card . 364.5 Using a SAS controller (N8103-184/199) . 374.6 Using a RAID Controller (N8103-205/206/207/208/210/211) . 375. License Authentication. 385.1 Desktop Experience . 385.2 Server Core . 436. Setup of Windows Server 2019 NIC Teaming (LBFO) . 446.1 Launching the NIC teaming setup tool . 446.2 Creating a team . 446.3 Removing a team . 456.4 Notes and restrictions . 457. Setup for Solving Problems . 472Windows Server 2019 Installation Guide
Contents7.1 Specifying Memory Dump Settings (Debug Information) . 477.2 How to Create a User-mode Process Dump File . 53Chapter 2 Maintenance . 541. Failure Information. 551.1 Collecting Event Logs . 551.2 Collecting Configuration Information . 571.3 Collecting User-Mode Process Dump . 581.4 Collecting Memory Dump. 582. Troubleshooting . 592.1 Problem of Using Internal Devices and Other Hardware . 593. Windows System Recovery . 603.1 Recovery of Windows Server 2019 . 60Chapter 3 Appendix . 611. List of Windows Event Logs . 62Revision Record . 66Windows Server 2019 Installation Guide3
Notations Used in This DocumentNotations Used in This DocumentNotations used in the textThe symbols used in this document include the following:ImportantIndicates critical items that must be followed when handling hardware or operating software.If the procedures described are not followed, hardware failure, data loss, and otherserious malfunctions could occur.NoteIndicates items that must be confirmed when handling hardware or operating software.TipsIndicates information that is helpful to keep in mind when using this server.Optical disk driveThis server is equipped with one of the following drives. These drives are referred to as optical disk drive in thisdocument DVD-ROM drive DVD Super MULTI driveHard disk driveUnless otherwise stated, hard disk drive described in this document refers to the following. Hard disk drive (HDD) Solid state drive (SSD)Removable mediaUnless otherwise stated, removable media described in this document refers to the following.4 USB flash drive Flash FDDWindows Server 2019 Installation Guide
TrademarksAbbreviations of Operating SystemsWindows Operating Systems are referred to as follows.See Chapter 1 (1.2 Supported Windows OS) for detailed information.Notations in this documentOfficial names of WindowsWindows Server 2019 StandardWindows Server 2019Windows Server 2019 DatacenterWindows Server 2019 EssentialsWindows Server 2016 StandardWindows Server 2016Windows Server 2016 DatacenterWindows Server 2016 EssentialsTrademarksEXPRESSBUILDER, ESMPRO and ExpressUpdate are registered trademark of NEC Corporation.Microsoft, Windows, and Windows Server are registered trademarks or trademarks of Microsoft Corporation in the United States andother countries.All other product, brand, or trade names used in this publication are the trademarks or registered trademarks of their respectivetrademark owners.Windows Server 2019 Installation Guide5
Warnings and Additions to This DocumentWarnings and Additions to This Document1.Unauthorized reproduction of the contents of this document, in part or in its entirety, is prohibited.2.This document is subject to change at any time without notice.3.Do not make copies or alter the document content without permission from NEC Corporation.4.If you have any concerns, or discover errors or omissions in this document, contact your salesrepresentative.5.Regardless of article 4, NEC Corporation assumes no responsibility for effects resulting from youroperations.6.The sample values used in this document are not the actual values.Keep this document for future reference.Latest editionsThis document was created based on the information available at the time of its creation. The screen images,messages and procedures are subject to change without notice. Substitute as appropriate when content hasbeen modified.The most recent version of the guide, as well as other related documents, is also available for download fromthe following website.https://www.nec.com/6Windows Server 2019 Installation Guide
NEC Express5800 SeriesExpress5800/T110j-S, T110jInstalling WindowsThis chapter describes how to install Windows. Read through this chapter to set up the Windows correctly.1. Before Starting SetupDescribes applicable server models, installable Windows operating systems and supported upgrade methods.2. Installing Windows Server 2019Describes how to install Windows Server 2019.3. Applying Starter PackDescribes how to apply Starter Pack.4. Setting Up Device DriversDescribes how to install and set up Device Drivers.5. Activating WindowsDescribes how to Activating Windows to continue to use the system.6. Setup of Windows Server 2019 NIC Teaming (LBFO)Describes how to Setup of Windows Server 2019 NIC Teaming (LBFO).7. Setting Up for Solving ProblemsDescribes the features that must be set up in advance so that the server can recover from any trouble earlyand precisely.Windows Server 2016 Installation Guide7
Chapter 1 Installing Windows1. Before Starting Setup1. Before Starting SetupThis section lists the confirmation items for setting up the Windows operating system.1.1 Supported ModelsThe following models are supported by this document.Model NamesExpress5800/T110j-S, T110j1.2 Supported Windows OSYou can install the following editions of Windows operating system. Windows Server 2019 is 64-bit(x64) only.Boot modeWindows OSUEFILegacyStandard N/ADatacenter N/AWindows Server 2019 : supported1.3 Install OptionsIn this guide, the installation options of Windows Server 2019 are written as below. GUI-based installation optionWritten as “Desktop Experience” in this guide. CUI-based installation optionWritten as “Server Core” in this guide.Important8“Nano Server” is not supported on Express 5800 series servers.Windows Server 2019 Installation Guide
Chapter 1 Installing Windows1. Before Starting Setup1.4 Supported Mass Storage ControllersThe Starter Pack supports the following mass storage controllers.T110j-ST110jControllers supported on an operating system by applying the Starter PackOnboard RAID Controller(LSI Embedded MegaRAID) N8103-205 RAID Controller(RAID 0/1) N8103-206 RAID Controller(2GB, RAID 0/1) N8103-207 RAID Controller(2GB, RAID 0/1/5/6) N8103-208 RAID Controller(4GB, RAID 0/1/5/6) N8103-210 RAID Controller(2GB, RAID 0/1) N8103-211 RAID Controller(2GB, RAID 0/1/5/6) N8103-184 SAS Controller N8103-199 SAS ControllerN/A Other Options : supportedWindows Server 2019 Installation Guide9
Chapter 1 Installing Windows1. Before Starting Setup1.5 Supported Optional LAN boardsThe Starter Pack supports the following LAN boards.T110j-ST110jLAN boards supported on an operating system by applying the Starter PackNoneN/AN/AN8104-14910GBASE Adapter (SFP /2ch) N8104-1501000BASE-T Adapter N8104-151Dual Port 1000BASE-T Adapter N8104-152Quad Port 1000BASE-T Adapter Other Options : supported1.6 In-place Upgrade to Windows Server 2019Performing an in-place upgrade from Windows Server 2016 to Windows Server 2019 is not recommendedbecause this may adversely affect files and the registry.If you want to use Windows Server 2019, please read this document (Chapter1 “2. Installing Windows Server2019”) and back-up necessary user files prior to installation.Tips An In-place Upgrade refers to upgrading the operating system to WindowsServer 2019 by overwriting the existing operating system, Windows Server2016, on the same server hardware. Performing upgrade from evaluation version to release version is notrecommended since this may unexpectedly affect to system or applications.10Windows Server 2019 Installation Guide
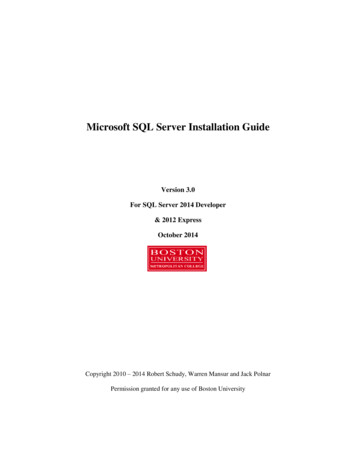
Chapter 1 Installing Windows1. Before Starting Setup1.7 DownloadsFirst of all, download the Starter Pack for the applicable model.1.Downloading the Starter Pack.(1)Go to NEC Corporation Web site at https://www.nec.com/.Click Support & Downloads.(2)Click Support.(3)Under “PCs & Servers”, find “Servers” and click Asia Pacific.Windows Server 2019 Installation Guide11
Chapter 1 Installing Windows1. Before Starting Setup(4)On “Regional Contact” page, and “Related Links” and click Download.(5)On “Downloads - Express5800 Server Series” page, click Windows Support Kits tab.(6)On “NEC Express5800 Server Series Microsoft Windows Server 2019 Support Kit” page, select theappropriate model name on the list of supported models.(7)2.Scroll down to Windows Server 2019 Support Kit section and download the module.After downloading the Starter Pack, unzip the file in any folder (e.g. C:\TEMP) on the hardware.Folders which include double-byte characters or spaces in their names cannot be specified.TipsIf folder hierarchy is too deep, extraction of setup programs may not be performedcorrectly.If you copy the Starter Pack to an optical disk such as a DVD, copy all the files and folders without changingthe structure.TipsIf you use a DVD, write the data in a format compatible with Windows operatingsystem.The DVD copying the modules is written as “Starter Pack DVD” in this guide.3.After copying the modules, delete all the files and unzipped folders on the hardware.Download is now complete.12Windows Server 2019 Installation Guide
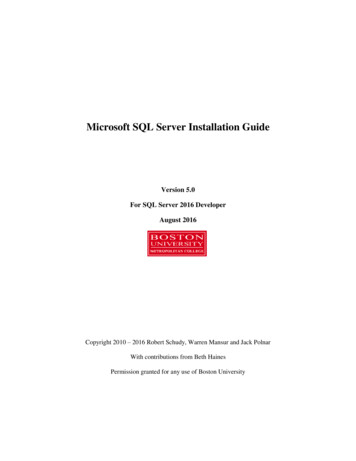
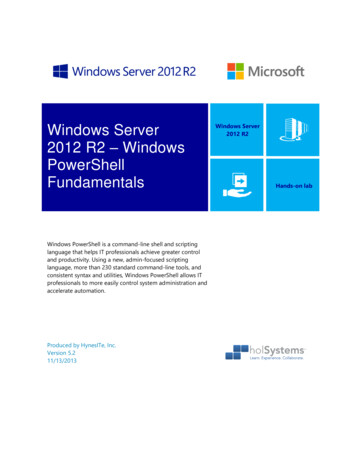
Chapter 1 Installing Windows2. Installing Windows Server 20192. Installing Windows Server 20192.1 Before Starting SetupBefore you install Windows Server 2019, read this chapter carefully.COA labelScrape off with a coin or the like lightly the scratch that covers a part of the product key on theCertificate of Authenticity (COA) label. When you scrape, be careful not to break the part thatthe product key is printed on.Windows Server 2019Product Key: XXXXX-XXXXX-XXXXX-XXXXX-XXXXXWindows ActivationTo activate Windows Server 2019, enter the Product Key written on the COA label. The COAlabel of Windows Server 2019 is attached to the operating system media package or the server.See Chapter 1(5. License Authentication), for details.Starter Pack ApplicationStarter Pack installs necessary drivers to Express5800 series servers.Be sure to apply the Starter Pack.BIOS UpdateA BIOS update may be required to install Windows Server 2019.To know if a BIOS update is required, check if there are applicable modules; go to [WindowsServer 2019 Support kits] (shown in [1.7 Downloads]).For the update procedure, refer to “Readme.txt” included in the downloaded data or instructionsshown on the above web site when downloading the module.BMC Firmware UpdatesBMC Firmware updates may be required to install Windows Server 2019.To know if BMC Firmware updates are required, check if there are applicable modules; go to[Windows Server 2019 Support Kits] (shown in [1.7 Downloads]).For the update procedures, refer to “Readme.txt” included in the downloaded data or instructionsshown on the above web site shown when downloading the modules.BIOS settingChange Boot Mode to UEFI Mode. See Chapter 2 (1. System BIOS) in Maintenance Guide fordetails.Boot Boot mode select UEFIWindows Server 2019 Installation Guide13
Chapter 1 Installing Windows2. Installing Windows Server 2019Hardware configurationThe following hardware configurations require special procedures.Using RAID controllerBefore you install Windows Server 2019, if using a RAID controller, build the RAID system inadvance according to the User’s Guide. The latest product manuals are available on NEC’scorporate website (https://www.nec.com/).Installation When Multiple Logical Drives ExistIf you select wrong hard disk drive in Windows Server 2019 installation, the setup may eraseexisting data unexpectedly. Refer to displayed disk capacity or partition size to find target harddisk drive.Reinstalling to a mirrored volumeRemove an MO device before installing an OS. Some peripheral devices need to be haltedbefore installation. Refer to the manual provided with the peripheral devices for how to set adevice appropriate to installation.Peripheral devices such as RDX/MORemove an MO device before installing an OS. Some peripheral devices need to be haltedbefore installation. Refer to the manual provided with the peripheral devices for how to set adevice appropriate to installation.DAT, LTO, and similar mediaDo not set media that is unnecessary to installation during setup.Reinstalling to hard disk drives that have been upgraded to dynamic disksIf the hard disk drive has been upgraded to a dynamic disk, the operating system cannot bereinstalled to it with the existing partitions.Set up the operating system with the Windows standard installer.14Windows Server 2019 Installation Guide
Chapter 1 Installing Windows2. Installing Windows Server 2019Setup when mass memory is installedIf mass memory is installed in your system, the large size of paging file is required at installation.Thus, the partition size for storing debug information (dump file) may not be secured.If you fail to secure the dump file size, allocate the required file space to multiple disks byperforming the following steps.1. Set the system partition size to a size sufficient to install the OS and paging file.2. Specify another disk as the destination to store the debug information (required dumpfile size) by referring to Chapter 1 (7. Setup for Solving Problems).If the hard disk drive does not have enough space to write the debug information, set the partitionsize to a size sufficient to install the OS and paging file, and then add another hard disk drive forthe dump file.NoteIf the partition size for installing Windows is smaller than the recommended size,expand the partition size or add another hard disk drive.If sufficient space cannot be secured for the paging file, perform either of the following afterinstalling Windows.― Specify a hard disk drive other than the system drive as the location to store thepaging file for collecting memory dumpCreate a paging file of the installed memory size 400 MB or more in a drive other than thesystem drive.The paging file that exists in the first drive (in the order of drive letter C, D, E, .)is used as the temporary memory dump location. Therefore, the size of the pagingfile must be "installed memory size 400 MB" or more. Paging files in dynamicvolumes are not used for dumping memory. The setting is applied after restartingthe system.Example of correct settingC: No paging file existsD: Paging file whose size is "installed memory size 400 MB" or more The paging file in drive D can be used for collecting memory dumpbecause its size satisfies the requirement.Example of incorrect setting 1C: Paging file whose size is smaller than the installed memory sizeD: Paging file whose size is "installed memory size 400 MB" or more The paging file in drive C is used for collecting memory dump, butcollection may fail because the size of the paging file is smaller than theinstalled memory size.Windows Server 2019 Installation Guide15
Chapter 1 Installing Windows2. Installing Windows Server 2019Example of incorrect setting 2C: Paging file whose size is "installed memory size 0.5"D: Paging file whose size is "installed memory size 0.5"E: Paging file whose size is 400 MB The total paging file size in all drives is "installed memory size 400 MB",but collection may fail because only the paging file in drive C is used forcollecting memory dump.Example of incorrect setting 3C: No paging file existsD: Paging file whose size is "installed memory size 400 MB" or more(in dynamic volume) Paging files in a dynamic volume cannot be used for collecting memorydump. Thus, collecting memory dump fails.― Specify a drive other than the system drive for "Dedicated Dump File".Create the registry shown below by using the Registry Editor and specify the name ofDedicated Dump File. When specifying the file named "dedicateddumpfile.sys" in drive D Key:HKEY LOCAL rolName:DedicatedDumpFileType:REG SZData:D:\dedicateddumpfile.sysNote the following when specifying Dedicated Dump File: Pay strict attention to edit the registry. The setting is applied after restarting the system. Specify a drive that has free space of "installed memory size 400 MB" or more. Dedicated Dump File cannot be placed in dynamic volumes. Dedicated Dump File is only used for collecting memory dump, and is not used asvirtual memory. Specify the paging file size so that sufficient virtual memory can beallocated in the entire system.16Windows Server 2019 Installation Guide
Chapter 1 Installing Windows2. Installing Windows Server 2019System partition sizeThe system partition size can be calculated by using the following formula.Size required to install the OS paging file size dump file size application sizeDesktop ExperienceSize required to install the OS 12,400MBPaging file size (recommended) installed memory size 400MBDump file size installed memory size 400MBApplication size as required by the applicationServer CoreSize required to install the OS 8,600MBPaging file size (recommended) installed memory size 400MBDump file size installed memory size 400MBApplication size as required by the applicationFor example, if the installed memory size is 2GB(2,048MB), application size is 100MB, thepartition size is calculated as follows:12,400MB (2,048MB 400MB) 2,048MB 400MB 100MB 17,396 MBThe above mentioned partition size is the minimum partition size required for system installation.Ensure that the partition size is sufficient for system operations.The following partition sizes are recommended.Desktop Experience: 32,768MB(32GB) or moreServer Core: 32,768MB(32GB) or more*1GB 1,024MBNote The above paging file sizes are recommended for collecting debug information(dump file). The initial size of the Windows partition paging file must be largeenough to store dump files.Make sure you set a sufficient paging file size. If the paging file is insufficient,there will be a virtual memory shortage that may result in an inability to collectcorrect debug information. Regardless of the sizes of internal memory and write debug information, themaximum size of the dump file is "size of internal memory 400 MB". When installing other applications or other items, add the amount of spaceneeded by the application to the partition.If the partition size for installing Windows is smaller than the recommended size,expand the partition size or add another hard disk drive.Windows Server 2019 Installation Guide17
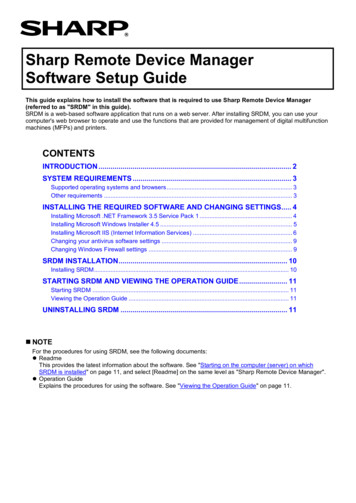
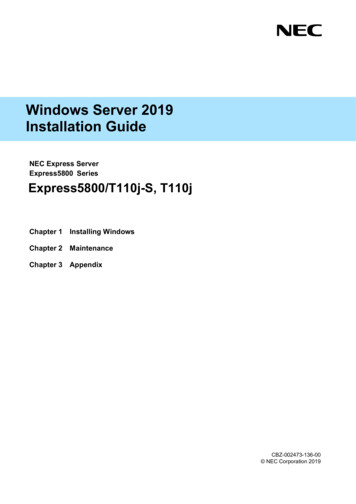
Chapter 1 Installing Windows2. Installing Windows Server 2019TipsWhen creating a partition, Windows OS creates the following partitions at the topof hard disk drive.—Recovery Partition:499MB—EFI System Partition (ESP):100MB *1—Microsoft Reserved Partition (MSR):16MB *2615MB is allocated for these three partitions out of the specified partition size.For example, when 61,440MB is specified for partition size, the area available freearea is calculated as follows:61,440MB – (499MB 100MB 16MB) 60,825MBFree areaRecovery Partition(499MB)System PartitionMicrosoft Reserved Partition (MSR) *2(16MB)EFI System Partition (ESP) *1(100MB)*1 May be 300MB in size depending on hard disk drive type.*2 MSR is not displayed on Disk Management.Windows Server 2019 Hyper-V supportRefer to the following web site for information related to Windows Server 2019 load/w2019/hyper-v/hyper-v-ws2019.htmlUsing BitLockerIf using BitLocker, note the following. Be sure to keep the recovery password secure. Do not keep it near a server running BitLocker.ImportantIf the recovery password is not entered, the OS cannot be started, and thecontent of the partition encrypted by BitLocker cannot be referenced anymore. The recovery password might be required at startup of the OS afterthe following:— Replacement of motherboard— Change of BIOS setting— Initialization of trusted platform module (TPM) ** Depending on your system, it may not be supported.Refer to the document about hardware. To reinstall the operating system into a partition that is encrypted with BitLocker, delete theBitLocker-encrypted partition prior to reinstallation.Support for NIC teaming in Windows Server 2019The NIC teaming feature, which used to be provided by network interface card (NIC) vendors, isbuilt into Windows Server 2019. In Windows Server 2019, this feature is also called "loadbalancing and failover (LBFO)".Refer to Chapter 1 (6. Setup of Windows Server 2019 NIC Teaming (LBFO)) and specify anyrequired settings.18Windows Server 2019 Installation Guide
Chapter 1 Installing Windows2. Installing Windows Server 20192.2 Setting Up the Operating SystemStart2.1 Before Starting SetupUpdate BIOS and BMC firmware2.3 Before You Start2.4 Clean Install3Applying Starter Pack4Setting Up Device Drivers5 License Authentication6 Setup of Windows Server 2019 NIC Teaming (LBFO)7 Setup for Solving ProblemsThe installation is complete.If you need to install applications after installing the operating system, refer to the applicationinstallation guides.Windows Server 2019 Installation Guide19
Chapter 1 Installing Windows2. Installing Windows Server 20192.3 Before You StartBefore you install Windows Server 2019, check the BIOS settings and hard disk environment (disk arrayconfiguration, etc.) of your server referring to a product manual (users’ guide, etc.). The latest product manualsare available on NEC’s corporate website (https://www.nec.com/).2.3.1 Preparation for Operating System InstallationPrepare the following media and instruction manuals before starting setup.Items to necessary to prepare OS installation media *need to purchase one of the following.‐ Microsoft operating system installation media(hereafter referred to as Windows Server 2019 DVD-ROM)‐ NEC ope
To activate Windows Server 2019, enter the Product Key written on the COA label. The COA label of Windows Server 2019 is attached to the operating system media package or the server. See Chapter 1(5. License Authentication), for details. Starter Pack Application Starter Pack