Transcription
CROSS STITCHFORBEGINNERSguideBy Hannah Braniff at Hannah Hand Makes
Entering the world of cross stitch can be quite overwhelming for a beginner.You will start coming across words that you didn’t even know existed such as“frogging”. Or you may have heard of them, but you still have no idea what theyactually are. This list is some of the most common words and phrases you will comeacross in this new world.These are the basic terms you need to get started in cross stitch. If you want tofind out even more you can read my blog post “88 Cross Stitch Terms Every StitcherNeeds to Know”.Aida - The most commonly used fabric for cross stitch, weaved evenly with holes in tomake your "X".Aida band - A strip of aida which has a pretty border on; used for bookmarks/toweledging etc.Anchor – A popular brand of needlecraft supplies, particularly their selection of floss.Beading Needle - A needle used to stitch seed beads onto your design.Design Area - The size of your finished piece. It will be smaller on higher counts of aida.DMC - Another popular brand of embroidery floss, but they also do other supplies suchas aida, wool and hoops.Embroidery hoop - These are used to help keep your fabric taught, and you can usethem to frame your finished work too.Evenweave/linen - Another common fabric used in cross stitch, but much softer andmore flexible.Fabric Count - This refers to the number of holes per inch (HPI) there are on the fabric.For example, on 14 count aida there are 14 holes per inch.Floss – Another word for your thread; 6 strands of embroidery thread loosely woundtogether.Fractional Stitch - A stitch that covers just one quarter or three quarters of the square.Frogging - A term used when you make a mistake and have to unstitch/rip your floss.Named because you have to “rip-it, rip-it”.French Knot - A small knot that you make by wrapping the floss around your needle. Itadds a bit of extra texture to your design, but they are a bit tricky to get the hang of atfirst.
Full Stitch - A full "X" stitch.Half Stitch - Just one diagonal stitch going in either direction "\" "/".Light Effects Thread - A type of thread from the brand DMC. There are metallicthreads, neon and glow in the dark.Motif - A small cross stitch pattern, usually of a single item such as a Christmas Tree ora bird, used to make Christmas cards or add onto clothes etc.Needle Minder - A magnet that snaps onto your fabric to keep your needle safe.Needle Threader - A tool used to help you thread your needle more easily.Q-snaps - These seem very popular in America, but I don't see them being used much inthe UK. They are plastic tubes that link together to hold your work while you arestitching.Sampler - A type of cross stitch pattern made up of a variety of stitches.Seed Beads - Small beads which you can add straight onto your stitch or add to yourdesign after you have stitched it.Skein - Usually around 8 metres of floss wound up into bundles/skeins.Tapestry Needle - A blunt needle made specifically for cross stitch that comes indifferent sizes. For example, a size 24 can be used for 14 count aida or 28 count linen.Thread Conditioner - Used to condition your thread so it glides through the aida moreeasily and make your thread last longer. I recommend always using this on Light Effectsthread.Waste Canvas - A type of fabric you can use to stitch onto clothes etc. and removeonce you have finished stitching.
FabricThe fabric used for cross stitch is usually aida, or even weave/linen (these twocome in the same counts but are made of different materials; even weave is cotton andmodal and obviously linen is linen).These fabrics are perfect for cross stitch because they are weaved evenly sothat there are small squares with holes on each corner for you to make your "X" over.They each come in different "counts" and the higher the count the smaller yourstitches will be, and so the smaller your overall design will be. The count is the numberof holes per inch (HPI) of the fabric. The most common counts for aida are 14, 16 or 18but they also come in 6, 8 and 11 and even weave/linen ranges from 22 to 36 count(the most popular are 28 and 32).The difference between aida and even weave/linen is the feel of the fabric.Evenweave and linen are much softer and flexible, but aida is perfect if you are abeginner to cross stitch. The other difference is that on aida you stitch from one holeto the next but on Evenweave and linen you "stitch over two", which means when youare making your stitch you miss a hole each time.To make your design the same size on both aida and Evenweave/linen, you justdouble the count of the aida. For example, if your design calls for 14 count aida thenyou can stitch it on 28 count linen and the size will stay the same.The two brands of fabric I recommend are DMC and Zweigart. I personally useZweigart; they have a huge range of colours and types and a little fun fact; you can tellif your fabric is Zweigart because they stitch orange thread through the selvage.You can also get waste canvas which is used to stitch onto towels, clothes etc.You attach the waste canvas to the garment, stitch over it and then take the canvas off.For some you use water and it dissolves and others you have to pull the threads out.
NeedlesThe needles used for cross stitch tend to be called cross stitch or tapestryneedles and they come in different sizes that relate to the thickness of the needle. Themost commonly used size is 24 and this is perfect for 14 count aida and 28 countEvenweave/linen.The bigger the count of your fabric, the bigger the size you want your needle(although this actually means that the needle will be thinner). For example, 16 countaida or 32 count Evenweave/linen needs a size 26 needle and 18 count aida or 36count Evenweave/linen will need a size 28 needle.There are so many brands of needle, but I think the King of cross stitch needlesis John James needles.Hoops/frames/q-snapsEmbroidery hoops or frames are used to keep your fabric taught while you arestitching on it. This make it so much easier and quicker to stitch your design.They come in a huge range of sizes and shapes and materials. You can getwooden or rubber (flexi) and q-snaps are plastic tubes rather than a hoop. They can beround, oval or rectangle and as small as 2 inch to a huge 12 inch. You can even getframes that are on a stand, so you don't even have to hold it while you are stitching yay!Although the main purpose of the hoop is to help you stitch, they also makegreat frames for your finished work. This works better for smaller pieces and givesyour finished piece a bit of extra personality.The brand of hoops that I use are Elbesee. These are the best I have come acrossso far; they are thick, smooth and have a proper screw on top, so you can actually use ascrew driver to tighten the hoop if you need to (I have no upper body strength at all so Iuse screwdrivers a lot on finished hoops).Thread/flossAhh, my favourite part of cross stitch! I love the colours and types of floss youcan get.The main floss used for cross stitch is stranded cotton. Stranded cotton is madeup of 6 strands of loosely twisted thread and for cross stitch you only need to use 2 ofthese strands, so you get a whole lot of stitches out of 1 skein of thread/floss.
There is also Pearl cotton which is just 1 strand of thread, but it's about as thickas 3 strands of cotton. This is mainly used for hand embroidery, but you can use it forcross stitch too.I'm going to talk about a specific brand of floss now (DMC) but I know that otherbrands also do some of these types of floss. I just use DMC myself and know a lot moreabout their products than I do about Anchor for example (which is another popularbrand of floss).You can get DMC floss in most needle craft shops, both online and in brick andmortar. They have lots of types of thread; stranded cotton, Pearl, Light Effects andVariations (this is floss that has a few colours in 1 strand of thread so as you arestitching the colours change without you needing to change your thread).They have over 500 colours in their collection and have recently released 35new stranded cotton ones and 35 Etoile (glitter), both of which you can currently buyfrom Sew and So here.A PatternPatterns are usually made up of symbols and some are in colour and some are inblack and white. There are benefits to both; I think colour ones are easier to follow butblack and white are easier to mark off as you are stitching (a little tip; if you use pencilto mark off you stitches, you can rub it off when you are finished and start again!)There will also be a key near your pattern telling you which colour each symbolis; making it super easy to buy the colours you need before you start.There are so, so, so many cross stitch patterns in the world and they have neverbeen easier to get hold of one. Etsy is my favourite place to find cross stitch patterns;you can search, buy and download with just a few clicks. And a little tip, depending onthe size of the pattern, you might not even need to print it off. I very often just save thePDF to my phone as a photo and work from it on my screen. This doesn't really workfor larger patterns that you need to mark off as you stitch but it's great for those small,quick projects.Another place to find patterns is magazines! There are a few cross stitchmagazines out now; Cross Stitch Crazy, Cross Stitcher and The World of CrossStitching are 3 that I see in most shops that I go in. I put myself on a magazine buyingban because it was getting a bit silly how many I had, but I recently subscribed to CrossStitch Crazy digital editions. It only cost me 24 for the year and I always get the neweditions without even going to the shop! The only down side is that you don't get the
free gift, but if you are anything like me, I already have enough supplies to use for thepatterns in there.ScissorsAnd last, but not least, scissors. You might think these are the most boring partof cross stitch but not anymore!You can get so many cute and funky embroidery scissors now; my favourite pairare my unicorn ones from Cloud Craft. Or I have a small supply of mermaidscissors and rose gold scissors.Scissors are mainly only used to snip your thread; either to cut the skein to thelengths you need or to snip the trails at the back, which I recommend doing as you goalong to save getting it all tangled at the back (yes, I'm speaking from experience).Embroidery scissors are the best thing to use as they are the easiest, but you can justuse any pair of scissors you have around the house.ExtrasSo those are the 6 things you absolutely need for cross stitch, but these extras willhelp make your stitching even easier and so, more fun! A pencil - use this to mark off the squares on your pattern that you havestitched. I don't always need to do this, it depends on the size of the pattern.And you can use a pen, but I always recommend a pencil for the reason Imentioned above; you can rub it out at the end and re-use the pattern. A little pot or bag - These are handy to have to put the trails of thread you snipoff in. A bigger bag - Used to transport your kit and especially good if you stitch whilecommuting and great for keeping all your supplies in one place. I sell colourful,cotton ones or I can highly recommend these craft pouches from Sarah AshfordStudio. A needle threader – A helpful tool if you struggle to thread your needle. A needle minder - Perfect for keeping your needle safe in between stitches, ifyou need to put it down to make a cup of tea or grab a snack which leads nicelyto my last extra. Tea/coffee/cake - These almost went in the top 6 needed. There's nothingbetter than getting cosy with a warm drink, a piece of cake and some crossstitch.
All cross stitch patterns come on a grid made up of small squares (think back tothe graph paper used in your maths class and you’re along the right lines). The grid hasnumbers running along the top and side, usually in multiples of 10, that represent thenumber of squares on your aida. There are arrows in the middle of these numberspointing to the centre square of the pattern, which is where you start stitching(sometimes the centre square is also marked). The numbers may start to decrease afterthe centre arrow, but they usually continue to increase.On your grid will be the design, made up of lots (or maybe just a few) squares.Each square that is a stitch will be filled with something. It may just be a colour, or itmay just be a symbol. Most commonly it is a mixture of both squares and symbols.Near your pattern, either under, at the side or on the next page, will be your key.This shows you what number of threads the colours/symbols represent. The mostcommonly used thread is DMC or Anchor and patterns usually give you these numbers,sometimes both. For example, a pink heart on the pattern may represent DMC 3689.If the whole square is filled, this is a full X. If just half of the square is filled, thisis half an X and can go in either direction; / or \ - the pattern should make it clear whichway to go. Then if just one quarter of the square is filled, this is a fractional kit. It isusually only bigger, more complicated patterns that include fractional stitches andmost patterns will tell you what stitches are in it includes before you buy. I don’t usefractional stitches in any of my designs. In fact, most of my designs are made up of justfull cross stitches.On top of the squares there may also be back stitches. These are representedby solid lines, usually in back but they may also be the colour you will stitch them in.Either way, the exact colour should be in your key.Depending on the size of your pattern, it may fit on one page, or may be spreadacross a few pages. It could also be printed on larger paper.The design should also have the finished dimensions on, as well as the name ofthe designer. Please remember that cross stitch patterns are protected undercopyright laws, so don’t re-sell them yourself or share the pattern; in particular don’tshare a photo of the pattern on social media.You can see an example of a cross stitch pattern near the end of this eBook.
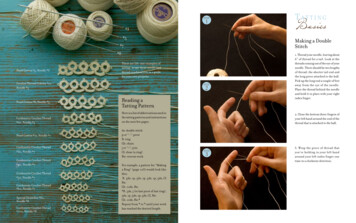
How To Start Your Cross StitchYou always start stitching in the centre of your fabric and you can find thecentre by folding your fabric/aida in half length ways and width ways. Where theymeet is your centre square and you can find the centre of your pattern by following thearrows. If there is no stitch in the centre of your pattern then count out to the nearestone.Then pop your aida in the hoop ready to start stitching. Pull the aida as tight asyou can get it, this will make it much easier to stitch on.Next you may have to snip your thread. A quick way to do this is to gather all theloops at the bottom of your skein and snip them. You will be left with around 24 equalstrands of thread. Some people do find these a little short, but I personally always usethis method to snip my threads now, and it’s particularly good if you are a beginner.For your first stitch come up the top left hole of the square you are starting onand leave and hold about an inch of thread out at the back. Then go diagonally acrossinto the bottom right hole.Next, come back up the top right hole and back down into the bottom left. (Formore details and video on how to do a cross stitch pop over to this post). As you are
stitching make sure your stitches are going over the inch of thread at the back tosecure it. Repeat this until you come to the end of the thread or colour you are using.There are of course other ways to do this. Some people prefer to go from rightto left first, where I go from left to right. And some people do lots of half cross stitchesone way and come back over them the other way, which I show you in this video. Ifyou find a different way to stitch, then go with whatever you find easiest; theimportant bit is to be consistent and do each stitch the same.How to start cross stitch - an alternative "loop" methodThis method is probably the easiest but is not the one I teach anymore, althoughI do recommend using it when you are stitching with Light Effects thread.To start this way, take 1 strand of thread and fold it in half. You should have aloop at one end; thread your needle at the other end. Come up on the square you arestarting on and leave the loop sticking out of the back. When you go back down tomake your first stitch, put your needle through the loop and pull gently. Your threadshould now be secure.How to tie off your threadWhen you are coming to the end of the thread or you need to swap colours,simply turn your hoop over and thread your needle under a few stitches at the back.
If you have quite a bit of thread left when you come to the end the you can snipit off and keep it to use again or "park it" (slip it through an unused part of your fabricat the edge) to use later.
1. Don’t pull your needle too tight when doing your “x’s” as this can make yourstitches look flat. On some of my old projects you can see the pre-made holes onthe aida even more prominently because I have pulled my needle so hard when Ihave been stitching. This is something I did when I was younger, but also when Ifound stitching again in later life. The trick is to pull it just tight enough, so the"X" sits flat on the aida.2. Snip the loose thread at the back as you go to stop them getting caught in yournew stitches, and have a little pot handy to put them in. If you save them allthere are some pretty cool things you can make with them on Pinterest such asa phone case and little decorative cards.3. Try and stitch your design in natural light if you can. This makes it much easierto see your stitches and puts less strain on your eyes. Or if (like me) you likecosy, late night stitching, sit next to a lamp or try popping a reading light on yourhoop.4. Take the aida out of the hoop when you are not using/stitching on it to reducethe creases from the hoop. This is particularly important if you are framing itusing a traditional frame or canvas as it will be much easier to iron.5. When you are ready to stitch the felt on the back, put the side with the pencilmarks on against your hoop to hide them.6. If you are going to iron your finished piece, put a towel on your ironing boardand put your aida right side down so you are ironing the back. This will stopyour stitches going flat. Or try and iron around your stitches if you can.7. Most kits will come in a plastic bag or cardboard box (I use the latter) but if youwould like something a little colourful and reusable, these drawstring bags arethe perfect solution. You can even stitch on them which I have another tutorialall about. Or I can highly recommend Sarah Ashford’s craft pouches.8. If you want the same design to fit in a smaller space, you can stitch it on ahigher count of aida. For example, one of my first designs was a rainbow in an 8inch hoop. If I wanted to make this finished piece smaller, I could have stitched iton 16 or 18 count aida.
9. Stitch contrasting colours of aida and thread on 16 count or higher aida. Forexample, I had a Halloween kit that was black aida and glow in the dark thread(which is basically white). When I stitched this hoop, I used 14 count aida andyou could see lots of the black aida through the white stitches. This alsohappened when I stitched some animals in all black thread on white, 14 countaida. You could see the white aida through the black stitches.At first, I considered using more than the usual 2 strands of thread to stitch it,but I don't think stitches look quite as neat when using more than 2 strands, so Ididn't really want to do this.It took me a while to figure out that if I just stitched it on a higher count aida (16count was fine) it eliminated this problem. This is because the stitches are morecompact and closer together on higher counts so less aida shows through.10. If you are creating a lot of patterns I recommend buying cross stitch patternsoftware. When I started designing my own patterns, to stitch commissions, Iwould use graph paper and Microsoft excel. This worked quite well because itwas just for me. My commissions were usually announcements, new baby,weddings etc. so were just names and dates, and I would only really use excel soI could see the colours. I would make all the squares the same size (12px x 12px),then use the fill button to fill the squares with colour.When I started selling kits this wasn't ideal any more as it wasn't professional;the colours weren't true to the DMC ones and there were no symbols. I wentonto the Etsy forums and found out about PC Stitch. There is also MacStitch forMac users and it was around 36 when I bought it. It has just recently updatedso it has the new 35 colours and some variations.There are other software's out there that tend to be more expensive, butPCStitch works great for what I need it to do. There are so many features that Idon't actually use too, such as importing photos and changing them intopatterns. You can also make fonts, it has lots of speciality stitches and you caneven blend colours.11. Wash your hands before you start stitching. This is a pretty simple tip but couldsave you needing to wash your finished piece (unless, like me, you have kids wholike to draw on your aida).12. If you are prone to losing your needle, buy a needle minder! I don’t know how Iever stitched without one! Many other needlecraft suppliers sell them including
me.13. Your needle will probable twist as you are stitching. Just drop it every now andthen, between your stitches, to untwist it.14. A knot may form when you are stitching. To undo it, thread your needle backthrough the knot and it should come loose.15. Plan you pattern before you start stitching and make sure you have all thesupplies you need. There is nothing more annoying than running out of threadhalf way through your design.You may have done so already, but if not, sign up to my newsletter and you willreceive some pattern planning pintables to make it even easier for you. Or youcan buy your own personalised printed planner too! I love mine, and again, it’ssomething I can’t believe I lived without.And don’t forget the biggest tip of all! Put your feet up, relax, and enjoyyour cross stitch journey.
Mistakes are just part of life and they are definitely a part of cross stitch.Although cross stitch is pretty easy, it only takes one missed stitch, or a littlemiscounting and it messes up your whole design.If you realise quite quickly that you have made a mistake, then it can be quitequick to fix too. It's just a case of unpicking a few stitches using your needle and thenyou can simply carry on. However, if you make a mistake and don't realise until nearingthe end of your work or even after you have finished (it's happened to me before) thenit's not so quick to fix.You have two options here really; if it's just a small, almost unrecognisablemistake you can try and ignore it and hope no one points it out. Or, if you are a bit of aperfectionist like me, then you are going to have to unstitch and start again. You mightnot have to unstitch everything (phew!) just the section where it's gone a bit wrong.To do this I recommend using a seam ripper; you simply put the seam ripperunder your stitches and glide it along. You can also use scissors to do this, just becareful you're not snipping any of the aida underneath.A fun little fact; when you are ripping your stitches, it's called "frogging"because you have to "rip-it, rip-it". I know, cheesy, but true.Once you have fixed your mistake, you may notice that some of the holes onyour aida are now a lot bigger. Just move some of the weaving around the hole and tryand put it back to its original shape if this is bothering you.
Where to buyHannah Hand Makes for cross stitch kits for beginners, patterns, scissors, projectplanners, project bags and needle minders.Sew and So for hoops, thread, patterns, needles and aida. Basically everything!Cloud Craft for scissors, needle minders, hoops and Satsuma Street paper patterns.Hobby Craft* for hoops and cross stitch kits.Willow Fabrics for Zweigart Aida and scissors.Etsy for cross stitch patterns.Your local craft stores.
Thank you so much for reading my first ever E-book guide! I hope it hasinspired you to start cross stitching or helped you on your cross stitch journey in someway.I would love to connect with you personally, so why not come and join myFacebook community? If you are not on Facebook, you can also follow me onInstagram, join my Pinterest community or sign up to my newsletter.Or do all 4! I can’t wait to chat with you!And If you want to dive even deeper into cross stitch, I have a wholecourse for you!My how to cross stitch course for beginners will save you so much time andhassle of trying to find cross stitch tutorials all over the web. Instead you will havethem all in one place! And every time you complete a lesson it will check it off for youso you can see your progress.At the end of this course you will be able to officially call yourself a crossstitcher and you will have a new hobby that you can enjoy forever.ENROL NOWHappy stitching!
Full Stitch - A full "X" stitch. Half Stitch - Just one diagonal stitch going in either direction "\" "/". Light Effects Thread - A type of thread from the brand DMC. There are metallic threads, neon and glow in the dark. Motif - A small cross stitch pattern, usually of a single item such as a Christmas Tree or a bird, used to make Christmas cards or add onto clothes etc.