Transcription
HP MediaSmart ServerUser’s GuideVersion Update 1.1.1Revised 05 November 2007
Version Update 1.1.1
ContentsWelcome to HP MediaSmart ServerChapter 1: InstallingOverview of the HP MediaSmart Server Setup1-1Before Starting 1-2Connecting the server1-5Turning on the HP MediaSmart Server 1-6Checking the Server Lights1-7Updating Your Firewall’s Trusted Program List1-7Installing the Software on the First Computer 1-8Congratulations! You are ready to start using your server 1-12Chapter 2: Getting StartedOpening the Windows Home Server Console2-1Setting up the HP MediaSmart Server using the AssistantTask 1 of 6: Setup HP Software UpdateTask 2 of 6: Create User Accounts2-22-52-7Task 3 of 6: Configure Remote Access2-13Task 4 of 6: Configure your HP Photo Webshare2-17Task 5 of 6: Turn on Media Sharing 2-19Task 6 of 6: Learn more about your HP MediaSmart Server 2-20Installing the Software on Additional Home ComputersSetting up Additional Home Computers2-212-23Chapter 3: Server ConsoleMediaSmart Server tab3-1Windows Home Server tabs3-2i
Chapter 4: Control CenterAccessing the Control Center 4-1MediaSmart tabTools tab4-14-2Help & Support tab 4-3Chapter 5: Photo WebshareBefore You Begin5-1Logging on to HP Photo WebshareWebshare home page5-45-5Managing Webshare User Accounts 5-6About the Types of Webshare User AccountsManaging Visitors 5-8Managing Groups 5-125-7Creating an album to share 5-13Naming your album 5-14Adding photos to your album 5-14Sharing an album 5-17Notifying visitors by email5-18Viewing, printing, and saving photosViewing photos 5-19Buying prints 5-21Saving photos 5-22Presenting slideshows 5-23Changing a Visitor’s PasswordFrequently Asked Questions5-195-235-23Chapter 6: Using the ServerShared folders 6-2Windows Home Server Console Help for shared foldersAccessing shared folders from your computer 6-2Backing up and restoring a computerExpanding server storage 6-5Installing an internal SATA driveii6-26-46-5Version
Installing and removing an external USB disk drive, eSATA drive,SATA port multiplier 6-9Adding and removing drives from server storage 6-11Removing a hard drive from the server 6-12Replacing the system drive 6-16Removing the system drive 6-16Re-installing the new system drive 6-20Securing your server from intrudersStreaming media6-226-27Setting up iTunes on the server and the client computer 6-29Network health6-30How to add shared folders to network places6-31Hardware status 6-32Remote access6-33How to map and disconnect a drive letter6-34Chapter 7: TroubleshootingHP MediaSmart Server troubleshooting tips: 7-1What to do if the server is unresponsive 7-2Power-on indicator is off 7-3Why is the hard drive light-bar purple? 7-3Why is the hard drive light-bar red? 7-3Why is the server’s health indicator light red? 7-4Computer Recovery 7-5What to do about hardware warning messages? 7-5Using Server Recovery and Factory Reset 7-7File transfer failure 7-13If you cannot access the Windows Home Server 7-14Health indicator codes 7-14Network connection troubleshooting tips: 7-16Network connection issues 7-16No available port on network router 7-20Why did URL not work? 7-20What do firewall blocking messages mean? 7-21Webshare troubleshooting tips:7-21iii
Why can’t I share my album? 7-22How to add photos from your photos shared folder to yourWebshare. 7-23Unable to upload images. 7-23How do you make Webshare work in the home? 7-23Why am I getting a certificate error? 7-24Upload Photos requires ActiveX control to be loaded? 7-24Clicking on photo Webshare on CC Does Not Open. 7-24Webshare administrator cannot delete Visitor account. 7-24Visitor can create a photo album and add pictures but the albumdoesn't display. 7-24Visitor can create a photo album and add pictures but the albumdoesn't display the pictures. 7-24Visitor cannot download pictures and sees a message telling them thatthey cannot download pictures. 7-25Visitor cannot add pictures and sees a message telling them that theycan't add pictures. 7-25Visitor has created an album (or albums) and wants to delete thealbum but cannot. 7-25Visitor has changed their password, now they can't log intoWebshare. 7-25Selecting URL from address field in web browser loads “page thatopens cannot be closed without closing the entire application”. 726Webshare user is unable to log out of Webshare. 7-26Trouble uploading large files to Webshare. 7-26Clicking on Photo Webshare on CC causes command error. 7-26Browser cannot display the page when accessing through URL. 7-26Other common troubleshooting tips 7-27How to find the server software and firmware information. 7-27The first backup is taking a long time. 7-27What are optimum data throughput speeds for different networkinterfaces? 7-28iTunes troubleshooting tips 7-28iTunes aggregator does not appear to be working. 7-29Song selection from the server is not updating with new additions. 729ivVersion
Podcasts not showing in playlist. 7-29Microsoft Windows Home Server troubleshooting tipsServer low on space. 7-29Cannot connect to server shares. 7-307-29Email troubleshooting tips 7-30Why do I need email address for visitors and Home Server users? 730Why do I need to set-up Webshare notifications? 7-31How do I find what my SMTP server is? 7-31Do I need to do an SMTP email configuration? 7-31If you have chosen to use your own email provider to send PhotoWebshare announcements and these email announcements havenot been received by the people on your lists. 7-31Emailed link not opening. 7-31Email is not received. 7-32Media Streaming troubleshooting tips 7-32Why my files do not show up on DMA? 7-32File doesn't appear. 7-33Server not showing up. 7-34Media Files (audio/Video) of supported format aren't seen bydevice. 7-34Why can I play and stream DRM content my home computer but I can notstream it from my HP MediaSmart Server? 7-34What value does TZO domain names provide beyond the Microsoft Liveoption: 7-35Chapter 8: Product informationProduct specifications8-1Regulatory statements8-5WM-DRM 10 licensed technology8-7Limited warranty and technical support statement8-8Chapter 9: Licenses, Copyrights and Notices for OpenSource ComponentsApache LicenseBSD License9-19-7v
ImageMagick LicenseJSON License9-89-12Codehaus License9-13GNU General Public License (GPL, Version 2, June 1991)9-13GlossaryviVersion
Welcome to HP MediaSmart ServerThe HP MediaSmart Server is a home server for families with multiplecomputers on a home network who want to enjoy their digital experienceswhen and where they want. The HP MediaSmart Server includes remoteaccess to files, automatic computer backups, virtually unlimited storageexpendability, media streaming to the entertainment center, and HP’s newPhoto Webshare.Help is available from most windows on the HP MediaSmart Server.HP HelpHP Help includes the types of help shown in the following table. Additionally,the online User’s Guide provides links to topics in the Windows Home ServerHelp.User’s Guide—Contains online help, installation instructions, guidance forset up, using the product, tutorials, recovery information, and other importantinformation.Online Help—A Help button is available on most pages.HP Support Web site—Additional support and informational articles areavailable at http://www.hp.com/support.Windows Home Server Console HelpSome tasks, such as creating users and using shared folders, are donethrough the Windows Home Server Console.1At the computer, double-click the Windows Home Server iconsystem tray.2Log on to the Windows Home Server Console.in the1-1
3Click Help in the upper right corner, indicated by ahelp buttons on dialog boxes.icon, or clickTable 1: Windows Home Server Console Help1-2Main TopicsDescriptionWelcome to the Windows Home ServerConsoleLearn what the Windows Home Server trayicon colors mean. This topic also providesan overview of adding user accounts,organizing files, configuring backups, andcustomizing server settings.Computers & BackupExplains how backups work and how toconfigure, restore, and troubleshootbackups.User AccountsHow to add users to your server.Shared FoldersAdding, opening, removing, viewing thehistory of shared folders, and using folderduplication.Server StorageView, add, repair, and remove hard drivesfrom total storage.Network HealthWhat health notifications mean and whatto do about them.Windows Home Server SettingsHow to configure backups, passwords,media sharing, remote access, add-ins,resources, and more.Remote AccessHow to set up the server to easily accessyour files away from home.Version Update 1.1.1
1InstallingIn this chapter you’ll connect the HP MediaSmart Server to you home networkand install the software on your first home computer.What’s in this chapter» Overview of the HP MediaSmart Server Setup» Before Starting» Connecting the server» Turning on the HP MediaSmart Server» Checking the Server Lights» Updating Your Firewall’s Trusted Program List» Installing the Software on the First Computer» Congratulations! You are ready to start using your serverOverview of the HP MediaSmart Server SetupComplete the following steps to set up the HP MediaSmart Server on yourhome network.To set up the HP MediaSmart Server1Connect the HP MediaSmart Server to your network and turn it on.For additional information, see Connecting the server on page 1-5.2Update the trusted programs list for any firewall or anti-virus software onyour computer.For additional information, see Updating Your Firewall’s Trusted ProgramList on page 1-7.3Install the HP MediaSmart Server software on one computer.For additional information, see Installing the Software on the FirstComputer on page 1-8.4InstallingFollow the Setup Assistant in the Windows Home Server Console.1-1
For additional information, see Setting up the HP MediaSmart Serverusing the Assistant on page 2-2.5Install the HP MediaSmart Server software on additional computers.For additional information, see Installing the Software on AdditionalHome Computers on page 2-21.Before StartingImportant information about locating and using the HP MediaSmart Server. Locating the server Network Requirements Supported operating systems Wireless support Additional SoftwareLocating the serverFind a suitable place to locate your HP MediaSmart Server before you installthe software on your computers. The location you choose must have either anavailable wired network connection to your broadband router or a switchconnected to your broadband router.The server also requires adequate ventilation to ensure it does not get too hot:1-2 Do not locate the server in an unventilated space. Make sure that the server’s front and back panels are not blocked. Check that the location of the server is not too hot. Maximumenvironmental temperature for operating the server is 35 C (95 F).InstallingVersion Update 1.1.1
Network RequirementsTo successfully use the HP MediaSmart Server, your network must meet thefollowing requirements:Table 1: Network RequirementsRequirementRecommendedServer connection100 Mbps to 1000 Mbps (GigabitEthernet) wired connectionHome computersOne or more computers running asupported operating system with a wired orwireless network connection. For a list ofsupported operating systems, seeSupported operating systems on page 1-3.Internet connectionBroadband connection, such as DSL orcable, required for remote accessfunctionality.RouterAn external Internet broadband router with100 Mbps (or faster) Ethernet connection tothe server for remote access functionalityand wired or wireless connections to thecomputers on the network.Additionally, your router must have DHCPenabled to provide an automatic IPaddress to the server.Supported operating systemsThe following operating systems are supported to work with the HPMediaSmart Server:Table 2: Supported operating systemsInstallingWindows VistaaWindows XPbWindows Vista Home BasicWindows XP Home with Service Pack 2(SP2)Windows Vista Home N (European Uniononly)Windows XP Professional with SP21-3
Table 2: Supported operating systemsWindows VistaaWindows XPbWindows Vista Home PremiumWindows XP Media Center Edition 2005with SP2 and Rollup 2Windows Vista BusinessWindows XP Media Center Edition 2005with SP2Windows Vista Business N (EuropeanUnion only)Windows XP Media Center Edition 2004with SP2Windows Vista EnterpriseWindows XP Tablet Edition with SP2Windows Vista Ultimatea. Remote access is not support by Windows Vista Home (all versions); the Business,Enterprise, and Ultimate versions of Windows Vista support remote access. Formore information, see Why can't I connect to some computers? in the WindowsHome Server Console Help.b. Windows XP Professional and Windows XP Media Center Editions support remoteaccess. Windows XP Home does not support remote access.Note: The HP MediaSmart Server does not support client computers running64-bit operating systems.Wireless supportYou must connect the HP MediaSmart Server to your router (or switch) with anEthernet cable. The server does not support wireless connection to your router.However, computers connected wirelessly to a wireless access point or routerare supported.Additional SoftwareInternet Explorer 6.0 or later is required to run the HP MediaSmart Serversoftware. Download Internet Explorer from www.microsoft.com/downloads.iTunes 7.1 or later is required for combining household music libraries andstreaming music with iTunes. Download iTunes from www.apple.com/itunes/download.1-4InstallingVersion Update 1.1.1
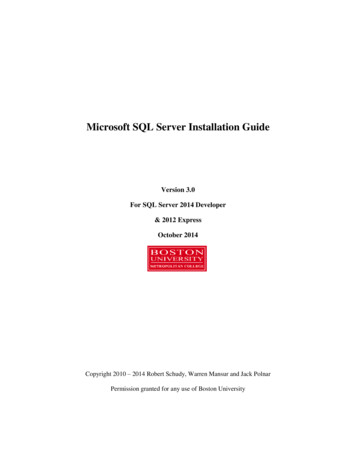
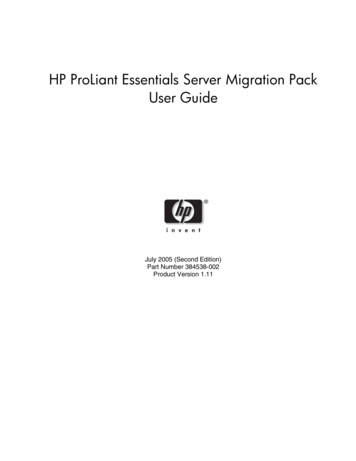
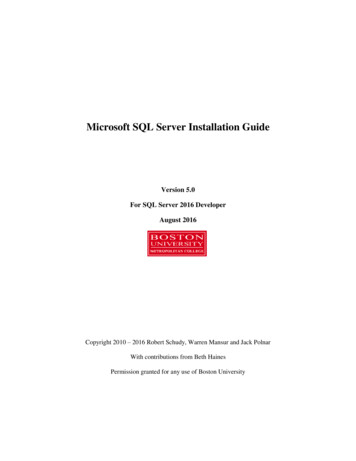
Connecting the serverHow you connect the HP MediaSmart Server to your network depends on thenetwork configuration.Figure 1: Connecting the HP MediaSmart Server to the networkThis example shows a broadband router connecting the following: HP MediaSmart Server Desktop computer Laptop with a wireless adapter TV connected to a network-enabled media streaming device, such as anXbox 360 Remote users connecting to the HP MediaSmart Server and home networkthrough an Internet browserThe server requires a DHCP-enabled router to get its IP address. By default,most routers include a DHCP server. For more information, check your routerdocumentation.Caution: If you have wireless functionality on your network, be sure toenable your router’s security settings, such as WPA or WEP, to protect yournetwork. See the documentation that came with your router.Installing1-5
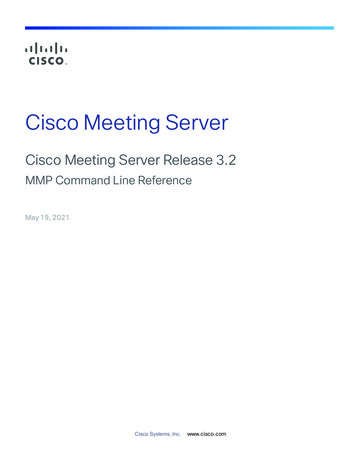
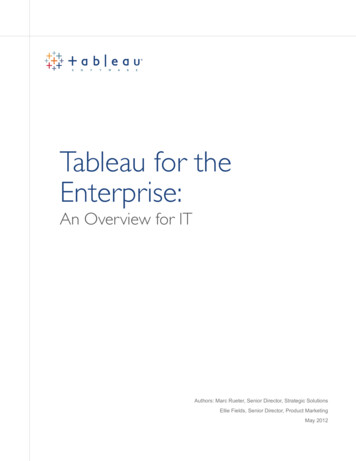
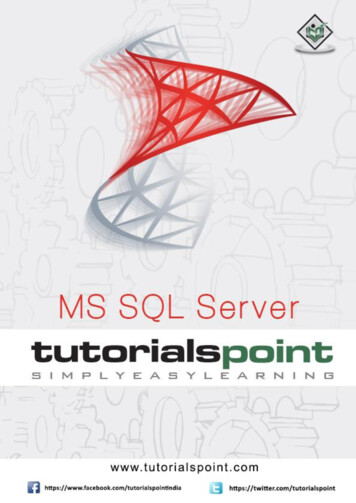
Turning on the HP MediaSmart ServerConnect the HP MediaSmart Server to a power source and to a router.Figure 2: Connecting to power and powering onTo power on the server1Plug in. Plug one end of the power cord into the server’s powerreceptacle and the other end into an electrical outlet.2Connect. Connect one end of the Ethernet cable to the server and theother end to an available Ethernet port on your router or to a switch that isconnected to your router.3Power on. Press the Power button on the back of the server.The server takes approximately 60 seconds to startup. The indicator lightsblink and change color throughout the startup process. Wait for all of theserver lights to be solid before proceeding with the software installation.Important: Do not attach USB devices to the HP MediaSmart Server duringinitial setup. For additional information, see the Troubleshooting on page 7-1.1-6InstallingVersion Update 1.1.1
Checking the Server LightsThe lights on the front of the HP MediaSmart Server indicate the status of theserver. After the HP MediaSmart Server startup completes and prior to the firstsoftware installation, the indicator lights show: Hard drives—solid purple Network—solid blue Health—solid purpleAfter you complete the software installation, all lights should be solid blue.If the lights are not solid blue, see the following: Why is the hard drive light-bar purple? on page 7-3 Why is the hard drive light-bar red? on page 7-3 Power-on indicator is off on page 7-3 Why is the server’s health indicator light red? on page 7-4Updating Your Firewall’s Trusted Program ListThe HP MediaSmart Server Software Installation Disc installs severalprograms that enable your computer to communicate with the HPMediaSmart Server over your network. Software firewalls installed on yourcomputer can block this communication and prevent the computer fromlocating the HP MediaSmart Server on your network. The following steps arerecommended before installing the HP MediaSmart Server programs:Installing Launch your firewall and anti-virus software and update the trustedprograms list. Verify that your firewall and anti-virus software is set to "Learn" newprograms. After the HP MediaSmart Server software is installed, thefirewall should prompt you to allow the installed programs tocommunicate with the server. If you are using a firewall or anti-virus program that cannot automaticallyupdate its trusted software list, please contact the firewall or anti-virussoftware vendor to find out how to manually add software to the trusted1-7
software list. Then, visit http://www.hp.com/go/support for a list ofsoftware to add.Sidebar: Hubs and Network Health LightSome network hubs, as opposed to switches or routers, may reduce performancebetween your computer and the HP MediaSmart Server, or the hub may prevent yourcomputer from communicating with the server. If this is a problem, the network healthindicator light on the front of the server will be off. Replacing the hub with a switch mayimprove the network performance or restore connectivity.Installing the Software on the First ComputerUse the Software Installation Disc to install both the HP MediaSmart Serversoftware and the Windows Home Server Connector software.The software installation consists of the following: HP Update (if not already installed) Windows components—Windows Installer 3.1 and .NET 2.0 or latersoftware. (Installed only if they are not already on the computer) HP MediaSmart Server software Windows Home Server Connector Windows Home Server Setup—the setup runs only on the first computerwhere the software is installed.Checking for Administrative PrivilegesYou must have administrative privileges on your home computer to install thesoftware. Complete the following instructions for Windows Vista or WindowsXP to view or change user account settings. In Windows Vista, click Start, Control Panel, and then UserAccounts and Family Safety. In Windows XP, click Start, click Control Panel, and then double-clickUser Accounts.Inserting the Software Installation DiscThe Software Installation Disc first installs the HP MediaSmart Server softwareand then the Microsoft Home Server Connector software on your computer.1-8InstallingVersion Update 1.1.1
1Insert the Software Installation Disc into a computer connected to yournetwork. The installation starts.2Follow the instructions on each installation page. The remainder of thischapter describes important parts of the installation, but not every step isdescribed.Note: Computers running Windows Vista may display User Account Controlmessages, such as “A program needs your permission to Continue.” ClickContinue.About the HP MediaSmart Server SoftwareThe HP MediaSmart Server software installs first. This software is used to Provide a single point of access for all of the server’s features, Share photos and videos quickly and securely over the Web using HPPhoto Webshare, Centralize your iTunes music library, and more!Note: Click User’s Guide on this dialog box if you need additionalassistance with the installation and setup.Click Next to display and accept the end user license agreement.Installing the HP MediaSmart ServerClick Install and follow the instructions on each page.The following components are installed if they are not already on yourcomputer. This installation may restart your computer and take severalminutes. Windows Installer 3.1 Microsoft .Net Framework 2.0 HP UpdateThe HP MediaSmart Server software automatically installs after thecomponents. Once the HP software is installed, the Windows Home ServerConnector install begins.About the Windows Home Server ConnectorThe Windows Home Server Connector:Installing1-9
Connects your computer to the server. Automatically backs up your computer every night. Monitors the health of the network and computers running WindowsVista. Enables configuration of the server from your computer.Windows Home Server Setup runs only once—on the first computer whereyou install the Windows Home Server Connector software.Finding the ServerThe Windows Home Server Connector installations looks for and connects toyour HP MediaSmart Server. If the installation cannot find your server, seeTroubleshooting on page 7-1.Once the server is found, click Next to continue the installation.Initializing Windows Home ServerThe Windows Home Server initialization begins and can take several hoursdepending on your hardware. Please wait while Windows Home Server: Configures your hardware Recovers your data Starts Windows Home ServerNaming the HP MediaSmart ServerType a name for your server. Server names can be: 15 characters maximum with no spaces Letters (at least one), numbers and hyphensNote: This is the only time you can name your server. It cannot be changedlater. The default name is HPSERVER. Write down the server name if youchange it.Setting the Server PasswordOn the Windows Home Server password page, you are asked to create astrong password. A strong password must be at least 7 characters long andmust fulfill three of the following four requirements:1-10InstallingVersion Update 1.1.1
Uppercase characters Lowercase characters Numbers Symbols (such as !, @, and #)Note: A password hint can be seen by anyone who clicks the Password hintbutton. It is recommended that you write your password down somewheresafe.Important: The server password is not the same as a user password. Foradditional information on user accounts and passwords see, Task 2 of 6:Create User Accounts on page 2-7.Help Protect Windows Home Server AutomaticallyWindows Home Server Setup automatically downloads and installs relevantimportant updates from Windows Update to help make your home servermore secure.Choose if you want Windows Home Server to continue automaticallydownloading updates after Setup and click the next arrow.Note: It is recommended that you turn on Automatic WindowsUpdates.Customer Experience Improvement ProgramJoin the Customer Experience Improvement Program (CEIP) and help makeWindows Home Server even better. CEIP collects information about yourhardware and home server usage without interrupting you. No informationcollected is used to identify or contact you.Choose if you want to participate in this program and click the next arrow.Windows Error ReportingTo help understand the problems you may encounter with Windows HomeServer, Windows Error Reporting can automatically report them to Microsoft.Any personal information inadvertently collected in the reports will not beused.Choose if you want to participate in this program and click the next arrow.Installing1-11
Checking for Windows Home Server UpdatesThe Windows Home Server installation checks for any relevant importantupdates. This may take some time to complete, but does not requireadditional information from you.Important: Do not restart or turn off your home server during the updateprocess.Checking for HP MediaSmart Server UpdatesThe HP MediaSmart Server installation checks for any updates. Installingupdates ensures that you experience the full functionality and optimalperformance of the HP MediaSmart Server.Important: Do not restart or turn off your home server during the updateprocess.When do you log on to the server?Introducing the HP MediaSmart Server AssistantThe server installation is complete. When you click OK, the Assistantremains at the bottom of the page to guide you through setting up your HPMediaSmart Server.A green check mark appears for each completed step. Once all of the stepsare complete, the Assistant link at the top of the page turns green. Foradditional information, see Setting up the HP MediaSmart Server using theAssistant on page 2-2.Congratulations! You are ready to start using yourserverSome HP MediaSmart Server features, such as backups and shared folders,are pre-configured and ready to go as soon as the first software installation iscomplete. Other features require some set up before you can use them.BackupsAfter running the Software Installation Disc on your first home computer it isautomatically added to the list of computers that are backed up by the HP1-12InstallingVersion Update 1.1.1
MediaSmart Server each night. Run the Software Installation Disc onadditional home computers to enable them to communicate with the serverand to add them to nightly backups.To customize the hard-drive volumes to back up, or to exclude folders from thebackup1At the computer, double-click the Windows Home Server icon in the tasktray and log on.Figure 3: Windows Home Server system tray icon2Click the Backups & Computers tab.Shared Folders and Media SharingStart copying digital assets from your computer to shared folders on the HPMediaSmart Server.1At the computer, double-click the HP MediaSmart Server desktop icon.Figure 4: HP MediaSmart Server desktop icon2Copy Photos, Music, or Videos to the appropriate shared folder or clickServer to create shared folders for other digital content.Note: From the Media Sharing page on the Windows Home ServerSettings tab, you can turn on digital media streaming for the Photos, Music,or Videos shared folders. Click On for each folder that you want to streamfrom.Set up Additional FeaturesFeatures such as HP Software Update, User Accounts, Remote Access, PhotoWebshare, and Media Sharing require some setup. The Assistant guides youthrough setting up your server. Using the Assistant is optional butInstalling1-13
recommended to ensure that the most frequently used server features are setup correctly.1At the computer, double-click the Windows Home Server icontask tray and log on.in theThe MediaSmart Server tab should be active.2Follow the instructions in the Assistant at the bottom of the page.See Setting up the HP MediaSmart Server using the Assistant on page 2-2 fordetailed instructions on using the Assistant.1-14InstallingVersion Update 1.1.1
2Getting StartedAfter completing the first installation, use this chapter to set up the HPMediaSmart Server.What’s in this chapter» Opening the Windows Home Server Console» Setting up the HP MediaSmart Server using the Assistant» Task 1 of 6: Setup HP Software Update» Task 2 of 6: Create User Accounts» Task 3 of 6: Configure Remote Access» Task 4 of 6: Configure your HP Photo Webshare» Task 5 of 6: Turn on Media Sharing» Task 6 of 6: Learn more about your HP MediaSmart Server» Installing the Software on Additional Home Computers» Setting up Additional Home ComputersOpening the Windows Home Server ConsoleYou can access the Windows Home Server Console in the following ways: To open the Windows Home Server Console from the start menu To open the Windows Home Server Console from the HP MediaSmartServer desktop icon To open the Windows Home Server Console from the system trayTo open the Windows Home Server Console from the startmenu1At the computer, click Start, All Programs, and then select WindowsHome Server Console.2Log on to the Windows Home Server Console.
To open the Windows Home Server Console from the HPMediaSmart Server desktop iconThis method requires that during installation you selected to create a desktopshortcut to the HP MediaSmart Server.1From the computer desktop, double-click HP MediaSmart Server icon.Figure 5: Desktop HP MediaSmart Server icon2In the Control Center, click the Tools tab.3Click Home Server Console.4Log on to the Windows Home Server Console.To open the Windows Home Server Console from the systemtray1At the computer, double-click the Windows Home Server iconsystem tray.2Log on to the Windows Home Server Console.in theSetting up the HP MediaSmart Server using the AssistantAfter running the Software Installation Disc on the first computer, the installerdisplays the Windows Home Server Console with the MediaSmart Server tabselected. Additionally, the Assistant displays at the bottom of the page anddescribes the most important tasks for configuring the HP MediaSmart Server.This topic includes the following:2-2 About the Assistant Opening and Closing the Assistant Using the Assistant Task Indicators Other HP MediaSmart Server SettingsGetting StartedVersion Update 1.1.1
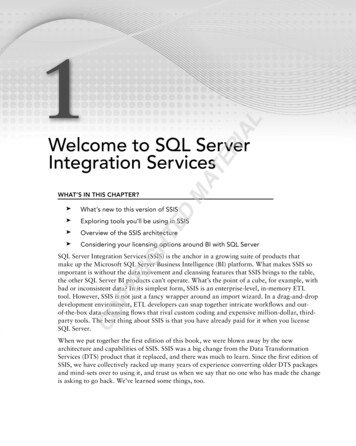
Figure 6: The Assistant displays with suggested configuration tasksAbout the AssistantThe Assistant guides you through setting up your server. Using the Assistant isoptional but recommended to ensure that the most frequently used serverfeatures are set up correctly. Task 1 of 6: Set up HP Software Update—Set up HP SoftwareUpdate to automatically check for HP MediaSmart Server and computerupdates. For more information, see Task 1 of 6: Setup HP SoftwareUpdate on page 2-5. Task 2 of 6: Create User Accounts—Create a guest server accountor individual user accounts to seamlessly connect to shared folders on theHP MediaSmart Server from your home computers. Individual useraccounts with strong passwords are required to access the server fromoutside the home or to set up HP Photo Webshare. Remote access mustalso be enabled to set up Webshare. Task 3 of 6: ConfigureRemote Access guides you through setting up remote access. For moreinformation, see Task 2 of 6: Create User Accounts on page 2-7. Task 3 of 6: Configure Remote Access—Create a domain nameand configure your router to enable access to your HP MediaSmartServer and HP Photo Webshare from a web browser anywhere on theGetting Started2-3
Internet. For more information, see Task 3 of 6: Configure Remote Accesson page 2-13. Task 4 of 6: Configure your HP Photo Webshare—Set upWebshare managers, email, and visitor upload limits. Before configuringWebshare, create at least one user account with remote access enabledand configure remote access settings. For more information, see Task 4 of6: Co
the online User’s Guide provides links to topics in the Windows Home Server Help. Windows Home Server Console Help Some tasks, such as creating users and using shared folders, are done through the Windows Home Server Console. 1 At the computer, double-click the Windows Home Server icon in the system tray.