Transcription
arduino#arduino
Table of ContentsAbout1Chapter 1: Getting started with arduino2Remarks2What is Arduino?2Why Use Arduino?2Versions2Examples2Bare Minimum2Blink3First Time Setup4Setup5Upload7Serial monitor7LED - With Button control7Chapter 2: Analog Inputs9Syntax9Remarks9Examples9Print out an Analog Value9Get Voltage From Analog Pin9Chapter 3: Arduino IDEExamples1111Installing on Windows11Portable app on Windows11Installing on Fedora11Installing on Ubuntu11Installing on macOS11Chapter 4: Audio Output12Parameters12Examples12
Basic Note OutputsChapter 5: Bluetooth sic bluetooth hello worldChapter 6: Data Storage1415Examples15cardInfo15SD card datalogger17SD card file dump18SD card basic file example19Listfiles20SD card read/write22Chapter 7: Digital hbutton reading24Chapter 8: Digital Output26Syntax26Examples26Write to pinChapter 9: Functions2627Remarks27Examples27Create simple function27Call a function27Chapter 10: Hardware pinsExamples2929
Arduino Uno R3Chapter 11: How Python integrates with Arduino t serial communication between Arduino and PythonChapter 12: How to store variables in EEPROM and use them for permanent Store a variable in EEPROM and then retrieve it and print to screenChapter 13: I2C Communication3436Introduction36Examples36Multiple slavesChapter 14: s39Interrupt on Button PressChapter 15: Libraries3941Introduction41Examples41Installing libraries with the Library Manager41Including libraries in your sketch.42Chapter 16: Liquid Crystal Library44Introduction44Syntax44
Parameters44Examples44Basic Usage44Chapter 17: Loops46Syntax46Remarks46Examples46While46For47Do . While47Flow Control48Chapter 18: MIDI Communication49Introduction49Examples49MIDI THRU Example49MIDI Thru with Queue49MIDI Clock Generation51MIDI Messages Defined52Chapter 19: PWM - Pulse Width ModulationExamplesControl a DC motor through the Serial port using PWM575757The basics57Bill of materials: what do you need to build this example58The build58The code58PWM with a TLC5940Chapter 20: Random Numbers5960Syntax60Parameters60Remarks60Examples60
Generate a random number60Setting a seed61Chapter 21: Serial es63Simple read and write63Base64 filtering for serial input data63Command Handling over Serial63Serial Communication with Python64Arduino:64Python:65Chapter 22: Servo66Introduction66Syntax66Examples66Moving the servo back and forthChapter 23: SPI CommunicationRemarks666767Chip select signals67Transactions67Using the SPI in Interrupt Service Routines68ExamplesBasics: initialize the SPI and a chip select pin, and perform a 1-byte transferChapter 24: Time Management686870Syntax70Remarks70Blocking vs. non-blocking code70Implementation details70Examples71
blocking blinky with delay()71Non-blocking blinky with the elapsedMillis library (and class)71Non-blocking blinky with millis()72Measure how long something took, using elapsedMillis and elapsedMicros73More than 1 task without delay()73Chapter 25: Using Arduino with Atmel Studio 7Remarks7575Setup75Connections75Debugging considerations77Software setup79To include libraries in your sketch80To add the terminal window80Benefits80ExamplesAtmel Studio 7 imported sketch exampleChapter 26: Variables and Data TypesExamples81818282Create variable82Assign value to a variable82Variable types82Credits84
AboutYou can share this PDF with anyone you feel could benefit from it, downloaded the latest versionfrom: arduinoIt is an unofficial and free arduino ebook created for educational purposes. All the content isextracted from Stack Overflow Documentation, which is written by many hardworking individuals atStack Overflow. It is neither affiliated with Stack Overflow nor official arduino.The content is released under Creative Commons BY-SA, and the list of contributors to eachchapter are provided in the credits section at the end of this book. Images may be copyright oftheir respective owners unless otherwise specified. All trademarks and registered trademarks arethe property of their respective company owners.Use the content presented in this book at your own risk; it is not guaranteed to be correct noraccurate, please send your feedback and corrections to info@zzzprojects.comhttps://riptutorial.com/1
Chapter 1: Getting started with arduinoRemarksWhat is Arduino?Arduino is an open-source electronics platform based on easy-to-use hardware and software.Why Use Arduino? Inexpensive. You can also buy clones that are even cheaper.Easy to use and get started withHuge communityCompletely Open SourceVersionsVersionRelease Date1.0.02016-05-08ExamplesBare MinimumHere's the 'bare minimum' Arduino sketch. This can be loaded into the Arduino IDE by choosingFile Examples 01. Basics Bare Minimum.void setup() {// put your setup code here, to run once}void loop() {// put your main code here, to run repeatedly}Code in the setup() function will be run once when the program starts. This is useful to set up I/Opins, initialize variables, etc. Code in the loop() function will be run repeatedly until the Arduino isswitched off or a new program is uploaded. Effectively, the code above looks like this inside theArduino runtime library:setup();while(1) {https://riptutorial.com/2
loop();}Unlike programs running on your computer, Arduino code can never quit. This is because themicrocontroller only has one program loaded into it. If this program quit there would be nothing totell the microcontroller what to do.BlinkHere's a short example that demonstrates the setup() and loop() functions. This can be loadedinto the Arduino IDE by choosing File Examples 01. Basics Blink. (Note: Most Arduinoboards have an LED already connected to pin 13, but you may need to add an external LED tosee the effects of this sketch.)// the setup function runs once when you press reset or power the boardvoid setup() {// initialize digital pin 13 as an output.pinMode(13, OUTPUT);}// the loop function runs over and over again forevervoid loop() {digitalWrite(13, HIGH);// turn the LED on (HIGH is the voltage level)delay(1000);// wait for a seconddigitalWrite(13, LOW);// turn the LED off by making the voltage LOWdelay(1000);// wait for a second}The above snippet:1. Defines the setup() function. The setup() function gets called first on execution in everyArduino program.1. Sets pin 13 as an output.Without this, it might be set to an input, which would make the LED not work; howeveronce it is set as an output it will stay that way so this only needs to be done once whenthe program starts.2. Defines the loop() function. The loop() function is called repeatedly for as long as theprogram is running.1. digitalWrite(13, HIGH); turns the LED on.2. delay(1000); waits one second (1000 milliseconds).3. digitalWrite(13, LOW); turns the LED off.4. delay(1000); waits one second (1000 milliseconds).Because loop() is run repeatedly for as long as the program is running, the LED will flash on andoff with a period of 2 seconds (1 second on, 1 second off). This example is based off of theArduino Uno and any other board that already has an LED connected to Pin 13. If the board that isbeing used does not have an on-board LED connected to that pin, one can be attached externally.https://riptutorial.com/3
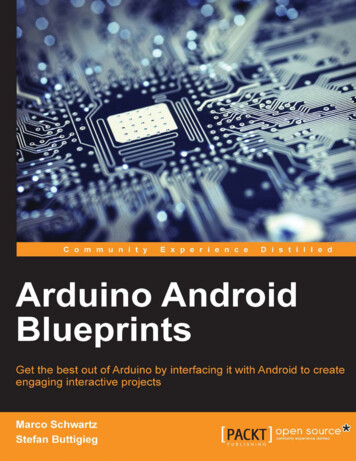
More on timing (for example delays and measuring time): Time ManagementFirst Time SetupSoftware needed: Arduino IDEhttps://riptutorial.com/4
https://riptutorial.com/5
functions. This is enough to upload to an Arduino board, but it will do nothing at all. The "Blink"example sketch works as a simple test when first using an Arduino board. Go to File Examples 01.Basics Blink. This will open a new window with the Blink sketch.Select your board. Go to Tools Board [name of your Arduino board].Select the COM port for your board. Most Aurduino-compatible boards will create a fake COMport, which is used for serial communication (debugging) and for programming the board. COM 1https://riptutorial.com/6
is usually already present, and your board will create a new one, e.g. COM 4. Select this fromTools Port COM 4 (or other COM number).Some boards have additional settings in the Tools menu, such as clock speed. These vary fromboard to board, but usually an acceptable set of defaults is already selected.UploadYou are now ready to upload Blink. Click the Upload button or select Sketch Upload. Thesketch will compile, then upload to your Arduino board. If everything worked, the on-board LED willstart blinking on and off every second.Serial monitorIn the Arduino IDE ypu hava a serial monitor. To open it use the button serial monitor at the rightside of the window.Be sure that the code is uploaded before you open the monitor. The upload and monitor will notrun at the same time!LED - With Button controlYou can also use this code to setup an LED with a button switch with a pull up resistor, this couldpreferably be with the next step after setting up the intial LED controllerint buttonState 0; // variable for reading the pushbutton statusvoid setup(){// initialize the LED pin as an output:pinMode(13, OUTPUT); // You can set it just using its number// initialize the pushbutton pin as an input:pinMode(2, INPUT);}void loop(){// read the state of the pushbutton value:buttonState DigitalRead(2);// check if the pushbutton is pressed.// If it's not, the buttonState is HIGH : if (buttonState HIGH){// turn LED off:https://riptutorial.com/7
digitalWrite(13, LOW);}else{// turn LED off:digitalWrite(13, HIGH);}}Read Getting started with arduino online: startedwith-arduinohttps://riptutorial.com/8
Chapter 2: Analog InputsSyntax analogRead(pin)//Read from the given pin.RemarksSerial.println(val)For help with Serial communication, see: Serial CommunicationExamplesPrint out an Analog Valueint val 0;// variable used to store the value// coming from the sensorvoid setup() {Serial.begin(9600); //Begin serializer to print out value// Note: Analogue pins are// automatically set as inputs}void loop() {val analogRead(0); // read the value from// the sensor connected to A0.Serial.println(val); //Prints the value coming in from the analog sensordelay(10); // stop the program for// some time}Get Voltage From Analog PinAnalog pins can be used to read voltages which is useful for battery monitoring or interfacing withanalog devices. By default the AREF pin will be the same as the operating voltage of the arduino,but can be set to other values externally. If the voltage to read is larger than the input voltage, apotential devider will be needed to lower the analog voltage.#define analogPin 14//A0 (uno)#define AREFValue 5//Standard for 5V Arduinos#define ADCResolution 1023//Standard for a 10bit ADCint ADCValue 0;https://riptutorial.com/9
float voltage 0;void setup(){Serial.begin(9600);}void loop(){readADC();Serial.print(voltage); Serial.println("V");}void readADC(){ADCValue analogRead(analogPin);float ( ( (float)ADCValue/ADCRange ) * AREFValue );//Convert the ADC value to afloat, devide by the ADC resolution and multiply by the AREF voltage}Read Analog Inputs online: inputshttps://riptutorial.com/10
Chapter 3: Arduino IDEExamplesInstalling on Windows1. Go to https://www.arduino.cc/en/Main/Software2. Click the "Windows Installer" link3. Follow the instructionsPortable app on WindowsTo use the Arduino IDE on Windows without needing to install it:1. Go to https://www.arduino.cc/en/Main/Software2. Click the "Windows ZIP file for non admin install" link3. Extract the archive to a folder4. Open the folder, and double click Arduino.exeInstalling on Fedora1. Open a terminal and run: sudo dnf install arduino2. Open the Arduino application, or type arduino into the terminalInstalling on Ubuntu1. Open a terminal and run: sudo apt-get install arduino2. Open the Arduino application, or type arduino into the terminalInstalling on macOS1. Go to https://www.arduino.cc/en/Main/Software2. Click the Mac OS X link.3. Unzip the .zipfile.4. Move the Arduino application to Applications.Read Arduino IDE online: -idehttps://riptutorial.com/11
Chapter 4: Audio OutputParametersParameterDetailsspeakerShould be an output to an analog speakerExamplesBasic Note Outputs#define NOTE C4262 //From pitches.h file defined in [Arduino Tone Tutorial][1]int Key 2;int KeyVal 0;byte speaker 12;void setup(){pinMode(Key, INPUT); //Declare our key (button) as inputpinMode(speaker, OUTPUT);}void loop(){KeyVal digitalRead(Key);if (KeyVal HIGH) {tone(speaker, NOTE C4); //Sends middle C tone out through analog speaker} else {noTone(speaker); //Ceases tone emitting from analog speaker}delay(100);}[1]: https://www.arduino.cc/en/Tutorial/toneMelodyRead Audio Output online: utputhttps://riptutorial.com/12
Chapter 5: Bluetooth .hDocumentationSoftwareSerial(rxPin,txPin, inverse logic)Constructor. rxPin: Data in (receive) pin, defaults to 0. txPin:Data out (transmit) pin, defaults to 1. inverse logic: If true, treatsLOW as if it were HIGH and HIGH as LOW when determining bitvalues. defaults to false.begin(speed)Sets the baud rate for serial communication. Supported baudrates are 300, 600, 1200, 2400, 4800, 9600, 14400, 19200,28800, 31250, 38400, 57600, and 115200.available()Check if there is some data over serialread()Reads a string from serialisListening()Checks to see if requested software serial port is activelylistening.overflow()Checks if a software serial buffer overflow has occurred. Callingthis function clears the overflow flag, meaning that subsequentcalls will return false unless another byte of data has beenreceived and discarded in the meantime. The software serialbuffer can hold 64 bytes.peek()Return a character that was received on the RX pin of thesoftware serial port. Unlike read(), however, subsequent calls tothis function will return the same character. Note that only oneSoftwareSerial instance can receive incoming data at a time(select which one with the listen() function).print(data)Prints data to the transmit pin of the software serial port. Worksthe same as the Serial.print() function.println(data)Prints data to the transmit pin of the software serial port, followedby a carriage return and line feed. Works the same as theSerial.println() function.listen()Enables the selected software serial port to listen. Only onesoftware serial port can listen at a time; data that arrives for otherports will be discarded. Any data already received is discardedduring the call to listen() (unless the given instance is alreadyhttps://riptutorial.com/13
methoddetailslistening).write(data)Prints data to the transmit pin of the software serial port as rawbytes. Works the same as the Serial.write() function.RemarksCommon Mistake : If you keep the rx and tx pins at default values (0 and 1), you cannot uploadnew code until and unless you remove it, so it's almost always better to change the tx and rx pinsin the SoftwareSerial constructor.ExamplesBasic bluetooth hello world#include SoftwareSerial.h // its always better to change the default tx and rx as the may interfere with other processin future.// configure tx , rx by defualt they will be 0 and 1 in arduino UNOSoftwareSerial blue(3,2);void setup() {// preferred baud rate/data transfer rate in general is 38400blue.begin(38400);// do initialization or put one time executing code here}void loop() {// put code that you want it to run every time no matter whatif(blue.available()){// put only that code which needsd to run when there is some data// This means that the their is some data sent over the bluetooth// You can do something with the dataint n;// consider that the data received to be integer, read it by using blue.parseInt();n blue.parseInt();}}Read Bluetooth Communication online: thcommunicationhttps://riptutorial.com/14
Chapter 6: Data StorageExamplescardInfo/*SD card testThis example shows how use the utility libraries on which the'SD library is based in order to get info about your SD card.Very useful for testing a card when you're not sure whether its working or not.The circuit:* SD card attached to SPI bus as follows:** MOSI - pin 11 on Arduino Uno/Duemilanove/Diecimila** MISO - pin 12 on Arduino Uno/Duemilanove/Diecimila** CLK - pin 13 on Arduino Uno/Duemilanove/Diecimila** CS depends on your SD card shield or module.Pin 4 used here for consistency with other Arduino examplescreated 28 Mar 2011by Limor Friedmodified 9 Apr 2012by Tom Igoe*/// include the SD library:#include SPI.h #include SD.h // set up variables using the SD utility library functions:Sd2Card card;SdVolume volume;SdFile root;// change this to match your SD shield or module;// Arduino Ethernet shield: pin 4// Adafruit SD shields and modules: pin 10// Sparkfun SD shield: pin 8const int chipSelect 4;void setup(){// Open serial communications and wait for port to open:Serial.begin(9600);while (!Serial) {; // wait for serial port to connect. Needed for Leonardo only}Serial.print("\nInitializing SD card.");// we'll use the initialization code from the utility libraries// since we're just testing if the card is working!if (!card.init(SPI HALF SPEED, chipSelect)) {Serial.println("initialization failed. Things to check:");Serial.println("* is a card inserted?");https://riptutorial.com/15
Serial.println("* is your wiring correct?");Serial.println("* did you change the chipSelect pin to match your shield or module?");return;} else {Serial.println("Wiring is correct and a card is present.");}// print the type of cardSerial.print("\nCard type: ");switch (card.type()) {case SD CARD TYPE SD1:Serial.println("SD1");break;case SD CARD TYPE SD2:Serial.println("SD2");break;case SD CARD TYPE rintln("Unknown");}// Now we will try to open the 'volume'/'partition' - it should be FAT16 or FAT32if (!volume.init(card)) {Serial.println("Could not find FAT16/FAT32 partition.\nMake sure you've formatted thecard");return;}// print the type and size of the first FAT-type volumeuint32 t volumesize;Serial.print("\nVolume type is FAT");Serial.println(volume.fatType(), DEC);Serial.println();volumesize volume.blocksPerCluster();volumesize * volume.clusterCount();volumesize * 512;Serial.print("Volume size (bytes): ");Serial.println(volumesize);Serial.print("Volume size (Kbytes): ");volumesize / me size (Mbytes): ");volumesize / 1024;Serial.println(volumesize);// clusters are collections of blocks// we'll have a lot of clusters// SD card blocks are always 512 bytesSerial.println("\nFiles found on the card (name, date and size in bytes): ");root.openRoot(volume);// list all files in the card with date and sizeroot.ls(LS R LS DATE LS SIZE);}void loop(void) {}https://riptutorial.com/16
SD card datalogger/*SD card dataloggerThis example shows how to log data from three analog sensorsto an SD card using the SD library.The circuit:* analog sensors on analog ins 0, 1, and 2* SD card attached to SPI bus as follows:** MOSI - pin 11** MISO - pin 12** CLK - pin 13** CS - pin 4created 24 Nov 2010modified 9 Apr 2012by Tom IgoeThis example code is in the public domain.*/#include SPI.h #include SD.h const int chipSelect 4;void setup(){// Open serial communications and wait for port to open:Serial.begin(9600);while (!Serial) {; // wait for serial port to connect. Needed for Leonardo only}Serial.print("Initializing SD card.");// see if the card is present and can be initialized:if (!SD.begin(chipSelect)) {Serial.println("Card failed, or not present");// don't do anything more:return;}Serial.println("card initialized.");}void loop(){// make a string for assembling the data to log:String dataString "";// read three sensors and append to the string:for (int analogPin 0; analogPin 3; analogPin ) {int sensor analogRead(analogPin);dataString String(sensor);if (analogPin 2) {dataString ",";}https://riptutorial.com/17
}// open the file. note that only one file can be open at a time,// so you have to close this one before opening another.File dataFile SD.open("datalog.txt", FILE WRITE);// if the file is available, write to it:if (dataFile) {dataFile.println(dataString);dataFile.close();// print to the serial port too:Serial.println(dataString);}// if the file isn't open, pop up an error:else {Serial.println("error opening datalog.txt");}}SD card file dump/*SD card file dumpThis example shows how to read a file from the SD card using theSD library and send it over the serial port.The circuit:* SD card attached to SPI bus as follows:** MOSI - pin 11** MISO - pin 12** CLK - pin 13** CS - pin 4created 22 December 2010by Limor Friedmodified 9 Apr 2012by Tom IgoeThis example code is in the public domain.*/#include SPI.h #include SD.h const int chipSelect 4;void setup(){// Open serial communications and wait for port to open:Serial.begin(9600);while (!Serial) {; // wait for serial port to connect. Needed for Leonardo only}Serial.print("Initializing SD card.");https://riptutorial.com/18
// see if the card is present and can be initialized:if (!SD.begin(chipSelect)) {Serial.println("Card failed, or not present");// don't do anything more:return;}Serial.println("card initialized.");// open the file. note that only one file can be open at a time,// so you have to close this one before opening another.File dataFile SD.open("datalog.txt");// if the file is available, write to it:if (dataFile) {while (dataFile.available()) // if the file isn't open, pop up an error:else {Serial.println("error opening datalog.txt");}}void loop(){}SD card basic file example/*SD card basic file exampleThis example shows how to create and destroy an SD card fileThe circuit:* SD card attached to SPI bus as follows:** MOSI - pin 11** MISO - pin 12** CLK - pin 13** CS - pin 4createdNov 2010by David A. Mellismodified 9 Apr 2012by Tom IgoeThis example code is in the public domain.*/#include SPI.h #include SD.h File myFile;void setup(){// Open serial communications and wait for port to open:https://riptutorial.com/19
Serial.begin(9600);while (!Serial) {; // wait for serial port to connect. Needed for Leonardo only}Serial.print("Initializing SD card.");if (!SD.begin(4)) {Serial.println("initialization failed!");return;}Serial.println("initialization done.");if (SD.exists("example.txt")) {Serial.println("example.txt exists.");}else {Serial.println("example.txt doesn't exist.");}// open a new file and immediately close it:Serial.println("Creating example.txt.");myFile SD.open("example.txt", FILE WRITE);myFile.close();// Check to see if the file exists:if (SD.exists("example.txt")) {Serial.println("example.txt exists.");}else {Serial.println("example.txt doesn't exist.");}// delete the file:Serial.println("Removing example.txt.");SD.remove("example.txt");if (SD.exists("example.txt")) {Serial.println("example.txt exists.");}else {Serial.println("example.txt doesn't exist.");}}void loop(){// nothing happens after setup finishes.}Listfiles/*ListfilesThis example shows how print out the files in adirectory on a SD cardThe circuit:https://riptutorial.com/20
* SD card attached to SPI bus as follows:** MOSI - pin 11** MISO - pin 12** CLK - pin 13** CS - pin 4createdNov 2010by David A. Mellismodified 9 Apr 2012by Tom Igoemodified 2 Feb 2014by Scott FitzgeraldThis example code is in the public domain.*/#include SPI.h #include SD.h File root;void setup(){// Open serial communications and wait for port to open:Serial.begin(9600);while (!Serial) {; // wait for serial port to connect. Needed for Leonardo only}Serial.print("Initializing SD card.");if (!SD.begin(4)) {Serial.println("initialization failed!");return;}Serial.println("initialization done.");root SD.open("/");printDirectory(root, 0);Serial.println("done!");}void loop(){// nothing happens after setup finishes.}void printDirectory(File dir, int numTabs) {while(true) {File entry dir.openNextFile();if (! entry) {// no more filesbreak;}for (uint8 t i 0; i numTabs; i ) tps://riptutorial.com/21
if (entry.isDirectory()) {Serial.println("/");printDirectory(entry, numTabs 1);} else {// files have sizes, directories do ), DEC);}entry.close();}}SD card read/write/*SD card read/writeThis example shows how to read and write data to and from an SD card fileThe circuit:* SD card attached to SPI bus as follows:** MOSI - pin 11** MISO - pin 12** CLK - pin 13** CS - pin 4createdNov 2010by David A. Mellismodified 9 Apr 2012by Tom IgoeThis example code is in the public domain.*/#include SPI.h #include SD.h File myFile;void setup(){// Open serial communications and wait for port to open:Serial.begin(9600);while (!Serial) {; // wait for serial port to connect. Needed for Leonardo only}Serial.print("Initializing SD card.");if (!SD.begin(4)) {Serial.println("initialization failed!");return;}Serial.println("initialization done.");// open the file. note that only one file can be open at a time,// so you have to close this one before opening another.myFile SD.open("test.txt", FILE WRITE);https://riptutorial.com/22
// if the file opened okay, write to it:if (myFile) {Serial.print("Writing to test.txt.");myFile.println("testing 1, 2, 3.");// close the file:myFile.close();Serial.println("done.");} else {// if the file didn't open, print an error:Serial.println("error opening test.txt");}// re-open the file for reading:myFile SD.open("test.txt");if (myFile) {Serial.println("test.txt:");// read from the file until there's nothing else in it:while (myFile.available()) {Serial.write(myFile.read());}// close the file:myFile.close();} else {// if the file didn't open, print an error:Serial.println("error opening test.txt");}}void loop(){// nothing happens after setup}Read Data Storage online: oragehttps://riptutorial.com/23
Chapter 7: Digital InputsSyntax // Sets the pin to the mode defined.digitalRead(pin); // Reads the value from a specified digital pin,pinMode(pin, pinMode)ParametersParamterDetailspinmodeShould be set to INPUT or INPUT PULLUPRemarksIf the input pin is not pulled LOW or HIGH, the value will float. That is, it won't be clearly a 1 or a 0,but somewhere in between. For digital input, a pullup or pulldown resistor is a necessity.ExamplesPushbutton readingThis is an basic example on how to wire up and make an LED turn on/off when the pushbutton ispressed./* Basic Digital Read* -----------------** turns on and off a light emitting diode(LED) connected to digitalhttps://riptutorial.com/24
* pin 13, when pressing a pushbutton attached to pin 7. It illustrates the* concept of Active-Low, which consists in connecting buttons using a* 1K to 10K pull-up resistor.** Created 1 December 2005* copyleft 2005 DojoDave http://www.0j0.org * http://arduino.berlios.de**/int ledPin 13; // choose the pin for the LEDint inPin 7;// choose the input pin (for a pushbutton)int val 0;// variable for reading the pin statusvoid setup() {pinMode(ledPin, OUTPUT);pinMode(inPin, INPUT);}// declare LED as output// declare pushbutton as inputvoid loop(){val digitalRead(inPin); // read input valueif (val HIGH) {// check if the input is HIGH (button released)digitalWrite(ledPin, LOW); // turn LED OFF} else {digitalWrite(ledPin, HIGH); // turn LED ON}}Example taken from Arduino.cc.Read Digital Inputs online: -inputshttps://riptutorial.com/25
Chapter 8: Digital OutputSyntax digitalWrite(pin, value)ExamplesWrite to pinint ledPin 13;void setup(){pinMode(ledPin, OUTPUT);}void loop(){digitalWrite(ledPin, HIGH);delay(1000);digitalWrite(ledPin, LOW);delay(1000);}// LED connected to digital pin 13// sets the digital pin as output////////sets the LED onwaits for a secondsets the LED offwaits for a secondExample at Arduino.cc.Read Digital Output online: -outputhttps://riptutorial.com/26
Chapter 9: FunctionsRemarksOther than in ordinary C / C , the Arduino IDE allows to call a function before it is defined.In .cpp files, you have to define the function, or at least declare the function prototype before youcan use it.In an .ino file, the Arduino IDE creates such a prototype behind the scenes.Arduino - function declaration - officialExamplesCreate simple functionint squareNum (int a) {return a*a;}int: return typesquareNumint a: function name: parameter type and namereturn a*a: return a value (same type as the return type defined at the beginning)Call a functionIf you have a function declared you can call it anywhere else in the code. Here is an example ofcalling a function:https://riptutorial.com/27
void setup(){Serial.begin(9600);}void loop() {int i 2;int k squareNum(i); // k now contains 4Serial.println(k);delay(500);}int squareNum(int a) {return a*a;}Read Functions online: nshttps://riptutorial.com/28
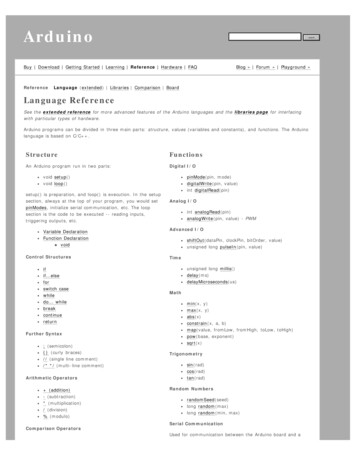
Chapter 10: Hardware pinsExamplesArduino Uno R3Microcontrollers use pins to interact with the rest of the circuit. These pins will usually be one ofinput / output pins, vin or ground. I/O pins can be simple digital I/O pins, or they can have somespecial carachteristics like being able to vary the voltage of their output using pulse widthmodulation.
functions. This is enough to upload to an Arduino board, but it will do nothing at all. The "Blink" example sketch works as a simple test when first using an Arduino board. Go to File Examples 01.Basics Blink. This will open a new window with the Blink sketch. Select your board. Go to Tools Board [name of your Arduino board].