Transcription
QUICK REFERENCEQuantStudio 6 and 7 Flex Real-Time PCR SystemsPub. no. 4489826 Rev. ANote: For safety and biohazard guidelines, refer to the “Safety”section in the QuantStudio 6 and 7 Flex Real-Time PCR SystemsMaintenance and Administration Guide. For every chemical, readthe Safety Data Sheets (SDSs) and follow the handlinginstructions. Wear appropriate protective eyewear, clothing,and gloves.The following topics are covered in this quick reference guide:QuantStudio Start the Maintain the QuantStudio 6 and 7 Flex Systems . . . . . . 1 Experiment workflow . . . . . . . . . . . . . . . . . . . . . . . . . . . . . . 3 Set up the experiment . . . . . . . . . . . . . . . . . . . . . . . . . . . . . . 4 Prepare the reactions . . . . . . . . . . . . . . . . . . . . . . . . . . . . . . . 7 Prepare the plate or array card . . . . . . . . . . . . . . . . . . . . . . . 7 Run the experiment . . . . . . . . . . . . . . . . . . . . . . . . . . . . . . . . 9 During the experiment. . . . . . . . . . . . . . . . . . . . . . . . . . . . . 10 After the experiment is complete . . . . . . . . . . . . . . . . . . . . 10 Review the results. . . . . . . . . . . . . . . . . . . . . . . . . . . . . . . . . 11 Export and audit the experiment . . . . . . . . . . . . . . . . . . . . 13 Power off the QuantStudio 6 and 7 Flex Systems . . . . . 146 and 7 Flex Systems . . . . . . . . . . 1Start the QuantStudio 6 and 7 Flex Systems1. Touch anywhere on the touchscreen to determine if theinstrument is in standby mode.Does the touchscreen display the Standby screen after youtouch it? Yes – The instrument is ready for use. Go to step 3. No – Go to step 2 to power on the instrument.2. Toggle the power button on therear of the instrument, then waitfor it to start.The instrument is ready to usewhen the touchscreen displaysthe Main Menu.5. Power on the computer:a. Press the computer power button, then wait for it to start.b. When the Login screen appears, enter your user nameand password, then click OK.6. Start the QuantStudio 6 and 7 Flex System Software:a. From the desktop, double-click QuantStudio 6 and 7Flex System Software.b. If the Login dialog box appears, enter your user nameand password, then click Log In.Note: Security is a separately licensed module. If yoursystem requires this module, contact Life Technologies.7. Add the instrument to the My Instruments group:a. From the Home tab, click Instrument Console.b. From the Instrument Console, select the icon for yourinstrument, then click Add to My Instruments.Maintain the QuantStudio 6 and 7 Flex SystemsThe QuantStudio 6 and 7 Flex Systems require regularcalibration and maintenance for proper operation. To ensureproper operation of your instrument, perform weekly, monthly,and semiannual maintenance as indicated in the followingtable.FrequencyUser-performed maintenance taskCheck the computer disk space. If necessary, back upyour experiment files and instrument settings.WeeklyPower off the computer, then power on the computerafter 30 seconds.Clean the instrument with a lint-free cloth.Perform a background calibration.†MonthlyRun disk cleanup and disk defragmentation.Perform an instrument self test.Perform an ROI calibration.EthernetUSB1USB2RS232PW3. (QuantStudio 7 Flex System only) PWRIf you have an AppliedBiosystems Twister Robot, toggle the power button onthe rear of the Twister Robot.Note: The Twister Robot is ready to use when the powerLED illuminates.RF1F24. Power on the monitor.For Research Use Only. Not for use in diagnostic procedures.Semiannually(every6 months)Perform a background calibration.†Perform a uniformity calibration.Perform a dye calibration.Perform a normalization calibration.As neededPerform an RNase P instrument verification run.Replace the instrument lamp.‡† You can perform a background calibration to check for contamination.‡ After replacing the instrument lamp, perform all calibrations and an RNAse Pinstrument verification run.
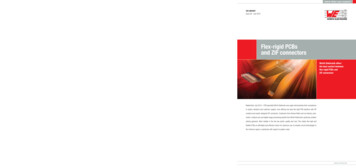
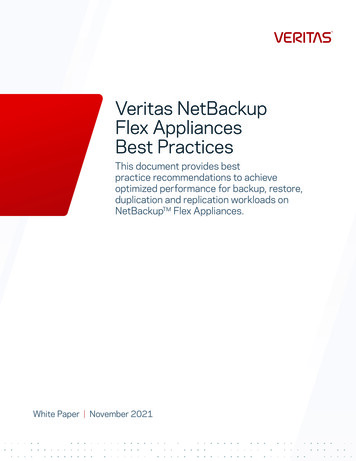
Calibration workflowThe following figure shows the workflow for calibrating theQuantStudio 6 and 7 Flex Systems. Whether you areperforming all calibrations or just a subset, perform them in thesequence shown below.Start Do not allow the bottoms of the plates or array cards tobecome dirty. Fluids and other contaminants that adhere tothe bottoms of the consumables can contaminate thesample block and cause an abnormally high backgroundsignal. Confirm that your centrifuge is clean. Beforecentrifugation, wipe down the bucket(s) using a tissue. Vortex and centrifuge all calibration plates to ensurecomplete mixing and that all reagents are contained at thebottom of the wells. The calibration plates must be wellmixed and centrifuged before use. Perform an ROI calibration Filling the calibration array cards (QuantStudio 7 FlexSystem only)Perform a background calibration Refer to the QuantStudio 6 and 7 Flex Real-Time PCR SystemsMaintenance and Administration Guide for detailed instructionson creating the array cards required to calibrate theQuantStudio 7 Flex System. See “Fill an array card(QuantStudio 7 Flex System only)” on page 8 for the generalprocedure for filling and sealing array cards.Perform a uniformity calibration Perform dye calibrations Note: Not all array cards are required for a monthlymaintenance. Before preparing array cards for calibration, see“Maintain the QuantStudio 6 and 7 Flex Systems” on page 1to determine which calibrations are required.Perform a normalization calibration Perform an RNase P instrument verification testPrepare the calibration plates IMPORTANT! Wear powder-free gloves and safety glasses whenyou prepare the plate.FinishGuidelines for handling calibration consumables Wear appropriate protective eyewear, clothing, and gloves. Prepare and run calibration plates and array cards withinthe recommended time limits listed below.Time tothawAfter thawed,run within All 96-/384-well calibrationconsumables†30 minutes120 minutesAll array card calibrationconsumables‡30 minutes120 minutesRNase P plate (96-/384-well)5 minutes30 minutesRNase P array card§15 minutes60 minutesConsumable† All 96-well plates and 384-well plates used in the calibration of theinstrument (ROI, background, uniformity, dye, and normalization).‡ All array cards used in the calibration of the QuantStudio 7 Flex Systemonly (ROI, background, uniformity, dye, and normalization).§ For use with QuantStudio 7 Flex System only. Store calibration plates or array cards in a dark place untilyou are ready to use them. The fluorescent dyes in the wellsof calibration consumables are photosensitive. Prolongedexposure to light can diminish the fluorescence of the dyes.21. Remove the calibration plate from the freezer, then thaw itat room temperature for approximately 30 minutes.IMPORTANT! Use the calibration plate within 2 hours ofdefrosting it. Until you are ready to run the plate, store it inthe dark and at ambient temperature (15–30 C). Do notremove the calibration plate from its packaging until youare ready to run it. The fluorescent dyes in the wells of theplate are photosensitive. Prolonged exposure to light candiminish the fluorescence of the dyes.2. Remove the plate from its packaging. Do not remove theoptical film.3. Vortex and centrifuge the plate:a. Vortex the calibration plate for 5 seconds.b. Centrifuge the plate for 2 minutes at 1500 rpm.IMPORTANT! The calibration plate must be well mixedand centrifuged.QuantStudio 6 and 7 Flex Real-Time PCR Systems Quick Reference
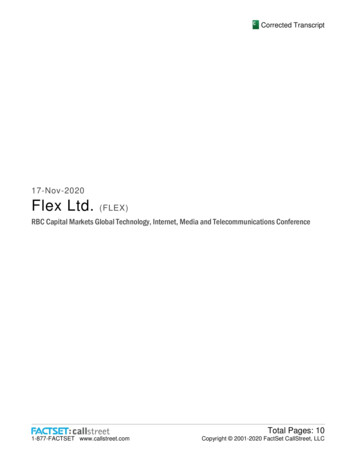
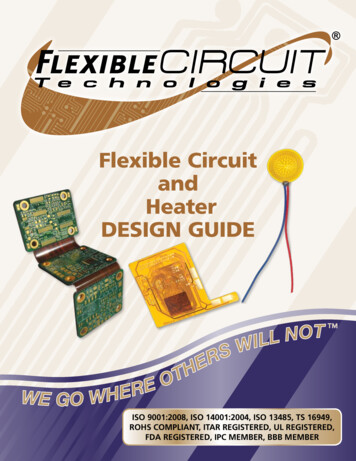
c. Confirm that the liquid in each well of the plate is at thebottom of the well. If not, centrifuge the plate again at ahigher rpm and for a longer period of time.CorrectIncorrect8. When the run is complete and the software displays theAnalysis screen, confirm the status of the calibration, wherepassed indicates that the run produced viable calibrationdata, and failed indicates that the run did not produce dataor that the data it collected is unusable.Analysis statusLiquid is atbottom of well. Not centrifuged with enough force, or Not centrifuged for enough time.Note: The following procedures are general instructions forperforming an instrument calibration. For specific instructions,refer to the QuantStudio 6 and 7 Flex Real-Time PCR SystemsMaintenance and Administration Guide.1. From the Home tab, click Instrument Console.Click Next.FailedTroubleshoot the failed calibration asdescribed in the QuantStudio 6 and 7Flex Real-Time PCR Systems Maintenanceand Administration Guide.a. After the calibration, toucheject the plate or array card.on the touchscreen tob. Remove the calibration plate or array card from theinstrument tray.WARNING! PHYSICAL INJURY HAZARD.2. From the Instrument Console, select the icon for yourinstrument, then click Manage Instrument.3. From the Instrument Manager, start the calibration:Maintenance, then click the calibration.b. From the calibration screen, click Start Calibration.4. Click Next, then prepare for the calibration as instructed.5. From the bottom of the Setup tab, enter the reagentinformation for the plate or array card that you are using.6. Load the calibration plate or array card into the instrument:a. From the instrument touchscreen, touchinstrument tray.Passed9. Unload the calibration plate or array card:Perform the calibrationa. ClickActionDuring instrument operation, the plate or arraycard temperature can reach 100 C. Allow theconsumable to cool to room temperature beforeremoving.c. Touchon the instrument touchscreen to close theinstrument tray.10. From the Calibration screen, click Finish to complete thecalibration, then click Yes to save the results.11. (Optional) Click Print Report in the upper right corner ofthe screen to print a summary of the calibration results foryour records.to eject theExperiment workflowb. Load the plate or card into the plate holder so that: Well A1 of the plate or array card is in the top-leftcorner of the plate adapter. The barcode faces the front of the instrument.IMPORTANT! Plates and cards should be loaded andunloaded by operators who have been warned of themoving parts hazard and have been adequately trained.c. From the instrument touchscreen, touchinstrument tray.to close theStart Set up the experiment Prepare the reactions and consumables Run and monitor the experiment7. After loading the plate or array card, start the calibration:a. From the Setup tab, select Check the box when thecalibration plate has been loaded, then click Next. Download and review the analysis resultsb. From the Run screen, click START RUN. IMPORTANT! Do not attempt to open the access doorduring the run. The door is locked while the instrument isin operation.Export and audit the experiment FinishQuantStudio 6 and 7 Flex Real-Time PCR Systems Quick Reference3
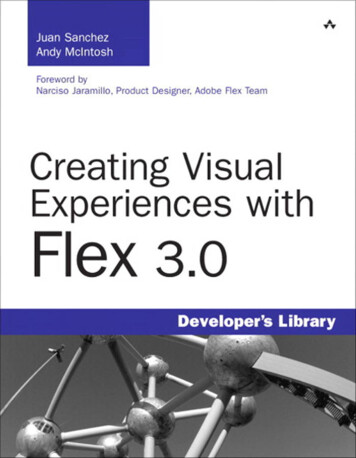
2. Select the instrument type you are using to run theexperiment: QuantStudio 6 Flex System - includes a coupled fivecolor filter set and supports the 384-Well, 96-Well, andFast 96-Well sample blocks QuantStudio 7 Flex System - includes a decoupled,six by six-color filter set and supports the 384-Well, 96Well, Fast 96-Well, and Array Card sample blocksNote: Instructions for the setup, run, and analysis of anexperiment vary depending on the specific experiment that youperform. Refer to the QuantStudio 6 and 7 Flex Real-Time PCRSystems Getting Started Guide for more information.Set up the experimentFrom the Home tab, select Experiment Setup, then completethe setup screens.3. Select the block type you are using to run the experiment:384-Well, Array Card (QuantStudio 7 Flex System only), 96Well (0.2mL), or Fast 96-Well (0.1mL).Define the experiment properties1. From the Experiment Properties screen, enter informationidentifying your experiment:4. Select the type of experiment to set up: Standard Curve,Relative Standard Curve, Comparative CT ( CT), MeltCurve, High Resolution Melt, Genotyping, or Presence/Absence.Note: High Resolution Melt (HRM) is a separately licensedmodule. If your experiment requires this module, contactLife Technologies.a. In the Experiment Name field, enter up to 100characters to uniquely identify the experiment.b. (Optional) In the Barcode field, enter or scan thebarcode of the plate or array card you are using to runthe experiment.c. (Optional) In the User Name field, enter up to 100characters to identify the owner of the experiment.5. Select the reagent you are using to detect the targetsequence: TaqMan Reagents, SYBR Green Reagents,MeltDoctor HRM Reagents (High Resolution Meltexperiments only), or Other.d. (Optional) In the Comments field, enter up to 2000characters to associate with the experiment.1a2345674QuantStudio 6 and 7 Flex Real-Time PCR Systems Quick Reference
6. Select the run properties: Select the ramp speed for the experiment: Standard orFast. (Optional) If you selected:– Melt Curve or High Resolution Melt as theexperiment type, then you have the option ofincluding a PCR stage for that experiment.– Genotyping or Presence/Absence as the experimenttype, then you have the option of including a PrePCR Read and Amplification stage for thatexperiment.– SYBR Green as the reagent, then you have theoption of including a melt curve for that experiment.b. Define the target properties:7. (Optional) In the reagent information panel, click New toadd a row for data entry, then enter or scan the detailedinformation (including the Part Number, Lot Number, andExpiration Date) of the reagents you will use in yourexperiment.c. (Optional, if selected in Tools Preferences Setup)Add and define the custom tasks to assign to targets.Refer to the QuantStudio 6 and 7 Flex System SoftwareHelp for more information.IMPORTANT! The expiration dates you enter must occurafter the current date.Define the targets, samples, biological replicates, passivereference dye, and controls1. From the Experiment Menu, select Define in the Setupgroup.2. Define the targets to detect in the experiment:a. Click New to add a new target to the experiment. Enter a Target Name. Select a Reporter and Quencher dye.Note: The default reporter and quencher dyes useddepend on the reagent selected during experimentsetup. For example, if TaqMan is the selectedreagent, the default reporter is FAM and defaultquencher is NFQ-MGB. Select a target Color.Note: Refer to the QuantStudio 6 and 7 Flex Real-TimePCR Systems Getting Started Guide for information ondefining SNP assays to detect in Genotypingexperiments.3. From the Define screen, enter or import the names of thesamples loaded into the plate or array card.Do either of the following: Click New to add a new sample and manually definethe sample properties:– Enter a Sample Name.– Select a sample Color.– (Optional) Add and define a Custom Attribute forthe sample. Refer to the QuantStudio 6 and 7 FlexSystem Software Help for more information. Import the sample data from a sample definition file.Click Import from File, select the sample definition file(.txt, .xls, or .xlsx) from which you want to importsample data, then click Open.32b45QuantStudio 6 and 7 Flex Real-Time PCR Systems Quick Reference2c5
4. (Optional for Standard Curve, Relative Standard Curve,and Comparative CT ( CT) experiments) Define thebiological replicate groups to use in the experiment:a. Click New to add a new biological replicate group tothe experiment.b. Define the biological replicate group properties: Enter a Biological GroupName. Select a sample Color. (Optional) Click in the Comments field to entercomments about the biological replicate group.5. (All experiments except Presence/Absence) Select a dyefrom the Passive Reference drop-down menu (ROX dyeis the default selection).6. (Relative Standard Curve, and Comparative CT ( CT)experiments) Select a Reference Sample and EndogenousControl target to use in the experiment from theappropriate drop-down menu.7. (High Resolution Melt experiments) Add and define thecontrols to use in the experiment. Refer to theQuantStudio 6 and 7 Flex System Software Help for moreinformation.Assign the targets, samples, biological replicates, andcontrols1. From the Experiment Menu, select Assign in the Setupgroup.2. (Standard Curve and Relative Standard Curveexperiments) Define and set up standards in the plate orarray card:a. Select well(s) using the Plate Layout or the Well Table.b. Click Define and Set Up Standards, select a target,define the standard curve, then select and arrange wellsfor the standards. Refer to the QuantStudio 6 and 7 FlexReal-Time PCR Systems Getting Started Guide for moreinformation.3. Assign targets to wells in the plate or array card:a. Select well(s) using the Plate Layout or the Well Table.b. Click a checkbox in the Targets list to assign a target tothe selected well(s):c. Select the detection task for the target from the Taskdrop-down menu. Available tasks include Unknown,Standard, Negative Control, Positive Control, Custom,and others, depending on the experiment type.23b3c3a456QuantStudio 6 and 7 Flex Real-Time PCR Systems Quick Reference
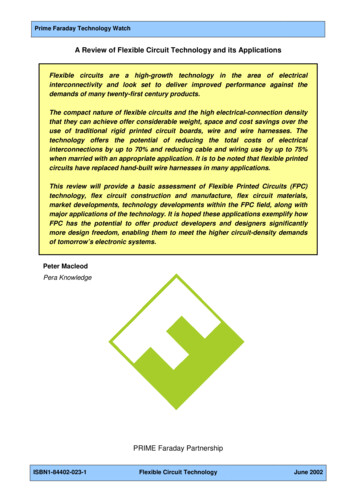
Note: Refer to the QuantStudio 6 and 7 Flex Real-Time PCRSystems Getting Started Guide for more information abouttarget tasks, and for information on assigning SNP assaysto Genotyping experiments.4. Assign samples to wells in the plate or array card:a. Select well(s) using the Plate Layout or the Well Table.b. Click a checkbox in the Samples list to assign a sampleto the selected well(s).IMPORTANT! Apply no more than one sample to each well.5. (Optional for Standard Curve, Relative Standard Curve,and Comparative CT ( CT) experiments) Assignbiological replicate groups to wells in the plate or arraycard:a. Select well(s) using the Plate Layout or the Well Table.b. Click a checkbox in the Biological Groups list to assigna biological replicate group to the selected well(s).Prepare the reactionsInstructions for the preparation of reactions vary depending onthe specific experiment that you perform Refer to theQuantStudio 6 and 7 Flex Real-Time PCR Systems Getting StartedGuide for more information.Prepare the plate or array cardGuidelines for plate or array card preparation Wear appropriate protective eyewear, clothing, and gloves. Use only plates or array cards, reagents, and kits that areapproved for use with the QuantStudio 6 and 7 FlexSystems. Do not allow the consumable bottoms to become dirty. Store prepared plates or array cards in the dark until theycan be loaded into the instrument. (Plates only) Confirm that the liquid in each well of the plateis at the bottom of the well. If not, centrifuge the platebriefly for 2 minutes at 1500 rpm.CorrectIncorrectDefine the run method1. From the Experiment Menu, select Run.2. Enter the Reaction Volume per Well to use to run theexperiment: 96-Well plate: 1-200 µL Fast 96-Well plate: 1-100 µL 384-Well plate: 1-30 µL Array Card (QuantStudio 7 Flex System only): 1 µL3. Review the information in the Graphical View tab and editthe run method as needed: Add and delete steps or stages Edit the time, temperature, or ramp rate for a step Enable or disable data collection (Cycling stage) Edit the number of cycles and selectAutoDelta settings (enable or disable and enter theStarting Cycle) (Melt curve stage) Select the ramp increment (Step andHold or Continuous)4. (Optional, if selected in Tools Preferences Defaults)Select the Optical Filters tab and select the PCR (cyclingstages only) and Melt Curve (melt stages only) filter setwhich matches the profile of the dye(s) you have added tothe plate or array card.Save the experimentClick Save ( ) to save the experiment.Note: You can also save the experiment as a template, thencreate experiments from the template. Refer to theQuantStudio 6 and 7 Flex Real-Time PCR Systems Getting StartedGuide for more information.QuantStudio 6 and 7 Flex Real-Time PCR Systems Quick ReferenceLiquid is atbottom of well. Not centrifuged with enough force, or Not centrifuged for enough time.Note: Refer to the QuantStudio 6 and 7 Flex Real-Time PCRSystems Getting Started Guide for information on preparing 96well reaction tubes and tube strips.Seal the reaction plateIMPORTANT! Wear powder-free gloves while sealing plates.1. Load the plate with prepared reactions.2. Remove a single optical adhesive film from the box. Whileholding the film backing-side up, bend both tabs upward.3. In one swift movement, peel backthe white protective backing fromthe center sealing surface. Do nottouch the center sealing surface.4. While holding the film by the tabs,lower the film onto the reactionplate (adhesive side facing theplate). Make sure that the filmcompletely covers all wells of thereaction plate.7
5. While applying firm downwardpressure, move the applicatorslowly across the film, bothhorizontally and vertically, toensure good contact between thefilm and the entire surface of thereaction plate.6. Use the applicator to hold theedge of the film in place, thengrasp one end of the tab andsharply pull up and away. Repeatthe action to remove the other tab.IMPORTANT! You must cleanly remove each tab along theprecut dotted line.c. Hold the pipette in an angled position ( 45 degrees)and place the tip into the fill port. The fill port is thelarger of the two holes on the left side of the fillreservoir.FillportVentportd. Dispense the fluid so that it sweeps in and around thefill reservoir toward the vent port.Pipet the entire 100 µL into the fill reservoir, but do notgo past the first stop of pipettor plunger or you mayblow the solution out of the port.7. Repeat step 5 again to ensure a tight, evaporation-free seal.While applying pressure, run the edge of the applicatoralong all four sides of the outer border of the film.IMPORTANT! You must apply pressure to the optical filmduring application to ensure a tight, evaporation-free seal.8. Inspect the reaction plate to confirm that all wells aresealed. The plate is properly sealed when an imprint ofeach well is visible on the surface of the film.9. Use a lint-free wipe to remove allexcess glue from around theperimeter of the adhesive film.IMPORTANT! You must removeany excess glue from the plate.Fill an array card (QuantStudio 7 Flex System only)IMPORTANT! Do not allow the tip to contact andpossibly damage the coated foil beneath the fill port.3. Centrifuge the array card:a. Place the filled array card into a centrifuge array cardcarrier clip and place empty array cards in theremaining slots. Confirm that the labels on the bucketsand clips are oriented in the same direction.b. Place the filled carrier clips into the centrifuge buckets.Make sure that the array card fill reservoirs and bucketand clip labels face outward when loaded into thecentrifuge.IMPORTANT! Wear powder-free gloves while filling cards.Note: The instructions below describe only the array cardloading procedure. For more information, contactLife Technologies.1. Remove an array card from its box and place it on a clean,dry surface.2. Pipet 100 µL of the appropriate solution into each of theeight reservoirs in the array card:a. Place the array card on a lab bench, with the foil sidedown.IMPORTANT! You must run the centrifuge with all fourbuckets in place and each of the two carriers filled witharray cards. Place empty array cards into unfilled slots.IMPORTANT! Balance the loads in opposite buckets inthe centrifuge.aFilled arrayEmptyarraybb. Load 100 μL of the calibration solution into a pipette.8QuantStudio 6 and 7 Flex Real-Time PCR Systems Quick Reference
c. Close the centrifuge cover, then spin the array card for 1minute at 1200 rpm.d. When the run is finished, stop the centrifuge, then spinthe array card again for 1 minute at 1200 rpm.IMPORTANT! Do not try to save time by doing one spinfor 2 minutes. The two sets of ramps are important for agood fill into the array card.4. When the second run is finished, open the centrifuge andcheck that the fluid levels in the reservoirs of each cardhave decreased by the same amount. Also, check all wellsfor bubbles and note the locations as possible problems.Correct fillIncorrect/partial fille. Remove the sealed array cardfrom the fixture and trim thefill reservoirs from the arraycard assembly using scissors.Trim the foil array card sothat the edge is even with theplastic carrier.IMPORTANT! Completely remove the fill reservoirs from thearray card so that the edge is free of residual plastic. The plasticfrom the fill reservoirs that extends beyond the edge of the cardcan prevent the array card from seating properly on the sampleblock and can affect amplification.Correct trimIf necessary, centrifuge the cards for an additional minuteto fill any unfilled wells. Do not exceed three 1-minute runsor centrifuge the card for longer than 1 minute at a time.5. Seal the array card:a. With the carriage (roller assembly) of the Array CardStaker/Sealer in the Start position, place a filled arraycard into the fixture with the foil side up so that the fillreservoirs are the farthest away from the carriage.b. Press down on all four corners of the array card toensure that it is fully seated within the fixture.abPinsIncorrect trimIMPORTANT! Store the array card in a dark place until you areready to load it. Do not expose the array card to light until youare ready to use it. The dyes in the array card is photosensitive.Prolonged exposure to light can diminish the fluorescence ofthe dye.Run the experimentNote: (QuantStudio 7 Flex System only) If you have an AppliedBiosystems Twister Robot, refer to the Applied Biosystems Twister Robot Automation Accessory Quick Reference forinstructions on running an experiment using the AutomationController Software.Load the plate or array card into the instrumentc. Use the two alignment pins in the fixture to position thearray card correctly.d. Seal the array card by running the carriage slowly overit. Run the carriage over the array card in one directiononly. Do not apply downward force on the carriage asyou move it forward over the card.cdIMPORTANT! Plates and array cards should be loaded andunloaded by operators who have been warned of the movingparts hazard and have been adequately trained.1. Eject the instrument tray by doing either of the following: From the instrument touchscreen, touch. From the QuantStudio 6 and 7 Flex System Software,select Tools Instrument Console, select yourinstrument icon, then click Open Door.2. Load the plate or array card into the plate adapter.QuantStudio 6 and 7 Flex Real-Time PCR Systems Quick Reference9
When you load the plate or array card, ensure that:Touch To Well A1 is positioned at the top-left corner of theinstrument tray.Elapsed TimeDisplay the time elapsed for the run. The barcode is facing the front of the instrument.Remaining TimeDisplay the time remaining for the run.View the run events that occurred during therun.Touchagain to close the event list.Monitor the experiment from the softwareTo open the Run screen for an instrument running anexperiment:000002563. Close the instrument tray by doing either of the following: From the instrument touchscreen, touch. From the Instrument Console screen, click Close Door.Start the experimentIMPORTANT! Perform calibrations and run experiments underthe environmental conditions specified in the QuantStudio 6and 7 Flex Real-Time PCR Systems Maintenance and AdministrationGuide. Exposure to extreme temperatures can have adverseeffects on the run results, as well as shortening the life span ofthe components.1. From the Home tab, click Instrument Console.2. From the Instrument Console screen, select the instrumenticon, then click Manage Instrument or double-click theinstrument icon.3. From the Manage Instrument screen, click MonitorRunning Experiment to view the Run screen.For instructions on viewing the Amplification Plot andTemperature Plot, refer to the QuantStudio 6 and 7 Flex RealTime PCR Systems Getting Started Guide.After the experiment is completeUnload the instrumentWARNING! PHYSICAL INJURY HAZARD. During1. From the QuantStudio 6 and 7 Flex System Software,clickRun in the Experiment Menu.2. Click START RUN. Select the instrument to run theexperiment from the My Instruments drop-down menu.IMPORTANT! If your instrument is unavailable, clicking STARTRUN does not display instrument names in the drop-downmenu.IMPORTANT! Do not attempt to open the access door during therun. The door is locked while the instrument is in operation.During the experimentIMPORTANT! The information in this section provides generalguidelines for reviewing the real-time data of experiments asthey are being run on the instrument. Refer to the QuantStudio 6 and 7 Flex Real-Time PCR Systems Getting Started Guide forspecific instructions on reviewing your data.instrument operation, the plate or array cardtemperature can reach 100 C. Allow the consumable tocool to room temperature before removing.When the instrument displays the Main Menu screen, you canunload the plate or array card as follows:1. After the experiment, touchthe plate or array card.on the touchscreen to eject2. Remove the plate or array card from the instrument trayand dispose of it according to your laboratory regulations.3. Touchon the instrument touchscreen to close theinstrument tray.Download the completed experimentIf the QuantStudio 6 and 7 Flex System Software was closedduring the run or if the computer-instrument connection wasdisrupted, then you can transfer the experiment data to thecomputer using the software or a USB drive.Download experiments using the QuantStudio 6 and 7 FlexSystem SoftwareMonitor the experiment from the instrument1. From the Home screen, click Instrument Console.After you start the experiment, you can view the timeremaining, time elapsed, and the event log from the instrumenttouchscreen.2. Select your instrument, then click Manage Instrument.103. Click Manage Files, then click File Manager.QuantStudio 6 and 7 Flex Real-Time PCR Systems Quick Reference
4. From the File Manager screen, download the file(s):a. From the F
QuantStudio 6 and 7 Flex Real-Time PCR Systems Pub. no.4489826 Rev. A Note: For safety and biohazard guidelines, refer to the “Safety” section in the QuantStudio 6 and 7 Flex Real-Time PCR Systems Maintenance and Administration Guide. For every chemical, read the Safety