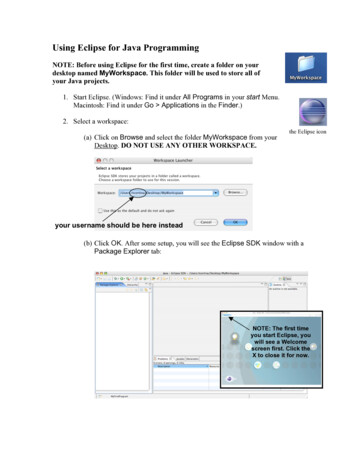
Transcription
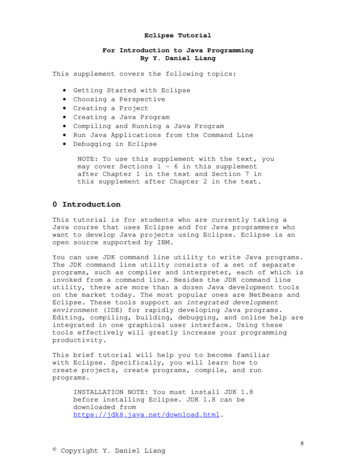
Using Eclipse to Run Java ProgramsDownloading and Installing EclipseHere’s how:1. Visit www.eclipse.org.2. On that Web site, follow the links for downloading Eclipse. Be sureto pick the version that’s appropriate for your operating system(Linux, Macintosh, Windows, or whatever).The download is a compressed file – a ZIP file, a tar.gz file, orsomething like that.The next step depends on which operating system you have.3. If you’re not using a Macintosh, Extract the compressed file’scontents to a directory on your hard drive. If you’re using a Mac,don’t bother extracting. Just look for a new Eclipse icon on yourdesktop.On my Windows computer, I extract the compressed file’s contents tothe root of my C: drive. On my Linux/Unix computer, I extract thecompressed file’s contents to my /usr/local directory. In either case,the extraction creates a new directory named eclipse. The eclipsedirectory contains everything I need in order to run Eclipse.Running EclipseHere’s how you start an Eclipse session:1. Double-click the Eclipse icon.On a Macintosh, double click the Eclipse icon that appears on yourdesktop.On a Linux/Unix or Windows computer, use the explorer to navigate tothe new eclipse directory. In the eclipse directory you find aneclipse icon. (This blue icon contains a stylized picture of some roundcelestial object being eclipsed. What else would you expect to see?)Double-click the eclipse icon.When Eclipse runs for the first time, you see a Welcome page.Beginning Programming with Java For DummiesExcerpted from Eclipse For Dummies 2005 Wiley Publishing, Inc.1
2. On the Welcome page, click the icon labeled Workbench.The Eclipse workbench appears. At first, this workbench displayssomething called the Resource perspective. The Resource perspective isan arrangement of panes that helps you find files on your hard drive.The Resource perspective is nice. But to create a Java program, you wantanother perspective – called the Java perspective. The Java perspective’sarrangement helps you navigate from one part of a Java program toanother.3. On the Eclipse menu bar, choose Window Open Perspective Java.In response to your choice, the Eclipse workbench rearranges itself. (SeeFigure 1.)Figure 1: Opening the Java perspective for the very first time.Creating a New Java ProjectHow does that old nursery rhyme go? “Each sack had seven cats. Each cat hadseven kittens.” Imagine the amount of cat litter the woman had to have!Anyway, in this section you create a project. Eventually, your project willcontain a Java program.1. On the Eclipse menu bar, choose File New Project.You see the New Project dialog, as shown in Figure 2.Beginning Programming with Java For DummiesExcerpted from Eclipse For Dummies 2005 Wiley Publishing, Inc.2
Figure 2: The New Project dialog.* Formally, a project is a collection of files and folders.* Intuitively, a project is a basic work unit. For instance, a selfcontained collection of Java program files to manage your CDcollection (along with the files containing the data) may constitutea single Eclipse project.2. In the New Project dialog, select Java Project, and then click Next.You see the New Java Project wizard, as shown in Figure 3.Beginning Programming with Java For DummiesExcerpted from Eclipse For Dummies 2005 Wiley Publishing, Inc.3
Figure 3: The New Java Project wizard.3. In the Project Name field, type a name for your new project.In Figure 3, I typed Chapter03 Listing01. In the steps that follow, Iassume that you also type Chapter03 Listing01. Of course, you cantype all kinds of things in the Project Name field. I’m an old stick in themud so I avoid putting blank spaces in my project names. But if youinsist, you can use dashes, blank spaces, and other troublesomecharacters.You have to type a name for your new project. Aside from typing aname, you can accept the defaults (the Location and Project Layout stuff)in the New Java Project wizard.4. Click Finish.When you click Finish, the Eclipse workbench reappears. The leftmostarea contains the Package Explorer view. The view’s list contains yournew Chapter03 Listing01. (See Figure 4.)Beginning Programming with Java For DummiesExcerpted from Eclipse For Dummies 2005 Wiley Publishing, Inc.4
Figure 4: The Chapter03 Listing01 project in the Package Explorer view.In Eclipse, a view is one of the things that can fill up an area. A viewillustrates information. When you read the word “view,” think of it as a “pointof view.” Eclipse can illustrate the same information in many different ways.So Eclipse has many different kinds of views. The Package Explorer view isjust one way of envisioning your Java programming projects.Creating and running a Java classDrumroll, please! It’s time to write some code.1. Select a project’s branch in the Package Explorer.For example, select the Chapter03 Listing01 branch in Figure 4.2. On the main menu bar, choose File New Class.The New Java Class wizard miraculously appears, as shown in Figure 5.Figure 5: The New Java Class wizard.Beginning Programming with Java For DummiesExcerpted from Eclipse For Dummies 2005 Wiley Publishing, Inc.5
3. In the New Java Class wizard, fill in the Name field.In Figure 5, I typed MyFirstJavaClass. You can type whatever you darnwell please (unless you want to stay in sync with these instructions).4. Select other options in the New Java Class wizard.For this example, put a check mark in the public static voidmain(String args[]) box. Aside from that, just accept thedefaults, as shown in Figure 5.5. Click Finish.After some disk chirping, you see the workbench in Figure 6. ThePackage Explorer displays a new MyFirstJavaClass.java file, andthe workbench’s middle area displays a Java editor.Figure 6: Eclipse creates a skeletal Java source file.6. Add your own code to the skeletal Java source file.In Figure 7, I add System.out.println("Chocolate,Royalties, Sleep") to the main method’s body.Figure 7: An additional line of code.Beginning Programming with Java For DummiesExcerpted from Eclipse For Dummies 2005 Wiley Publishing, Inc.6
7. Choose File Save to save your new MyFirstJavaClass.javafile.You don’t have to tell Eclipse to compile your code. By default, Eclipsecompiles as you type.Of course, you want to test your new program. Using Eclipse, can run theprogram with only a few mouse clicks. Here’s how:8. Choose Run Run As Java Application. (See Figure 8.)Figure 8: Running a Java program.After a brief delay, a new Console view appears in the bottommost areaof the Eclipse workbench. If you click the Console’s tab, you see yourprogram’s output, as shown in Figure 9.Figure 9: The output of the program in Figure 7.Using the Import wizardThis section tells you how to bring existing Java code into an Eclipse project.You can use these steps to bring my sample programs (from BeginningProgramming with Java For Dummies) into Eclipse.1. Create a new Java project.Beginning Programming with Java For DummiesExcerpted from Eclipse For Dummies 2005 Wiley Publishing, Inc.7
That is, follow the steps the “Creating a New Java Project” section ofthis online chapter. If you want to follow along with me in this example,name your project ImportWizardTest.2. In the Package Explorer, select your newly created project. Then, onthe main menu, choose File Import.An Import Wizard appears.3. In the Import Wizard, select File System. Then click Next. (SeeFigure 10.)Figure 10: The first page of the Import Wizard.The File System page appears.4. In the From Directory field, enter the name of a Java sourcedirectory.In this example, I'm importing some of the stuff in the/Users/barryburd/MyProjects/Chapter03 Example01directory. So in Figure 11, I typed /Users/barryburd/MyProjectsChapter03 Example01 in the From Directory field.Beginning Programming with Java For DummiesExcerpted from Eclipse For Dummies 2005 Wiley Publishing, Inc.8
Figure 11: Selecting the files you want to import.5. Expand the folder on the in the left pane, looking in the right panefor the file that you want to import. When you find the file, put acheckmark in the file’s checkbox.In Figure 11, I put a checkmark in the Mortgage.java file’scheckbox.6. In the Options group, select the Create Selected Folders Only radiobutton.Once again, see Figure 11.7. Click Finish.The Import Wizard disappears. In the Eclipse workbench, your projecttree contains new entries. (See Figure 12.)Figure 12: The newly imported Mortgage.java code.Beginning Programming with Java For DummiesExcerpted from Eclipse For Dummies 2005 Wiley Publishing, Inc.9
Package Explorer displays a new MyFirstJavaClass.java file, and the workbench’s middle area displays a Java editor . Figure 6: Eclipse creates a skeletal Java source file. 6. Add your own code to the skeletal Java source file. In Figure 7, I add System.out.println(
