Transcription
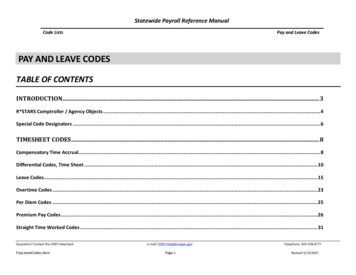
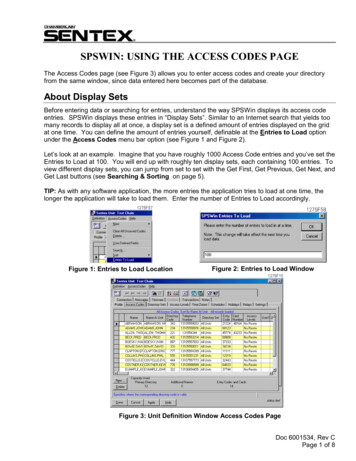
SPSWIN: USING THE ACCESS CODES PAGEThe Access Codes page (see Figure 3) allows you to enter access codes and create your directoryfrom the same window, since data entered here becomes part of the database.About Display SetsBefore entering data or searching for entries, understand the way SPSWin displays its access codeentries. SPSWin displays these entries in “Display Sets”. Similar to an Internet search that yields toomany records to display all at once, a display set is a defined amount of entries displayed on the gridat one time. You can define the amount of entries yourself, definable at the Entries to Load optionunder the Access Codes menu bar option (see Figure 1 and Figure 2).Let’s look at an example. Imagine that you have roughly 1000 Access Code entries and you’ve set theEntries to Load at 100. You will end up with roughly ten display sets, each containing 100 entries. Toview different display sets, you can jump from set to set with the Get First, Get Previous, Get Next, andGet Last buttons (see Searching & Sorting on page 5).TIP: As with any software application, the more entries the application tries to load at one time, thelonger the application will take to load them. Enter the number of Entries to Load accordingly.Figure 1: Entries to Load LocationFigure 2: Entries to Load WindowFigure 3: Unit Definition Window Access Codes PageDoc 6001534, Rev CPage 1 of 8
Entering Access CodesEnter Access Codes as follows:1Name: Enter the tenant's full name, using up to 50 characters.2Directory Name/Name at Unit: The name that will be sent to the unit. When you click on thisfield, SPSWin automatically enters the tenant's name in uppercase letters; you can enter analternate name (i.e., MANAGER) or delete the entry. The number of characters allowed is asfollows:For Horizons, Infinity L, Infinity S, and Infinity M: 13.For Infinity L and Infinity M (both with Commercial Firmware): 35.3Directory code: Enter the code visitors will key in to dial the tenant's telephone number, if thetenant will need a directory code.4Telephone number: Enter the tenant's telephone number (required if you entered a Directorycode for the tenant).5Entry code/card: Enter the entry code or card code the tenant will use to gain access to thebuilding, if required.6Access levels: Enter the access levels by clicking on the data field. A drop-down menu willappear, listing all access levels available. Select the desired level and the menu will roll upand display your choice.NOTE: You must first create Access Levels (see the SPSWin User’s Guide or onlinehelp) AND you must enter an Entry Code to use Access Levels.7Date Limit (optional) Infinity and Multi-Link Only: You have the option of limiting the timean Access Code can be used. Enter the last date on which you want the Access Code used.The Access Code will grant access from the time you send data to the unit, until the end of thedate you entered. For example, if you enter “09/30/2003”, the Access Code will grant entryuntil midnight, 1 October, 2003.8To the right of the Access Levels column are five user-defined columns or fields (see Figure7), which can be used to store any type of (optional) data the user wants to track. This datawill not be sent to the unit. This data field is for user purposes only.9Enter all additional access codes, then select either the Apply or Done button to save the data.If the data is not saved, by leaving this window, you will lose all entered data.IMPORTANT NOTES: You must click Apply to save any changes.Also, if your entry disappears after you select the Apply button, this behavior is normal.The application may (depending on your search/sort and Entries to Load settings) movethe entry out of view (see About Display Sets on page 1 for more information).Multi-LinkUse Limit (optional): You can place a limit on the number of times an Access Code can be used.Enter the number of times (1-9) you want the Access Code to grant access. After you send the data tothe unit, the number of uses will begin counting down. For example, if you enter “6”, the Access Codewill deny access on the 7th try.NOTE: Only the Multi-Link has the capability of specifying both a Date Limit and a UseLimit for any one Access Code.Doc 6001534, Rev CPage 2 of 8
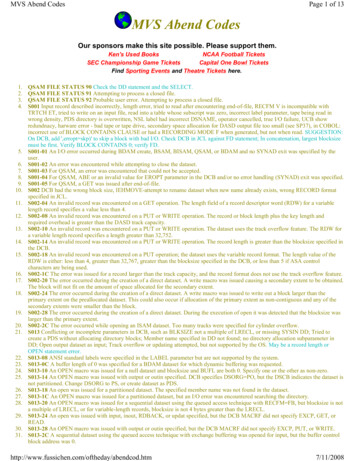
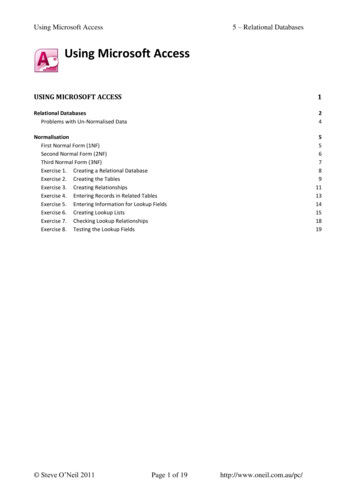
Bulk-Loading CodesThe Enter Range of Codes feature allows you to bulk-load a large number of entry codes/cards intothe system at one time. Names cannot be associated with entry codes/cards when entered as agroup, but may be added to individual records later.EXAMPLE: You have just received 250 cards to enter into the system. Why bulk-load them?Every time someone needs a card, you won't have to individually generate a new card inSPSWin right away. You can give someone the group card, which has its own code, andthen return later to assign a name to that card.NOTE: All cards entered in the same group will have the same access level.1At the Unit Definition window, under the Access Codes menu option, select New -- CodeGroup. You will arrive at the Enter Range of Codes window (see Figure 4 and Figure 5).Figure 4: Enter Range of Codes Window (Units Supporting Entry Codes and Cards)Figure 5: Enter Range of Codes Window (Units Supporting Entry Codes Only)2From/To: Enter the code range in the From and To boxes.3As: If your system supports both entry codes and cards, select to enter Entry Codes or CardCodes.4Access Level: Assign an access level to the group of cards/codes.5Click the Done button.Doc 6001534, Rev CPage 3 of 8
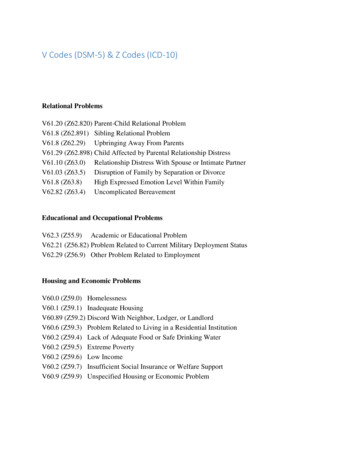
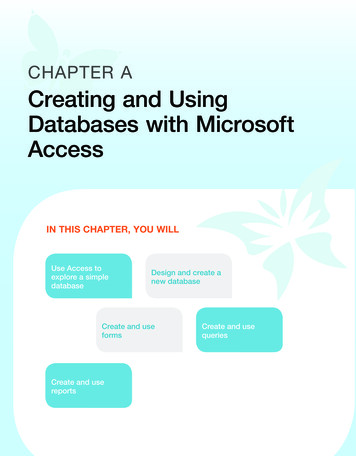
Deleting Access CodesThe Delete Access Codes feature allows you to . .Delete a single access code record.ORDelete all access codes from thecurrent display set (see page 1 formore information on display sets).Delete all of the directory codes, entrycodes, and/or card codes from thecurrent display set.1At the Unit Definition window, under theAccess Codes menu option, selectDelete. You will arrive at the DeleteAccess Codes window (Figure 6).2Select your delete options.3Click OK.Figure 6: Delete Access Codes WindowUser Defined columnsYou may wish to track additional information abouteach person listed in the directory. SPSWin givesyou five additional columns (fields) in which toenter such information.To use the additional column headings:1Click on the Access Codes menu at thetop of the Unit Definition Window (Figure3).2Click on the User-Defined Fields .3The User-Defined Fields Entry screendisplays.4Click in one of the boxes under UserDefined Field Name. Enter the name ofthe field you wish to use. For example,“No. of persons using unit”. You mayenter up to five field names.5When you are finished, click on the Donebutton. This will save the fields. If you donot wish to save the field names, click onthe Cancel button. The Access CodesPage will be displayed. You may nowcontinue editing the access code anddirectory information including your newfields.Doc 6001534, Rev CPage 4 of 8Figure 7: User Defined Fields Entry Window
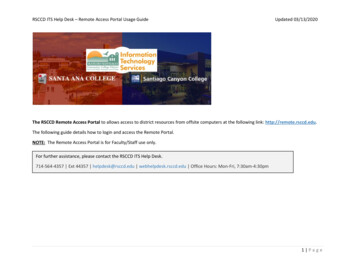
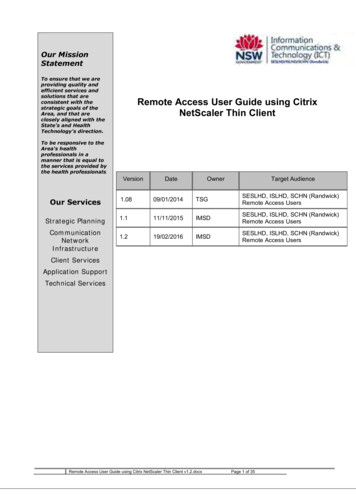
Searching & Sorting EntriesWhen you’re working with a large number of entries, SPSWin provides search and sort features thatallow you to locate a specific group of entries or one particular entry.Use the reference section below to perform all the related search/sort functions:Sort By CodeGet FirstGet PreviousGet LastGet NextTOOLBAR BUTTONGet FirstGet PreviousGet NextGet LastSearchGet AllSort By NameSort By CodeSearchGet AllSort By NamePRESS THIS BUTTON TO . . .Move to the first display set if you have multiple sets.Move to the previous display set if you have multiple sets.Move to the next display set if you have multiple sets.Move to the last display set if you have multiple sets.Perform a entry search (see Figure 8).Re-retrieve all entries. This function is useful after you finishvalidating data, bulk-loading entries, or performing a entry search.Sort the display by tenant name (see Figure 9).Sort the display by directory, entry, or card code (see Figure 10).Step 1: Select the type ofdata you want to search.Step 2: Select thecomparison value (e.g.,begins with, contains, etc.)Step 3: In the Value field,enter the name, code, etc.you are want to locate.Step 4: Click OK.Figure 8: Record Search WindowDoc 6001534, Rev CPage 5 of 8
Step 1: Select the Sort Byoption.Step 2: Select the Sorting Order.Ascending sorts from A to Z.Descending sorts from Z to A.Step 3: Click OK.Figure 9: Sorting by NameStep 1: Select the Sort Byoption.Step 2: Select the Sorting Order.Ascending sorts from 1 to 1(greater than 1). Descendingsorts from 1 (greater than 1)to 1.Step 3: Click OK.Figure 10: Sorting by CodeSEARCH TIPSExplore the different ways of searching and sorting access code records by reviewing theData and Comparison drop-down boxes on the SPSWin Specify Access Code RecordSubset screen (above).Sorting Only Directory Codes: To view a list of directory codes, click the Searchbutton, select “Directory Code” from the Data drop-down box, select “is greater than orequal to” from the Comparison drop-down box, and enter “0” in the Value text box.Sorting Only Entry Codes: To view a list of entry codes, click the Search button, select“Entry Code” from the Data drop-down box, select “is greater than or equal to” from theComparison drop-down box, and enter “0” in the Value text box.Sorting Only Card Codes: To view a list of card codes, click the Search button, select“Card Number” from the Data drop-down box, select “is greater than or equal to” from theComparison drop-down box, and enter “0” in the Value text box.Doc 6001534, Rev CPage 6 of 8
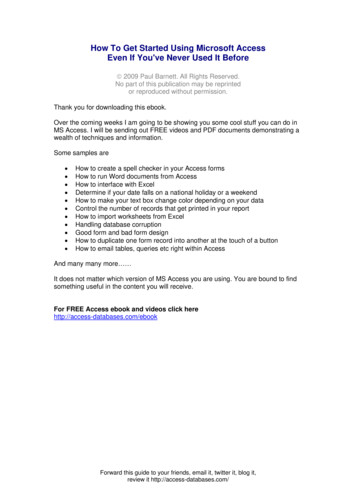
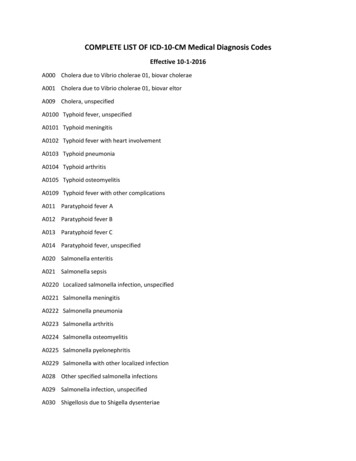
Validating DataWhen you validate your data, SPSWin checks for conflicting or erroneous data and displays the invalidentries on the Access Codes page (see Figure 11). ValidateFigure 11: Validating DataSentex Systems recommends that you validate your data if:You have added a significant amount of entries.You are experiencing system difficulties.To return to the normal view after validating your data, click Get All.NOTE: After correcting any invalid entries, re-do the validation to ensure all problems have beencorrected.Doc 6001534, Rev CPage 7 of 8
ERROR MESSAGESIncorrect or insufficient data is indicated either by a yellow exclamation mark or a lined red circle,and explanatory messages appear on the status bar at the bottom of the grid as follows:Invalid dir code – no phone number: Directory codes must have telephone numbers tobe valid.Mismatched directory code & telephone number: Once directory code and telephonenumber have been entered, if entered again (i.e., for another person in the apartment),they must match. HINT: To group the mismatched entries together, sort by directory code.Duplicate entry code / card number for at least one of the access level memberunits: Duplicate entry codes / card numbers exist. HINT: To group the duplicate codestogether, sort by card or entry code.NOTE: An entry code and a card code with an equal numeric value (e.g., entry code0001 and card code 00001) are considered duplicate numbers (since the value of theaforementioned example equals “1”).Dir code size exceeded: The directory code has too many digits.Entry code size exceeded – (Individual Units): The entry code has too many digits.Entry code sized exceeded for at least one of the access level member units – (MultiLink): The entry code has too many digits for one of the units in this particular access level.Both a date limit & use limit are defined – (Multi-Link only): Date limits and use limitscannot both be specified. Choose one.Invalid Entry/Card – An entry or card code exceeded 65534. Enter a lesser number.COPYRIGHT 2001, ALL RIGHTS RESERVEDwww.sentexsystems.comThis document is protected by copyright and may not be copied or adapted without the prior written consent ofSentex Systems. This documentation contains information proprietary to Sentex and such information may notbe distributed without the prior written consent of Sentex. The software and firmware included in the Sentexproduct as they relate to this documentation are also protected by copyright and contain information proprietaryto Sentex.FOR TECHNICAL SUPPORTCall our toll free number:(800) 528-2806Installation and service informationis available six days a week (Monday-Saturday).Doc 6001534, Rev CPage 8 of 8
The Enter Range of Codes feature allows you to bulk-load a large number of entry codes/cards into the system at one time. Names cannot be associated with entry codes/cards when entered as a group, but may be added to individual records later. . Sentex Systems recommends that you validate