Transcription
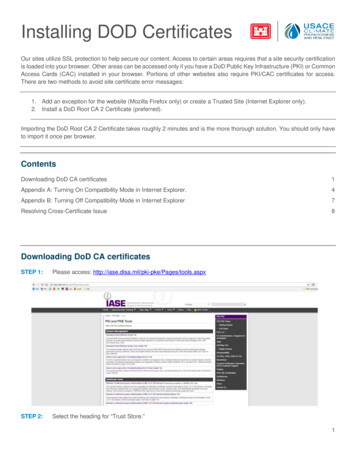
Installing DOD CertificatesOur sites utilize SSL protection to help secure our content. Access to certain areas requires that a site security certificationis loaded into your browser. Other areas can be accessed only if you have a DoD Public Key Infrastructure (PKI) or CommonAccess Cards (CAC) installed in your browser. Portions of other websites also require PKI/CAC certificates for access.There are two methods to avoid site certificate error messages:1. Add an exception for the website (Mozilla Firefox only) or create a Trusted Site (Internet Explorer only).2. Install a DoD Root CA 2 Certificate (preferred).Importing the DoD Root CA 2 Certificate takes roughly 2 minutes and is the more thorough solution. You should only haveto import it once per browser.ContentsDownloading DoD CA certificates1Appendix A: Turning On Compatibility Mode in Internet Explorer.4Appendix B: Turning Off Compatibility Mode in Internet Explorer7Resolving Cross-Certificate Issue8Downloading DoD CA certificatesSTEP 1:Please access: http://iase.disa.mil/pki-pke/Pages/tools.aspxSTEP 2:Select the heading for “Trust Store.”1
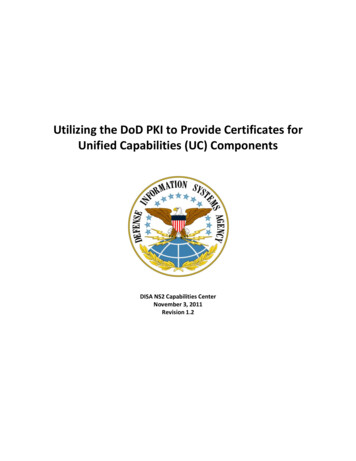
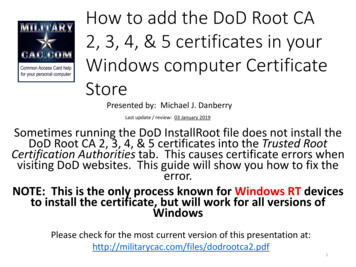
STEP 3:Under the heading for “InstallRoot 5.0.1 NIPR Windows Installer,” please select the link for “Non Administrator.”STEP 4:You will be prompted to Open/Run/Save the installation file, “InstallRoot NonAdmin 5.0.1x32 NonAdmin.msi.”The need to save is not required, so it is your preference on which of the available options you choose.STEP 5:Upon opening the InstallRoot NonAdmin 5.0.1x32 NonAdmin.msi file, you will be presented with theInstallRoot Setup Wizard. Simply choose "Next" after reading each step of the Wizard.STEP 6:When prompted to select the features you wish to install, ensure that *at least* the "Graphical Interface" ischecked. Afterwards, click on "next" and then "install."2
STEP 7:After the installation of the tool is complete, click "Run InstallRoot."STEP 8:At this point, you may be prompted to add the certificates to Firefox (if installed on your computer). It isrecommended that you select "Yes," but if you primarily use Internet Explorer, this is not required. You may also beprompted to allow InstallRoot to manage Java certificates. Select No.STEP 9:A "Quick Start" screen will appear showing screenshots of the final steps you will need to take to complete theinstallation. Please read the red text instructions within these screenshots and choose "Next" until you're able to select"Finish."3
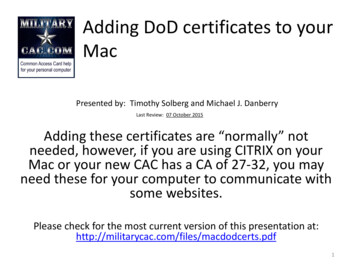
STEP 10: After selecting "Finish," you should be presented with a Microsoft Current User tab and, if you chose to installcertificates to Firefox as indicated in step #8, a Firefox tab should also appear for each Firefox profile on your computer.Please look under each of these tabs and make sure that "Install DoD Certificates" has a green checkmark. The othercertificates (ECA and JITC) are not required.STEP 11:Click on the "Install Certificates" button.Note: If you experience any difficulty installing these certificates on a work-issued computer, please consult your local ITgroup and ask them to install the administrator version of InstallRoot that's available for download on the same websiteidentified in step #1.STEP 12: When finished, close and re-open your browser. Test that the installation was successful by navigating LoginType.cfm. If successful, you will not receive a pop-up window,although you may see a Security Alert. Click OK or Yes.Appendix A: Turning On Compatibility Mode in Internet Explorer.STEP 1:STEP 2:If the Menu bar is not displayed, display it using either method listed below: Press the Alt key on your keyboard. Right-click in the space to the right of the Address bar, then click on the Menu bar.In the Menu bar, click on Tools, and then click on Compatibility View settings.4
5
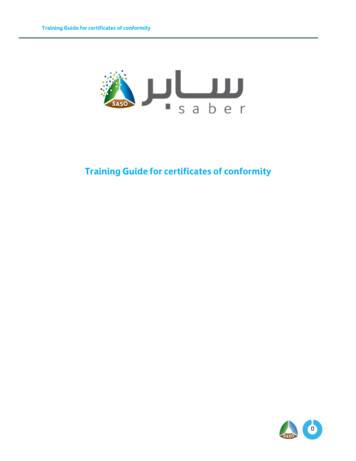
STEP 3:Internet Explorer will open the Compatibility View Settings pop-up window. Checkbox options are displayedat the bottom of the pop-up. Options will be different in different versions of Internet Explorer.If it is not checked, click on the checkbox for Display intranet sites in Compatibility View.Internet Explorer 11STEP 4:Internet Explorer 10Click Add to add the DOD site to Compatibility View. Click Close at the bottom of the pop-up window.STEP 5:Internet Explorer will close the Compatibility View Settings pop-up window and automatically refresh youropen tab. The warning encountered earlier will no longer be displayed. Login and download the certificates asoutlined above.6
Appendix B: Turning Off Compatibility Mode in Internet ExplorerSTEP 1:STEP 2:If the Menu bar is not displayed, display it using either method listed below: Press the Alt key on your keyboard. Right-click in the space to the right of the Address bar, then click on the Menu bar.In the Menu bar, click on Tools, then click on Compatibility View settings.STEP 3:Internet Explorer will open the Compatibility View Settings pop-up window. Checkbox options are displayed atthe bottom of the pop-up. Options will be different in different versions of Internet Explorer.If it is checked, click on the checkbox for Display intranet sites in Compatibility View to uncheck it.7
Internet Explorer 11STEP 4:Internet Explorer 10Click Close at the bottom of the pop-up window.STEP 5:Internet Explorer will close the Compatibility View Settings pop-up window and automatically refresh youropen tab.Resolving Cross-Certificate IssueSTEP 1:Open Internet Explorer.STEP 2:Clear the browser cache by navigating to Internet Options Content Clear SSL state8
STEP 3:Under Tools Internet Options Content Certificates Intermediate Certificate Authorities.STEP 4:Look in the “Issued to” and “Issued by” columns for any certificates that have the word “Interoperability”. Thereare probably at least two certificates with that word you would find.STEP 5:Delete these certificates.STEP 6:Close Internet Explorer.STEP 7:Reopen Internet Explorer.9
Appendix B: Turning Off Compatibility Mode in Internet Explorer STEP 1: If the Menu bar is not displayed, display it using either method listed below: Press the Alt key on your keyboard. Right-click in the space to the right of the Address bar, then click on the Menu bar. STEP 2: In the Menu bar, c